

- Home
- InDesign
- Discussions
- Re: Overprint Preview, Proof Setup, Proof Colors
- Re: Overprint Preview, Proof Setup, Proof Colors
Overprint Preview, Proof Setup, Proof Colors

Copy link to clipboard
Copied
As I see on this forum, there's a lot of confusion among the not-so-experienced users like me about: Overprint Preview, Proof Setup and Proof Colors. Depending on these settings, you get different results on the screen and you might even think that you have a problem with your images and you need to fix them.
Now I work on a project with lots of grayscale images (CMYK Black) and my color settings seem to be correct, and the proof setup is set to working CMYK, but if I turn on the Overprint Preview, the images look too bright and I can even notice some imperfections in them like noise, jpeg artefacts and stuff. Note that I've edited these images before for screen use (contrast / brightness, shadows / highlights and so forth).
Then, if I turn on Proof Colors - the sharpness is lost, everything looks dull or muddy. But when I choose a custom proof setup and when I set my CMYK profile there - suddenly everything looks nice. Should I rely on this or I'm confusing something?
Thanks


 14
Replies
14
14
Replies
14

Copy link to clipboard
Copied
Overprint Preview attempts to show on your monitor screen how your document would appear as printing inks on paper, where some inks overprint others (particularly black ink).
Proof Colors is the switch you turn on or off to have the monitor pretend to be a more-limited CMYK color space.
But which CMYK color space do you want it to pretend to imitate? That is where you enter into the Proof Setup and choose the CMYK color space that you know to be the closest CMYK color model to the actual commercial printing company printing press (and your vendor would tell you which one they prefer).
These are all elements of color management toward the outcome of process color printing.

Copy link to clipboard
Copied
Overprint Preview soft proofs the page as it should print to Document CMYK—the document’s assigned CMYK Profile. With it on, RGB Colors are previewed as they would convert into the assigned CMYK Profile, Grayscale images preview as they should print on the CMYK black plate, and Separation Preview shows the CMYK output values for an Export to flattened Document CMYK. The accuracy of the soft proof depends on the accuracy of your OS’s monitor profile.
If the output is going to be Document CMYK, you don’t need Proof Colors for an accurate soft proof—Overprint/Separation Preview displays the correct document CMYK soft proof. You can use Proof Setup/ Proof Colors to soft proof the conversion to some other output device.
Copy link to clipboard
Copied
Thanks, @rob day. Here are some important facts:
It seems that Overprint / Separations Preview gives me misleading results. The finished product in Acrobat doesn't look like that.
This problem almost misled me to believe that there's something wrong with the images and that I have to fix them.
And an important update: the problem that I'm having is not caused by my previous editing of the images. The problem is in the way that they are displayed in Indesign.
Now I noticed that I've never edited some of them, but they too appear a bit brighter than they should be, with some of their imperfections revealed. Maybe its a psychological thing, but they also look a bit sharper than they should be. Its strange.
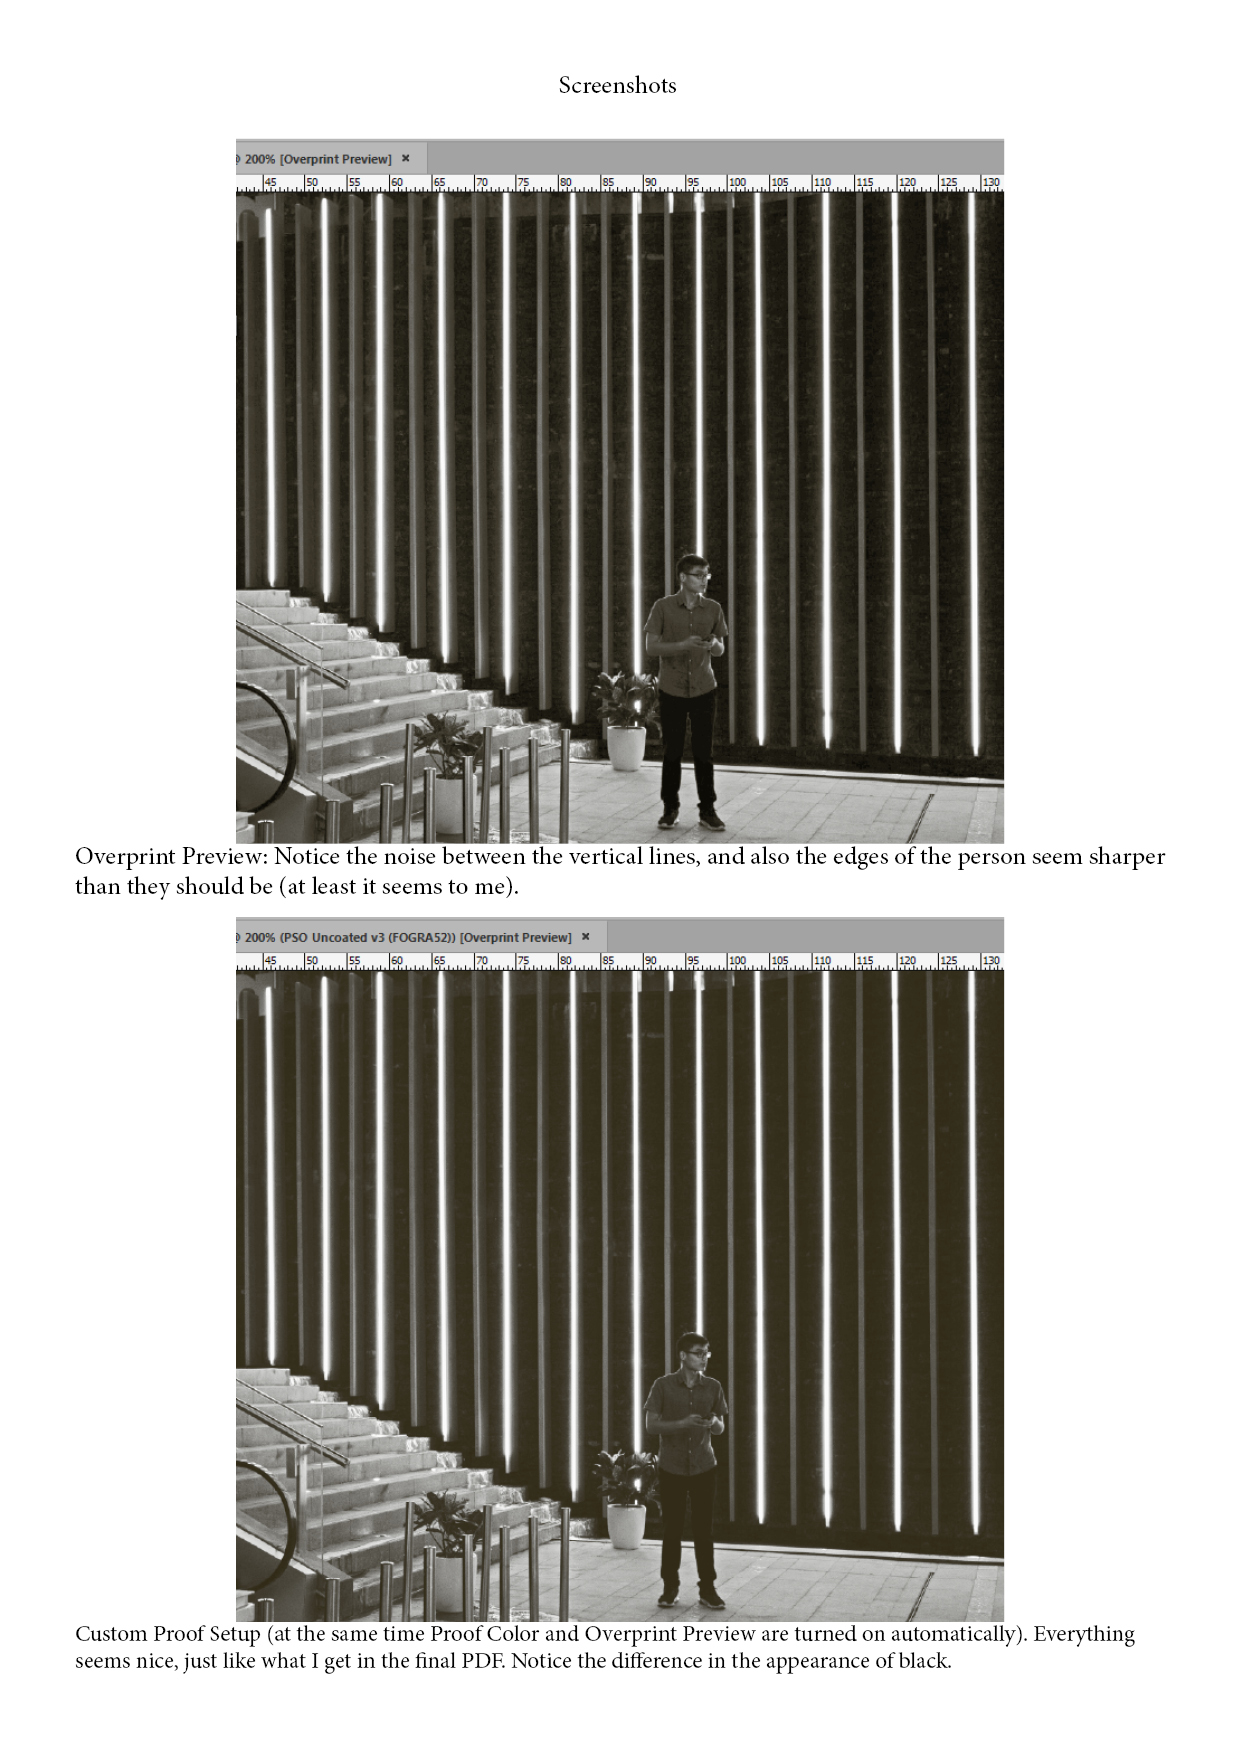
So that's what I get on my screen in Overprint / Separations Preview with the Proof Setup set to Document CMYK or Working CMYK, which in my case is the same.
As far as I understood you, turning on Overprint / Separations Preview is sufficient and I don't have to touch any other settings (Proof Color, Custom Proof Setup etc.), so that's what I get on my screen.
But when I export to PDF - everything looks nice. Basically, what I see in Acrobat seems to be the same as if I turned on the Custom Proof Setup in Indesign with my CMYK profile set in it (at the same time, this also turns on Proof Color and Overprint Preview automatically).
If I set Indesign that way, the images suddenly appear "fuller" and more "meaty", which looks nice and which resembles what I get in the PDF. Overprint Preview doesn't give me that.
All the placed images are CMYK Black and they have the black Ink ICC profile embedded in them - the black ink from the CMYK profile required by the printer. The color management and pretty much everything is set to this CMYK profile. I see no conflicts.
The embedded profiles are honored. There are no transparent objects on the page that I'm viewing, while the Transparency Blend Space is set to CMYK (for a moment I switched to RGB to see what will happen, but everything remained the same, so I clicked undo).
I also tried replacing these CMYK black images with the sGray originals (the versions intended for screen use), but the effects that I explained before repeat themselves. In Output Preview - the images are a bit too bright and a bit too sharp, while in Custom Proof Setup - they appear more full and "meaty" (not as much as the CMYK Black versions, but that's normal).
So what is happening here, I don't understand.
Here are two screenshots (exported in one JPG image attached below). I don't use this image in my actual work (and it's not my photo). I picked it only for experimental purposes, because originally it was very dark. I wanted to recreate the effects of the editing that I mentioned before. I made this photo (the attached one below) to look like this by playing with the brightness / contrast, shadows / higlights and such settings.
Thanks
Copy link to clipboard
Copied
I also tried replacing these CMYK black images with the sGray originals (the versions intended for screen use), but the effects that I explained before repeat themselves
In Photoshop did you convert the sGray originals to the Black Ink profile (Edit>Convert to Profile...), or assign the Black Ink profile (Edit>Assign Profile...) to the sGray original? Assigning the Black Ink profile wouldn’t change the grayscale’s output values.
Not sure if you would call it a bug (I would), but Proof Colors doesn’t display grayscale objects as they would print on the proof setup profile’s black plate—I rarely use Proof Colors
InDesign’s Overprint Preview matches the Output Preview of a PDF/X export’s Output Intent. Top OP turned on, bottom OP off:

Copy link to clipboard
Copied
In Photoshop did you convert the sGray originals to the Black Ink profile (Edit>Convert to Profile...), or assign the Black Ink profile (Edit>Assign Profile...) to the sGray original? Assigning the Black Ink profile wouldn’t change the grayscale’s output values.
Thanks for the reply, @rob day.
I converted the sGrays to CMYK Black and I didn't assign wrong profiles to them, so that's not where the problem lies.
Now I experimented with an RGB image - I converted it directly to CMYK Black and then I converted a copy of that RGB image to sGray and finally to CMYK Black. There's no difference between the final results. So it seems that my problem is not caused by the conversions.
InDesign’s Overprint Preview matches the Output Preview of a PDF/X export’s Output Intent.
Here on my computer it's not like that. I can match what I see in Acrobat's Output Preview only if I set Indesign to Proof Setup > Custom > My CMYK profile + Overprint Preview + Proof Colors.
In this way I get an exact match between Indesign and the PDF. The percents seem to be the same. If its exported as PDF/X, I don't even have to turn the Output Preview on.
Now, I don't know why I have this problem. Maybe my ID installation is messed up and I though that maybe the color settings in my system are messed up. I tried to change the profile for the monitor, but it didn't help.
If what we see in Acrobat can be trusted - then I will set Indesign to match what I see in the PDF (by using the custom proof setup) and that's it. But I must be sure about this.
Copy link to clipboard
Copied
Here on my computer it's not like that. I can match what I see in Acrobat's Output Preview only if I set Indesign to Proof Setup > Custom > My CMYK profile + Overprint Preview + Proof Colors.
So is your PDF/X-4 export to a Gray profile destination (a single Process Black plate) or a 4-color CMYK destination?
PSO Uncoated v3 (FOGRA52) is a CMYK profile and Black Ink - PSO Uncoated v3 (FOGRA52) is a Gray profile. As I mentioned in the other post Gray profiles have the problem of displaying 100% black and the dark end of the tonal scale incorrectly.
It’s going to be more obvious on an uncoated sheet. The absolute (rich) black that Black Ink - PSO Uncoated v3 (FOGRA52) Gray Output Intent is showing on screen in Acrobat isn’t likely to be what happens on press.
Copy link to clipboard
Copied
So is your PDF/X-4 export to a Gray profile destination (a single Process Black plate) or a 4-color CMYK destination?
@rob day, I know which discussion you are reffering to (this one here). Back then I experimented by exporting a PDF with a grayscale output intent, but I don't plan to use that for printing.
Now I plan to export the final PDF to a CMYK destination, so all my test PDFs are like that, too. So when I asked can we trust what we see in them, I meant a PDF/X exported with a CMYK output intent.
If that's reliable, then I can temporarily set Indesign to Proof Setup > Custom > My CMYK profile + Overprint Preview + Proof Colors, so I can work like that until my problem is solved. There's no other way.
I wanted to see whether this problem affects the color images, too, so I placed some RGBs and CMYKs in the document, but they look fine with Overprint Preview turned on. So if I'm not wrong, there's a problem only with the grayscale images.
Copy link to clipboard
Copied
@rob day, here's an update: I went to Edit > Preferences> Appearance of Black and I switched the On Screen setting from Display All Blacks as Rich Blacks to Display All Blacks Accurately. Now the problem that I had is gone.
If I click Print Preview, the content now looks the same as in the PDF, which is good. But I'm not an advanced user like you and I don't know if this is the right thing to do. I hope it won't mess something up.
Now I'm also not sure whether to change the Printing / Exporting setting there from Output All Blacks as Rich Black to Output All Blacks Accurately.
I wish there was something like this in Photoshop.
Copy link to clipboard
Copied
But, if you are printing offset on an uncoated sheet you won’t get a rich black, so the "rich black" soft proof would be misleading. Are you printing offset on an uncoated sheet?
I posted some coated vs. uncoated press sheet scans in your other thread:
Copy link to clipboard
Copied
But, if you are printing offset on an uncoated sheet you won’t get a rich black, so the "rich black" soft proof would be misleading.
Thank you, @rob day.
I will print on uncoated paper, so it seems that, indeed, the rich black setting is misleading.
As I said before, everything looked strange until I switched to Display All Blacks Accurately. Suddenly, everything looked better - same as in the PDF. This seems to be what I was looking for. So I guess that this is the right solution for this particular case? I hope that this is accurate and reliable.
Also, a couple of questions remained:
- Should I also switch to Output All Blacks Accurately?
I will print on uncoated paper, but the grayscale material will go to an offset press, while the color pages will go on a digital press (if this is important to mention).
- Is it possible to set Photoshop to display this material in the same way as Indesign? I'm afraid that the answer will be no. At least that's my impression from all the answers you kindly posted here and in the other discussion. Thanks.
Copy link to clipboard
Copied
- Should I also switch to Output All Blacks Accurately?
I don’t think either way affects the Black output numbers when the Destination is either a Gray or CMYK profile. The Destination has to be an RGB profile for Output All Blacks as Rich Blacks to have an affect. Display All Blacks as Rich Blacks would give you a misleading Overprint View in InDesign—it would display 100% balck on uncoated as absolute black.
- Is it possible to set Photoshop to display this material in the same way as Indesign? I'm afraid that the answer will be no.
You would have to move the grayscale to the black plate of a profiled CMYK file for the edits as I described in the other thread.
Have you run any grayscale jobs to the offset press yet? Maybe the way you are doing will be acceptable given the limits of the press. No matter what you do you are not going to overcome the limited dynamic range of 1-color black on an uncoated sheet.
Copy link to clipboard
Copied
Not sure if this helps, but it shows the difference between assigning and converting to the Black Ink Profile.
Here the top grayscale was edited in sGray, the middle grayscale is a copy of the sGray doc with the assignment changed to Black Ink - PSO Uncoated, and the bottom is a copy of the sGray doc converted to Black Ink - PSO Uncoated. I have Separation Preview turned off, so all 3 images preview as 2.2 Gamma (sGray), and not the document’s print profile:

With Separation Preview turned on the top and middle image preview the same because assigning a profile has no affect on the output values—both image preview the same and have the same output Black values:


The bottom image was converted from sGray to Black Ink - PSO Uncoated, so its preview is closer to the sGray original, but its output values have changed—50% Black was converted to 58% Black:

Example files are attached
Copy link to clipboard
Copied
Copy link to clipboard
Copied
Note that I've edited these images before for screen use
Also, what Gray Profile did you Assign to the grayscales when you edited them in Photoshop?

Find more inspiration, events, and resources on the new Adobe Community
Explore Now
 AdChoices