

P: Adaptive Profiles

Copy link to clipboard
Copied
This post applies to Lightroom Classic and Lightroom Desktop.
Feedback for Camera Raw should be posted here.
Update February 2025:
Adobe has introduced two Adaptive Profiles – Adaptive Color & Adaptive B&W.
Getting started with the Adaptive Profiles:
- Access a profile inside the profile favorites menu.
- In addition, there is a new section for Adaptive Profiles in the Profiles browser.
- Enable the profile and adjust the ‘Amount’ slider as desired.
- Use the rest of the Camera Raw tools just like you would otherwise.
Check out the Help Page for more detailed usage information. For more technical information on the underlying technology, please refer to this blog post.
Please try the profiles and share feedback in this community forum thread. It would help to include details like how you access Camera Raw (via Adobe Bridge or Photoshop), your computer system details, and as much information as possible about what you like or do not like about the resulting image quality. Our team will continually monitor this thread to track issues and improve the future experience.
Best practices for using the Adaptive Profiles:
Try the new profile in the following scenarios:
- For food scenes.
- In situations where simply moving Tone and Color sliders may not be sufficient, such as for: high-contrast scenes, landscape or cityscape scenes with skies.
- For High-Dynamic-Range (HDR) photography, simply select Adaptive Color or Adaptive B&W as a profile and click on the ‘HDR’ button.
Note: Adaptive Profiles generate HDR and Standard Dynamic Range (SDR) data jointly, creating photos that look consistent with one another. In other words, after applying either of these profiles, if you toggle the HDR button on or off, you will see either the adaptive HDR or SDR look, depending on the position of the toggle.
To maximize the value of using Adaptive Profiles, please follow these steps:
- Always start from the Adobe Default or Camera Default rendering (with no other edits) and enable the Adaptive Profile first.
- Reset any other settings before applying the profile.
- Make additional global and local edits after assigning the profile, just as you would begin to edit photos with Adobe Color or any other profile.
Boris Ajdin: Product Manager, Emerging Products Group
Posted by :


 133
Replies
133
133
Replies
133

Copy link to clipboard
Copied


Copy link to clipboard
Copied
For landscape shots with heavy snow, Adaptive Color often makes the photo too dark.
The classic "Auto" settings usually handle this scenario well.

Copy link to clipboard
Copied
A basic but annyoing handling issue on LRC (at least on a Mac): If you apply the Adaptive Profile to an image using the mouse/Pad, you cannot move to the next picture using the cursor keys, you have to click first into the image row on the bottom of the screen. this is differently with the "Auto" button, there you can place the mouse cursor on that button and the cursor keys stay functional.

Copy link to clipboard
Copied
won't even work since update, reinstalled etc useless and you want to start charging x2 the price when my 10 year plus sub ends!!
Copy link to clipboard
Copied
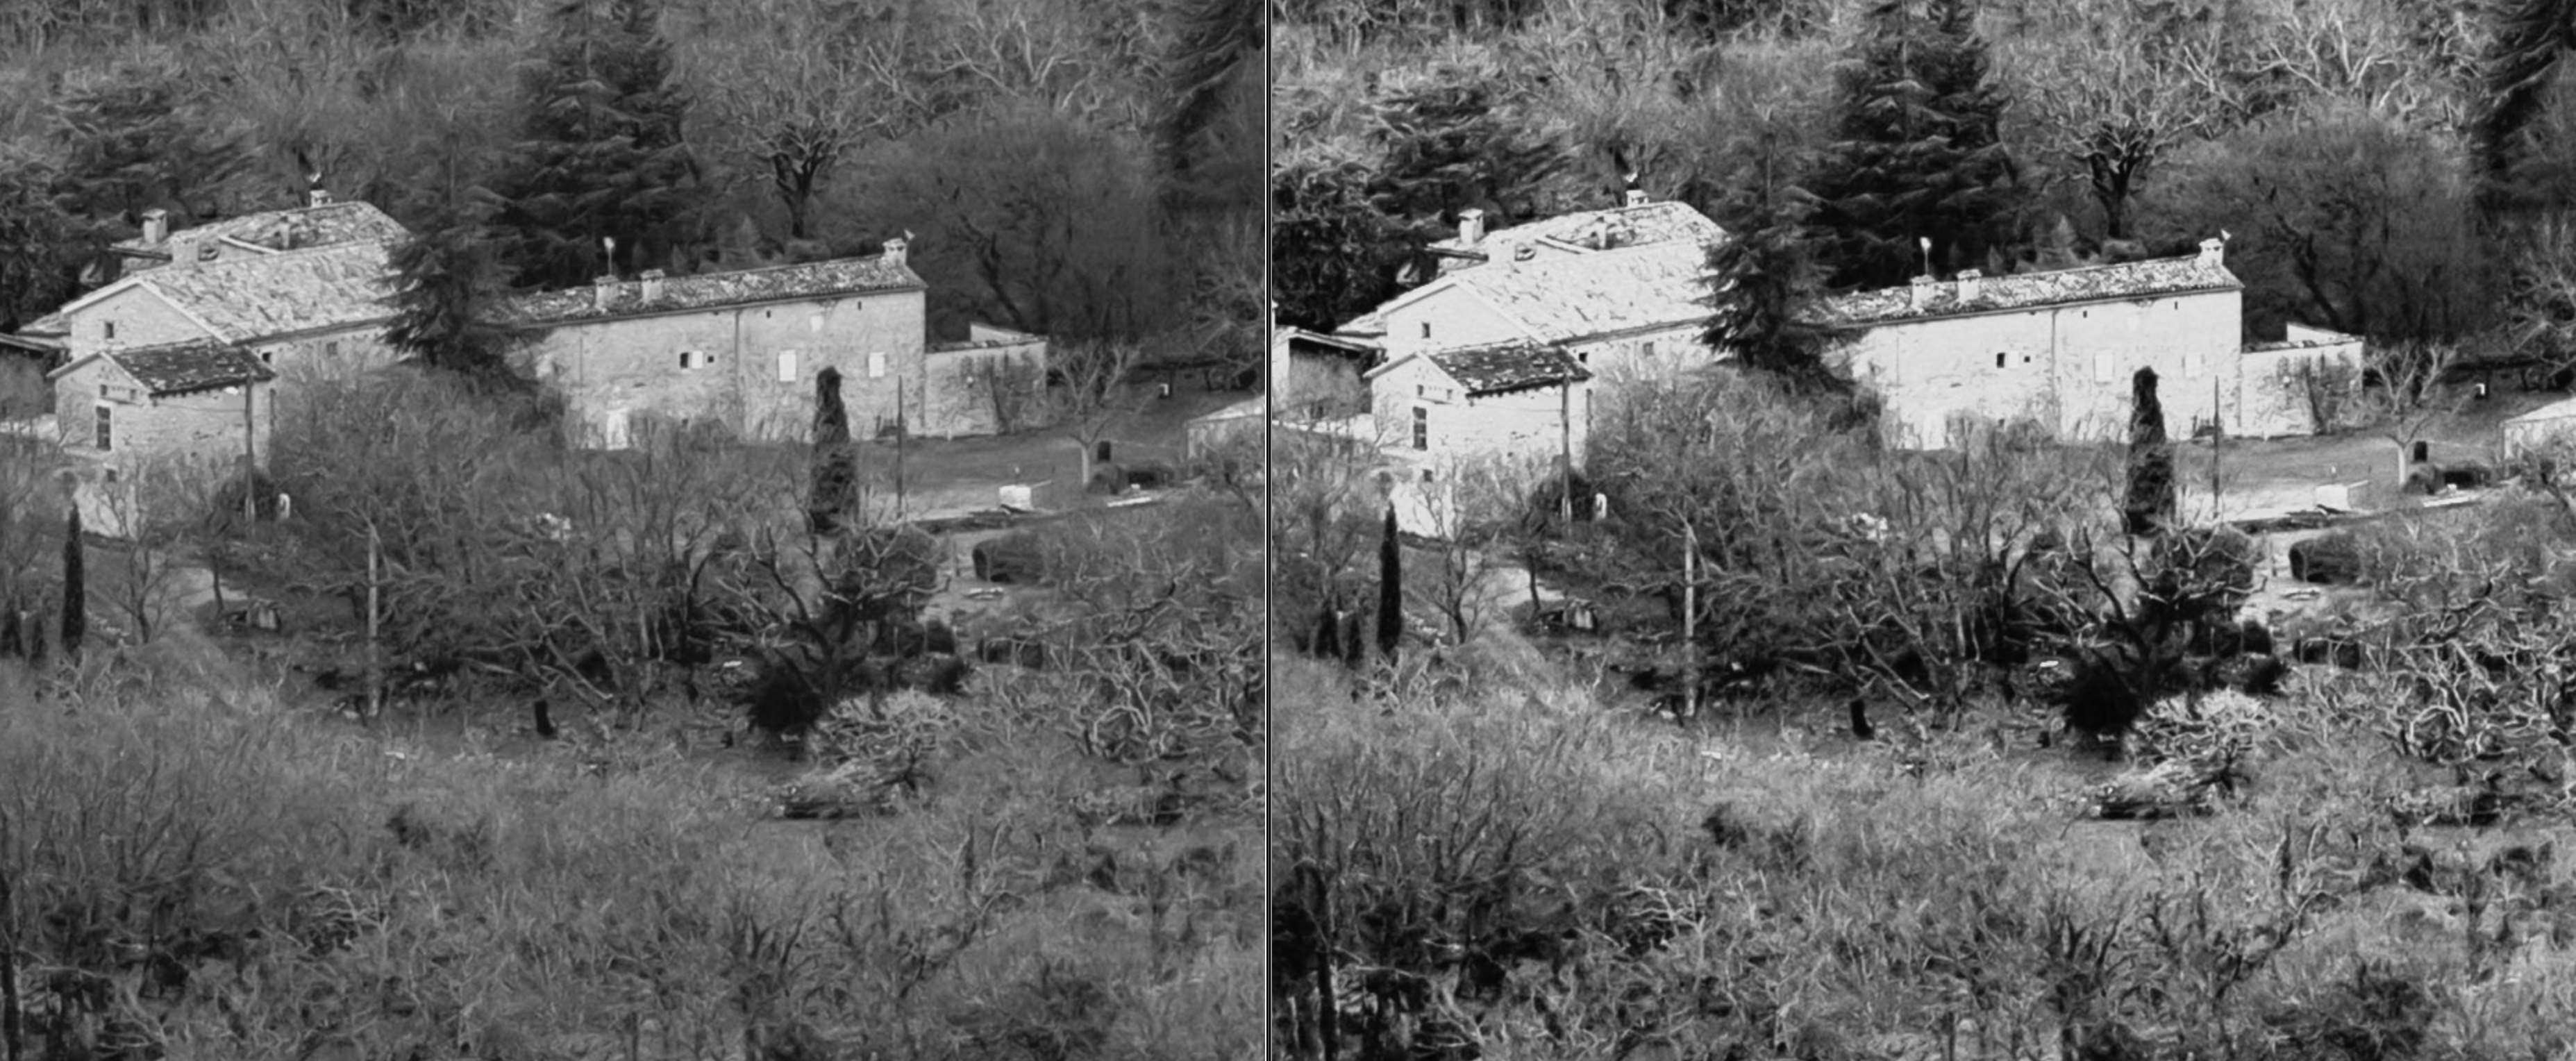
Adaptive Profiles certainly show lots of promise and are usually a great starting point for an image (particularly a color one). I've been editing many high contrast (think snow, bright sky and black rock) scenes this week trying both Adaptive and traditional starting points for an edit.....but only on a non-HDR monitor.
A few thoughts and questions though:
- Is this a tool only for (or best for) those with HDR monitors? I don't have one so I can't tell.
- Why is my main LrC histogram so different from my curves histogram for an image with Adaptive Monochrome applied - see screenshot)? (something to do with HDR I suspect?) And which histogram to use when editing?
- Increasing the contrast slider (from zero) after Adaptive Color only seems to darken the image by pulling down the darker tones whilst fixing the lightest tones. I've even see the lightest tones reduce on some images! Admittedly the contrast is increased but not in an average luminisoty way as I'd expect. This is not a bad thing - it's just unexpected. It is easily "solved" by increasing the white slider.
- High contrast color landscapes can often end up looking too "crunchy" - (think overdone HDR simulatiion from 20 years ago!).
- Adaptive profiles are a great starting point for skies in landscapes but everything else appears too dark.
This isn't a complaint - just initial views, feedback and questions.

Mac Sequoia 15.3.1
LrC 14.2

Copy link to clipboard
Copied
This needs to work for event photographers. It doesn't skin tones and harsh / low light situations really struggle. As a pro user I don't need this for a simple or unchanging series of photos. I can apply setting across the series, and even match exposures with existing tools. What I need is a scene / content aware edit. This isn't it from what I can see, which is too bad. It's not that hard to account for the types of scenes that event photographers usually encounter. If adobe would like work with me, I have 100k+ edited photos from standard event photography scenes they could use to train a model.
Copy link to clipboard
Copied
And that seems to be part of the problem that some are experiencing, is that the Adaptive effect is different from photo to photo even in a sequence. I have no doubt that the feature will be improved over time though.

Copy link to clipboard
Copied
Question.....does the Adaptive profile execution rely primarily on the CPU or GPU? My quick observation is that it is more CPU dependent.

Copy link to clipboard
Copied
The new Adobe LrC update promised better performance, but in my case, after updating I have noticed slower performance. After applying the 'Adaptive Profile' to a group of images, the application becomes slow, it takes a long time to switch from one image to another in the development tab.

Copy link to clipboard
Copied
Copy link to clipboard
Copied
I like both the new Adaptive profiles. I usally don't have to make much of an adjustment after applying. BUT I would love to have them applied when importing my RAW images into Lightroom Classic. I can't find the option for that in the preferences or in the profile option when importing. Suggestions?

Copy link to clipboard
Copied
I've made a "preset" for that; you can chose on import. But still get a red dot to update.
Copy link to clipboard
Copied
Where can we download it? Wouldn't mind giving it a bash.

Copy link to clipboard
Copied
the adaptive color is a game change for me it give me the baseline for my editing

Copy link to clipboard
Copied
Sounds great, but after upgrading to LR Classic 14.2, opening a .heic image in Develop and opening the Profile Browser, I don't see any Adaptive Profiles at all. I tried a .dng image and I even tried uninstalling LRC and reinstalling v14.2. I'm on a Mac Studio. What am I missing?
Copy link to clipboard
Copied
The profiles are for RAW conversions
Copy link to clipboard
Copied
These look nice, but it's a real bummer that I can't use them along with LUTs. If I have to choose between an image with more HDR, and an image with the correct 'mood' based on an LUT, I'm going to pick the LUT. Could there be a way in the future to use the adobe PGTM but use another profile's RGBT?, Or, even better, allow for stacking of color profiles on top of each other..

Copy link to clipboard
Copied
Initial impression is nice, but it would benefit greatly from a couple improvements:
- Love that it feels like it gives me a much flatter starting image. Sometimes I feel like standard profiles start me off with too much contrast, or weird colors. This seems to be able to land you at a proper neutral.
- Having just one slider called "Amount" feels weird. Like LR is just giving it one shot and you can't tweak anything except how much you dump onto the image. Only suggestion I have right now is a version of the "Blending" and "Balance" sliders from the Color Grading tool. But what you'd do is create 2 looks. Look 1: Whatever the Adaptive Profile currently does. Look 2: Something closer to the "flat" look of log footage that's just flat, but not necessarily trying to recover details or do some sort of over-intelligent Apple computational photography thing.
- Skin seems to get over-textured by the Adaptive profile. It's kind of a mix of the look you get if you overcook the Shadows slider, and when you overcook the Texture & Clarity sliders.
- Big thing: Syncing. Once I got a look I liked, syncing that look to the rest of my very similar images took forever because it was AI-analyzing each of them individually. I get why, but unnecessary & slows down my workflow compared to what I was doing. What I think makes sense: Add the option to bake a profile / preset / LUT / whatever from the Adaptive profile you like. That way it can un-intelligently dump that onto the rest of your images just like old times. Faster & easier.
Overal cool new tool. Would love to see how it improves over time.

Copy link to clipboard
Copied
Trying Adaptive Color for landscapes. Default (Amount = 100) rendering is consistently too bright, colors (especially greens) over-saturated. Reducing Amount to ~ 65 makes rendering more useful, with over-saturation of colors (again especially green) still a problem. Tool is useful enough that I'll keep experimenting with it.

Copy link to clipboard
Copied
Je trouve ça assez génial! Je découvre et il faut que je fasse de nombreux essais sur différents fichiers RAW mais les premières impressions sont très positives!

Copy link to clipboard
Copied
Adaptive colour profile gives a good starting point. When I am done editing a batch a images I like to pick a few and add a creative look by using the color profiles. This is not possible since I have already chosen a colour profile (the adaptive profile). The solution would be to enable a second colour profile or rename the adaptive colour profile to "Auto exposure" and place that button next to the existing "Auto" button on top of the exposure sliders.

Copy link to clipboard
Copied
Bonjour, intéressant mais je rencontre beaucoup de problèmes de halot dans le ciel. J'ai réinitialisé tout les paramètres et est simplement appliqué le profil adaptative couleur et voilà le résultat.
Si je change de profil le halot disparaît.
Cordialement
Jacques
Ps Cela arrive très fréquemment.
Copy link to clipboard
Copied
These are good profiles, particularly combined with HDR. In nearly every instance however I have to brighten the shadows quite a bit manually.
Copy link to clipboard
Copied
This is an excellent upgrade. Using the Adaptive Profile enhances the photo without moving any of the sliders, making it much easier to improve the photograph.

Copy link to clipboard
Copied
The Adaptive profile is an extremely mixed bag in my experience, so far.
For certain high contrast scenes (interiors for example), the results are amazing, and take a lot of difficult slider-pushing to the extremes away, giving one a much better and easier to handle starting point.
On the flip side is the color rendition, which appears to be based on "Adobe Color", and it is simply EXTREMELY bad for my Nikon files (just like Adobe Color is). Skies turns turquoise instead of blue. Orange and yellow are not truthful at all.
On top of that, for the Southern California desert scenes I photograph, the results are often almost comically bad, with mid-tones being pushed into the highlights and an odd "bleach bypass" look that I simply cannot explain. These aren't even high contrast scenes, just standard "exposed to the right" raw captures. The Adaptive profiles render a starting point that is less useful than the standard profiles.
Whatever the training set for the ML was, it wasn't the Southern California desert, and it wasn't Nikon cameras... 😜

Find more inspiration, events, and resources on the new Adobe Community
Explore Now
 AdChoices