Paul Peterson
Known Participant
November 22, 2021
Question

Images exporting darker than shown in Develop/Library

  • November 22, 2021
  • 8 replies
  • 8150 views

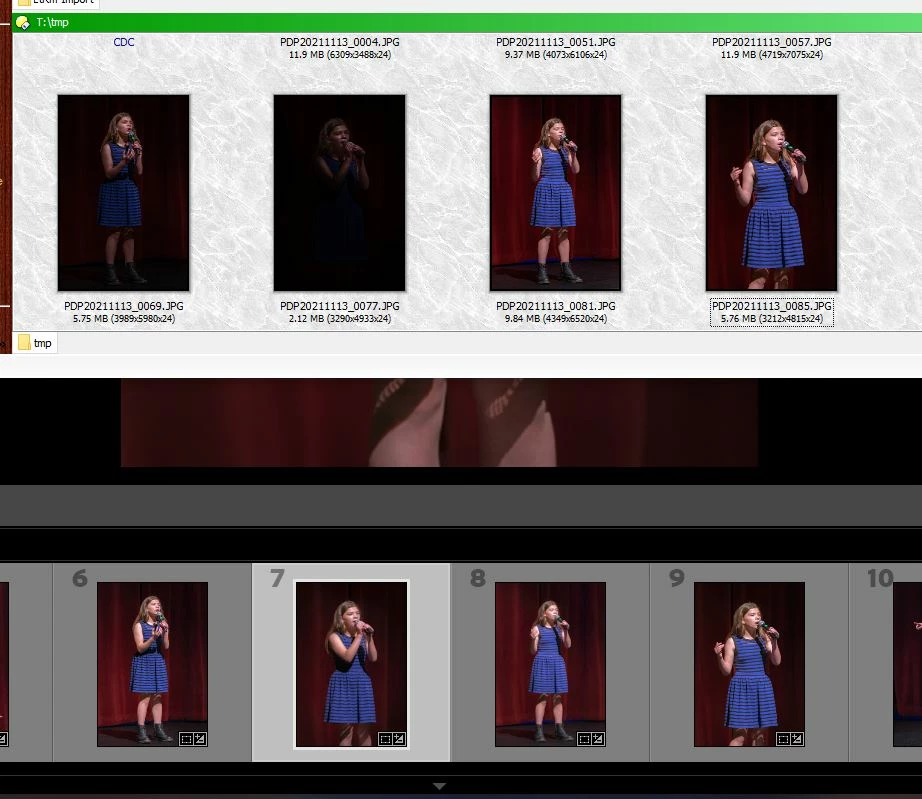
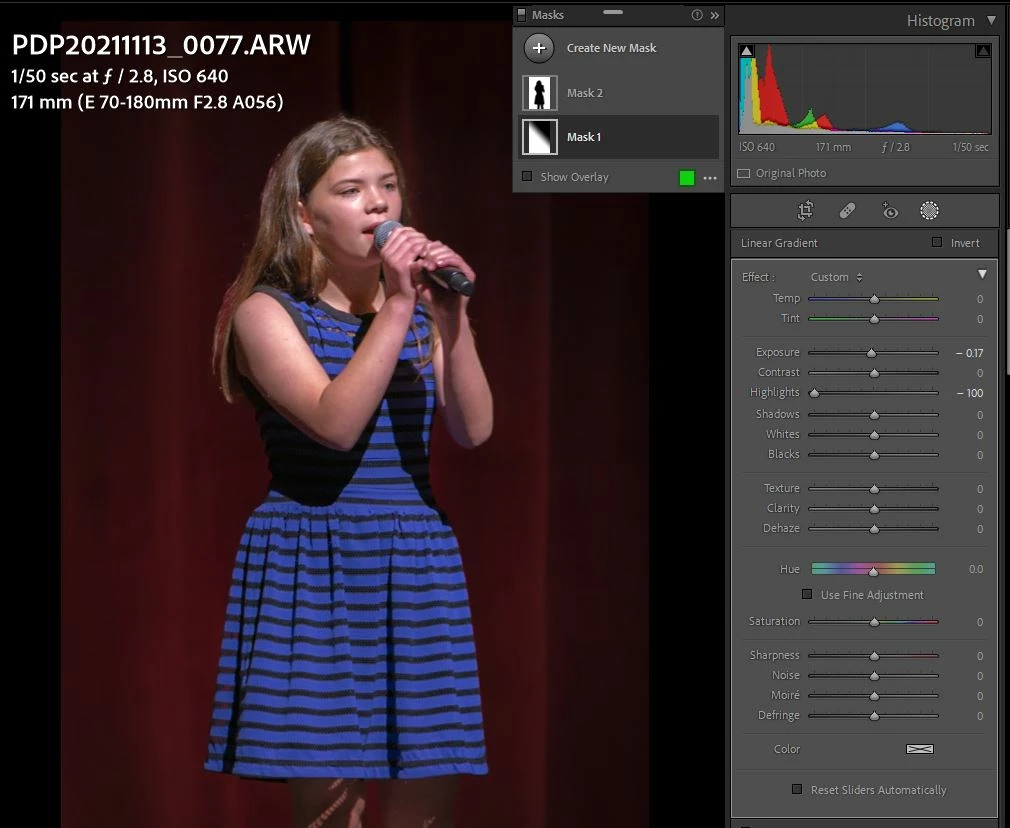
Since updating to latest versions with mask enhancements, some of my images are exporting with significant dark overlays which seem related to linear masks.  See attached example.  The top set of images are how the four were exported.  The same set below are how they appear (correctly) in LR.  Strange thing is that the last two images of the four look correct, but have the same type of masks as the other two.  Second attached screen cap is of the worst of the four, showing the two masks.

This topic has been closed for replies.

8 replies

Participant
December 25, 2022

Have you been able to find a solution by now? Happening to me a well. 

johnrellis
Legend
December 26, 2022
Participant
November 7, 2022

I have the same problem. Has anyone found out how to fix it?

johnrellis
Legend
November 7, 2022

"I have the same problem. Has anyone found out how to fix it?"


Your issue may or may not have the same underlying problem -- most instances of exported photos not matching Develop have well-known causes and straightforward solutions.  Please confirm each of these steps:


1. Which app are you using to view the exported photo?  If it's not color-managed, then you will see differences.


2. Quickly test if the profile currently assigned to your display is corrupt or incompatible with LR:

https://www.lightroomqueen.com/how-do-i-change-my-monitor-profile-to-check-whether-its-corrupted/


3. Try setting Preferences > Performance > Use Graphics Processor to Off and then compare Develop with a photo exported after setting the option to off.


4. Do the menu command Help > System Info and copy/paste the entire contents here.


5. Select one of the problem photos and in Library, do Metadata > Save Metadata To File. Then upload the photo and its .xmp sidecar (if it's raw) to Dropbox, Google Drive, or similar and post the sharing link here.


Todd Shaner
Legend
November 23, 2021

John, I used no mask or selections with my test image files. Interestingly I exported the PDP20211113_0077.ARW to DNG file format and opened it in LR 5.7.1. With the same settings (Exposure +2.75, Highloghts -75) that caused the dark rendering in LrC 11.0.1 the image file renders bright and as expected in LR 5.7.1. The Highlights control affects the highlight regions much more strongly than the midtone and shadow regions as expected. So something has changed since since 5.7.1. I also tested the DNG file in LR 9.4 and it has the same dark rendering issue as LrC 11.0.1 so the change causing this issue was made prior to LrC 9.4

Participating Frequently
November 2, 2022

I just had this same issue occur to me. Has the root cause and resolution been found? At first the selected photo would export signifigantly darker than the surrounding images but were shot at the same camera settings and had identical edits. At first it appeared like the other photos and only showed up dark once exported. Once I built the 1:1 preview for it, it showed up dark in Lightroom as well.


Todd Shaner
Legend
November 23, 2021

I'm seeing similar erratic behavior when switching between image files. The preview will flash brighter for about .5-1.0 sec. and then back to darker. At one point the Develop preview was dark and the Library preview brighter and remaining brighter. Zoom to 100% caused the Library preview to go back to dark same as Develop preview. I couldn't find a series of steps that would reproduce the behavior. That's why I said it appears erratic. The ARW file is about 4 EV underexposed and the Highlight control acts more like an exposure control, which seems wrong. I checked some Canon 5D MKII CR2 files that were about 4 EV underexposed and the Highlight control behaves as expected affecting the highlights more than the midtones and shadow areas. Sorry, but I have not a clue as to why this is happening.

Paul Peterson
Known Participant
November 23, 2021

John - Yes - cleared the cache and regenerated the previews.  The later had a correcting affect on the filmstrip picons, but as soon as I would click on one the edit, it would revert to a brighter version.


Todd - so glad I'm not the only one having the problem - well ... if you know what I mean.  Wouldn't wish it on anyone.

johnrellis
Legend
November 23, 2021

Did all of the affected photos have Select Subject / Sky masks applied at some point, or have some of them never had the masks applied?

Rikk Flohr_Photography
Community Manager
November 23, 2021

For those on this thread:

If you send the affected image to Camera Raw does Camera Raw render it correctly or the same as Lightroom Classic? 

Rikk Flohr: Adobe Photography Org
Paul Peterson
Known Participant
November 23, 2021

Rikk, I appreciate what you're getting at by your question.  But as I was trying to explain in my latest post, the shift in exposure level is happening within Lightroom.  For some reason, the image is showing up at a brighter level until you zoom into the image.  It shifts darker afer a few seconds and stays there until you move on to a different image.  Then it goes back to the brighter (inaccurate) level.  Now, I would think that it's something paticular about my workstation setup, like my graphic card setting.  But I've deactivated the GPU option in lightwave with no improvement.  I had not changed any colorspace or other related settings in my Win10 system before this issue showed up.  It showed up with the installation of v11 of LR

Paul Peterson
Known Participant
November 23, 2021

Further detail discovered: zooming in at a level of less than 100% does not reveal the querk. One must zoom in 100% or greater for the image to switch to rendering at a correct level.

Paul Peterson
Known Participant
November 22, 2021

I have reduced the problem to the Exposure and Highlights sliders.  Load the supplied .ARW image, set the exposure level to 2.75 and the Hightlights slider to -84, then export.  It will be much darker than in LR.

Files:

Image: https://www.dropbox.com/s/mozz19iq4v4tstt/PDP20211113_0077.ARW?dl=0

XMP file: https://www.dropbox.com/s/y65t46a3s3f196f/PDP20211113_0077.xmp?dl=0

johnrellis
Legend
November 22, 2021

[This post contains formatting and embedded images that don't appear in email. View the post in your Web browser.]


"Load the supplied .ARW image, set the exposure level to 2.75 and the Hightlights slider to -84, then export.  It will be much darker than in LR."


I don't see that with the .arw and .xmp you supplied. I made the changes to Exposure and Highlights and exported as JPEG, and on my LR 11.0.1 / Mac OS 11.6 the exported JPEG (left) looks nearly identical to Develop (right):


Usually when there's a large discrepancy between Develop and exported images on Windows, it's one of two things:


1. Using a non-color-managed viewer app. I don't recognize the app you're using in the screenshot -- what is it?  Firefox, Irfanview, and Faststone are three free color-managed viewers (Google Chrome still has bugs, last time I checked) (you have to explicitly enable color management in the latter two).


2. A color display profile that either doesn't conform to industry standards (fairly common on Windows) or is incompatible with LR (e.g. a version 4 ICC profile). You can quickly test that following these steps:

https://www.lightroomqueen.com/articles-page/how-do-i-change-my-monitor-profile-to-check-whether-its-corrupted/ 


Paul Peterson
Known Participant
November 22, 2021

Thanks, John.  My external viewer is the Directory Opus utility and has not been changed since things were looking correct. 

Your in-LR rendering doesn't look like mine, here:

Mine looks more like what you'd expect for a dim original image with exposure boosted and highlights lowered.  I'm surprised a how your's rendered so dark.  I have changed no monitor settings or color profiles.  Only change was the upgrade to v11.  Things have worked great till I started doing the exports.


GoldingD
Legend
November 22, 2021

Not about your problem, just an observation, and something to experiment with.


1. On either Mask1 or Mask3, double click on the mask iscon, then you can name the mask with something better to remind you, bith masks.


2. Been experimenting with the new masks, been watching tutorials. And I notice it appears you have applied Mask1 perhaps to work on background? Then Mask2 on subject. Experiment with first creating select subject, do nothing just yet to the adjustments, (well maybe rename it) duplicate that mask, invert the duplicate, and rename it (for example background). then go and edit the masks as you desire. Might cut down on some Add/Subtracts in each mask. Just something to try.


Paul Peterson
Known Participant
November 22, 2021

I did some further testing and narrowed it down to something with the combo of exposure and highlights sliders, not with maps.  The setting for all these images are high exposure and very low, if not -100% highlights settings.  If I bring the highlights slider back to 0 and the exposure down a bit, the in R and export images are much closer.  Strange thing is, if I copy the settings from one image the that has no problem to the ones that do, it does not fix the problem.  BTW - how does one edit or delete a post here?

TheDigitalDog
Inspiring
November 22, 2021

@Paul Peterson wrote:

BTW - how does one edit or delete a post here?


Click on the ... More 'link'. 

Author “Color Management for Photographers" & "Photoshop CC Color Management/pluralsight"
Paul Peterson
Known Participant
November 22, 2021

Thanks, but I don't see anything like a More link.