- Home
- Photoshop ecosystem
- Discussions
- Dealing with Textured Prints when Scanning
- Dealing with Textured Prints when Scanning
Dealing with Textured Prints when Scanning
Copy link to clipboard
Copied
Introduction of the problem
I've been scanning a lot of old family photos recently. One of the issues that I've had to deal with is that it was not uncommon for printers to use a textured or highly textured paper with some sort of pattern to provide some level of depth to the image. Admittedly, this did provide a nice appearance to the image, but if you are trying to scan that image for archival purposes, the texture can prove to be very problematic. If the surface had a flat (non-glossy) surface, you'd see small shadows in the region of the texture. If the surface were glossy, you'd see sharp reflections from the texture.
Below are two samples of each. On the left is an image with texture. Because this is subtle when seen on the web, I've placed a closeup within the image. On the right is a glossy image that has a lot of highly textured points sticking out to provide depth. In this example I've held the image in the light in a way that fully exacerbates the problem as the reflected light overwhelms the image.
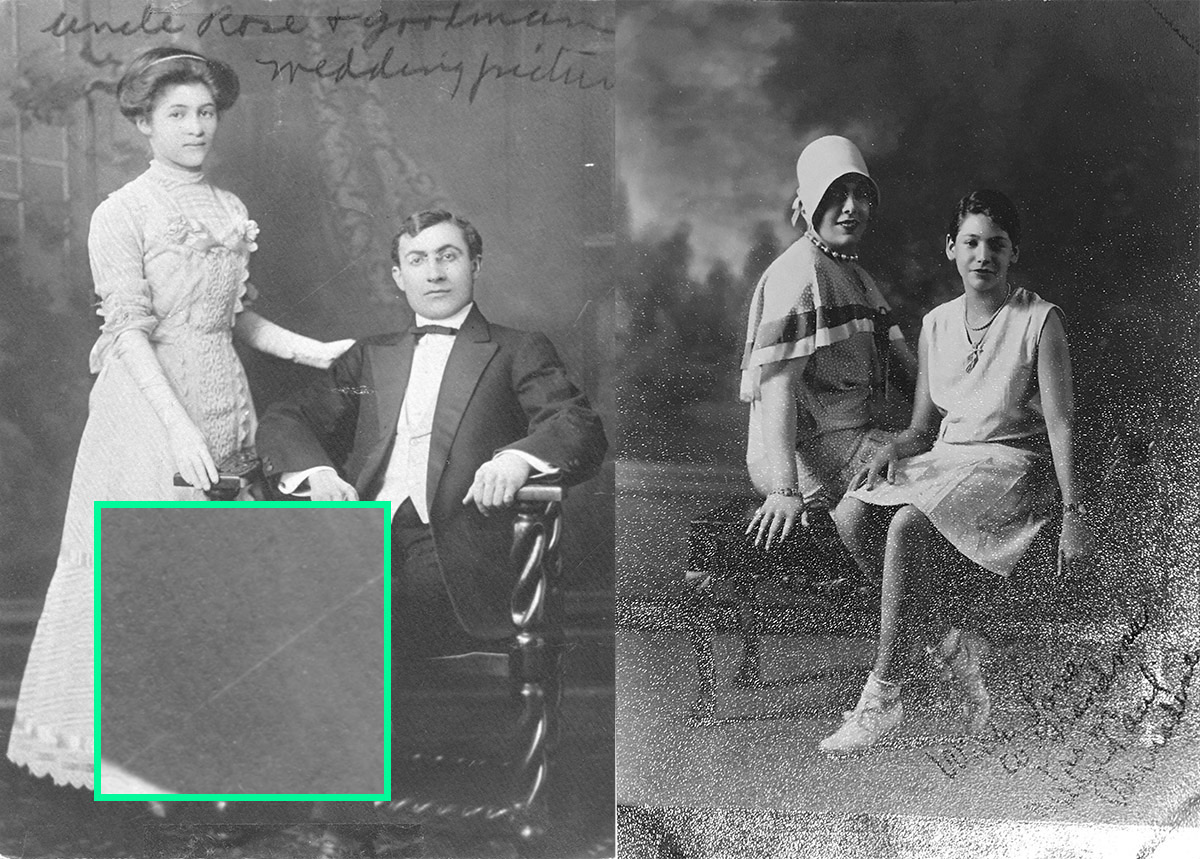
With the flat textured image like the one on the left above, there are two potential approaches: digital and mechanical. The digital approach relies upon FFT (Fast Fourier Transform) applications. There used to be a variety of these applications out there but they are either fairly complicated to use (such as this software) or are no longer available. PC users may have better luck finding this kind of software. Because FFT requires a regular repeating pattern in the image, the software approach will not help the image on the right because there is no regular repeating pattern of artifacts.
One common suggestion is to use a Gaussian blur to remove the textured lines (as in the above image on the left) by blurring the image. I recommend against this because it also blurs the image as well. If you have a good sharp image, why blur it unnecessarily?
Another suggestion is to scan twice but rotate the second scan by 180 degrees. The images are stacked (into layers) above each other and the user needs to reduce Opacity until there is a happy medium between seeing the shadow and not seeing the shadow.
An alternate approach is to do multiple scans but not just twice. Here's the deal: the texture you see from the scanner occurs because the light is not directly adjacent to the sensor and this creates shadow. Any variations on the orientation of the image will cause the shadow to change its position. You can align the scansas layers and then average them out. And here the more the merrier. With the image on the left above, four scans (at 90 degrees rotation each) gave good results. For the image on the right right above, four scans (at 90 degree rotation) was good but eight (at 45 degrees each scan) was much better.
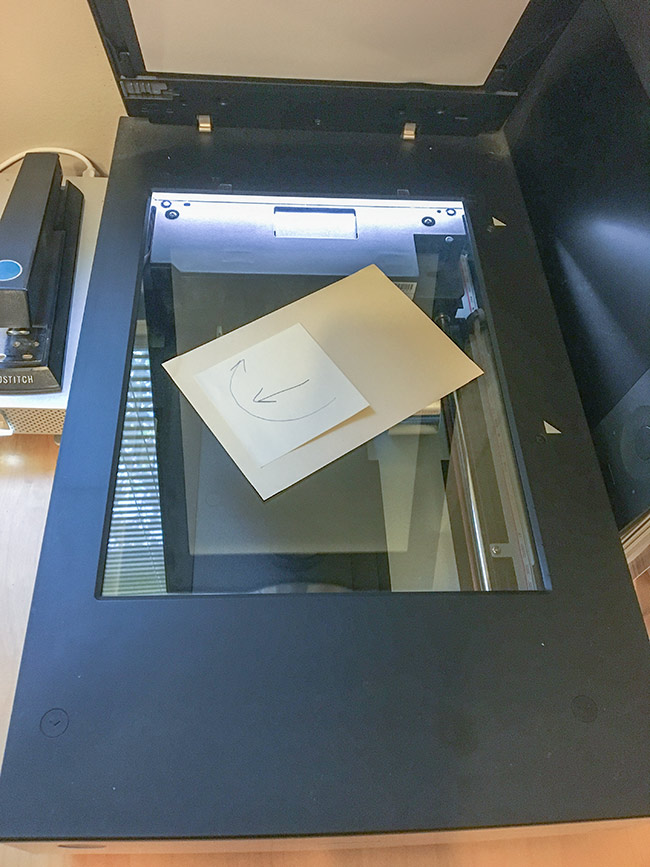
For my scanning I was using the Epson Perfection V700 Photo scanner. For my software I was mostly using SilverFast 8 (by LaserSoft Imaging). Because this is a fairly monotonous process, it's easy to lose track of your progress. As such, I found that placing a Post-it note on the back of the image with an arrow pointing toward the top of the image and a circular arrow pointing the way I'm rotating the image helped considerably. (You can laugh, but if you're tired, this is really really handy.) You can see my system in the image below.
When performing the scans, what you need to do is to:
- Prescan, make all of the cropping, adjustments, and any alterations you choose to make on the first scan. Then scan the image.
- Next open the scanner and rotate the image 45 or 90 degrees (as you so choose) [Read below for methods of capturing rotation with your scanning software.]
- Close the scanner lid, do a Prescan to locate the image, then move and/or rotate your cropping rectangle, close the lid and scan.
- Repeat as necessary for the four or eight images you desire.
The thing here is that you do not want to make any subsequent adjustments to the quality of the scan; leave the adjustments alone.
It's important to note that some scanning software allows you to rotate your crop rectangle while others cannot. Because of this I'll explain the process first for scanning software that can rotate the crop rectangle, and an alternate proceedure for scanning software that cannot rotate the crop rectangle. The end result will be no different.
If your scanning software can rotate the crop region:
Here I used Silverfast 8 scanning software which allows rotation of the crop region.
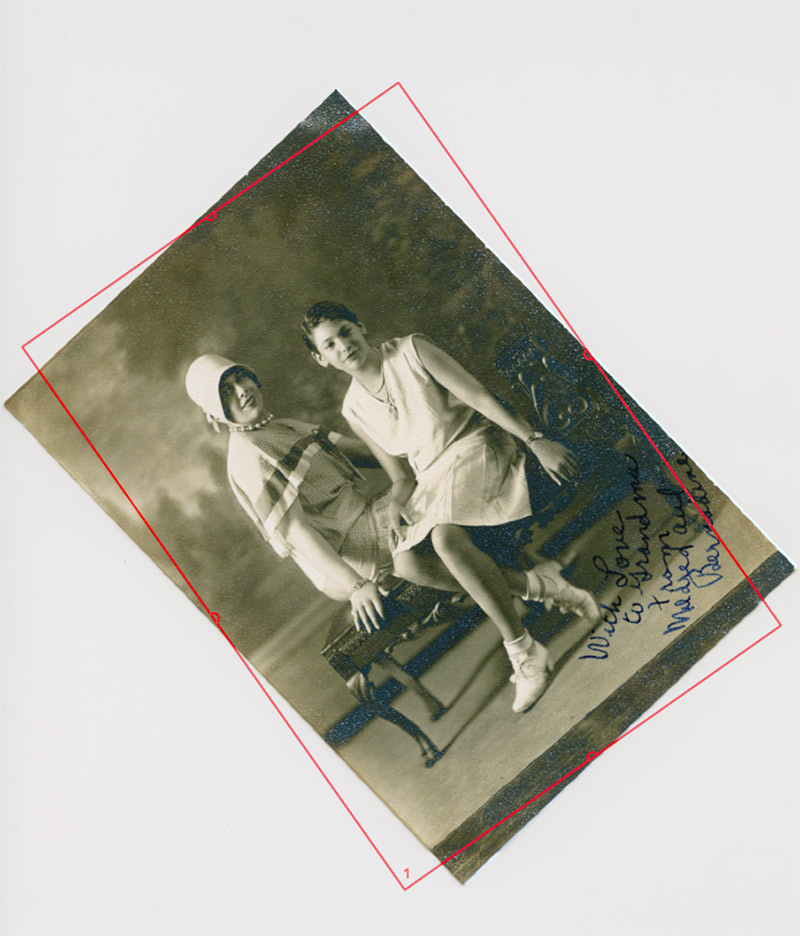
This is fairly straightforward: you place your image on the scanning bed at the angle you want, then do a prescan to see the image and the crop region. With Silverfast you have four half-circles on all sides (see the image below), if you mouse down on these you can rotate the crop region. In each corner you can resize the crop region to fit your image, and if you place the mouse along a side, you can resize along that side. One annoyance is that the rotation axis is located at the middle of the image, which means that if you align the crop region with a corner of the image, the crop-corner is no longer near the image-corner once you rotate the image. Because of this you have to move the crop region to accommodate this movement.
One problem that you may encounter is if your image is too tall (or wide). Your manual rotation of the crop region will stop if the opposite corners are wider than the scanner. The only option you have here is to shorten the rectangle, rotate, and then resize the rectangle as necessary. But I do encourage you to only change length OR width, not both.
I also encourage you to name/number the scans as you do them. Once you load these images into Bridge, you cannot tell which one is which, as shown below. For the rest of the process it really will not make a difference, but if you miss one, this will help you determine which one you missed.
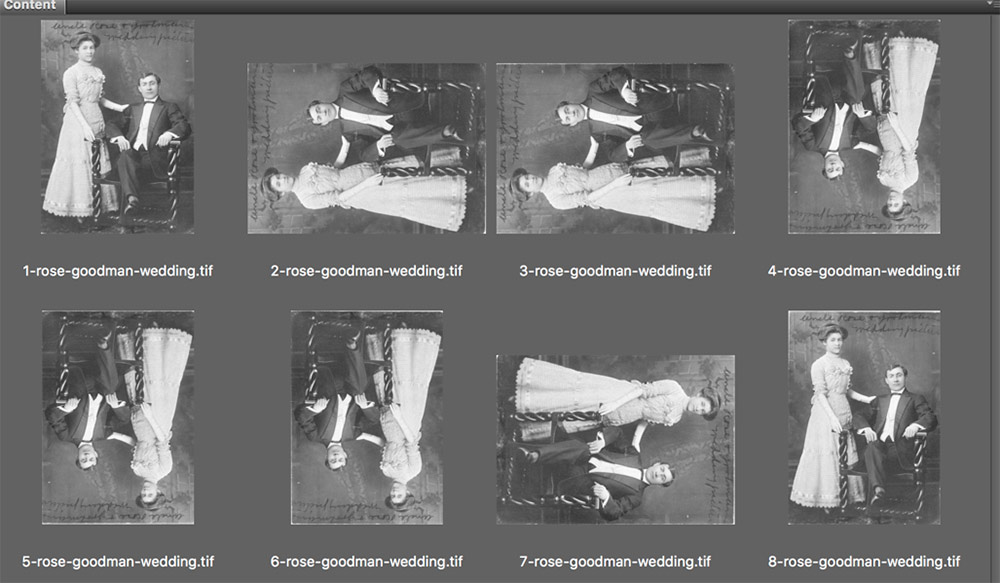
At this point use Adobe Bridge's rotation tools to bring all of the images to an upright position.
If your scanning software cannot rotate the crop region:
Here I used Epson Scan (v. 3.9.4) scanning software, because it does not allow rotation of the crop region.
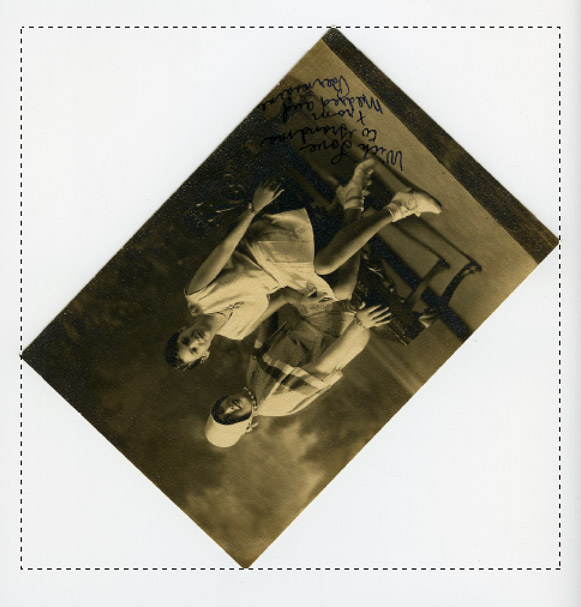
Obviously this only affects your process if you chose to add 45 degree rotations of your image. Since you cannot rotate the images, you are left with crops that contact the corners of the image as shown below. Fortunately this is fairly straightforward to resolve.
All you need to do is one extra step: bring the image into Photoshop and select the Crop Tool. As shown on the left, along the Options bar you can see the "Straighten" option. Select that and then drag across one of the straight edges (as shown below in the middle). PS will understand that this is either a horizontal or vertical axis and rotate the image accordingly. Finally, as shown in the third image, you'll need to set the formal crop lines against the image. Tap the Enter key when finished, Save it, and you're done with that image.
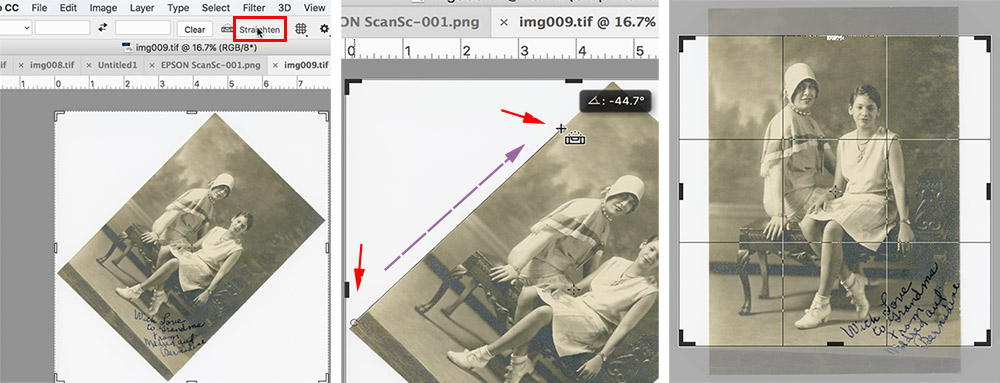
This is obviously only necessary if you need to scan at 45 degrees and is not necessary at all if you are only doing 4 rotated scans.
Finishing the process, two options:
Method #1: Open all four (or eight) images into Photoshop.
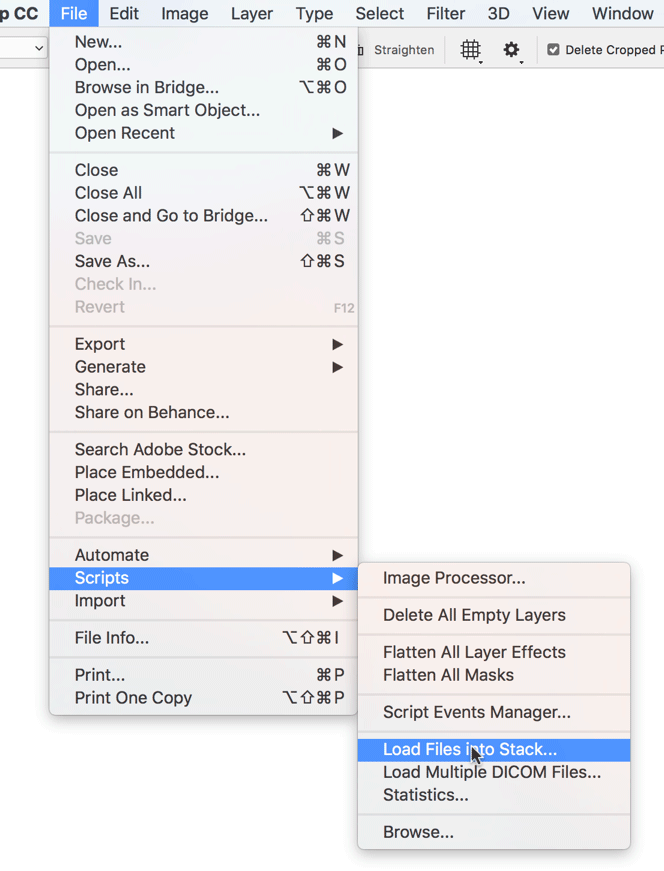
First Open all (four or eight) of the files. Then, from the File menu, go into scripts and select "Load Files into Stacks" as shown below
When this opens, select "Add Open Files"
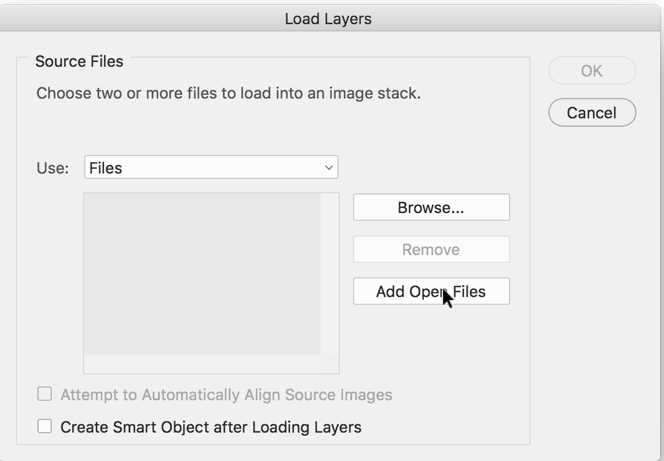
Finally check both boxes below.
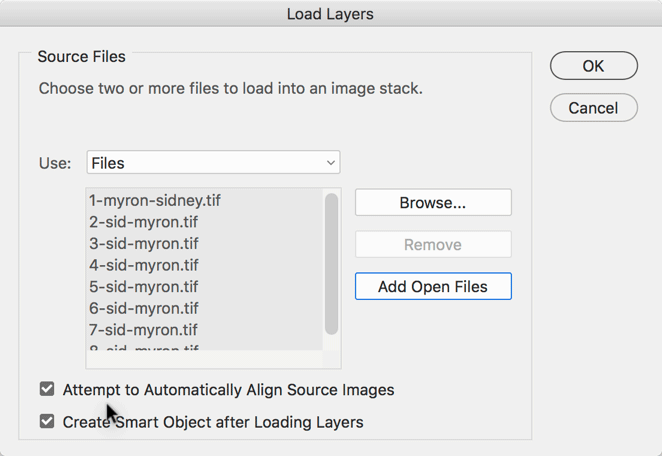
Now, go to the Layer menu and choose Smart Objects -> Stack mode -> (and select either) Mean or Median. [Note that these are commonly used when taking a photo in a public place when you don't want all of the people in the final photo: You need to take many, many shots of thefountain (let's say) . As people wander around, not everyone will be in every photo in the same place. Median will remove all the people from the photo.] In this case, however, because the shadows are not in every photo (or at least not in the same place), they (like the people around the fountain) will be cancelled out from the final photo.
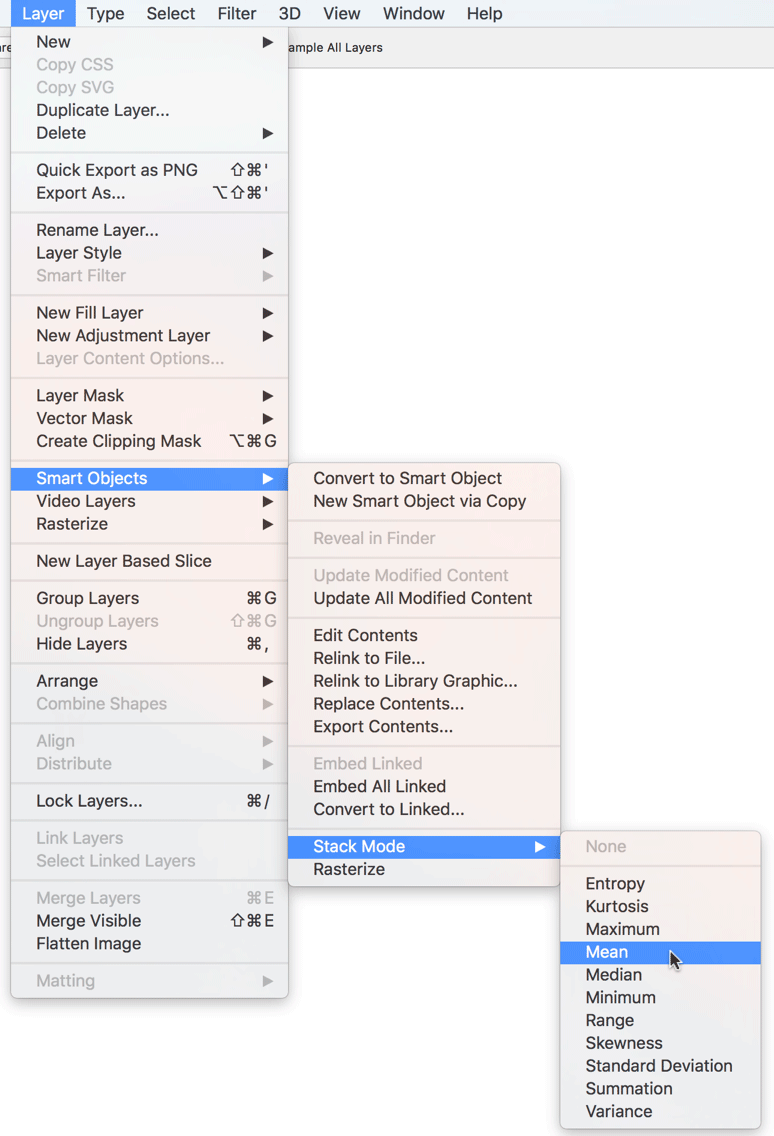
Method #2: if you have Dr. Brown's Services:
From Bridge you can select all 4 or 8 of the images and select Dr. Brown's Services and then Dr. Brown's Stack-A-Matic.
[Dr. Brown's Services can be downloaded here and installed in Adobe Bridge.]
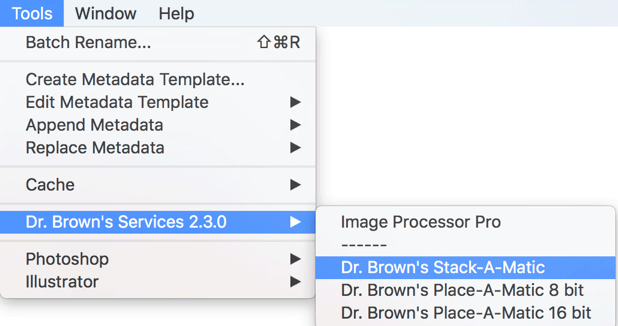
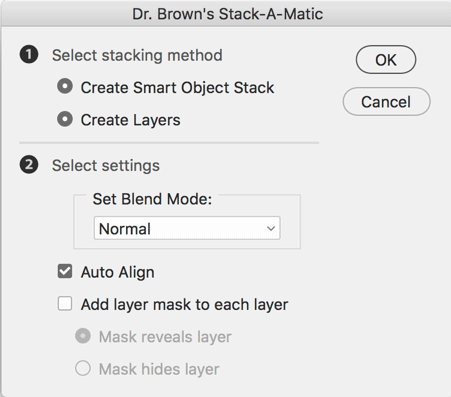
Once at this window, be sure to check the boxes shown and click OK:
Now go to the Layers menu and choose Smart Objects -> Stack mode -> (and select either) Mean or Median as you did in the first example.
The Result
So where does this get you?
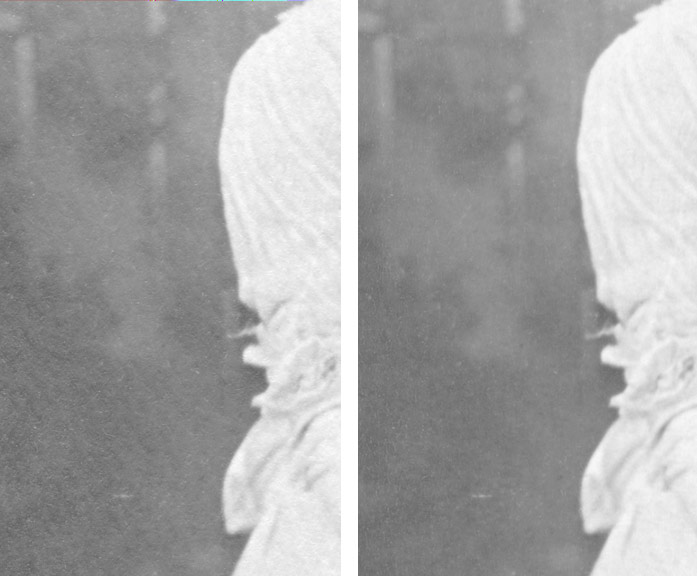
From the first photo at the top of this blog on the left above, you can see a detail on the left side, below. You can see the result after processing in that same detail on the right.
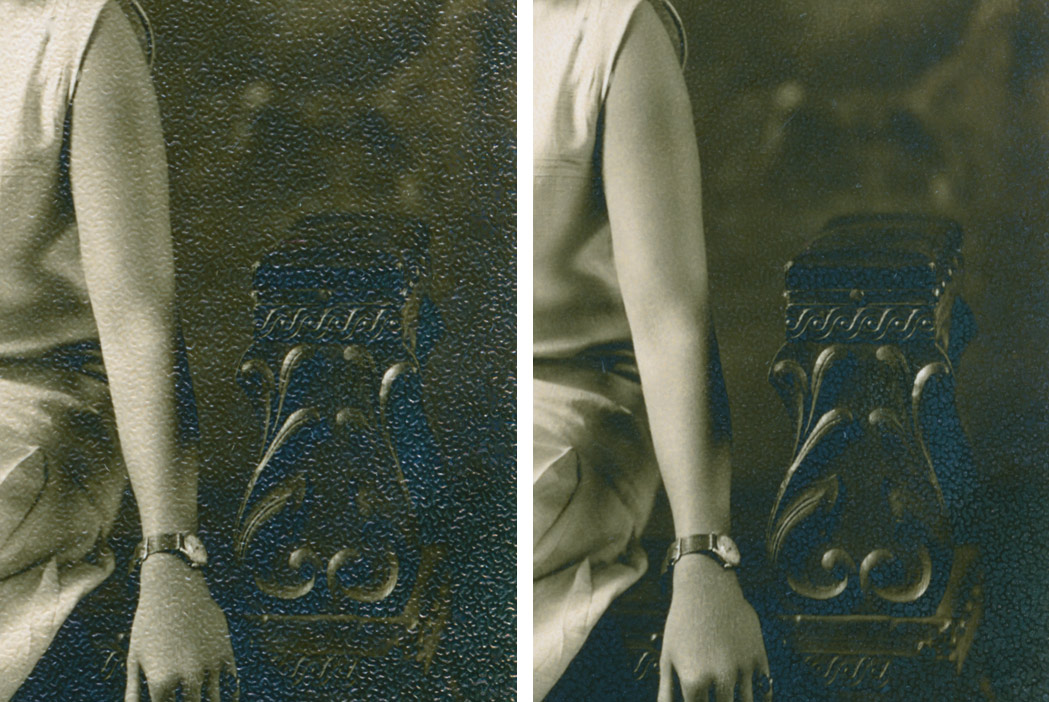
For the other image, again in the detail on the left below is the first scan (this is not as bad as the first image I showed because this is from a single scan without holding the photograph to reflect the light, but it's still unacceptable). On the right is the result of going through this process. Very acceptable.
The good news is that these textured photos are not as common as all the rest of your images. Out of over 700 images, I've only encountered 4. However, if you're going through the process of capturing your family's history, anything you can do to get the best possible image is worth the time and effort. I hope after reading this article you can recognize the vlaue of following this somewhat lengthy process.
I'd like to add a big thanks to Cristen Gillespie for helping me proof this blog. Cristen provided wonderful help.
Explore related tutorials & articles
Copy link to clipboard
Copied
I'm tired.
Copy link to clipboard
Copied
Copy link to clipboard
Copied
Haha. They dug up a post from over 6 years ago (interesting post though).
Copy link to clipboard
Copied
Yes, worth the bump anyway!
Copy link to clipboard
Copied
FYI, and there's been no other options since then. This is still the best way.
Copy link to clipboard
Copied
FYI, and there's been no other options since then. This is still the best way.
By @gary_sc
Well...that depends on the equipment you have available. A scanner is convenient, but will not necessarily give the best result.
If you have access to a repro stand (I know, not everybody does), and a good macro lens for your camera, two lights at 45° angle will be enough to kill all paper textures. All the delta angles will even out the light.
There is still a certain risk of micro-reflections in deep textures, but using a polarizer will minimize that, and if you use cross-polarized light absolutely all reflections will be completely eliminated.
I do realize that this is a bit of rigging. But once you're set up, you can work very fast - much faster than the procedure described above. And the final result will be much better.
Just for completeness' sake.
Copy link to clipboard
Copied
@D Fosse, You are absolutely correct. Getting rid of the shadow is the primary demand here. And IF you have that equipment, you're good as gold. And you are also correct that my approach is a tedious and time consuming process. But it does work. If you only have a few of these images, it's not horrible. But if your family really really liked them… :>)
But like you say, there are far fewer folks who have your equipment than have scanners. I will also point out that more people are likely to have a scanner attached to their printer (with the cheaper and poorer quality CIS (CMOS) sensor) than have a dedicated scanner (with the better, but more expensive CCD sensor). And, people are more likely to have the scanning software that came with their scanner than pay extra for the better software. (That's why I showed both.)
One does what one can with what they have, and thank you for sharing your option as well. It's a great approach!
Speaking of spending extra to get a job done. I have a friend who wanted to digitize all of his slides. So, he projected them onto a screen and then took pictures of the projected slide. I sent him this link:
He said, 'Ah, too much work, I'm happy with what I did!'
Copy link to clipboard
Copied
@gary_sc – thank you for sharing!
Copy link to clipboard
Copied
Hi, @Stephen Marsh, that means a lot, thanks!
Copy link to clipboard
Copied
I’m glad this got bumped. Somehow I missed this the first time back in 2017. Yes, it was a long read…but it was worth it to read all the way to the end. I knew about the stack modes and using them for things like noise reduction, but I didn’t think of using them to remove texture by rotating scans.
A family member’s old prints and slides have been given to me for scanning, so this technique is probably going to come in handy at some point. Thanks, @gary_sc !
Copy link to clipboard
Copied
How do you make sure your various scans are aligned, as there may be slight differences in rotation and cropping? Also can you recommend any substitutes for Adobe Bridge for rotation? Also since not everyone can purchase or access Photoshop, I've downloaded the stacking program Picolay. Any comments?
Copy link to clipboard
Copied
Hi, @Robert38747171mcck, sorry, I've never heard of Picolay, and, since I'm a Mac user, I can't even run it on my comptuer.
Sorry, but I can't help you. If you have any success, please report it here so that others may benefit. Thank you!
Copy link to clipboard
Copied
Also can you recommend any substitutes for Adobe Bridge for rotation?
By @Robert38747171mcck
The kind of rotation that Adobe Bridge does is not full reordering of the pixels in the file itself, it’s just changing the rotation information in the metadata. Which almost everything does, in fact it's probably how rotation works in your phone's photo app, and probably in the scanning software too. Because it's simple rotation in metadata, many Mac and Windows photo organizers do exactly that same thing, including practically all of the free/cheap organizer apps. So, if you already use one that you like, it probably rotates the same way as Bridge.
This is what the metadata looks like for an image that isn’t rotated in Bridge:
         <tiff:Orientation>6</tiff:Orientation>
         <tiff:ImageWidth>4162</tiff:ImageWidth>
         <tiff:ImageLength>2775</tiff:ImageLength>
This is what it looks like after rotating it clockwise in Bridge:
         <tiff:Orientation>1</tiff:Orientation>
         <tiff:ImageWidth>4162</tiff:ImageWidth>
         <tiff:ImageLength>2775</tiff:ImageLength>
As you see, the width and length did not change. If the pixels had been rotated, the width would have become the short side. But the pixels did not change, the Orientation value changed, and that tells other apps like Photoshop how much to rotate the image. Doing it this way means to rotate the image, the file doesn’t have to be opened and resaved; you just change that one metadata value.
This information came from Bridge; choose File > File Info, and then click the Raw Data tab.
Copy link to clipboard
Copied
Hi, @Robert38747171mcck, you're absoutely correct. Bridge does not change the pixels, only a suggestion to the software looking at the image how to view it. It does not change the pixels becuase it's not an image manipulation program. It's an image browser.
I'm sorry, I've used Photoshop for over 25 years now and I do not use any other image manipulation software to give you a reliable recomendation. I just do not have time in my life to go and check out every other software out there. Sorry
Find more inspiration, events, and resources on the new Adobe Community
Explore Now