Friend of Mutts
Participant
June 6, 2023
Answered

Displacement map confusion.

  • June 6, 2023
  • 2 replies
  • 4081 views

I have been trying to use a displacement map and the result is that the entire layer is shifted by the number of pixels specified when using the filter. I have had this issue before and just gave up out of frustration. I have a layer that is a textured skin layer. There are plenty of dark and light contrasts. I  have opened the layer in a new document, converted to gray scale, enhanced contrast and saved as a PSD. I am trying to put some wrinkles on the skin and want for them to take the contours of the skin contrast. I created a layer with the prospective wrinkles (not very good yet. That is a work in progress). When I apply the displacement map, all that happens is the entire wrinkle layer is shifted by the designated number of pixels in one direction. There is no change of the pattern withing the layer. I hope that this makes sense and someone can tell me the likely simple solution to this.

I have attached the PSD displacement map, the face that I am trying to put the wrinkles on, the face with the wrinkles pre and post dispacement and the steps of the displacement process. You will see in the post displacement that the entire darker portion, the wrinkles, has been shifted inside the highlights, but there is no distortion in the actual wrinkles. I had to do the wrinkles and the highlights seperately as one is a linear dodge layer and the other a linear burn layer. It works out well, because it clearly illustrates my issue.

If anyone can make heads or tails of this, I will be eternally grateful.

This topic has been closed for replies.
Correct answer Trevor.Dennis

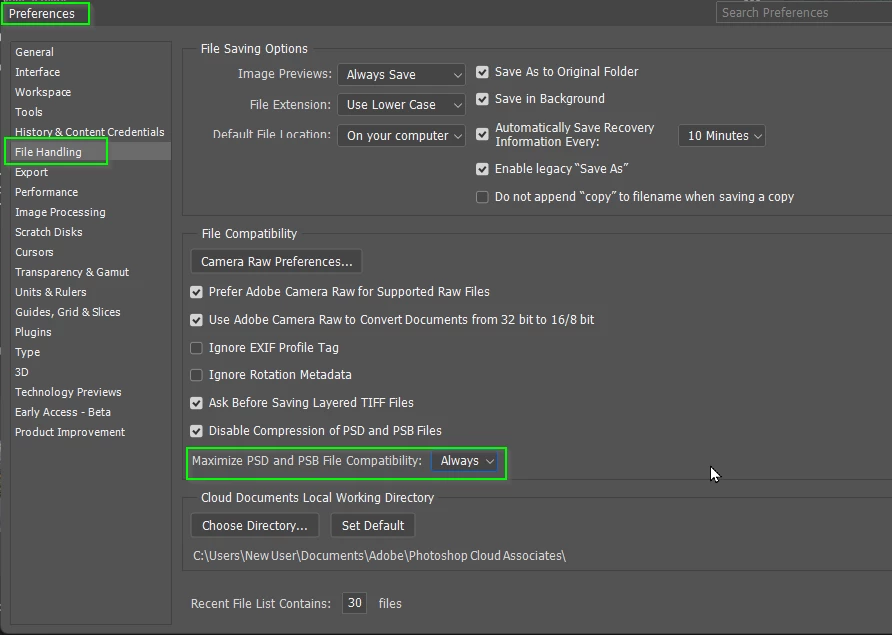
First thing to check is Preferences > File Handling Maximise File Compatability, which must be set to always for Displacement Maps to work.  I was stuck for a full day over that little hidden gotcha some years back.

We have a few threads on using them

https://community.adobe.com/t5/photoshop-ecosystem-discussions/displacement-map-doesn-t-do-anything/m-p/9888372

https://community.adobe.com/t5/photoshop-ecosystem-discussions/problem-with-displacement-maps/td-p/10253688


When you get it working, place two copies of the map layer above the displaced image layer. Set one to Muliply and the other to Screen.  Adjust opacity for best effect.  The place an S shaped Curves layer above to increase contrast.   The example below is pure illustration, as in 100% Photoshop — projects like these are a lot of fun, and a good way to increase your Photoshop skills.  Lets us know how you get on, and maybe show us some examples.


Good luck.

2 replies

Zesty_wanderlust15A7
Known Participant
June 7, 2023

I'm surprised it still exists. I thought they were going to drop that functionality?

Trevor.Dennis
Community Expert
Community Expert
June 7, 2023

It's funny you say that because I was not 100% sure I was going to find it when making the screen shot.

Trevor.Dennis
Community Expert
Trevor.DennisCommunity ExpertCorrect answer
Community Expert
June 7, 2023

First thing to check is Preferences > File Handling Maximise File Compatability, which must be set to always for Displacement Maps to work.  I was stuck for a full day over that little hidden gotcha some years back.

We have a few threads on using them

https://community.adobe.com/t5/photoshop-ecosystem-discussions/displacement-map-doesn-t-do-anything/m-p/9888372

https://community.adobe.com/t5/photoshop-ecosystem-discussions/problem-with-displacement-maps/td-p/10253688


When you get it working, place two copies of the map layer above the displaced image layer. Set one to Muliply and the other to Screen.  Adjust opacity for best effect.  The place an S shaped Curves layer above to increase contrast.   The example below is pure illustration, as in 100% Photoshop — projects like these are a lot of fun, and a good way to increase your Photoshop skills.  Lets us know how you get on, and maybe show us some examples.


Good luck.

Friend of Mutts
Participant
June 7, 2023

Thank you so much. It is warping the layer. It still shifts the entire layer somewhat, but I'm guessing that is a function of the fact that the contrasts and displacements are small in this example. Crazy that this one preference is integral to making such a common and necessary filter function correctly. As to your suggestion on placing multiple layers of the map layer above the displace layer, I will keep that in mind. This project currently has about 30+ layers functioning. I will make sure to optimize the look of the displacement, per your advice, when the rest of the image is settled.

c.pfaffenbichler
Community Expert
Community Expert
June 7, 2023
quote

It is warping the layer. It still shifts the entire layer somewhat, 

What else would you expect with a Displacement Map with an average of 86? (Edit: 50% gray translates to no offset, so if the desired effect is »small random local displacements in both/all four directions« the average of the Displacement Map should be 50% gray.)

And which also has identical R- and G-Channels?