• Global community
    • Language:
      • Deutsch
      • English
      • Español
      • Français
      • Português
  • 日本語コミュニティ
    Dedicated community for Japanese speakers
  • 한국 커뮤니티
    Dedicated community for Korean speakers
Exit
0

How can I have panels and menus appear with each new photo I open ?

Explorer ,
Apr 29, 2021 Apr 29, 2021

Copy link to clipboard

Copied

Hello everyone !

I have the latest version of Photoshop and each time I open a new picture, it appears in a single frame without all the menus and panels attached to it.

If I want to access the panels and menus, I need to look for them in the background where they were attached to the first picture I opened. 

In the attached picture, you can see the new picture in the foreground and the panels and menus in the background, with the previous picture.
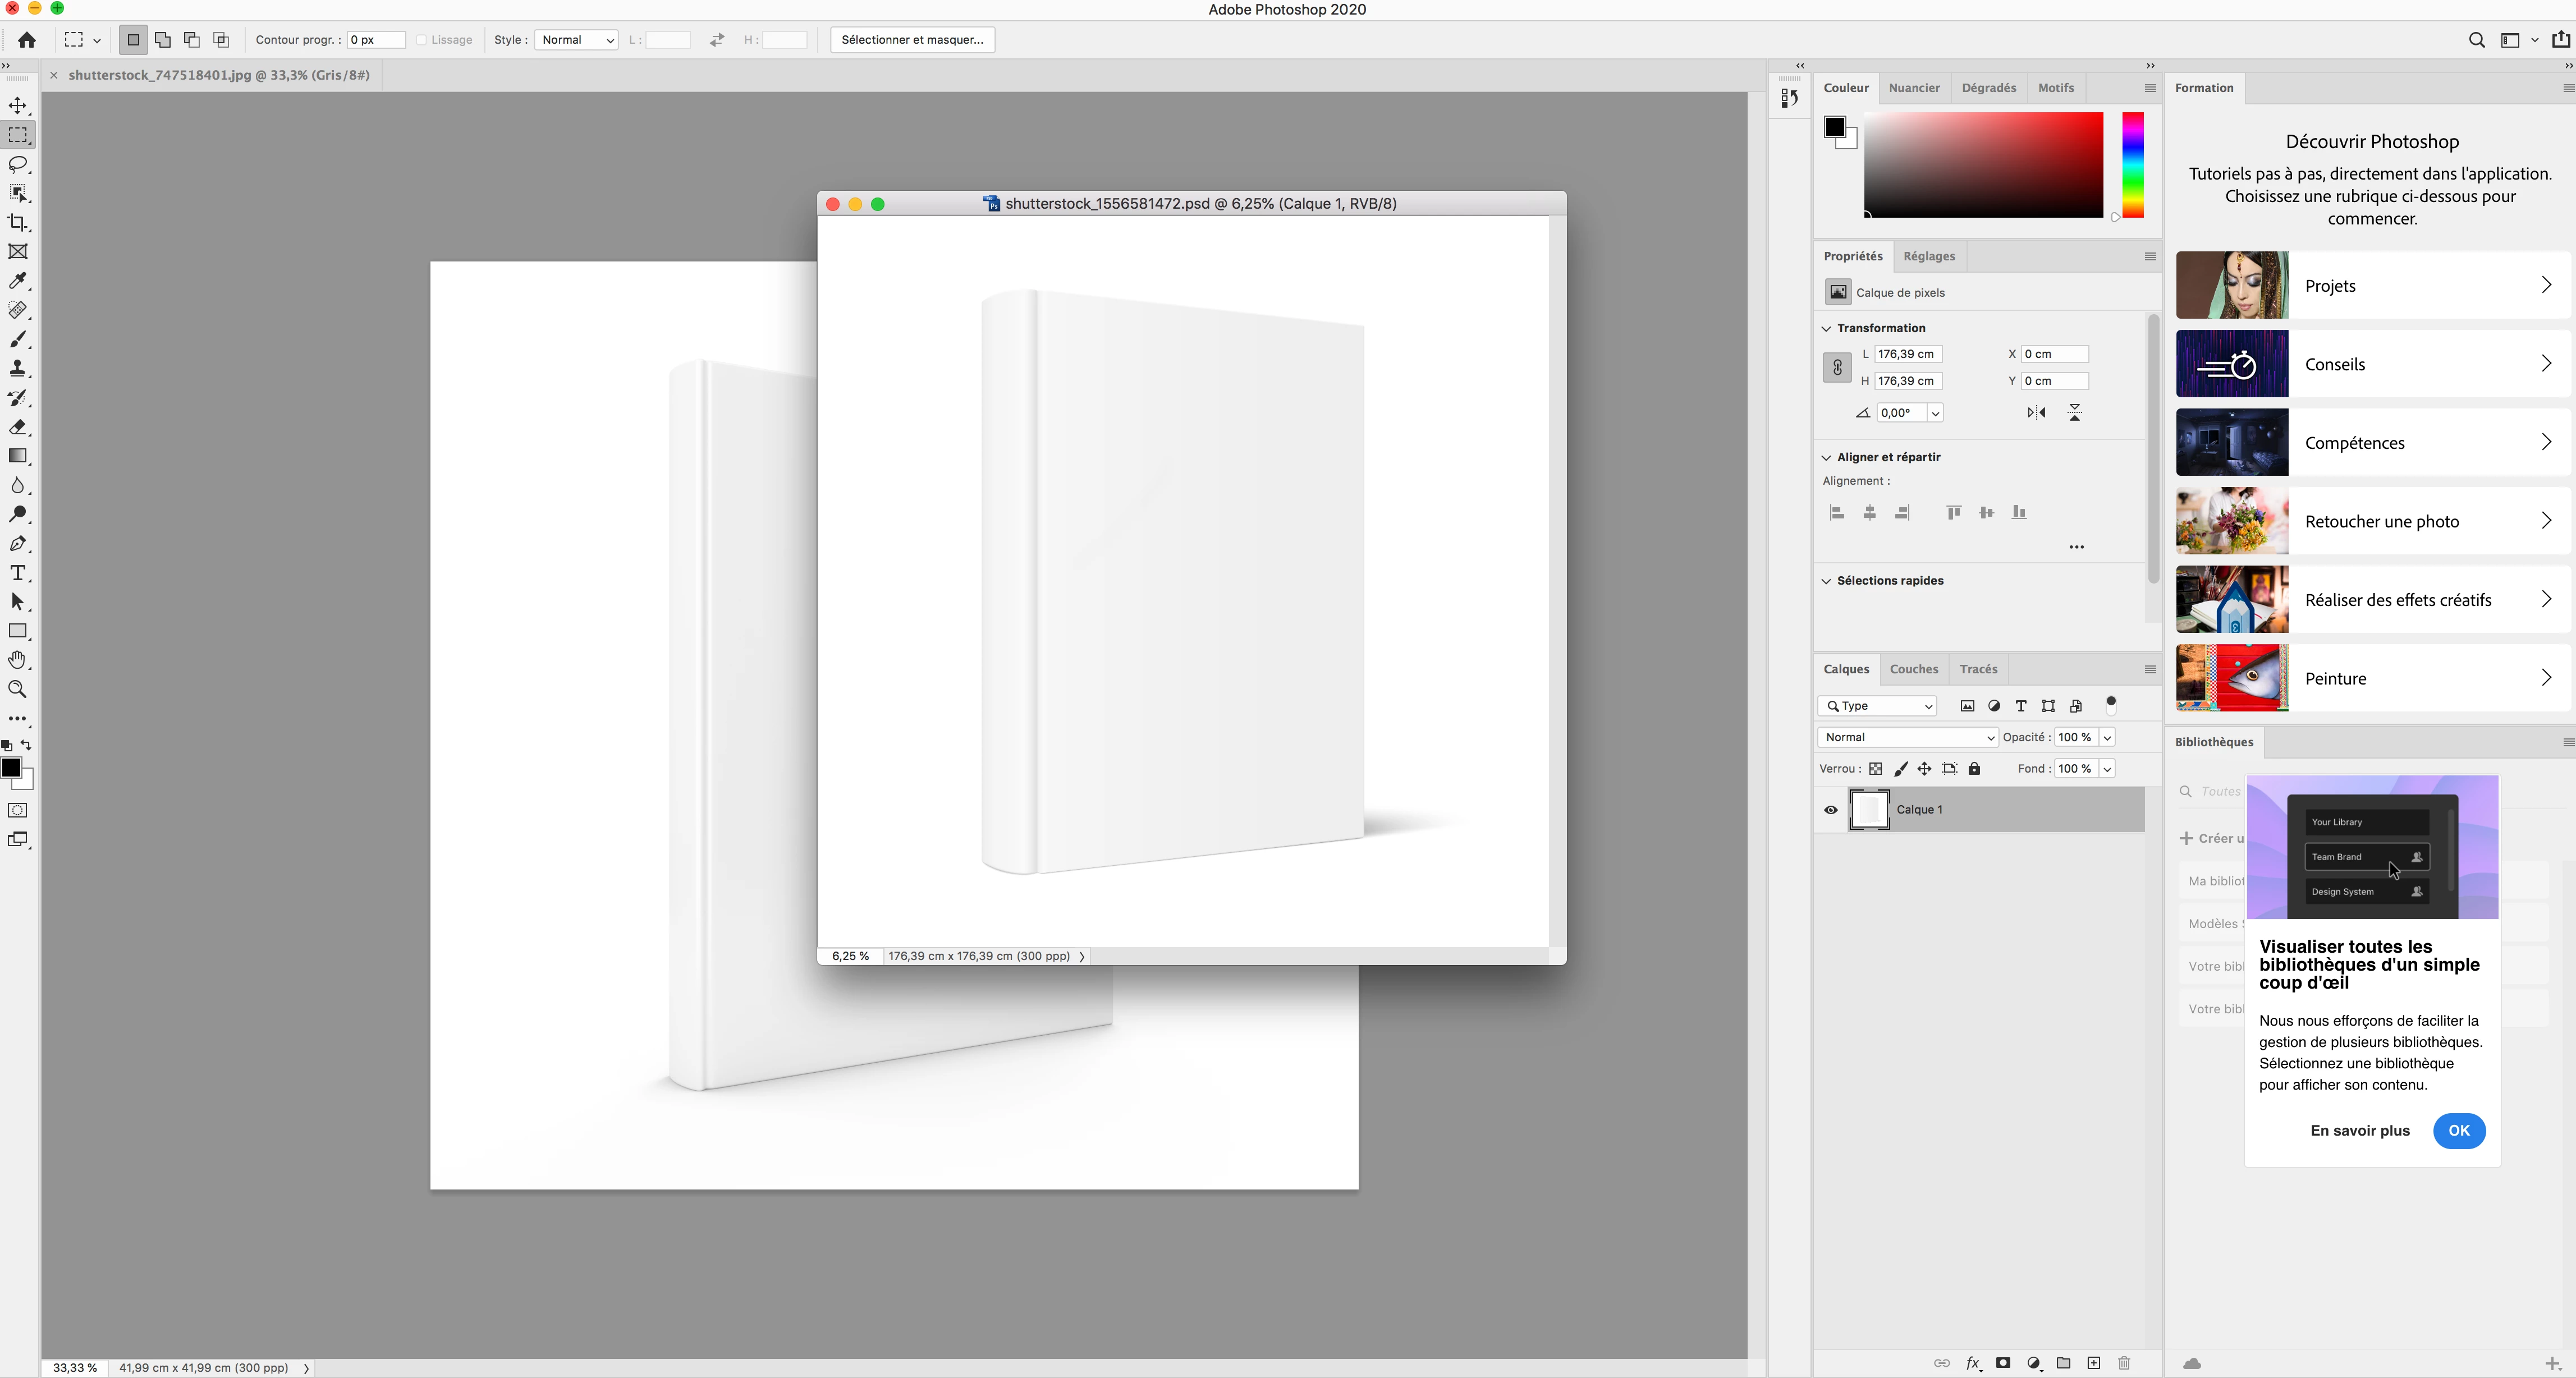
Capture d’écran 2021-04-29 à 10.28.16.png

It used to be that with each new picture, panels and menus would appear right away attached to the new picture. 

Is there a way to change the settings so that I can switch between pictures and have the panels appear in the foreground automatically ?

Thank you very much for your assistance.


Views

720

Translate

Translate

Report

Report
Community guidelines
Be kind and respectful, give credit to the original source of content, and search for duplicates before posting. Learn more
community guidelines

correct answers 1 Correct answer

Community Expert , Apr 29, 2021 Apr 29, 2021

I don’t know what exactly you mean. 

Have you tried Window > Application Frame? 

Votes

Translate

Translate
Adobe
Community Expert ,
Apr 29, 2021 Apr 29, 2021

Copy link to clipboard

Copied

What happens when you change the Screen Mode (F)? 

What are the Ohotoshop > Preferences > Workspace settings? 

Window > Application Frame? 

Votes

Translate

Translate

Report

Report
Community guidelines
Be kind and respectful, give credit to the original source of content, and search for duplicates before posting. Learn more
community guidelines
Explorer ,
Apr 29, 2021 Apr 29, 2021

Copy link to clipboard

Copied

Thank you for answering.

My settings are in French, but here they are.

Capture d’écran 2021-04-29 à 11.53.08.png

I don't see an option in the list that lets me have each new file attached to the panels and menus like it used to be. Unless I'm not understanding what the choices mean ?

The trouble with the current setting is that I can't access the panels for a new file unless I click on the background window that is attached to the first picture I opened. It's really slowing me down !

Thanks for your help.

Votes

Translate

Translate

Report

Report
Community guidelines
Be kind and respectful, give credit to the original source of content, and search for duplicates before posting. Learn more
community guidelines
Community Expert ,
Apr 29, 2021 Apr 29, 2021

Copy link to clipboard

Copied

What about the third from the top (in english »Open Documents as Tabs«)? Screenshot 2021-04-29 at 12.13.35.png

Votes

Translate

Translate

Report

Report
Community guidelines
Be kind and respectful, give credit to the original source of content, and search for duplicates before posting. Learn more
community guidelines
Explorer ,
Apr 29, 2021 Apr 29, 2021

Copy link to clipboard

Copied

I had tried that and it open the new picture in a tab. It works as far as having the panels and penus attached to the picture, but you can't have several pictures on your screen at the same time.

In Photoshop, I used to have several pictures on my screen and I'd go from one to the other and have all the panels come up when I'd click on each picture. So I'd be able to look at a picture while working on another.

Working with tabs doesn't do it for me as I need to be able to look at one picture while working on another, and switch quickly between them.

Is that still possible with the new version ?

Thanks.

Votes

Translate

Translate

Report

Report
Community guidelines
Be kind and respectful, give credit to the original source of content, and search for duplicates before posting. Learn more
community guidelines
Community Expert ,
Apr 29, 2021 Apr 29, 2021

Copy link to clipboard

Copied

I don’t know what exactly you mean. 

Have you tried Window > Application Frame? 

Votes

Translate

Translate

Report

Report
Community guidelines
Be kind and respectful, give credit to the original source of content, and search for duplicates before posting. Learn more
community guidelines
Explorer ,
Nov 26, 2021 Nov 26, 2021

Copy link to clipboard

Copied

LATEST

That's what it was, thank you very much !

Votes

Translate

Translate

Report

Report
Community guidelines
Be kind and respectful, give credit to the original source of content, and search for duplicates before posting. Learn more
community guidelines
Community Expert ,
Apr 29, 2021 Apr 29, 2021

Copy link to clipboard

Copied

Window > Arrange > Tile.

Or you can use Till All Verticially - or horizontally.  I use the former with just two documents open sometimes.

image.png

You cxan also have two windows open for the same document. This lets you view the same document at different zoom ratios.  The second window does not update in real time, but it does update at the end of a brush stroke, for instance.  It's a useful tool for illustration.  Any of the Arrange options might fit your specific requirements.

image.png

You might also find View > Flip horizontal useful (that's another favourite tool for illustrators.

Votes

Translate

Translate

Report

Report
Community guidelines
Be kind and respectful, give credit to the original source of content, and search for duplicates before posting. Learn more
community guidelines
Explorer ,
Apr 29, 2021 Apr 29, 2021

Copy link to clipboard

Copied

Thanks a lot for your answer.

Your suggestion with the tile option was very helpful. That helped me find a way to have roughly what I was looking for.

I noticed that the tool bar is "floating" with the tile option, and that's what I was looking.

So then I went back to having floating pictures, and I tried to detach the panels from the frame, to have them float like the tool bar, and it worked. So now I can have several pictures open on screen and have the floating panels on the side, and everytime I click on a picture, the panels are automatically linked to that picture and since I placed them on the side of the screen, I can access them easily and I don't have to dig for the background Photoshop screen to access the panels.

See on the attached pic, I can go back and forth on each picture and the panels will remain accessible easilly.

Capture d’écran 2021-04-29 à 15.00.25.png

So that will work for me.

Thank you very much for your help.

Votes

Translate

Translate

Report

Report
Community guidelines
Be kind and respectful, give credit to the original source of content, and search for duplicates before posting. Learn more
community guidelines
Community Expert ,
Apr 29, 2021 Apr 29, 2021

Copy link to clipboard

Copied

Are you aware how easy it is to make a custom workspace, and that you can record custom shortcuts and toolbar with a workspace?  To make this super convenient, I have a couple of actions that set particular workspace and then reset that workspace (takes it back to its recorded state). 


The magic happens by triggering these actions with a single function key. Appart from F1 any of the Function keys can be repurposed, and they are far to useful to waste on their defaults.  This is particularly useful when you are forever rearranging panels to take screen shots for forum posts  but it is also useful for putting this straight in a situation like yours where you have moved multiple panels into random positions.

image.png

It looks like you have plenty of screen space, so you could maybe use some of that by expanding your toolbar.  This is the tool bar I use with my main workspace.  I also turn off using the shift key to toggle between tools with the same shortcut.+


image.png


Votes

Translate

Translate

Report

Report
Community guidelines
Be kind and respectful, give credit to the original source of content, and search for duplicates before posting. Learn more
community guidelines