

- Home
- Photoshop ecosystem
- Discussions
- Re: How do I automatically copy the dimensions and...
- Re: How do I automatically copy the dimensions and...

Copy link to clipboard
Copied
I have to do the same manual process everytime and I wanna know if there's a way to make it automatic to release me from my suffering!
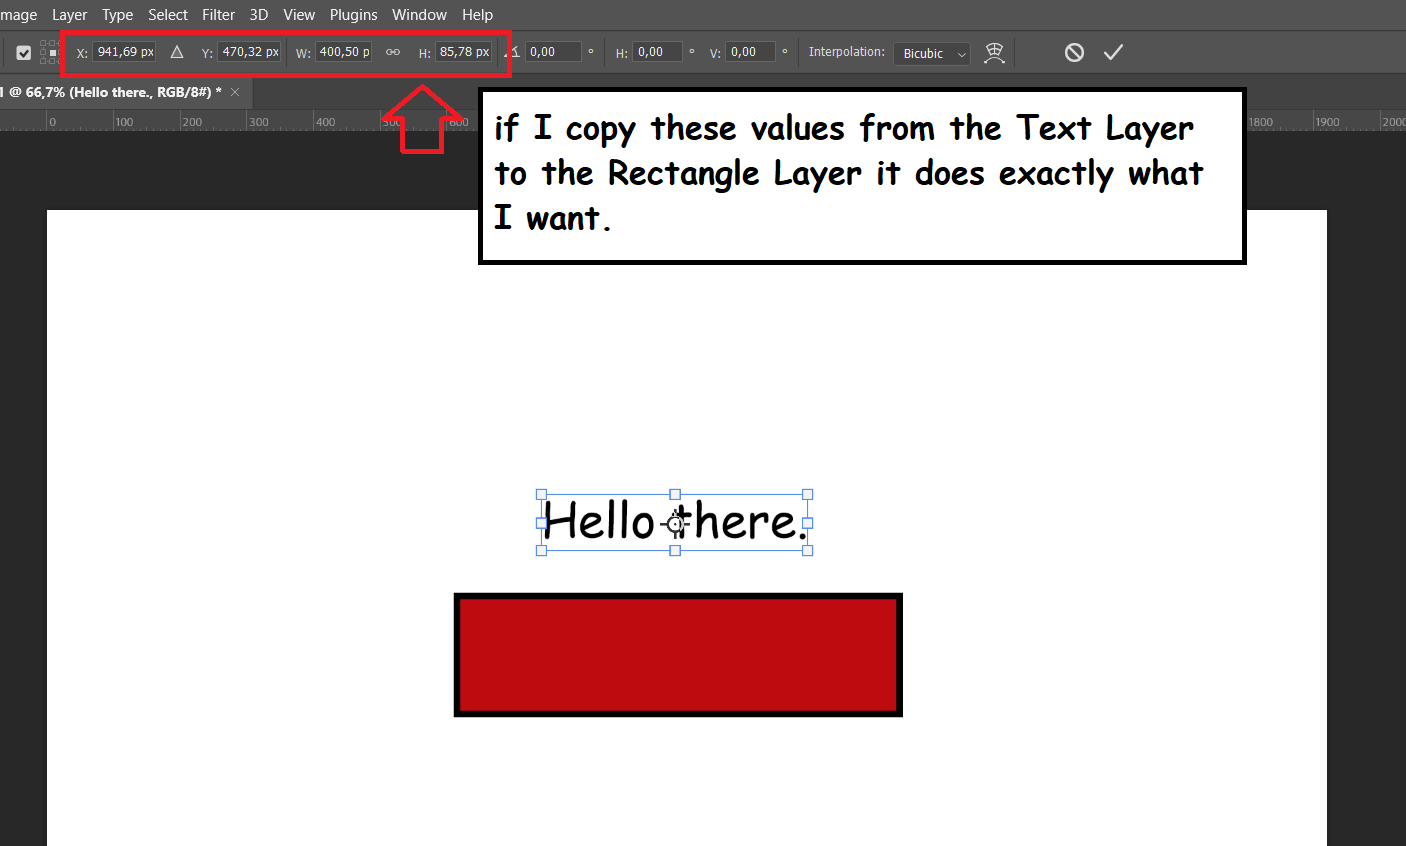
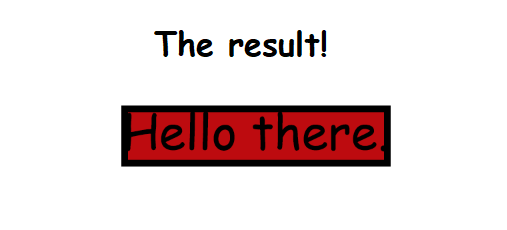
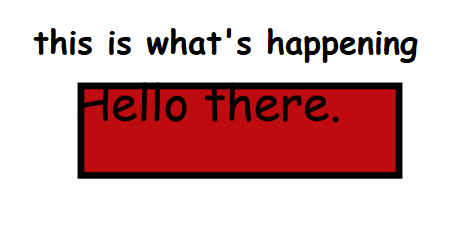
I have a text layer and I wanna make a shape layer have the same dimensions and position in the canvas, normally I do this by manually resizing and positioning the Shape layer, but I realized if press Ctrl + T, I have access to the size of the layer and it's position in the canvas, if I manually copy and paste these values from the Text Layer to the Shape Layer it does what I need, but I waste time doing that, so I wanna know if there's a way to do it automatically, a hidden feature or a script.
The text is always different, so I can't just use the same values everytime. See the images for an example.


 1 Correct answer

I will likely modify/update the following two scripts, however for now I hope that they serve.
EDIT – 7th August 2022, Scripts updated to 1.3 version:
Step 1 of 2:
/*
Resize Layer from Source - Script 1 of 2.jsx
Stephen Marsh, v1.3 - 7th August 2022
https://community.adobe.com/t5/photoshop-ecosystem-discussions/how-do-i-automatically-copy-the-dimensions-and-position-of-one-layer-to-another/td-p/13117557
NOTES:
Run this script on the source layer to copy the layer bounds info to the desktopExplore related tutorials & articles
 26
Replies
26
26
Replies
26
Copy link to clipboard
Copied
@HeyoThere – I have modified an existing script that I wrote for a similar purpose for you.
You first need to run the script on the source layer to capture the dimensions/position. Next, you must select the target layer that you wish to resize to the captured source dimension/position and run a script.
This script relies on you manually selecting the source and target layers each time.
However, if your text shape target layer was *always* directly above the source layer, or at the very top of the layer stack or always had the same name – then, in that case, this could be automated into a single-step script as the target layer would be known and would not require manual selection.
So, can this be simplified into a single step?
Copy link to clipboard
Copied
Thank you for responding me, what you described was exactly what I was imagining, selecting the Text layer and running a script to get it's values and then selecting the Shape layer and copying the values. So, there's no need to simplify it into a single step.
I'm very new to scripting (I literally started today!) so I may have done something wrong. I went in the link you mentioned and got the 2 scripts that you wrote, I pasted them into notepad+ and saved them as 2 separate *.jsx files, then I just recorded and action with each script and it seem like the scripts are running.
But I'm having 2 problems with the scripts, the first is that it doesn't seem to copy the position of the Text Layer in the canvas and the second is that apparently it rasterizes the Shape Layer.
Maybe you already fixed these problems and you just didn't send the new script yet, but I'm saying it just in case.
Copy link to clipboard
Copied
@HeyoThere wrote:
Maybe you already fixed these problems and you just didn't send the new script yet, but I'm saying it just in case.
That is right, the link was just a reference, I had not yet posted the updated code. I'll do that in a new post.
Yes, the original topic didn't require the layer to be vector, so I used rasterize. There is another option, change:
app.runMenuItem(stringIDToTypeID('rasterizePlaced'));
To:
app.runMenuItem(stringIDToTypeID('placedLayerConvertToLayers'));
You have the option of using two separate scripts – or a single script that uses a keyboard modifier such as the option or shift key to run the second part. If you are going to use an action, then two separate scripts may be better.
Copy link to clipboard
Copied
Ok, thank you very much!
Copy link to clipboard
Copied
That command may be less compatible as it doesn't exist in "older" versions... Anyway, converting to a smart object was just a "hack" that I used to resize to specific pixel values to avoid working in % values.
Copy link to clipboard
Copied
Also, another thing just came to me that I forgot to mention, sometimes I need to add specific value in the Width and Height of the Shape Layer, it's usually 100 pixels, how would I add this line in the script?
Copy link to clipboard
Copied
@HeyoThere wrote:
Also, another thing just came to me that I forgot to mention, sometimes I need to add specific value in the Width and Height of the Shape Layer, it's usually 100 pixels, how would I add this line in the script?
So, rather than using the source layer, you just want a separate script to resize a vector shape layer to a new width, height or width and height? Or do you want this option in the same script?
Copy link to clipboard
Copied
If possible I would like it to be on the same script, I don't know exactly how you would write it, but pretty much I wanna add a +100px in the copyed Width (the horizontal scale) value (from the Text Layer) and a +100px in the copyed Height (the vertical scale) value as well, but I would like to know what line is it, just in case I ever need to change this +100px to some other value
Copy link to clipboard
Copied
Do you want the 100px value hard-coded into the script, or have a dialog pop up asking you to add 0, or 100 or some other pixel value? Could a single value be used for both width and height, or would independent control be better?
Copy link to clipboard
Copied
I was thinking, if the number is easily changeable in the script I would prefer to make the changes there if I ever need. So, yes, I want it hard-coded in the script and no dialog pop up, also the same value could be used for both width and height.
Copy link to clipboard
Copied
I have updated both scripts to version 1.1
The second script uses the following at the top of the script so that you can change it where needed:
// Extra padding value in px: 0 or 100 etc.
var pxPadding = 100;
Copy link to clipboard
Copied
@Stephen Marsh I used the new script, it's adding the 100px in the shape as I wanted, but it seems to make the shape not be aligned to the text layer as it was before, would it be possible to add the 100 px but maintaining the position in the canvas? Maintaining the Shape Layer center aligned to the Text Layer as it was doing before by copying the position in the canvas
Copy link to clipboard
Copied
Copy link to clipboard
Copied
@HeyoThere – Be careful what you ask for, it may be given!
The layer is positioned at the top left, so the added 100px padding is naturally making the right and bottom larger. This was not evident before, as the text was the same size.
Now that you have specified that the resized layer should be centred, I have added the extra code into an updated 1.2 version to centre the image, taking into account the variable padding value.
Copy link to clipboard
Copied
@Stephen Marsh Thank you so much, this code seems to be what I was looking for, also, I'm sorry for nagging you so much, weirdly enough, for whatever reason the Text Layer doesn't seem to be exactly centered inside the Shape layer even now, and I thought this would be impossible because it was using the original position in the canvas from the image, so I end up having to manually Align the layer. The variation seems to depend on how big the image is.
Copy link to clipboard
Copied
I think I found the issue, it seemed like the outline that I added in the Shape was somehow messing a bit with the centering, I have no idea why. Removing it fixes the problem.
Copy link to clipboard
Copied
Mathematically centred, or optically centred?
Keep in mind that text has x-height, ascenders, descenders etc.
The script works on maths, not visuals.
This GIF animation shows that the text shape layer is 100px larger than the rectangle, and when the selection from the rectangle is expanded 50px the text is mathematically centred:

Copy link to clipboard
Copied
It was only bugging because I had an outline in the shape, but adding the outline as a Layer Style seems to work perfectly, so the code is working fine for me now, Thank you very much!
Copy link to clipboard
Copied
I will likely modify/update the following two scripts, however for now I hope that they serve.
EDIT – 7th August 2022, Scripts updated to 1.3 version:
Step 1 of 2:
/*
Resize Layer from Source - Script 1 of 2.jsx
Stephen Marsh, v1.3 - 7th August 2022
https://community.adobe.com/t5/photoshop-ecosystem-discussions/how-do-i-automatically-copy-the-dimensions-and-position-of-one-layer-to-another/td-p/13117557
NOTES:
Run this script on the source layer to copy the layer bounds info to the desktop preference file
*/

#target photoshop

// Store the original ruler units and set to px
var savedRuler = app.preferences.rulerUnits;
app.preferences.rulerUnits = Units.PIXELS;

// Set the layer dimension variables
var layerWidth = (activeDocument.activeLayer.bounds[2] - activeDocument.activeLayer.bounds[0]);
var layerHeight = (activeDocument.activeLayer.bounds[3] - activeDocument.activeLayer.bounds[1]);
var layerLeft = activeDocument.activeLayer.bounds[0];
var layerRight = activeDocument.activeLayer.bounds[2];
var layerTop = activeDocument.activeLayer.bounds[1];
var layerBottom = activeDocument.activeLayer.bounds[3];

// Log text file platform specific LF options
var os = $.os.toLowerCase().indexOf("mac") >= 0 ? "mac" : "windows";
if (os === "mac") {
    prefFileOutLF = "Unix"; // Legacy = "Macintosh"
} else {
    prefFileOutLF = "Windows";
}

// Create the preference file
var prefFileOut = new File('~/Desktop/_Resize_Layer_Preference_File.txt');
var dateTime = new Date().toLocaleString();
if (prefFileOut.exists)
    prefFileOut.remove();
    prefFileOut.open("w");
    prefFileOut.encoding = "UTF-8";
    prefFileOut.lineFeed = prefFileOutLF;
    prefFileOut.writeln(dateTime + ", " + "Source Doc: " + activeDocument.name + ", " + "Source Layer: " + activeDocument.activeLayer.name);
    prefFileOut.writeln(layerWidth.value);
    prefFileOut.writeln(layerHeight.value);
    prefFileOut.writeln(layerLeft.value);
    prefFileOut.writeln(layerRight.value);
    prefFileOut.writeln(layerTop.value);
    prefFileOut.writeln(layerBottom.value);
    prefFileOut.close();

// Restore the original ruler units
app.preferences.rulerUnits = savedRuler;

// End of script
alert("Source layer coordinates copied!");
Step 2 of 2:
/*
Resize Layer from Source - Script 2 of 2.jsx
Stephen Marsh, v1.3 - 7th August 2022
https://community.adobe.com/t5/photoshop-ecosystem-discussions/how-do-i-automatically-copy-the-dimensions-and-position-of-one-layer-to-another/td-p/13117557
NOTES:
Run this script on multiple target layers to resize using the source layer size from the desktop preference file
*/

#target photoshop

function main() {

    // Extra padding value in px: 0 or 100 etc.
    var pxPadding = 0;

    var prefFileIn = File('~/Desktop/_Resize_Layer_Preference_File.txt');

    // Store the original ruler units and set to px
    var savedRuler = app.preferences.rulerUnits;
    app.preferences.rulerUnits = Units.PIXELS;

    if (File(prefFileIn).exists && File(prefFileIn).length > 0) {
        try {
            // Read the preference file from the user's desktop
            prefFileIn.open('r');
            // Read the 1st line from the log file, a means to an end...
            var logInfo = prefFileIn.readln(1);
            // Read the remaining values and convert the string to a number/integer
            var prefFileWidthValue = Math.floor(prefFileIn.readln(2));
            var prefFileHeightValue = Math.floor(prefFileIn.readln(3));
            var prefFileLeftValue = Math.floor(prefFileIn.readln(4));
            var prefFileRightValue = Math.floor(prefFileIn.readln(5));
            var prefFileTopValue = Math.floor(prefFileIn.readln(6));
            var prefFileBottomValue = Math.floor(prefFileIn.readln(7));
            prefFileIn.close();
        } catch (error) {
            alert("An unexpected error occurred when reading the preference file!")
        }

        processSelectedLayers();

        // End of script
        app.refresh();
        prefFileIn.remove();
        app.beep();
        //alert("Script completed!");

        // Restore the original ruler units
        app.preferences.rulerUnits = savedRuler;


        // Functions

        function processSelectedLayers() {
            var s2t = stringIDToTypeID;
            (r = new ActionReference).putProperty(s2t('property'), p = s2t('targetLayersIDs'));
            r.putEnumerated(s2t('document'), s2t('ordinal'), s2t('targetEnum'));
            var lrs = executeActionGet(r).getList(p),
                sel = new ActionReference();

            for (var i = 0; i < lrs.count; i++) {
                sel.putIdentifier(s2t('layer'), p = lrs.getReference(i).getIdentifier(s2t('layerID')));
                (r = new ActionReference).putIdentifier(s2t('layer'), p);
                (d = new ActionDescriptor()).putReference(s2t("target"), r);
                executeAction(s2t('select'), d, DialogModes.NO);

                // Call the resize layer function
                resizeLayerFromPrefFile();
            }
        }

        function resizeLayerFromPrefFile() {

            // Convert the selected layer to an embedded Smart Object
            // A hack to work in px rather than converting to % for use with .resize()
            executeAction(stringIDToTypeID("newPlacedLayer"), undefined, DialogModes.NO);
            // Edit the smart object
            app.runMenuItem(stringIDToTypeID('placedLayerEditContents'));
            // Resize the smart object using px
            activeDocument.resizeImage(prefFileWidthValue + pxPadding, prefFileHeightValue + pxPadding, activeDocument.resolution, ResampleMethod.BICUBIC);
            // Close saving changes
            activeDocument.close(SaveOptions.SAVECHANGES);
            // Convert the smart object back to a layer (doesn't work in older versions)
            app.runMenuItem(stringIDToTypeID('placedLayerConvertToLayers'));
            // Remove the layer group
            removeGroup(false);

            // Align
            align2SelectAll('AdLf');
            align2SelectAll('AdTp');
            // Reposition the resized layer
            app.activeDocument.activeLayer.translate(prefFileLeftValue, prefFileTopValue);
            // Adjust the position after padding
            if (pxPadding > 0) {
                var positionValue = pxPadding / 2;
                activeDocument.activeLayer.translate(-positionValue, -positionValue);
            }
        }

        function align2SelectAll(method) {
            /*
            AdLf = Align Left
            AdRg = Align Right
            AdCH = Align Centre Horizontal
            AdTp = Align Top
            AdBt = Align Bottom
            AdCV = Align Centre Vertical
            */
            app.activeDocument.selection.selectAll();
            var desc = new ActionDescriptor();
            var ref = new ActionReference();
            ref.putEnumerated(charIDToTypeID("Lyr "), charIDToTypeID("Ordn"), charIDToTypeID("Trgt"));
            desc.putReference(charIDToTypeID("null"), ref);
            desc.putEnumerated(charIDToTypeID("Usng"), charIDToTypeID("ADSt"), charIDToTypeID(method));
            try {
                executeAction(charIDToTypeID("Algn"), desc, DialogModes.NO);
            } catch (e) {}
            app.activeDocument.selection.deselect();
        }

        function removeGroup(deleteContained) {
            try {
                var s2t = function (s) {
                    return app.stringIDToTypeID(s);
                };
                var descriptor = new ActionDescriptor();
                var reference = new ActionReference();
                reference.putEnumerated(s2t("layer"), s2t("ordinal"), s2t("targetEnum"));
                descriptor.putReference(s2t("null"), reference);
                descriptor.putBoolean(s2t("deleteContained"), deleteContained);
                executeAction(s2t("delete"), descriptor, DialogModes.NO);
            } catch (e) {}
        }

    } else {
        app.beep();
        alert('There is no valid file named "_Resize_Layer_Preference_File.txt" on the desktop!');
    }
}

activeDocument.suspendHistory("Resize selected layers script", "main()");
Copy link to clipboard
Copied
This code saved a lot of time for my life, I won't suffer anymore, thank you!!!
Copy link to clipboard
Copied
You are welcome!
Copy link to clipboard
Copied
@HeyoThere – I have updated the previous script to remove the temporary layer group created by Photoshop when converting the smart object back to layers.
I have written a few "two-part" scripts which require variables to be written to a preference file to provide permanence (as after the first script is run the variables cease to exist and are no longer available to the second script).
For a while now I have wanted to explore using a Photoshop "Environment Variable" to store the temporary variables from the first script run, without having to write them to a text file. Here it is!
Step 1 of 2:
/*
Resize Layer from Source - Script 1 of 2.jsx
Stephen Marsh, v2.0 - 7th August 2022
https://community.adobe.com/t5/photoshop-ecosystem-discussions/how-do-i-automatically-copy-the-dimensions-and-position-of-one-layer-to-another/td-p/13117557
NOTES:
Run this script on the source layer to copy the layer bounds info to the current Photoshop session environment variable
*/

#target photoshop

// Store the original ruler units and set to px
var savedRuler = app.preferences.rulerUnits;
app.preferences.rulerUnits = Units.PIXELS;

// Set the layer dimension variables
var layerWidth = (activeDocument.activeLayer.bounds[2] - activeDocument.activeLayer.bounds[0]);
var layerHeight = (activeDocument.activeLayer.bounds[3] - activeDocument.activeLayer.bounds[1]);
var layerLeft = activeDocument.activeLayer.bounds[0];
var layerRight = activeDocument.activeLayer.bounds[2];
var layerTop = activeDocument.activeLayer.bounds[1];
var layerBottom = activeDocument.activeLayer.bounds[3];

// Create the "Environment Variables"
$.setenv(resizeLayer1 = layerWidth.value);
$.setenv(resizeLayer2 = layerHeight.value);
$.setenv(resizeLayer3 = layerLeft.value);
$.setenv(resizeLayer4 = layerRight.value);
$.setenv(resizeLayer5 = layerTop.value);
$.setenv(resizeLayer6 = layerBottom.value);

// Restore the original ruler units
app.preferences.rulerUnits = savedRuler;

// End of script
alert("Source layer coordinates copied!");
Step 2 of 2:
/*
Resize Layer from Source - Script 2 of 2.jsx
Stephen Marsh, v2.0 - 7th August 2022
https://community.adobe.com/t5/photoshop-ecosystem-discussions/how-do-i-automatically-copy-the-dimensions-and-position-of-one-layer-to-another/td-p/13117557
NOTES:
Run this script on multiple target layers to resize using the source layer size from the current Photoshop session environment variable
*/

#target photoshop

function main() {

    // Extra padding value in px: 0 or 100 etc.
    var pxPadding = 0;

    // Store the original ruler units and set to px
    var savedRuler = app.preferences.rulerUnits;
    app.preferences.rulerUnits = Units.PIXELS;

    // Convert the string to a number/integer
    var prefFileWidthValue = Math.floor(resizeLayer1);
    var prefFileHeightValue = Math.floor(resizeLayer2);
    var prefFileLeftValue = Math.floor(resizeLayer3);
    var prefFileRightValue = Math.floor(resizeLayer4);
    var prefFileTopValue = Math.floor(resizeLayer5);
    var prefFileBottomValue = Math.floor(resizeLayer6);

    processSelectedLayers();

    // Restore the original ruler units
    app.preferences.rulerUnits = savedRuler;

    // End of script
    app.refresh();
    app.beep();
    //alert("Script completed!");


    // Functions

    function processSelectedLayers() {
        var s2t = stringIDToTypeID;
        (r = new ActionReference).putProperty(s2t('property'), p = s2t('targetLayersIDs'));
        r.putEnumerated(s2t('document'), s2t('ordinal'), s2t('targetEnum'));
        var lrs = executeActionGet(r).getList(p),
            sel = new ActionReference();

        for (var i = 0; i < lrs.count; i++) {
            sel.putIdentifier(s2t('layer'), p = lrs.getReference(i).getIdentifier(s2t('layerID')));
            (r = new ActionReference).putIdentifier(s2t('layer'), p);
            (d = new ActionDescriptor()).putReference(s2t("target"), r);
            executeAction(s2t('select'), d, DialogModes.NO);

            // Call the resize layer function
            resizeLayerFromPrefFile();
        }
    }

    function resizeLayerFromPrefFile() {

        // Convert the selected layer to an embedded Smart Object
        // A hack to work in px rather than converting to % for use with .resize()
        executeAction(stringIDToTypeID("newPlacedLayer"), undefined, DialogModes.NO);
        // Edit the smart object
        app.runMenuItem(stringIDToTypeID('placedLayerEditContents'));
        // Resize the smart object using px
        activeDocument.resizeImage(prefFileWidthValue + pxPadding, prefFileHeightValue + pxPadding, activeDocument.resolution, ResampleMethod.BICUBIC);
        // Close saving changes
        activeDocument.close(SaveOptions.SAVECHANGES);
        // Convert the smart object back to a layer (doesn't work in older versions)
        app.runMenuItem(stringIDToTypeID('placedLayerConvertToLayers'));
        // Remove the parent group
        removeGroup(false);
        // Align
        align2SelectAll('AdLf');
        align2SelectAll('AdTp');
        // Reposition the resized layer
        app.activeDocument.activeLayer.translate(prefFileLeftValue, prefFileTopValue);
        // Adjust the position after padding
        if (pxPadding > 0) {
            var positionValue = pxPadding / 2;
            activeDocument.activeLayer.translate(-positionValue, -positionValue);
        }
    }

    function align2SelectAll(method) {
        /*
        AdLf = Align Left
        AdRg = Align Right
        AdCH = Align Centre Horizontal
        AdTp = Align Top
        AdBt = Align Bottom
        AdCV = Align Centre Vertical
        */
        app.activeDocument.selection.selectAll();
        var desc = new ActionDescriptor();
        var ref = new ActionReference();
        ref.putEnumerated(charIDToTypeID("Lyr "), charIDToTypeID("Ordn"), charIDToTypeID("Trgt"));
        desc.putReference(charIDToTypeID("null"), ref);
        desc.putEnumerated(charIDToTypeID("Usng"), charIDToTypeID("ADSt"), charIDToTypeID(method));
        try {
            executeAction(charIDToTypeID("Algn"), desc, DialogModes.NO);
        } catch (e) {}
        app.activeDocument.selection.deselect();
    }

    function removeGroup(deleteContained) {
        var s2t = function (s) {
            return app.stringIDToTypeID(s);
        };
        var descriptor = new ActionDescriptor();
        var reference = new ActionReference();
        reference.putEnumerated(s2t("layer"), s2t("ordinal"), s2t("targetEnum"));
        descriptor.putReference(s2t("null"), reference);
        descriptor.putBoolean(s2t("deleteContained"), deleteContained);
        executeAction(s2t("delete"), descriptor, DialogModes.NO);
    }
}

activeDocument.suspendHistory("Resize selected layers script", "main()");

Copy link to clipboard
Copied
app.beep();
> Wow! 🙂 I had been doing Beeps for a while by calling an outside method from within an action. After a while, this gave gave me the worst PC trouble ever (even the BIOS crashed, but repaired itself), so I stopped that and miss it every day.
I'm gonna risk using this one though — thanks!
I feel a beep is very useful at the end of a Save action/script, to be somewhat sure it actually executed and you didn't remain stuck in an active field (more of a problem on a PC, I guess).
Copy link to clipboard
Copied
I find them less intrusive than an alert, sometimes I use one or the other or both as an end of script notification.
-
- 1
- 2

Find more inspiration, events, and resources on the new Adobe Community
Explore Now
 AdChoices