

- Home
- Photoshop ecosystem
- Discussions
- Re: How do I batch watermark a logo onto varying h...
- Re: How do I batch watermark a logo onto varying h...

Copy link to clipboard
Copied
I would like to watermark a logo on a batch folder of photos, but the photos are different heights (but same width). If I use text in Photoshop it's not a problem, but if I use my logo the Action places it in different positions depending on the height of the photo. What I am looking for is a way to have the logo placed in a relative position to the bottom right corner of the photo. Say, 25px from the bottom and 0px from the right. I am unsure of how to achieve this relative placement.


 1 Correct answer

There's a classic Russell Brown tutorial that might help you. It was created for Photoshop CS2, but the technique is applicable to later versions of Photoshop too.
Go to: http://www.russellbrown.com/tips_tech.html , and scroll down till you see this:

Explore related tutorials & articles
 53
Replies
53
53
Replies
53
Copy link to clipboard
Copied
Thanks guys, I have it sorted! 

Copy link to clipboard
Copied
Well done!
Copy link to clipboard
Copied
Hi guys,
another question about watermarking...
I would like to end up with 2 files from each original:
1. watermarked
2. not watermarked, and with an extra letter in the file name to distinguish itself
I need to do a 'save as' before watermarking in the actions. Problem is, if I touch the file name at all while recording, it wants to give ALL consecutive files that very same name, hence different files would keep copying over each other.
Eg. If file no. 1 is called 1234.jpg
and I want a 'save as' to give an unwatermarked version the name of 1234x.jpg,
I record that, but the next file - 1235.jpg
ands up called 1234x.jpg
Hope that makes sense! Am hoping there is a way around it 

Copy link to clipboard
Copied
I think you can do what you want by downloading the Image Processor Pro plug-in script from Russell Browns web site. That Image Processor will let you save as many jpeg images as you want for your images. Each can have a different action run during its creation each can be resized by the image processor each can be saved to a different folder one for water marked ones one for not water matked image. If save to the same folder the image processor would make sure the file name would be unique. If the output folder contained a file name that matched that matched the the input file name the image processor would add a numeric suffix to the file name so water marked and not watermarked images could be saved to the same folder.
Copy link to clipboard
Copied
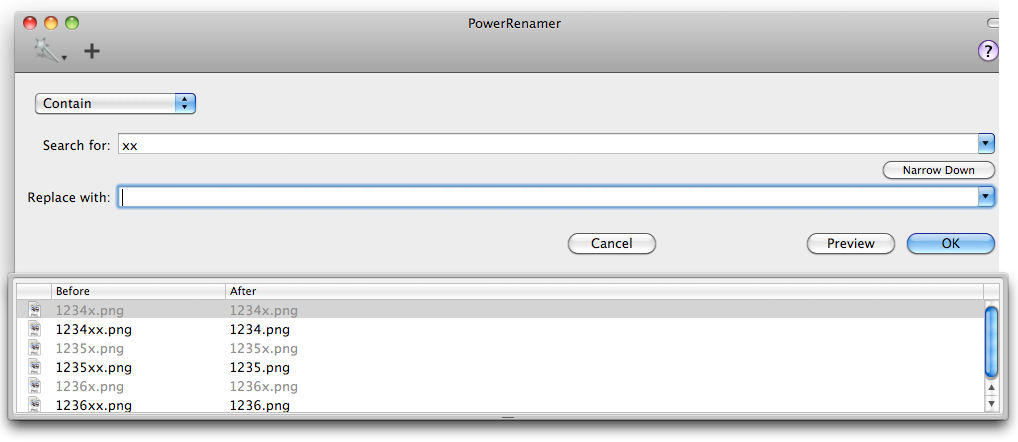
There may be a good solution from Russell Brown's website, but in case there's not, "File > Automate > Batch" can output multiple uniquely named files per invocation of an Action that contains multiple "Save As" steps. See the setup in the image below.
For input files named 1234 and 1235, the output would be:
1234x.jpg | (not watermarked) |
1234xx.jpg | (watermarked) |
1235x.jpg | (not watermarked) |
1235xx.jpg | (watermarked) |
Afterwards, you can batch rename the files to remove "xx" to achieve your stated requirement:
1234x.jpg | (not watermarked) |
1234.jpg | (watermarked) |
1235x.jpg | (not watermarked) |
1235.jpg | (watermarked) |

Copy link to clipboard
Copied
With menu File>Automate>Batch you woul need to run two batch jobs. With Image Processor Pro all you would need to do to use menu File>Automate>Image Processor Pro once and since this script is program as a Photoshop Plug-in you could record that into an Action which would have the dialog setting user recording the action recorded into the Action step bypassing the dialog when the action is played if you will be usung the same input and output folders all the time.
The Pro dialog will look something like this for you can customize|configure it fot your needs.
Copy link to clipboard
Copied
JJMack wrote:
With menu File>Automate>Batch you woul need to run two batch jobs.
I knew it! I would have bet my house on you disputing what I wrote, JJ.
You are wrong. Actually try what I wrote to Julie, and you'll see that my advice does work. Well, at least it works on my computer.
Create an Action which does a "Save As JPEG" followed by another "Save As JPEG" then "Close". Now run the Batch setup that I posted above on a folder of files. The result will be as I said earlier - two output files per each invocation of the Action.
Copy link to clipboard
Copied
Sorry I missed the name of the action save two images I was un aware that the Batch could overide more then one save As and have two names generated. I'm now a wiser man. Now I see there are serial numbers and letters. Yes it look like batch can do a good job just add the watermat layer save the image turn off the visibility of the watermark save the image. I don't think a day goes by thay I don't learn something about Photoshop. Thank You...
Copy link to clipboard
Copied
Thanks,
Regarding the Russell Brown script, I should have mentioned that I only have CS4 so not an easy option. 
The double-batch run in Photoshop using the checkbox "Override Action "Save As" Commands seems dandy. I have done the first bit, and it works a treat:
1234x.jpg | (not watermarked) |
1234xx.jpg | (watermarked) |
1235x.jpg | (not watermarked) |
1235xx.jpg | (watermarked) |
However I am unsure how to automate the removal of the xx extension for the watermarked files?
I am not sure how that action would go....
Cheers
Copy link to clipboard
Copied
I think conroy's rename would be done with the Bridge Batch Rename feature look for something like string replacment likn "xx" to "". I hane not use Batch rename I think its under the Bridge's Tools menu.
Copy link to clipboard
Copied
There may be a way to do it in Bridge, but that's a sledgehammer approach unless you're running the watermarking batch in Bridge, anyway. Your operating system or a simple utility can batch rename files.
If your using Apple OS X, PowerRenamer is free and extremely easy to use.
http://www.script-factory.net/software/FinderHelpers/PowerRenamer/en/index.html
Copy link to clipboard
Copied
conroy2009 wrote:
There may be a way to do it in Bridge, but that's a sledgehammer approach unless you're running the watermarking batch in Bridge, anyway. Your operating system or a simple utility can batch rename files.
If your using Apple OS X, PowerRenamer is free and extremely easy to use.
http://www.script-factory.net/software/FinderHelpers/PowerRenamer/en/i ndex.html
Conroy is a simple utility batch renamer or the free OS X PowerRenamer any less a sledgehammer then the Bridges Batch Rename feature? To me they all seem to do renames.
If you do not have a Mac OS x system or have the Free PowerRenamemer you do have the Bridge. I just look at its help if to select all files created its batch rename feature should be able to do the rename. Here is what is in the help. For me the hard part is "regular expressions"....
Batch rename files
You can rename files in a group, or batch. When you batch rename files, you can choose the same settings for all the selected files. For other batch-processing tasks, you can use scripts to run automated tasks.
- Select the files that you want to rename.
- Choose Tools > Batch Rename.
- Set the following options:
- Destination Folder
- Place the renamed files in the same folder, move them to another folder, or place copies in another folder. If you choose to put the renamed files in a different folder, click Browse to select the folder.
- New Filenames
- Choose elements from the menus and enter text as appropriate to create new filenames. Click the Plus button
 or Minus button
  to add or delete elements.
- String Substitution
- Allows you to change all or part of a filename to custom text. First, choose what you want to replace: Original Filename replaces the string from the original filename. Intermediate Filename replaces a string that is defined by preceding options in the New Filenamespop-up menus. Use Regular Expression allows you to use regular expressions to find strings based on patterns in filenames. Replace All replaces all substrings that match the pattern in the source string.
- Options
- Select Preserve Current Filename In XMP Metadata to retain the original filename in the metadata. For Compatibility, select the operating systems with which you want renamed files to be compatible. The current operating system is selected by default, and cannot be deselected.
- Preview
- One current and new filename appear in the Preview area at the bottom of theBatch Rename dialog box. To see how all selected files will be renamed, click the Preview button.
- (Optional) Select a preset from the Presets menu to renaming with frequently used naming schemes. To save batch rename settings for reuse, click Save.
For more information on batch-renaming files, see any of the following tutorials:
- Stacking and renaming files, by Conrad Chavez
- Batch-renaming, by Deke McClelland
- Changing obscure camera filenames with the Batch Rename command, by Michael Ninness
Copy link to clipboard
Copied
Conroy is a simple utility batch renamer or the free OS X PowerRenamer any less a sledgehammer then the Bridges Batch Rename feature? To me they all seem to do renames.
A sledgehammer and a toffee hammer will both break toffee. Which is easier to wield?
I explicitly stated that Bridge is a sledgehammer "unless you're running the watermarking batch in Bridge, anyway."
If using Windows, batch renaming a list of files is easy in Windows Explorer, if I remember correctly. The * wildcard represents any string of chararacters, so you'd rename:
*xx.png to *.png
In my world, that's easier than fumbling around in Bridge while following your bunch of tutorials.
Copy link to clipboard
Copied
So if one is runing Photoshop uses menu File>Automate>Batch to Batch an action that watematks a selected folder images and save two image files for each image into an output folder. Then switches to Photoshop mini bridge to see if all the ouput files were create correctly. Select slelect all of them so they can be reveal in the Bridge. To use the Bridge's Batch remane feature. Where then can to seup a rename and preview which files will be renamed is using a sledge hammer not a tofee hammer. Why because they still need to commit to the rename setup?
We look at this world though different eyes therfore we see things differently as does every one else. The one thing everyone has in common is we all see this world our way.
Copy link to clipboard
Copied
Hi guys, wondering if you have any ideas on a new dilemma. I have upgraded Photoshop to CS6 and installed Russell Brown's Image Processor Pro.
I have the ongoing task of processing pics of different sizes and different width/height ratios.
I would like to get the following result using IP Pro (in collaboration with an action):
1. Downsize pic to 960 pixels wide (height doesn't matter, but needs to stay in ratio)
2. Watermark pic.
3. Save.
4. Creating a thumbnail of 320 x 213 pixels, without distorting ratio. This may mean downsizing to 320 wide with relative height, *then* cropping via Image-Canvas Size. Chopping a bit off is preferable to me than distorting the ratio.
5. Save the smaller version as 'Documentnamex' (i.e. adding an 'x' to the document name for the thumbnail.
I have 1-3 in an action and have used it for years.
But as for the task of a smaller thumbnail, kept in ratio but chopped and named with an x - I am stumped. I downloaded IP Pro for the task, but I can't get it to work.
If I save the original with IP Pro (at step 3), how do I then get it to make the thumbnail?
If I create the thumbnail in the action, *then* do 2 saves in IP Pro (thumbnail and 960 version), the bigger one will be pixelated (and no surprises there)
Summary: I want 2 watermarked versions:
1. 1234a.jpg: 960 pixels wide, height relative
2. 1234ax.jpg: thumnail, 320 wide x 213 high
Any ideas?
Julie
Copy link to clipboard
Copied
juliew1589 wrote:
Summary: I want 2 watermarked versions:
1. 1234a.jpg: 960 pixels wide, height relative
2. 1234ax.jpg: thumnail, 320 wide x 213 high
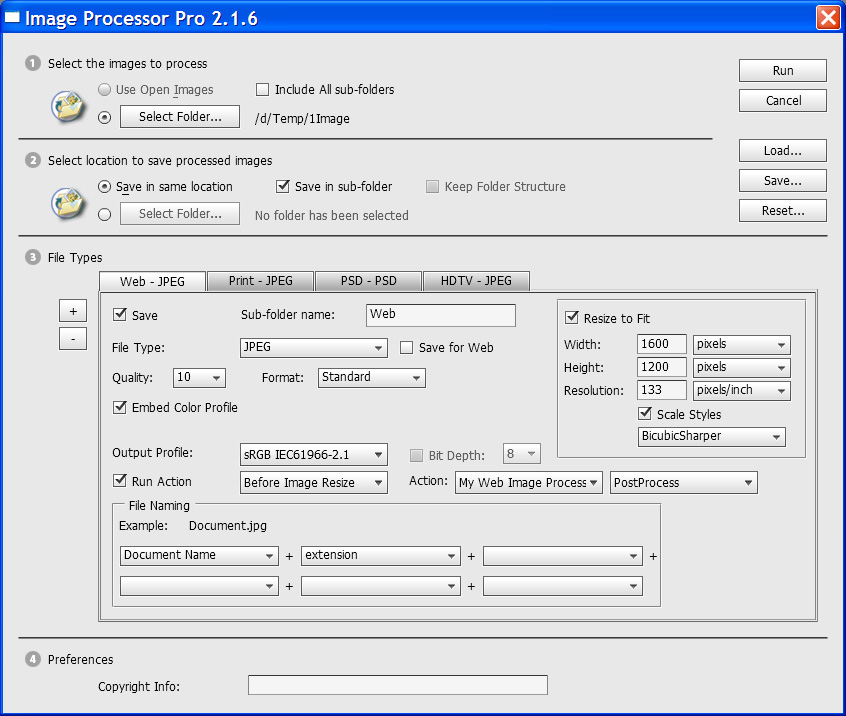
Image Processors like Image Processor Pro can easily do (1.) you just need an action to do the water mark anf the Image Processor Pro can do the resize all you need do is set the width and height to 960px. Image Processor Pro uses fit image to do the resize when the height and width is set to 960px the larges size of you image will be resized to 960 and the other side will be resized to maintain the image's aspect ratio.
Number (2.) is not easy to do and your watermark needs to be quite simple to be readable on an image that small. In fact I don't think a straight action can be crafted to do 2. particularly if you want to crop both Portrait and Landscape orientated images to a landscape 320:213 aspect ratio crop. I have coded a Plug-in script to be used in actions that can do that but I have not made it public. For cropping portraits into landscapes and landscapes into portraits does not work well for the image's compositions changes so much for much of the image content need to be cropped off. Cropping that changes orientation is best done interactively so you have control selecting the crop's composition.
If all images have a Landscape aspect ratio where width is longer then height you can download my crafting actions package. It contains a sample watermarking action that can watermark any size image. The package also contains a Plug-in Script the can set up a centered maximum size Aspect Ratio selection that has a 320:213 ratio. This script is some what like fit image it was coded to preserve an image orientation. If you record the plug-in step 320 213 and the image has a portrait aspect ratio the plug-in will use a portrait aspect ratio 213:320. Follow the AspectRatioSelection script with an Image Crop the watermark the crop execute the action before you use Fit Image to resize the image to 320x213. If yo do the Fit Image do not set the Image Processor Tab to do and resizing.
Crafting Actions Package UPDATED Aug 14, 2012 Changed AspectRatioSelection Plug-in script added Path support.
Contains
- Action Actions Palette Tips.txt
- Action Creation Guidelines.txt
- Action Dealing with Image Size.txt
- Action Enhanced via Scripted Photoshop Functions.txt
- CraftedActions.atn Sample Action set includes an example Watermarking action
- Sample Actions.txt Photoshop CraftedActions set saved as a text file.
- 12 Scripts for actions
Copy link to clipboard
Copied
Thanks for your response, much appreciated. First let me clarify:
-all pics will be landscape
-I am not troubled by the watermark on the thumbnail, i know it won't be readable
-I have been using the following action in the past, when thumbnails weren't required. (not sure if this action is still useful)

I don't know if any of the above changes your advice. I think you are suggesting to download your crafting actions package and it will do everything I need? If so, do I still need the action and/or IP Pro?
Thanks again
julie
Copy link to clipboard
Copied
juliew1589 wrote:
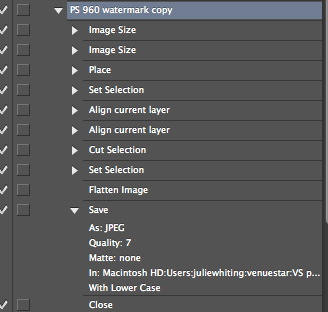
Can not tell what the action is doing for only the save as jpeg step is expanded so we can read it. Hold down the alt|option key and click on the little down triangle in front of the PS 960 watermark copy action twice. This should collapse the action then fully expand the action so all steps parameters are visible and readable. Capture the expanded view and post here.
Copy link to clipboard
Copied
Oops, my apologies, here it is:
Copy link to clipboard
Copied
Copy link to clipboard
Copied
juliew1589 wrote:
Oops, my apologies, here it is:
I see nothing.
Also looking at what I can see in your original action post its not one that you should use with the Image Processor Pro plug-in script. There should be no save in any action used by the script. The script is design to do the saves and give you control over where files are saved and provides you you file type save options and the ability to name files well. Actions have limits when it come to saving files and naming them. The script can also resize your images. The only resize you should do in any action used with the script is a cropping resize to change the images aspect ratio.
So what you need are two actions one that only adds the watermark and flatten the image if a layer styles was added to the logo. Layer styles can not be recorded relativlely setting are in absolute pixels. That is why I add watermark to full print size images then downsize the watermarked image for the web. so when flatten the layer style will be scaled because it was rastersized by the flatten.
The second action is one that crops the image into the 320:213 aspect ratio you need so when the script resizes the image to fit into a 320x320 pixel area it will be exactly 320 px x 213 px. Once the image is cropped to the aspect ratio the second action should play the first watermark action.
Both the actions should be run before the script resizes the image. Tab one uses action one watermark only before resizing then tab one should resize to fit 960 px by 960 px the images original aspect ratio will be preserved. Tab two uses action two one that crops and watermarks before resizing then tab two should resize to fit 320 px x 320 px and wind up with the crop aspect ratio 320:213 and be 320px x 213 px.
Copy link to clipboard
Copied
Sorry, I was giving you the incorrect action. What I gave you is the action I used before I started with IP Pro in my quest to make thumbnails.
And then my past didn't work - darn. Here is the correct one which I devised to work before IP Pro saves.
I need a 960 pixel wide version (height relative), and now I also need the 320 px x 213 px version, named with an x.
So you are saying I need 2 actions? Could one link to the other, or would I have to perform each action separately? And do I need your script, and/or IP Pro as well?
Thanks again
Copy link to clipboard
Copied
Action can play other actions as I wrote above., The hard part is cropping your image document to a 320:213 aspect ratio. If you download my crafting actions package it contains a plug-in script I wrote for use in actions Like actions can play other actions by selecting the action in the actions palette and using the play button. Actions can also use scripts by recording menu File>Scripts>Script name. The great thing about plug-in is many have programmed in action support. So if you download my package and install my scripts you can record menu File>Automate>AspectRatioSelection... then in the plug-jn scripts dialog you set 320 213 centered rectangle replace selection 0 feather and no anti-alias the plug-in will record those settings into your action step. When the action is played the dialog will be bypassed the largest 320:213 centered aspect ratio selection will be set, You follow that step with Image Crop then you record selecting the watermark action in the actions palette and click play. The action has three steps.
I recorded the two actions the way I would. I the saved it as a text file so you can read the steps. The watermark action set Photoshop ruler units to inches so if you record things like moves and such the are recorded in inch units. The action resizes the image width to 8" without resampling. No pixels are changed all the happens is the document DPI resolution is set so the document would print 8" wide. Just scales the image to 8" so if you record things like text layers the font size will be approbate for an 8" wide image. If to add canvas the number of pixels will in inches using the 8" wide DPI resolution. The Action then Places in the logo the place transform is used to move the logo to the top left corner then holding dot the shift key the lower right corner is draged so the logo is 2" wide using the visible rule frame as a guide. The shift key constrains the transform so the logo does not deform. To size the logo 1/4 the width of the document 2"/8" . The action then select all and modifies the selection border 20 px and then inverts the border selection so all of the image is selected but the border. The Logo is the aligned to the bottom right of the selection.
Here is the TwoActions Set
Set: TwoActions
Action: Watermark
Set general preferences of current application
To: General Preferences
true
Set units preferences of current application
To: Units & Ruler Preferences
ruler units: Inches
type units: Points
Image Size
Width: 8 Inches
Place
D:\Mr Mouse\My Documents\My Pictures\Working On\TextTutorial\TextTurorial.png
Center: center
Translate: -3.003 Inches, -2.358 Inches
Width: 44.3%
Height: 44.5%
Set Selection
To: all
Border
Width: 20 pixels
Inverse
Align current layer
Using: bottom edges
Align current layer
Using: right edges
Set Selection
To: none
Action: Crop and Watermark
Aspect Ratio Selection
“Aspect Ratio Selection action settings”
height: 213 pixels
width: 320 pixels
With center
Without border
With rectangle
Without ellipse
With replace
Without add
Without subtract
Without intersect
With selection
Without path
feather: 0 pixels
Without anti-alias
Crop
With Delete Cropped Pixels
Play action “Watermark” of set “TwoActions”
Copy link to clipboard
Copied
Thank you, I have made much progress with this! Have a great week 
Copy link to clipboard
Copied
juliew1589 wrote:
Thanks all, the Russell Brown tutorial was good and other advice has been helpful - especially using Align right edges & Align bottom edges.
However I notice that the particularly short images (not very high) end up with a slightly smaller watermark. I am not sure why this is. The width of all images is made the same. Attached screen grab shows some examples of the results, as well as the action I created.
Then you miss reading about dealing with image size in my crafring actions package. Action Dealing with Image Size.txt
Then you miss that logo need to be sized during place in the sample action set Sample Actions.txt Photoshop CraftedActions set saved as a text file.
===================================== the following section has been turned off in the sample action=================================
Place
C:\Program Files\Adobe\Adobe Photoshop Scripts\My Scripts\JJMack8bit.psd
Center: center
Translate: 0 inches, 0 inches
Width: 20%
Height: 20%
Set Selection
To: all
Align current layer
Using: bottom edges
Align current layer
Using: left edges
Set Selection
To: none
Set units preferences of current application
To: Units & Ruler Preferences
ruler units: percent
new document preset screen resolution: 133.318 inches
Move current layer
To: 0.5%, -0.3%
Set current layer
To: layer
Name: “My Logo”
Rasterize current layer
Item: smart object
Convert to Smart Object
========================================== end of the turned off section in the sammple action ========================================
the
Place
C:\Program Files\Adobe\Adobe Photoshop Scripts\My Scripts\JJMack8bit.psd
Center: center
Translate: 0 inches, 0 inches
Width: 20%
Height: 20%
Scaled the logo to the scaled document width.

 AdChoices