

- Home
- Photoshop ecosystem
- Discussions
- Re: How do I turn a jpeg into a layered psd file ...
- Re: How do I turn a jpeg into a layered psd file ...

Copy link to clipboard
Copied
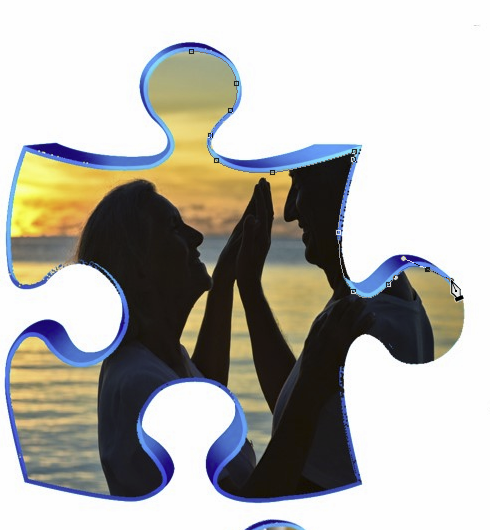
I have been asked to turn this jpeg into a layered psd file that would allow us to quickly and easily change out the 4 photos inside the puzzle pieces each week. I am pretty familiar with the basics of photoshop but I'm not sure how to create a psd file (or smart objects?) so that we can just copy/paste the 4 new photos into the file each week and have them look like this? Can someone provide the steps for this process? Thank you!!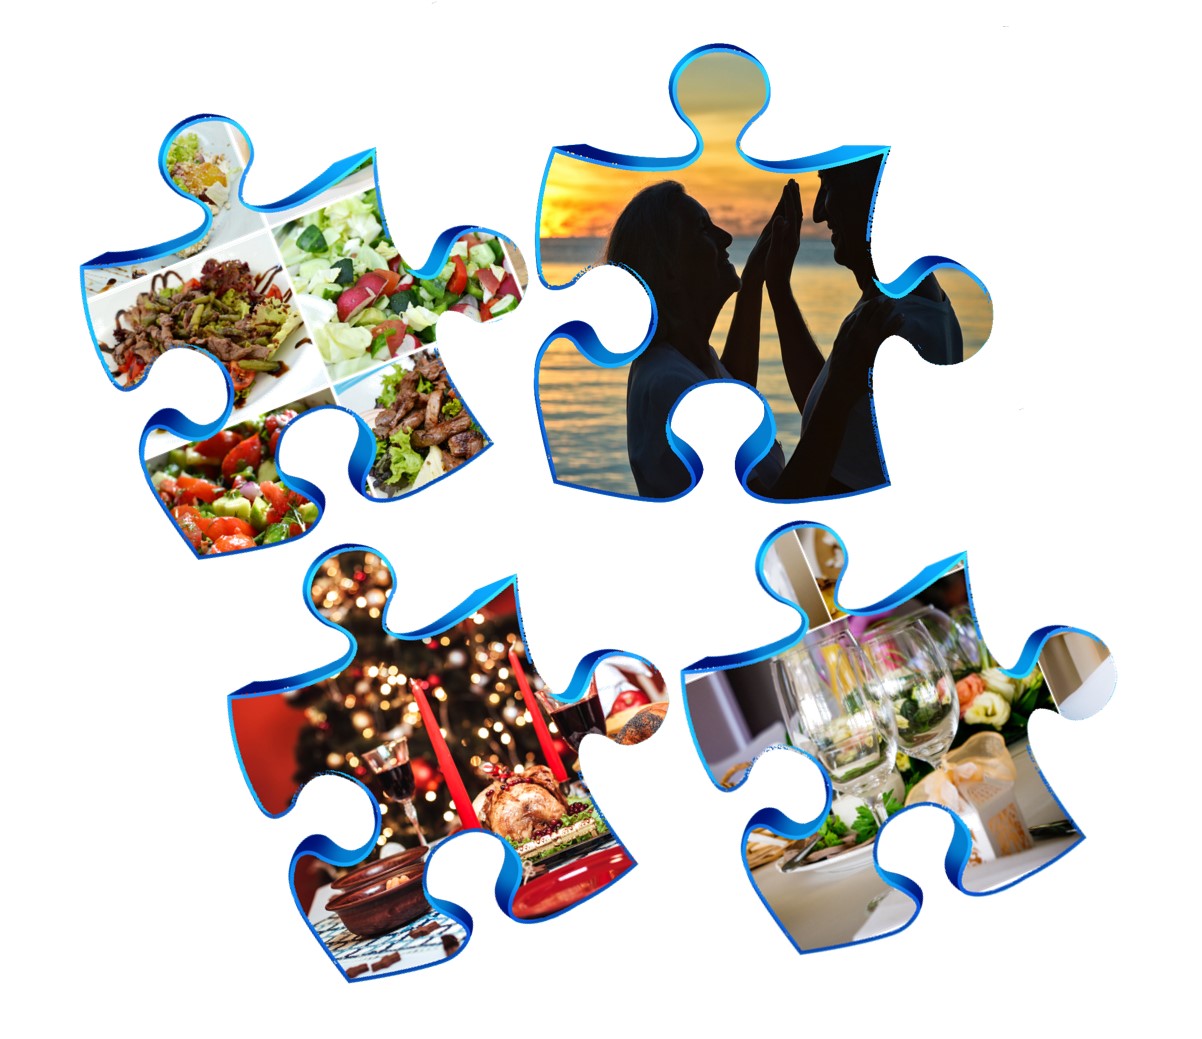


 3 Correct answers

What is the image size? Or is your screen shot all you have?
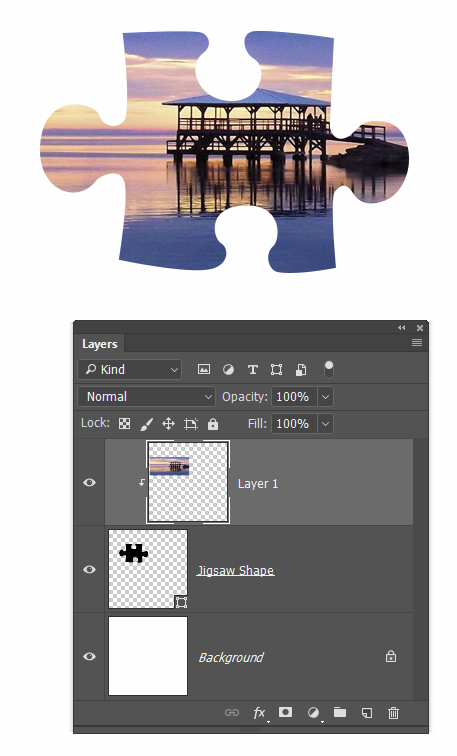
You are going to need to select the image area for jigsaw piece with the Pen tool, and use each clipping path to make a new layer which you can fill with a solid colour — something neutral like 50% grey.
Then clip the new images to those layers.
Or it might be easier to start again. There are four jigsaw shapes in the default custom shapes supplied with Photoshop.
Perhaps make a 3D object from the shapes. If you left the front face
...
Another approach. I LOVE the Alien Skin Eye Candy plugin. No Photoshop illustrator should be without it because it has a zillion easy to use effects. It also produces the effect on a copy of the layer, so you can build it up. So starting with one of the Custom Shape jigsaw pieces.
Add an extrusion. It is quick and easy to control, and a lot easier than using Photoshop 3D
Note as stated above, the effect will make a new layer, so go back to the original and add a bevel. Here again the control
...
Yep. Works fine. In fact it is the way to go because the perspective is right for all four pieces.

A minor complication is that the black layer has all pieces on the same layer, but you could either select and copy to separate layers, or leave as it is and clip all the images to the same layer, and control with Free Transform.

Explore related tutorials & articles
 8
Replies
8
8
Replies
8

Copy link to clipboard
Copied
I think you're going to hate this project. There's no easy peasy way to do this except to start masking the inner portions of each puzzle piece and create new layers. You need at least 5 layers. Maybe 6 if you use a background layer.
Nancy

Copy link to clipboard
Copied
On the other hand, once the masks have been made - and this is an obvious case for the pen tool - the rest is a walk in the park.
If the mask is unlinked (click the chain icon), the image can be positioned freely within the mask.
Copy link to clipboard
Copied
What is the image size? Or is your screen shot all you have?
You are going to need to select the image area for jigsaw piece with the Pen tool, and use each clipping path to make a new layer which you can fill with a solid colour — something neutral like 50% grey.

Then clip the new images to those layers.

Or it might be easier to start again. There are four jigsaw shapes in the default custom shapes supplied with Photoshop.

Perhaps make a 3D object from the shapes. If you left the front face a solid black it would be easy to select, and from that selection you could either make new layers to clip your images layers to, or make layer masks for them.

Copy link to clipboard
Copied
I'm inclined to agree that starting over with vector puzzle shapes would be a better way to do this.
Much better image quality that way, too.
Copy link to clipboard
Copied
Another approach. I LOVE the Alien Skin Eye Candy plugin. No Photoshop illustrator should be without it because it has a zillion easy to use effects. It also produces the effect on a copy of the layer, so you can build it up. So starting with one of the Custom Shape jigsaw pieces.
Add an extrusion. It is quick and easy to control, and a lot easier than using Photoshop 3D
Note as stated above, the effect will make a new layer, so go back to the original and add a bevel. Here again the control is awsome. Better than using Photoshop 3D I suspect.
Move this layer above the extruded layer.
Ctrl click the original layer to load it as a selection and Contract the selection so that it is just inside the bevel.
Make a new layer and fill with black.
It would be advisable to link all those layers so that they move together.
You can now clip your changing images to the black layer.
You can see that I used a curves layer to brighten the bevel here, because it was easier than going back into Alien Skin.

[EDIT] You could use the above steps on a single layer containing all four jigsaw shapes to save time. I'll have to try it to see how that effects the perspective of the extrusion though.
Copy link to clipboard
Copied
Yep. Works fine. In fact it is the way to go because the perspective is right for all four pieces.

A minor complication is that the black layer has all pieces on the same layer, but you could either select and copy to separate layers, or leave as it is and clip all the images to the same layer, and control with Free Transform.

Copy link to clipboard
Copied
Okay, thanks! Going to follow these steps and give this a shot! Wish me luck. 

Copy link to clipboard
Copied

Find more inspiration, events, and resources on the new Adobe Community
Explore Now
 AdChoices