Participating Frequently
February 24, 2023
Answered

How to align a smart object and keyframe animation

  • February 24, 2023
  • 3 replies
  • 3813 views

Hi there,


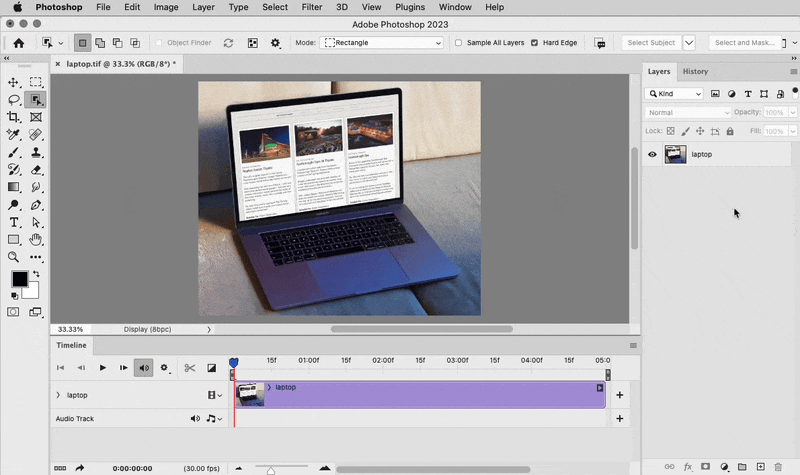
I've recently purchased a mockup of a Macbook that I'm hoping to animate by showing the screen's content scrolling using Photoshop's Timeline feature.


I have inserted the screen's image content on the Smart Layer mask and saved this, but when it brings you back into the main file, the alignment of the image on the Smart Layer is central, whereas I'd need this to be aligned to the top, so it starts at the top of the image on the Smart Layer, which is the top of the website I'm trying to display on the screen (sorry, I'm struggling to articulate).


Further to this, whilst I can locate the layer in the Timeline function, I'm unsure how to get this to move the content displayed on the screen as it's within a Layer Mask and nothing I try seems to move the content.


Please can somebody assist?


Many thanks,


Tom

This topic has been closed for replies.
Correct answer Conrad_C

This looks like something that comes up a lot in video editing. In video editing and visual effects apps (such as Adobe Premiere Pro and After Effects), this is often solved by nesting timelines, and that could be an approach here: Animating one document, nesting it in the main document and transforming that, so that the imported graphic’s animation is distorted along with its rectangle. The demo below shows the following steps:


1. While holding down the Option key (Alt key in Windows) drag the file with the web page, and drop it into the Photoshop document with the laptop. Adding that key to a drag-and-drop import is a shortcut for File > Place Linked, importing it as a linked Smart Object. The imported file contains the web page already animated within a canvas size that matches the laptop aspect ratio. (You can just drag and drop it, but then it would be embedded, and I find linked easier to edit.)

2. While the initial transform handles are active, Command-drag (Ctrl-drag in Windows) the corner handles to pin them to the corners of the laptop display. Adding that key allows free distortion. When finished, press the Enter or Return key.

3. Because the web page file is a Smart Object, double-clicking it opens it in another tab. Here its window is moved to be side by side with the other document window.

4. Because the web page file is pre-animated, the animation also plays in the containing document, but with the distortion applied. Note that no mask was needed, because all you have to do is distort the rectangle. The Smart Object is its own mask.


If you want to edit the animation, you do have to edit it in the Smart Object. One annoyance with that is the changes don’t show up in the containing document until you save the Smart Object document.


3 replies

Conrad_C
Community Expert
Conrad_CCommunity ExpertCorrect answer
Community Expert
March 2, 2023

This looks like something that comes up a lot in video editing. In video editing and visual effects apps (such as Adobe Premiere Pro and After Effects), this is often solved by nesting timelines, and that could be an approach here: Animating one document, nesting it in the main document and transforming that, so that the imported graphic’s animation is distorted along with its rectangle. The demo below shows the following steps:


1. While holding down the Option key (Alt key in Windows) drag the file with the web page, and drop it into the Photoshop document with the laptop. Adding that key to a drag-and-drop import is a shortcut for File > Place Linked, importing it as a linked Smart Object. The imported file contains the web page already animated within a canvas size that matches the laptop aspect ratio. (You can just drag and drop it, but then it would be embedded, and I find linked easier to edit.)

2. While the initial transform handles are active, Command-drag (Ctrl-drag in Windows) the corner handles to pin them to the corners of the laptop display. Adding that key allows free distortion. When finished, press the Enter or Return key.

3. Because the web page file is a Smart Object, double-clicking it opens it in another tab. Here its window is moved to be side by side with the other document window.

4. Because the web page file is pre-animated, the animation also plays in the containing document, but with the distortion applied. Note that no mask was needed, because all you have to do is distort the rectangle. The Smart Object is its own mask.


If you want to edit the animation, you do have to edit it in the Smart Object. One annoyance with that is the changes don’t show up in the containing document until you save the Smart Object document.


Participating Frequently
March 4, 2023

This worked a treat - thanks so much for your really detailed help, it's greatly appreciated 🙂

Myra Ferguson
Community Expert
Community Expert
February 25, 2023

The screenshots don't show your whole screen, so it's a little hard to see what all might be going on at the same time.


If you have adjusted content in a Smart Object, then you'll need to save that Smart Object before the changes are updated in the file from which it originates.


If you're having trouble setting the keyframes, then you could start over by either selecting and deleting keyframes or clicking off the stopwatch to the left of transform and back on again to set new keyframes. Then with the playhead at the beginning of the Timeline move the masked screen content where you want it. Move the playhead and move the content again to set the keyframe for that location. Continue setting keyframes that way until the motion is how you'd like it.

Participating Frequently
February 26, 2023

Thanks for getting back to me - I've just screen recorded the issue, in case that helps? 


https://drive.google.com/file/d/15p_KHEDoRRZpQ8Gm_pkodCfMNil2h5QY/view?usp=sharing

Participating Frequently
March 1, 2023

Maybe try switching which layer has the mask. Unlock the Background layer and put the Macbook layer above the content with the inverse of the layer mask that is applied to content. Remove the layer mask from the content layer. Then add the keyframes to the content layer.


I've just tried that and seems a similar issue is occuring in that it's moving the content layer on the canvas as opposed to in the bounding box of the max, if that makes sense? The screenshots show the keyframe movement: 

Participating Frequently
February 25, 2023

A quick bump to see if anyone can help 🙂