tusibabu
Participant
July 31, 2025
Question

How to apply “Front Image” dimensions from one image to another using an Action or Script?

  • July 31, 2025
  • 1 reply
  • 432 views

Hi All,

This is my first post ,

I’m using Photoshop version 24.7,      and I’m not familiar with scripting.

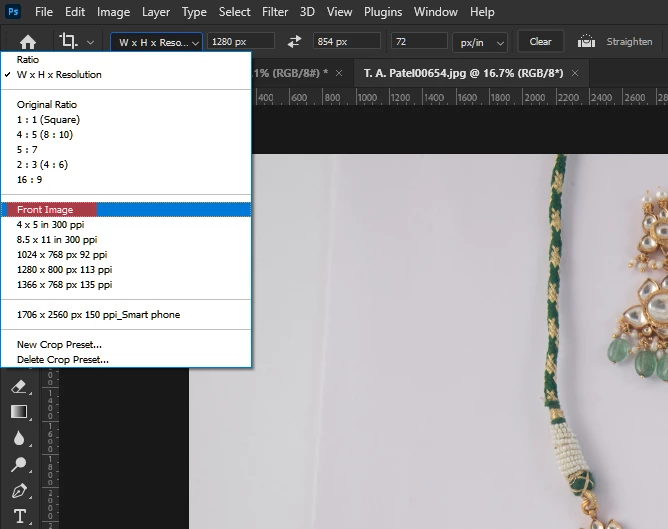
I want to use the “Front Image” option in the Crop Tool to copy the width, height, and resolution from one image, and apply those exact crop dimensions to a different (target) image.

When I try to record this using an Action, Photoshop does not store the Front Image dimensions — it only records the crop, not the size reference.

 Is there any way to copy dimensions from one image using “Front Image” and apply them automatically to another image, either through an Action or a ready-made script?

I’m looking for a solution where I don’t have to manually type the width/height every time.

Since I’m not familiar with scripting, I’d appreciate it if someone could share a script that does this.

Thank you in advance!

1 reply

Stephen Marsh
Community Expert
Community Expert
July 31, 2025

Yes, scripting can capture and use the doc width and height and resolution, independent of the front image setting.

That being said, this may or may not be applicable to this command via scripting.


There are other ways to crop using one image to others.


Are all of the images the same pixel dimensions and resolution?


How many images are open at once, and do you need to crop them all?

tusibabu
tusibabuAuthor
Participant
August 1, 2025

Thank you for your response!

To answer your questions:

     The source (front) image has specific dimensions and resolution, and I want to apply those exact crop settings to other images, which may be different in size or resolution.

     Usually, only 2 images are open at a time — the source image (from which I want to copy dimensions), and the target image (on which I want to apply the crop).

    I don't need to crop multiple images at once. Just one at a time is fine.

What I’m really looking for is a way to:

Open the source image.

Get its width, height, and resolution.

Switch to the target image.

Crop it using those same dimensions (centered or from top-left would be okay).


        That’s why I tried to use the “Front Image” option in Photoshop’s Crop Tool,
but this step doesn’t get recorded or added properly in an Action.


Actually, here’s my use case:


I have a high-resolution original image from which I want to remove the background.
Since I’m not getting clean background removal at full resolution directly in Photoshop, I use an online background removal platform.

However, the problem is that those online tools give me a transparent PNG, but it’s not in the original size or resolution — it’s usually downscaled.

So, what I currently do is:

I open the original high-resolution image and the low-resolution transparent image (from the online tool).

I want to apply the exact dimensions of the original image to the transparent one.

Then I copy and paste the transparent subject from the smaller image to the original image.

I use that pasted subject as a selection or mask on the original image to remove the background, but keep the full quality intact.

This way, I get a high-resolution version with the background removed, using the help of the online cutout.

Now I’m trying to automate or simplify this workflow using Actions or Scripts, especially the step where I apply the original image’s dimensions to the cropped version.


Thanks again for any suggestions!

Since I’m not familiar with scripting, if there’s a script or Action-based workaround that could help with this flow, I’d greatly appreciate it!

Stephen Marsh
Community Expert
Community Expert
August 20, 2025

Stephen Marsh,
I just tried your code today on the first screenshot I provided, and the second screenshot shows the result. I think the script worked, but it didn’t place the mask exactly on the subject. The mask was too big and didn’t properly cover my subject.

I feel that it may need some updates, but for now, we can pause here. I will work on this project again when necessary. I sincerely appreciate your effort in creating this script for me—thank you once again.


@tusibabu 


Thanks for your feedback, it's tough flying blind, it works fine with my test images, but your images may not be consistent like mine. That's why I originally wrote:


"Sample images are always helpful if you can provide links to them or upload here, if you really want to explore such a workflow."


Happy to review when you can supply examples.