- Home
- Photoshop ecosystem
- Discussions
- Re: How to have Adjustment Layer Target only One L...
- Re: How to have Adjustment Layer Target only One L...
How to have Adjustment Layer Target only One Layer ?
Copy link to clipboard
Copied
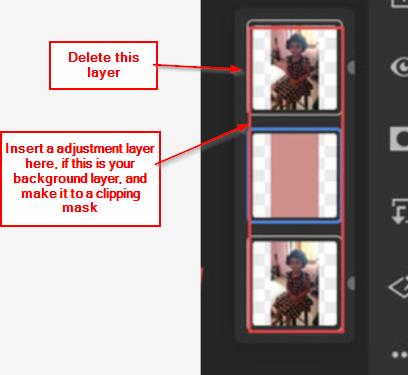
If someone can please tell me if I have these layers in my project as shown in the attached Picture and if I have changed the background of a subject and now if I want to make changes with regards to highlights and shadows of only the subject not the entire image.
If I add the adjustment layer where do I need to place it ? so that it only makes changes to the subject and not the background colour ?
Can someone please tell me ?
Explore related tutorials & articles
Copy link to clipboard
Copied
This can be done with a clipping mask.
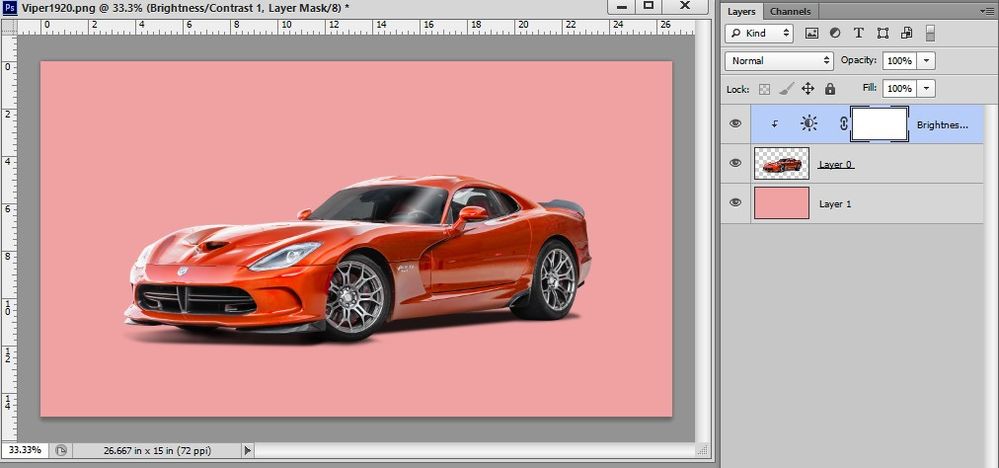
Insert a adjustment layer above the appropriate layer and make it to a clipping mask.
https://helpx.adobe.com/photoshop/using/revealing-layers-clipping-masks.html
https://www.youtube.com/watch?v=JyWplm5X-lU&ab_channel=EnvatoTuts%2B
By @AxelMatt
So with regards to the Layers I have in my Image Link. both look the same to me I dont know which is the Target Layer ? in this case what do I do ?
Copy link to clipboard
Copied
Go to the Layers panel. Place the adjustment layer directly above the layer you want it to affect (that's the "target layer" btw). Then place the cursor on the line separating the two layers, and alt-click. A small angled arrow appears, showing that the layer is now clipped to the underlying layer.
That's the shortcut. There are menu items to do it too, but I always use the alt-click method.
By @D Fosse
Hi ! Thanks for your reply. But you know that is what I am confused about to bevin with. With the example in the photo of my layer panel that I have posted in my first comment. Both layer look the same to me so I don't know on top of which layer should I put the adjustment layer ? Both look the same ? Can you please have a look at that photo I have shared of my layers panel and then tell me ?
Also to give you a history of what I did was I selected the subject and in refine tool selected New Layer with Mask and that's how I got two similar looking layers. Now I don't know on top of which layer should I keep the adjustment layer ? Can you now tell me based on my history of what I have dine in this project that where should I put the adjustment layer ?
Copy link to clipboard
Copied
Once you have to delete (or deactivate) the highest layer. Then insert a adjustment layer above the appropriate layer and make it to a clipping mask.
Copy link to clipboard
Copied
@AxelMatt wrote:Once you have to delete (or deactivate) the highest layer. Then insert a adjustment layer above the appropriate layer and make it to a clipping mask.
But if I am deleting the Top Layer as you suggest, my subject disappears from the gradient fill background that I have created and I only see a plain background image.
Copy link to clipboard
Copied
Sorry, my mistake. I was wrong. I've read your original post again.
You've wrote: "...so that it only makes changes to the subject and not the background colour ?..."
I've check the attached screenshot again and I've see no difference between the lowest and the highest layer.
What kind of effect should the middle layer have?
At the moment I don't quite understand what you want achieve with this layer contruct.
By @AxelMatt
I made a Selection and Did a New Layer with Mask and then using the Bucket Colur tool, coloured the Mask. So the other layer just came on its own, I have no idea how and why did it come there ? All I was trying to do was have my subject post against a colured background layer.
Copy link to clipboard
Copied
Copy link to clipboard
Copied
By @edgrimley
Ok let me try this then, Have one Layer of my Masked Layer have the Colour Background Layer below it and have the Adjustment Layer Unclipped at the Top.
Copy link to clipboard
Copied
Your adjusment layer is actually clipped...
Here is a short video on creating clipping masks.
https://www.youtube.com/watch?v=oNMWabDLvRA

