- Home
- Photoshop ecosystem
- Discussions
- Re: How to make a tapered brush stroke?
- Re: How to make a tapered brush stroke?
Copy link to clipboard
Copied
Hi all.
Photoshop CC 2019 on both Mac and Windows.
How do I make a brush stroke that tapers to a slimmer width at each end? I would like to apply it to a vector path in Photoshop. I do NOT have a pressure-sensitive tablet. Seems to me that I used to be able to make a brush stroke that tapered off on both ends of the path (a few versions/years ago). I cannot figure out how to do it with PS CC 2019.
Any ideas?
 1 Correct answer
In the Brush Settings panel, under Shape Dynamics, set Pen Pressure to control Size Jitter. Then, from the Paths panel menu, select "Stroke Path...". In the dialog that pops up, select "Brush" for Tool, and check the "Simulate Pressure" box.
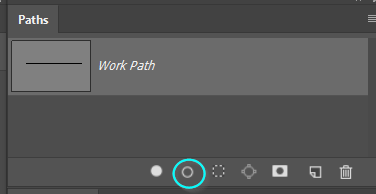
This setting is sticky, and will remain in effect until you turn it off by un-checking the box, so you can just use the Stroke Path icon in the Paths panel, or press Enter with the Brush tool active.
Explore related tutorials & articles
Copy link to clipboard
Copied
In the Brush Settings panel, under Shape Dynamics, set Pen Pressure to control Size Jitter. Then, from the Paths panel menu, select "Stroke Path...". In the dialog that pops up, select "Brush" for Tool, and check the "Simulate Pressure" box.
This setting is sticky, and will remain in effect until you turn it off by un-checking the box, so you can just use the Stroke Path icon in the Paths panel, or press Enter with the Brush tool active.
Copy link to clipboard
Copied
There's not a lot more you could add to that, as that is the way to do it. Simulate Pressure is symmetrical, but if you stroke a path with a brush set to Fade, then it operates in the direction the path was constructed. If you have a bunch of these to do, then the little Stroke icon at the bottom of the Paths panel is a godsend, but like Semaphoric has said, it will use the last used settings.

You can obviously adjust brush size and hardness on the fly. This can be useful when you are not sure about brush thickness. Start off thin and stroke the path, and keep increasing brush size and clicking on the Stroke icon. Then undo backwards if you go too far.
Copy link to clipboard
Copied
Using Fade would be a good option if you wanted to have the stroke be the same width over most of its length, tapering only near the ends. You would add two new, empty paths. In the original path, select one end point, and Edit > Cut (Control+ X), and paste it into one of the empty paths. Do likewise with the other end point.
In the two new paths, click on the end points with the Pen too. This makes them the final point.
Finally, stroke the truncated original path (the "middle") with a plain brush, and the other two paths using Fade.
Copy link to clipboard
Copied
Tapered is what I am after, thanks! And Jane, I was changing a color photo progressively into a Lichtenstein-like BenDay dot effect. In the example, you see the nose lines done as tapered brush strokes in PS using the pen tool drawn paths given a tapered brush stroke. The chin and jaw line were done with a less elegant method.

Copy link to clipboard
Copied
https://forums.adobe.com/people/Mike+Witherell wrote
Tapered is what I am after, thanks! And Jane, I was changing a color photo progressively into a Lichtenstein-like BenDay dot effect.
Hi Mike, I'm glad I asked — that's nice! Were all three of your daughters home for Thanksgiving?
Jane
Copy link to clipboard
Copied
Mike, why Photoshop and not Illustrator?
Copy link to clipboard
Copied
Jane, two of them, ... plus some of their friends! ![]()
Copy link to clipboard
Copied
Don't listen to these guys. Just copy and paste what the last guy said...
Open your Brush setting from the ribbon up top. Left of the folder icon with a brush in it.
Click the down carat. Click the settings gear in the upper right corn of the drop-down look to the bottom of the list and see Legacy Brushes. In Legacy Brushes -> Default Brush 5 or 6 down is the brush you're looking for.
Copy link to clipboard
Copied
Some of the answer directions do not jive w PS 2024. Can we revisit this question? It is easy in Fresco but hard to grasp in PS. photoshop 2024 how do I adjust my brush to start at a fine point and end in a fine point like you can in Fresco?
Copy link to clipboard
Copied
Use a hard round Pressure Affects Size preset, or create it in Brush Settings
Lay out a path with the Pen tool
Right click the Path and choose Stroke Path
In the pop-up dialog window make sure Simulate Pressure is checked.
And OK the stroke. You need to set your brush up before this
Note: with this set up, you can create future strokes by clicking on the icon (my yellow highlight) at the bottom of the Paths panel.
Copy link to clipboard
Copied
Thank you!!
Find more inspiration, events, and resources on the new Adobe Community
Explore Now


