- Home
- Photoshop ecosystem
- Discussions
- Hi Dave, I figured out most of it. I'm using a bru...
- Hi Dave, I figured out most of it. I'm using a bru...
Copy link to clipboard
Copied
Hey, this isn't the normal kind of color banding. We think it possibly has something to do high speed sync with the electronic shutter at 1/8000 shutter speed. It seems the electronic shutter at a high shutter speed in really bright conditions will make the banding. I wasn't aware that this was happening while taking the photos...and now I have these irreplaceable images from a vacation that are essentially ruined. I was just wondering if anyone else has experienced this or has been able to repair this somehow so that I might keep these images. I'm going to attach one of the images as an example.

 1 Correct answer


(Click on image to see @ 100%)
Change the mode to Lab Color
Choose the L channel
Filter > Blur >Surface Blur Radius 9. Threshold 15
Return mode to RGB
Explore related tutorials & articles
Copy link to clipboard
Copied
that looks like a lot of photoshopping. I do not know any point and click solution for this.
Discussion successfully moved from Adobe Creative Cloud to Photoshop
Copy link to clipboard
Copied
Interesting. What's the fill light, specifically? On camera flash? Some kind of LED? That's where it is, not the background.
I've noticed with my Sony that the silent shutter tends to give these interference stripes in LED and fluorescent lighting. That's because the sensor is scanned, not read all in one. I just need to be careful to avoid a certain shutter speed range, and adjust ISO if necessary.
Fixing it is possible, but takes a lot of time. No magic button.
Copy link to clipboard
Copied
Reminds me of this thread:
Copy link to clipboard
Copied
You may be able to reduce the effect like this:
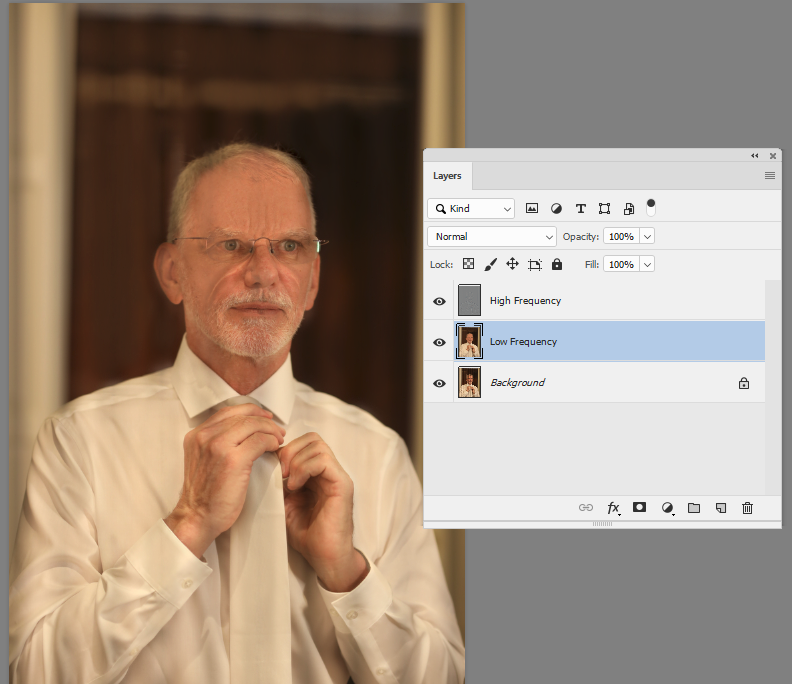
Make two copies of the image layer.
Name the lower "Low Frequency"
Name the upper "High Frequency"
Select the low frequency and apply a gaussian blur of around 6px
Select the high frequency layer and goto menu Image - Apply Image
Set the layer to use as "Low Frequency"
Set Blending mode to subtract
Scale 2
Offset 128
Click OK
Set High Frequency layer blending mode to Linear Light
Put the high frequency layer in a smart object and use High pass adjusting the radius to keep the contrast detail but remove the banding
Invert the Smart filter mask so all is black
Use a soft brush to paint on the mask until the banding goes
I added a masked copy of the original and lightly painted back in over any edge "ringing"
Not perfect, it has softened the skin, but IMO easier on the eye than the original banding

Dave
Copy link to clipboard
Copied
Basically a frequency separation for fixing skin used to remove the banding. Not a bad idea there. ![]()
Copy link to clipboard
Copied
https://forums.adobe.com/people/Daniel+E+Lane wrote
Basically a frequency separation for fixing skin used to remove the banding. Not a bad idea there.
Yep - with the added high pass on the HF layer
Dave
Copy link to clipboard
Copied
Good job, Dave - certainly qualifies as a "magic button" ![]()
Just to show what the "LED-effect" looks like on a shutterless sensor, here's one with a steep curve on top to exaggerate. This is full uncropped frame, shot at 1/320th second:

The line frequency increases with higher shutter speeds. At 1/100th-ish and below it's usually not a problem (so an optical stabilizer comes in handy if you use a long lens).
Most of these cameras, like my Sony a7RII, normally operate with a shutter - the silent mode is optional. I made it a habit to only use that when absolutely required by the situation.
Copy link to clipboard
Copied
Which light sources are affected like that in your setup?
Copy link to clipboard
Copied
c.pfaffenbichler wrote
Which light sources are affected like that in your setup?
This is LED, that's all I know. I don't have any detailed specs. This was in available room light, I didn't set it up.
Copy link to clipboard
Copied
Hi
Yes it is a combination of flickering lighting and line scanning frequency.
An LED is a DC device so the actual frequency of the LED flicker may be mains frequency but may be higher. A simple rectifier will flicker at 50 Hz (with each positive cycle). A bridge rectifier will flicker at 100Hz (each half cycle, negative or positive, becoming positive). A switch mode power supply will operate at a frequency much higher than mains. A well made power supply should smooth out the variation and not flicker at all - but that introduces cost.
Dave
Copy link to clipboard
Copied
davescm wrote
A well made power supply should smooth out the variation and not flicker at all - but that introduces cost.
I should have guessed...
Anyway, we haven't heard what fill light the OP actually used here. I'd still like to know.
Copy link to clipboard
Copied
Still trying to figure out what this flickering is. The obvious explanation is mains frequency. But:
Here the mains frequency is 50Hz, so that's 1/50th second per period. There are 8 horizontal bands, at 1/320th second. That doesn't add up.
However - the actual sensor scanning probably takes a lot longer than the nominal shutter speed. I suppose it has to, if the sensor is scanned line by line, and each line represents 1/320th second.
Copy link to clipboard
Copied
This is from https://digital-photography-school.com/understand-flash-sync-speed-so-you-dont-sink-your-photo-shoot...
On-camera flash (i.e. Speedlight)
Your on-camera flash won’t let you set a shutter speed higher than your sync speed. However, some on-camera flash systems have a setting for high speed sync. In other words you can set a faster shutter speed than the normal sync speed. This setting is useful if you’re using flash outdoors because sometimes 1/200s is too slow a shutter speed, and will result in overexposure on a very bright day even at f22.
High speed sync sends several pulses of lower intensity light as the curtains travel across the focal plane, instead of the usual big burst a studio flash makes. Using high speed sync is also useful in situations where you want shallow depth of field, or fill light, if using flash outdoors
Copy link to clipboard
Copied
Yeah, that could be it.
There's another interesting side effect of shutterless exposure, this one occurring at slow speeds: Instead of camera shake, you may get bent and in some cases disjointed straight lines.
All in all, working with a silent, curtain-less shutter can be a blessing in delicate situations, and you may be able to get shots you otherwise couldn't get at all. But plan a little ahead to avoid these shortcomings. A traditional curtain shutter is still much safer if the noise is acceptable. I keep my Sony with shutter enabled as long as I can. In any case, it's still orders of magnitude quieter than my Nikons.
Copy link to clipboard
Copied
@davescm will the trick you posted work for thicker bands like this?
got a new mirrorless and didn't realize how much the banding was a problem on silent.
I have some of these from the getting ready, and some from a church ceremony. I'm desperately looking for a solution.
Copy link to clipboard
Copied
Hi Yes - if anything it is slightly easier as there is better separation between the soft banding (LF) and the fine detail (HF).
Separate the two layers as described in my earlier post then, with a soft low opacity brush, just paint into the Low Frequency Layer using colour picked up from other parts of the image

Dave
Copy link to clipboard
Copied
interesting solution.
didn't realize I'd have to paint the individual frames.
I think I'm going to have to look into an automated solution. I'm currently searching for plugins that fix "rolling banding"
Copy link to clipboard
Copied
Any luck with this?
Copy link to clipboard
Copied
Hi Dave,
I am trying this technique but could not figure out this part:
"with a soft low opacity brush, just paint into the Low Frequency Layer using colour picked up from other parts of the image"
Are you able to guide me? I am not an expert in Photoshop.
Thank you.
Aldrin
Copy link to clipboard
Copied
Hi Dave,
I figured out most of it. I'm using a brush to paint on the high pass layer, but nothing is happening. What am I missing here.
Copy link to clipboard
Copied
Hi
You will only see the smart filter mask after you click OK on the High Pass filter
Dave
Copy link to clipboard
Copied
Righto. I actually changed my question, cause I figured that part out.
I'm now painting on the high pass filter with a soft white brush, but nothing is happening. I attached a new screenshot above.
Copy link to clipboard
Copied
The High Pass filter part is not goint to work on that image - it was for the lighter more frequent banding in the original post. Try missing that step and painting on the LF layer. I'm about to leave so can't try it for you now but if you post the image I'll look at it tomorrow.
Dave
Copy link to clipboard
Copied
Thanks Dave! I will give it a try. 🙂
-
- 1
- 2
Find more inspiration, events, and resources on the new Adobe Community
Explore Now


