Participant
December 8, 2018
Answered

How to repair specific banding on a digital photo

  • December 8, 2018
  • 6 replies
  • 36946 views

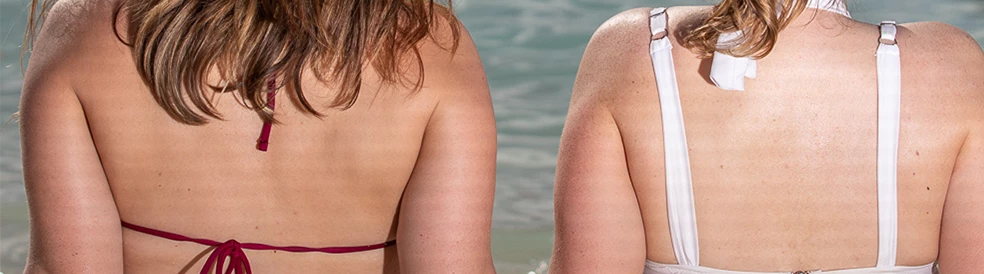
Hey, this isn't the normal kind of color banding. We think it possibly has something to do high speed sync with the electronic shutter at 1/8000 shutter speed. It seems the electronic shutter at a high shutter speed in really bright conditions will make the banding. I wasn't aware that this was happening while taking the photos...and now I have these irreplaceable images from a vacation that are essentially ruined. I was just wondering if anyone else has experienced this or has been able to repair this somehow so that I might keep these images. I'm going to attach one of the images as an example.

Correct answer Norman Sanders

(Click on image to see @ 100%)

Change the mode to Lab Color

Choose the L channel

Filter > Blur >Surface Blur Radius 9.  Threshold 15

Return mode to RGB

6 replies

Participant
August 11, 2020


This is what happened when I tried this method - didn't work for these shots :(( 

davescm
Community Expert
Community Expert
August 11, 2020

Which method, there are two described in this thread?

Dave

Participant
March 9, 2024

Hi Dave, 
I tried to use your high/low freq method but it doesnt seem to work.
is it the banding? or am i doing something wrong?
Really need your help here 
thank you

Norman Sanders
Norman SandersCorrect answer
Legend
December 8, 2018

(Click on image to see @ 100%)

Change the mode to Lab Color

Choose the L channel

Filter > Blur >Surface Blur Radius 9.  Threshold 15

Return mode to RGB

Inspiring
December 8, 2018

( Filter > Surface Blur )  Nice!  Worked great on the white hat, too.

davescm
Community Expert
Community Expert
December 8, 2018

You may be able to reduce the effect like this:

Make two copies of the image layer.

Name the lower "Low Frequency"

Name the upper "High Frequency"

Select the low frequency and apply a  gaussian blur of around 6px

Select the high frequency layer and goto menu Image - Apply Image
Set the layer to use as "Low Frequency"
Set Blending mode to subtract
Scale 2

Offset 128

Click OK

Set High Frequency layer blending mode to Linear Light

Put the high frequency layer in a smart object and use High pass adjusting the radius to keep the contrast detail but remove the banding
Invert the Smart filter mask so all is black

Use a soft brush to paint on the mask until the banding goes


I added a masked copy of the original and lightly painted back in over any edge "ringing"

Not perfect, it has softened the skin, but IMO easier on the eye than the original banding

Dave

Kimjayphoto
Participating Frequently
October 25, 2019

Hi Dave,

I figured out most of it. I'm using a brush to paint on the high pass layer, but nothing is happening. What am I missing here.

Kimjayphoto
Participating Frequently
October 25, 2019

Hi

You will only see the smart filter mask after you click OK on the High Pass filter

Dave


Righto. I actually changed my question, cause I figured that part out. 


I'm now painting on the high pass filter with a soft white brush, but nothing is happening. I attached a new screenshot above. 

c.pfaffenbichler
Community Expert
Community Expert
December 8, 2018
D Fosse
Community Expert
Community Expert
December 8, 2018

Interesting. What's the fill light, specifically? On camera flash? Some kind of LED? That's where it is, not the background.

I've noticed with my Sony that the silent shutter tends to give these interference stripes in LED and fluorescent lighting. That's because the sensor is scanned, not read all in one. I just need to be careful to avoid a certain shutter speed range, and adjust ISO if necessary.

Fixing it is possible, but takes a lot of time. No magic button.

Abambo
Community Expert
Community Expert
December 8, 2018

that looks like a lot of photoshopping. I do not know any point and click solution for this.

Discussion successfully moved from Adobe Creative Cloud to Photoshop

ABAMBO | Hard- and Software Engineer | Photographer