• Global community
    • Language:
      • Deutsch
      • English
      • Español
      • Français
      • Português
  • 日本語コミュニティ
    Dedicated community for Japanese speakers
  • 한국 커뮤니티
    Dedicated community for Korean speakers
Exit
0

Hue/Saturation Adjustment has no effect -please help

Community Beginner ,
May 07, 2018 May 07, 2018

Copy link to clipboard

Copied

For the past few months I've been using the exact same method to achieve a 'glow' effect for my digital art using these steps: (reference The Complete Guide to Self-Publishing Comics by Comfort Love and Adam Withers pages 113 to 116)

Steps (quoted directly from the book):

1. Open up your image. For this exercise, anyone or anything with eyes will do; just make sure your image is at least 200 dpi (dots per inch) and 3 by 3 inches.

2. Set your page's mode to full color by selecting Image>Mode>RGB Color.

3. Make a new layer by clicking on the Create New Layer icon on your Layers window.

4. Click the Foreground Color selector and choose black.

5. Fill your layer with black by using the Paint Bucket tool, or select Edit>Fill and fill with the foreground color (Alt/Option+Backspace).

6. Once your layer is filled with black, go to your Layers window and click on your Blending Modes menu and change the layer's mode to Screen. The black will disappear because the Screen layer mode makes all blacks transparent and all whites opaque.

7. Go back to your Foreground Color and select white.

8. Get your Brush tool and choose a soft-edged brush. Set your brush's Opacity to 100% and Flow 8%.

9. You want to create a glow that's strongest in the center and fades at the edges. To more easily accomplish this, use your bracket keys ([ and ]) to quickly change the size of the brush you're using. Paint your most intense white with a tiny brush in your subject's pupils, and then increase the size of your brush incrementally as you softly increase the glow size outward from that center point.

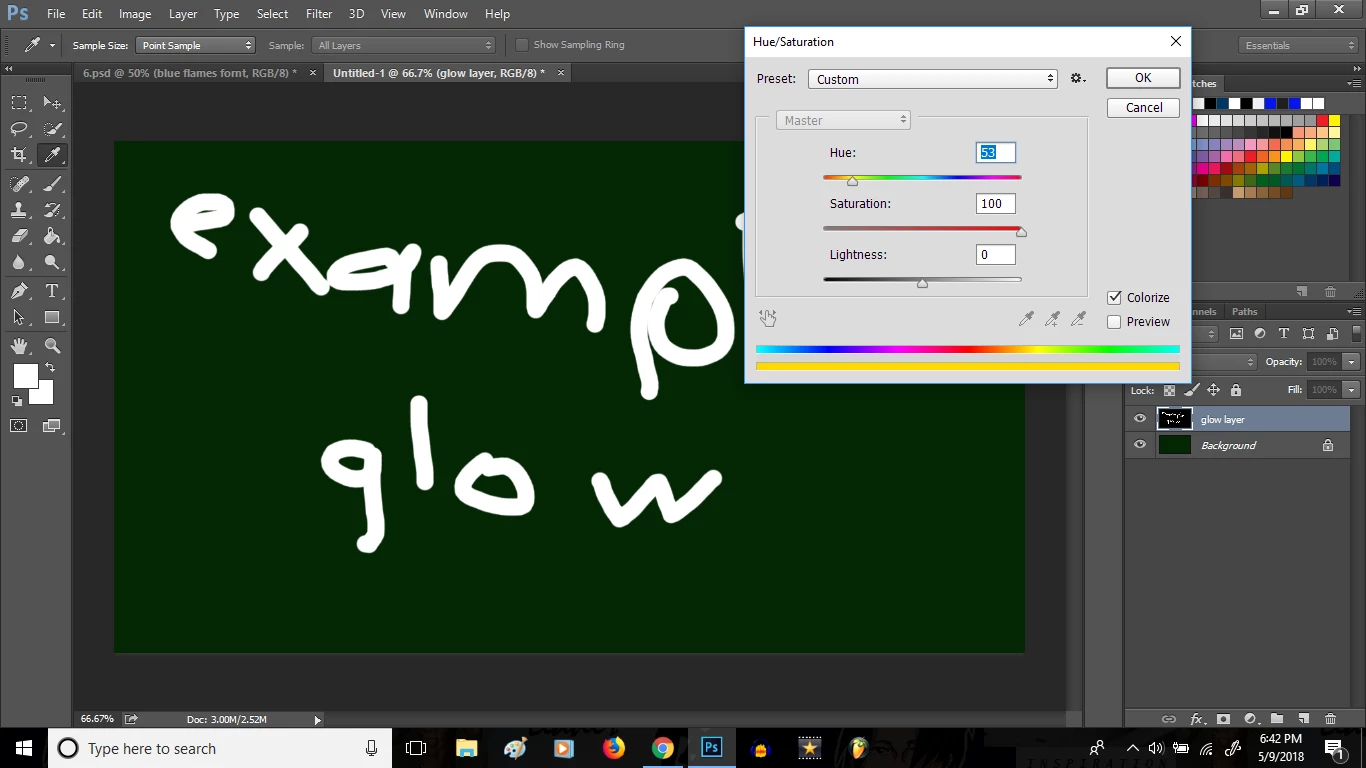
10. All right, this is the fun part. Click Image>Adjustments>Hue/Saturation (Ctrl/Cmd+U). This is another one of those windows we use all the time, so get comfortable with it. Once the Hue/Saturation window pops up, click on the little box in the bottom left corner that says, Colorize.

11. Move your Hue and Saturation slider bars to get the color you want. Hue changes what color the glow will be; Saturation adjusts how bold and colorful the glow is. Voila! You've just made your first glow in Photoshop!

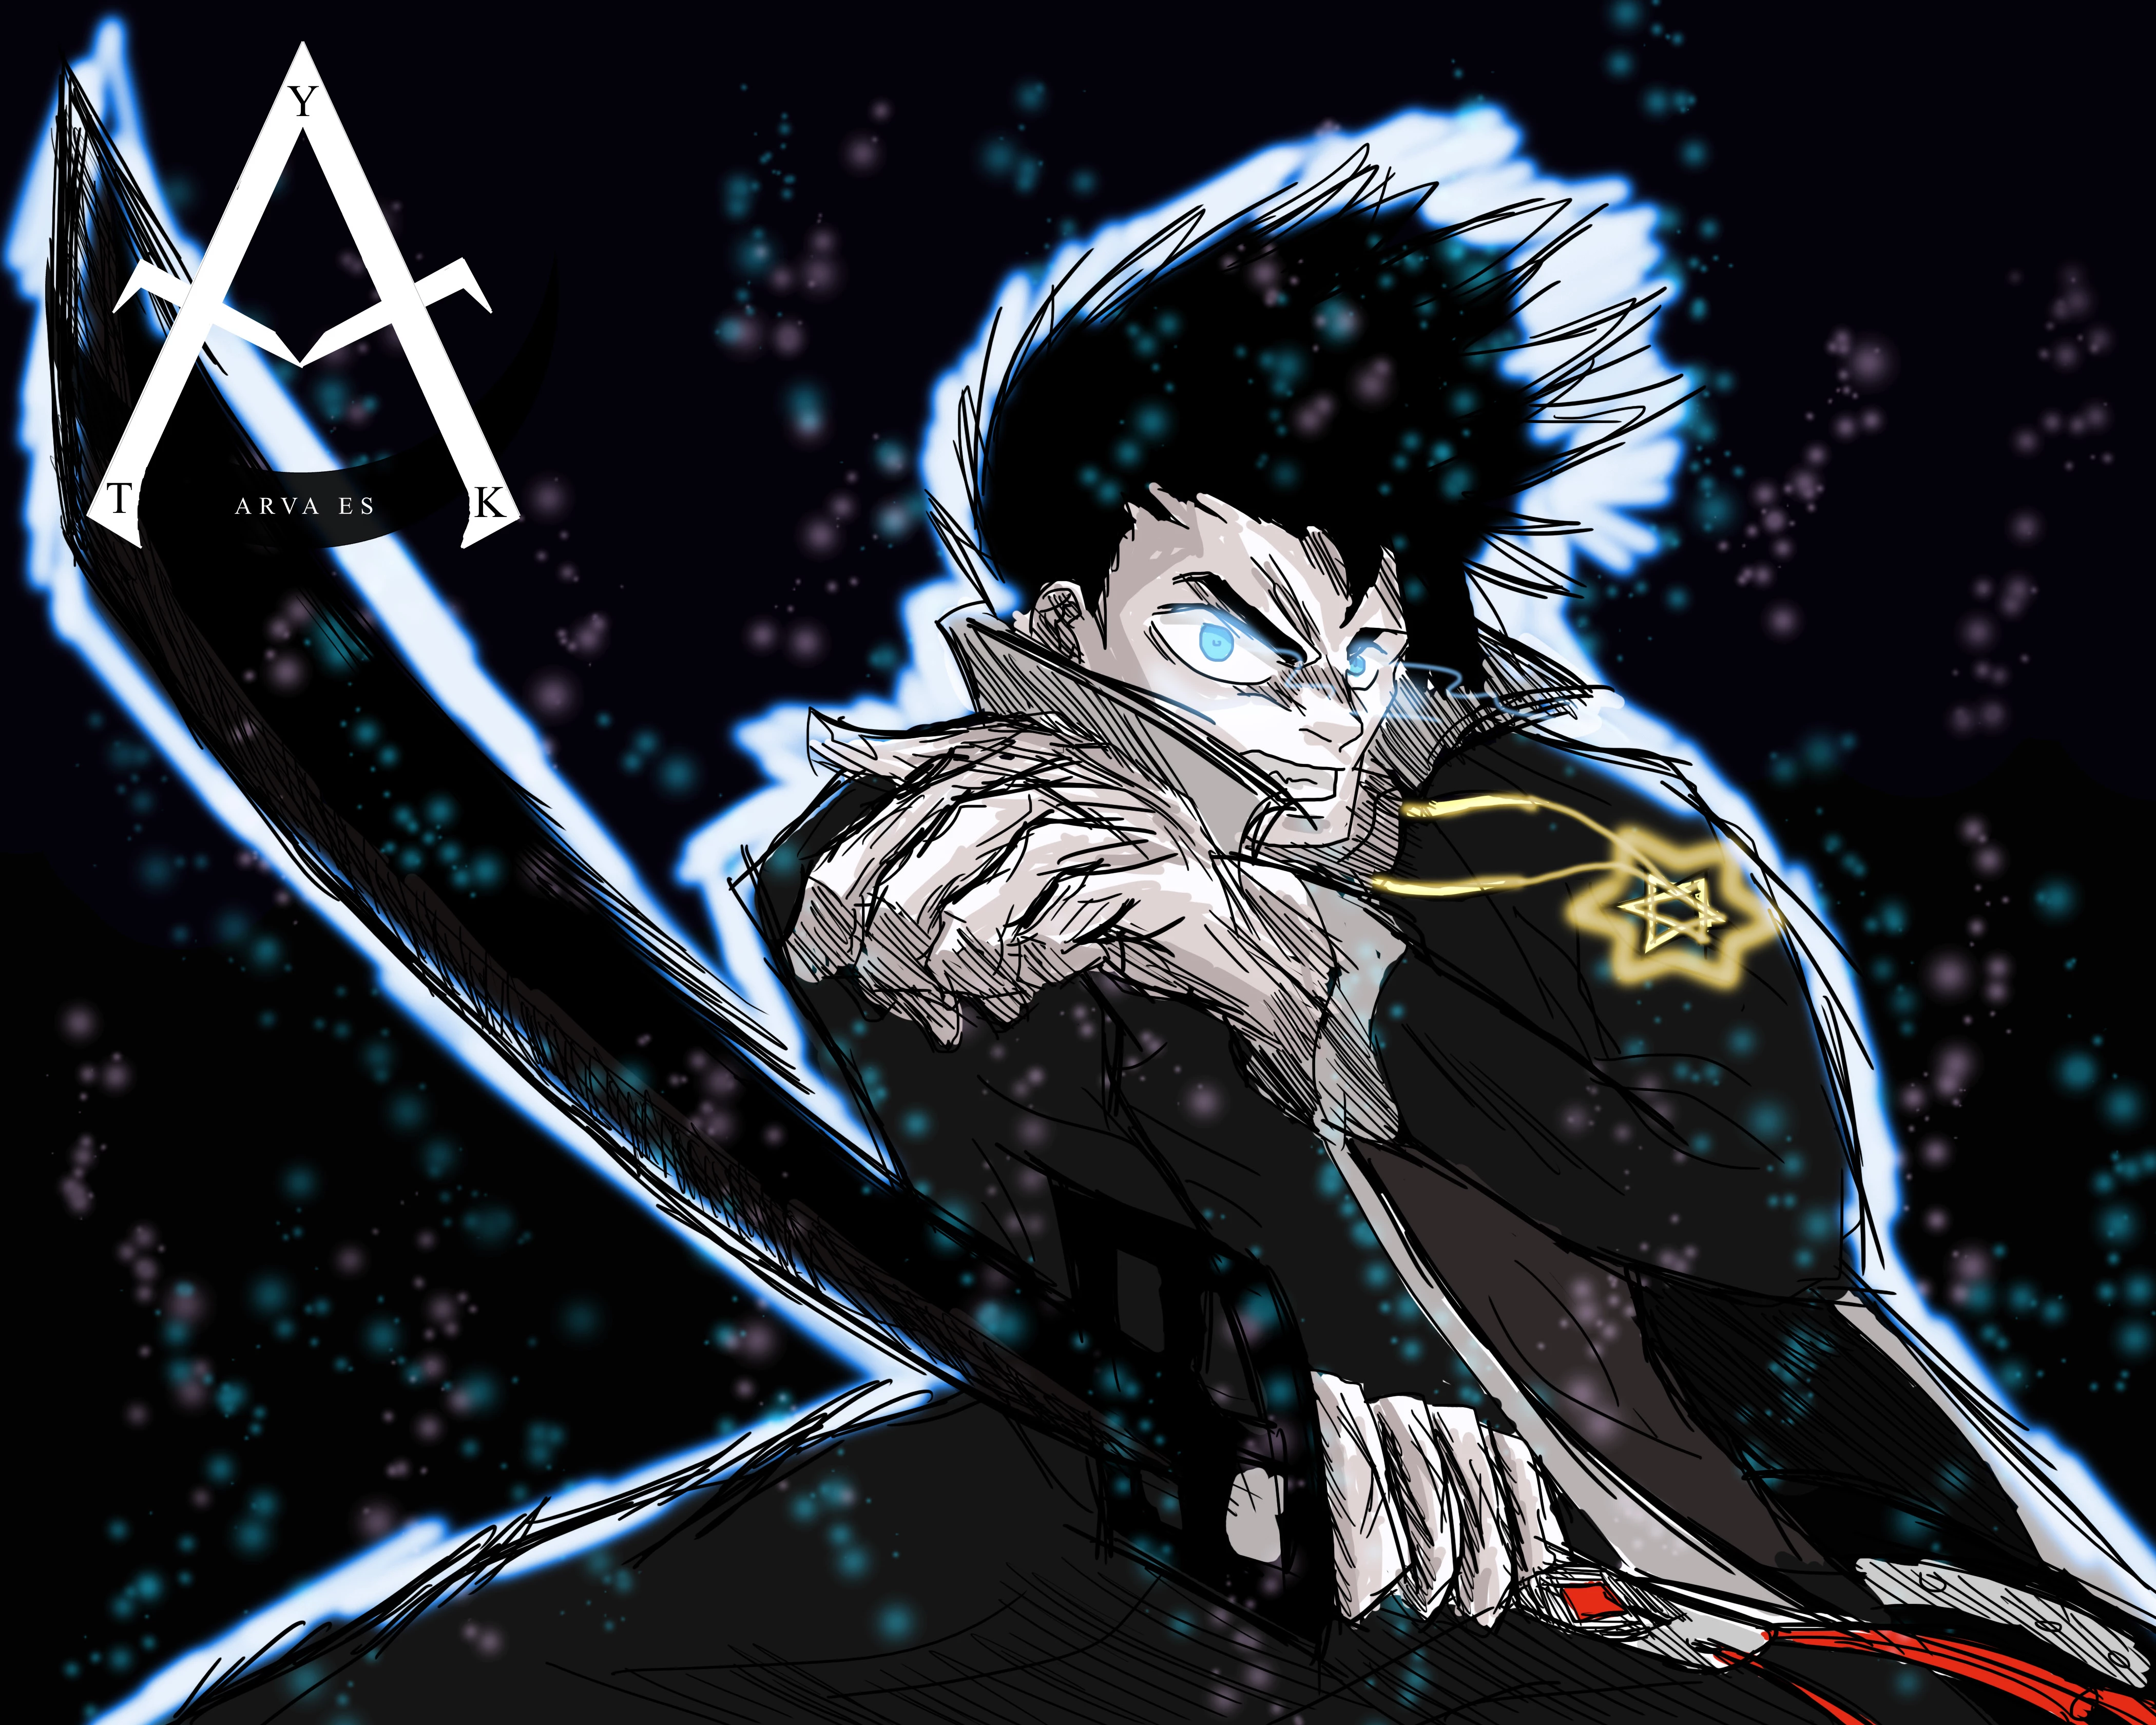
So whether you try this out for yourself for the first time or if you already use this method, you get the point. So my problem is that once I get to the Hue/Saturation step, nothing happens. Nothing is greyed out, it just literally has no effect on the document regardless of what I do. No color difference, not even Lightness has any effect which is the most disturbing part, because if you set it to -100 the screen turns black and at +100 the screen turns white under normal conditions. But as I said, no effect takes place. I've been using this method without problem for several months and all of a sudden I've run into this problem. I spent several hours checking to make sure everything else is correct normally and in relation to the steps. I did it the exact same way I always have, but now it doesn't work. It won't even work on other documents. I would very much appreciate help on resolving this issue as I use this effect in nearly all of my drawings. Below is one of my examples on how it's supposed to look:Micah sketch preview.jpg

Views

10.1K

Translate

Translate

Report

Report
Community guidelines
Be kind and respectful, give credit to the original source of content, and search for duplicates before posting. Learn more
community guidelines

correct answers 1 Correct answer

Community Expert , May 09, 2018 May 09, 2018

Hi you need to use a soft brush. Hue and saturation does not affect pure white or pure black only the intermediate values. A soft brush will give some intermediate values to act on. The luminosity of the pixels remains the same. That is why the glow in your earlier pic went from white, through colour to black.

Dave

Votes

Translate

Translate
Adobe
Community Expert ,
May 07, 2018 May 07, 2018

Copy link to clipboard

Copied

This is an old workflow. Try using the hue saturation adjustment layer, it’s the first icon in the second row in the adjustment panel. the “glow” in your screenshot looks blue to me...

Melissa Piccone | Adobe Trainer | Online Courses Author | Fine Artist

Votes

Translate

Translate

Report

Report
Community guidelines
Be kind and respectful, give credit to the original source of content, and search for duplicates before posting. Learn more
community guidelines
Community Beginner ,
May 07, 2018 May 07, 2018

Copy link to clipboard

Copied

A friend also recommended this method to me, but I found that I'm unable to be as creative with it. The method that I've been using allows me to 'draw' what I want to glow first. For example, in the picture I showed above, I used the brush to draw over the eyes and around the character and the dots then I added in the glow. In the method suggested, I can draw over what I want to have the glow effect but I have to choose a color very close to the color I would like to glow. The other problem is that it doesn't have the same visual effect as you can see here (compare this drawing'g glow effect with that one^)

It looks decent, but not nearly as good as before, also this method is less convenient to me. Is there any solution so that I might get the previous effect again?

6.jpg

Votes

Translate

Translate

Report

Report
Community guidelines
Be kind and respectful, give credit to the original source of content, and search for duplicates before posting. Learn more
community guidelines
Community Expert ,
May 08, 2018 May 08, 2018

Copy link to clipboard

Copied

In the method suggested, I can draw over what I want to have the glow effect but I have to choose a color very close to the color I would like to glow.

As per melissapiccone’s advice you could clipping mask a Hue/Saturation Layer to your black/white painted Layer and maintain editabiliy while getting exactly the same result as when applying the Adjustment destructively.

Votes

Translate

Translate

Report

Report
Community guidelines
Be kind and respectful, give credit to the original source of content, and search for duplicates before posting. Learn more
community guidelines
Community Beginner ,
May 08, 2018 May 08, 2018

Copy link to clipboard

Copied

I did try to do that, but wasn't effecting what i did in white. It only worked if the color i used for the brush was similar to the Hue that I chose in the adjustment layer. (hence the inconvenience). But really this method is okay to use, I just want to figure out how to achieve the same look (I want my glows to look like pic 1 not pic 2).

Votes

Translate

Translate

Report

Report
Community guidelines
Be kind and respectful, give credit to the original source of content, and search for duplicates before posting. Learn more
community guidelines
Community Expert ,
May 08, 2018 May 08, 2018

Copy link to clipboard

Copied

Have I not asked for screenshots?

Unless you do your part it seems unlikely that people will be able to help you.

For example without the pertinent screenshots we cannot be sure you checked »Colorize«.

Votes

Translate

Translate

Report

Report
Community guidelines
Be kind and respectful, give credit to the original source of content, and search for duplicates before posting. Learn more
community guidelines
Community Beginner ,
May 09, 2018 May 09, 2018

Copy link to clipboard

Copied

Untitled.png

this layer adjustment is clipped to edit the blue flames in the foreground.

Votes

Translate

Translate

Report

Report
Community guidelines
Be kind and respectful, give credit to the original source of content, and search for duplicates before posting. Learn more
community guidelines
Community Expert ,
May 09, 2018 May 09, 2018

Copy link to clipboard

Copied

There is no reason at all why step 10 cannot be replaced by "Add a Hue and Saturation adjustment layer directly above the "glow" layer. Alt click on the border in the layers panel to clip the adjustment to the glow layer. Tick colorize and adjust to get the effect you want.". That would make the process non-destructive i.e you can go back an alter the glow later.

As c.pfaffenbichler has requested we need to see screenshots including the layers panel and teh Hue/Sat settings to see why you are have this problem

Dave

Votes

Translate

Translate

Report

Report
Community guidelines
Be kind and respectful, give credit to the original source of content, and search for duplicates before posting. Learn more
community guidelines
Community Beginner ,
May 09, 2018 May 09, 2018

Copy link to clipboard

Copied

The problem is that I can't get it to glow in the first place. This is what I meant previously by the Hue/Saturation adjustment not having any effect. As you can see below I selected colorize and maximized saturation. At this point it should the same effect in appearance as the very first example image I uploaded^.

hdhdthd.png

Votes

Translate

Translate

Report

Report
Community guidelines
Be kind and respectful, give credit to the original source of content, and search for duplicates before posting. Learn more
community guidelines
Community Expert ,
May 09, 2018 May 09, 2018

Copy link to clipboard

Copied

Hi you need to use a soft brush. Hue and saturation does not affect pure white or pure black only the intermediate values. A soft brush will give some intermediate values to act on. The luminosity of the pixels remains the same. That is why the glow in your earlier pic went from white, through colour to black.

Dave

Votes

Translate

Translate

Report

Report
Community guidelines
Be kind and respectful, give credit to the original source of content, and search for duplicates before posting. Learn more
community guidelines
Community Beginner ,
May 10, 2018 May 10, 2018

Copy link to clipboard

Copied

Thank you very much! I've found that your suggestion has resolved my issue. I very much appreciate this, for as I said this effect is mandatory for many of my comic panels. If you'd like to see more of it you could search me up on Webtoons (search: Starbreaker).

This makes things so much easier. Thanks again

Votes

Translate

Translate

Report

Report
Community guidelines
Be kind and respectful, give credit to the original source of content, and search for duplicates before posting. Learn more
community guidelines
Community Expert ,
May 10, 2018 May 10, 2018

Copy link to clipboard

Copied

LATEST

To ble able to adjust the effect later on there would be several options: Smart Object with Gaussian Blur, Layer Mask with Feather, …

Votes

Translate

Translate

Report

Report
Community guidelines
Be kind and respectful, give credit to the original source of content, and search for duplicates before posting. Learn more
community guidelines
Community Expert ,
May 08, 2018 May 08, 2018

Copy link to clipboard

Copied

What version of Photoshop are you using? I’m not sure why it would stop working. Using the adjustment layer isn’t any different and gives you huge advantages over your original workflow. You can change the colors at anytime. You can also work on different layers and use clipping masks.

Melissa Piccone | Adobe Trainer | Online Courses Author | Fine Artist

Votes

Translate

Translate

Report

Report
Community guidelines
Be kind and respectful, give credit to the original source of content, and search for duplicates before posting. Learn more
community guidelines
Community Beginner ,
May 08, 2018 May 08, 2018

Copy link to clipboard

Copied

I have PS CC 2015

Votes

Translate

Translate

Report

Report
Community guidelines
Be kind and respectful, give credit to the original source of content, and search for duplicates before posting. Learn more
community guidelines
Community Expert ,
May 08, 2018 May 08, 2018

Copy link to clipboard

Copied

Could you please post screenshots taken at View > 100% and with the pertinent Panels (Layers, Channels, Options Bar, …) visible?

Votes

Translate

Translate

Report

Report
Community guidelines
Be kind and respectful, give credit to the original source of content, and search for duplicates before posting. Learn more
community guidelines