 Adobe Community
- Home
- Photoshop ecosystem
- Discussions
- Re: Photoshop : trouble subtracting one layer mas...
- Re: Photoshop : trouble subtracting one layer mas...
Photoshop : trouble subtracting one layer mask from another
Copy link to clipboard
Copied
Hi everyone, I'm having trouble subtracting one layer mask from another.
I have a complex background mask on its own layer. The background mask includes some of the subjects. I would like to subtract the subject layer masks, one at a time, from the background mask.
I used "select subject" to create multiple empty groups, each group having a layer mask revealing one of the subjects.
I tried to follow Julieanne Kost's blog post instructions--
Converting a Layer Mask into a Selection
To convert a Layer Mask to a selection, Command -click (Mac) | Control -click (Win) on the Layer Mask thumbnail in the Layers panel. You can then add, subtract or intersect the resulting selection with another Layer Mask using the following shortcuts:
Command + Shift (Mac) | Control + Shift (Win) to add additional Layer Mask to the selection.
Option +Command (Mac) | Alt +Control (Win) to subtract another Layer Mask from the selection.
Option +Command + Shift (Mac) | Alt +Control + Shift (Win) to create the intersection of two Layer Masks.
https://jkost.com/blog/2017/08/15-shortcuts-for-working-with-layer-masks-in-photoshop-cc.html
--- with no success. What happens is as follows, in Photoshop 25.0.0--
- Converting the target layer mask (the background mask) to a selection is successful.
- When I press and hold Alt + Ctrl, the cursor shows a minus sign for subtraction : successful
- Still holding down Alt + Ctrl, when I left-click on the subject mask in the other group layer, to subtract the subject from the background, a blue border briefly flashes around the Layers panel, and the subject layer mask is selected, while the target background layer mask is deselected. Not what I intended.
4. I also tested adding the subject mask to the background mask, as well as intersecting. Both of these operations work successfully, per instructions above.
I also tested and verified my Ctrl and Alt keys ((Logitech MX Keys), and Alt + Ctrl, using Windows 10 On-Screen Keyboard.
As a workaround, I'm wondering if the layer mask subtraction can be performed by "promoting" the 2 layer masks to first-class greyscale images, on separate layers, and then using a blend mode and flatten?
Any help sincerely appreciated, please?
Thank you for your consideration.
Explore related tutorials & articles
Copy link to clipboard
Copied
Another workaround I'll try is working the other way, and adding subject masks to a new black layer mask.
Copy link to clipboard
Copied
Make the layer with its mask a Smart Object and add another layer mask.
Copy link to clipboard
Copied
Hi Trevor, thank you for responding and for your suggestion. Just for everyone's benefit, Julieanne Kost has a YouTube video on the technique you described.
I tested this out on my end, and I got the intersection of the 2 masks, not the subtractive difference I'm looking for.
Copy link to clipboard
Copied
I am not completely sure of you entire intended workflow, but I think you might be able to get it from this.
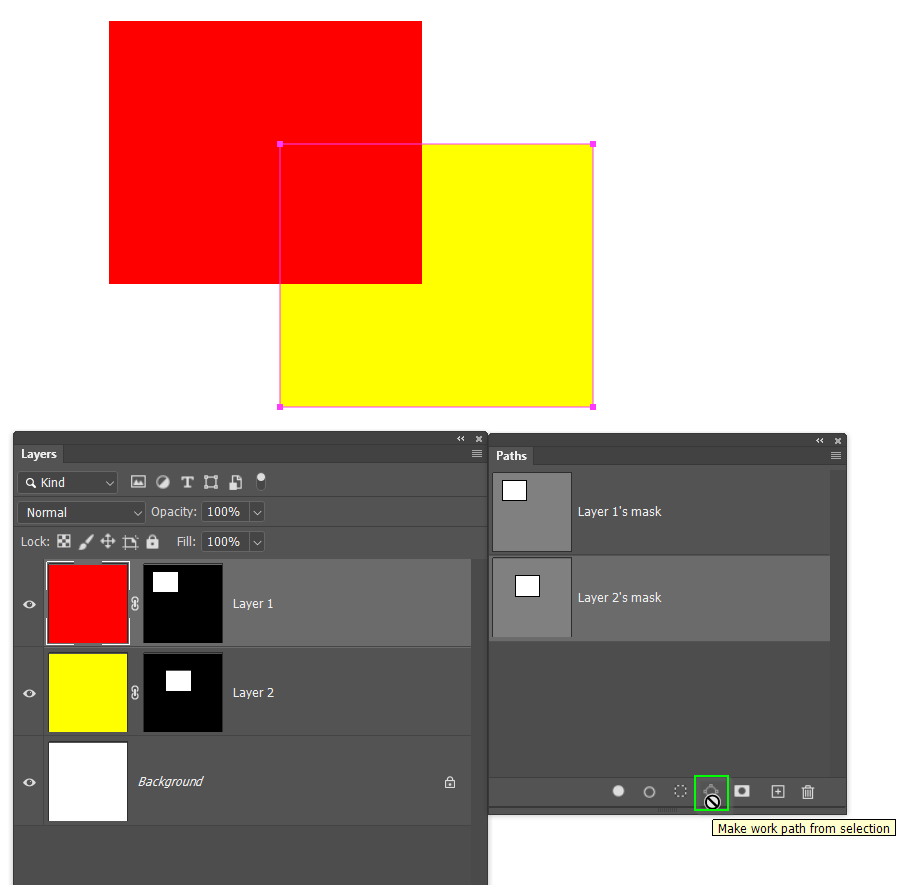
Assuming you have two layers with overlapping layer masks.
Ctrl click the first layer mask to load it as a selection, and use Make work path from selection icon in the Paths panel. Repeat for the other channel.
Ctrl click the layer 2 path to make ALL OF its points active, and copy with Ctrl c
Select layer 1's path, and paste with Ctrl v
You can now use the Path Operations drop down in the Option Bar, and select the required interaction.
I am sure you can work it out from there. I'd probabl;y delete the existing mask from layer 1. Ctrl click the layer on path tp load as a selection, and re-add a layer mask to layer 1
Copy link to clipboard
Copied
Trevor,
Thank you! You really went above and beyond, in explaining how to do the subtraction via work paths.
Just to clarify, please-- normal, basic layer mask subtraction works fine on your end, yes? In this case, something is obviously glitching on my end with this feature. I might just have to reinstall PS 25.0.0. If that doesn't resolve the issue, I may report this as a "bug" (i.e. likely incompatibility with something).
Thank you again for your time and for the helpful post on paths.
Copy link to clipboard
Copied
I would save all your masks as individual alpha channels, and use Image > Calculations to do the math.
Copy link to clipboard
Copied
I would save all your masks as individual alpha channels, and use Image > Calculations to do the math.
By @Semaphoric
I was going to suggest Apply Image, either way, the same idea, working with pixel data rather than selections.
Copy link to clipboard
Copied
I had to look up how that would work Stephen, and found a cool feature I have never used before. You never stop learning with Photoshop.
Copy link to clipboard
Copied
@Trevor.Dennis – there are always new things to learn in Photoshop, we probably all have various specific use cases that don't encompass the entire application. The funny thing is, I use Apply Image and Calculations for more "technical" results than "artistic", so YMMV!


