Exit
  • Global community
    • Language:
      • Deutsch
      • English
      • Español
      • Français
      • Português
  • 日本語コミュニティ
  • 한국 커뮤니티
1

remove color noise

Explorer ,
Sep 02, 2018 Sep 02, 2018

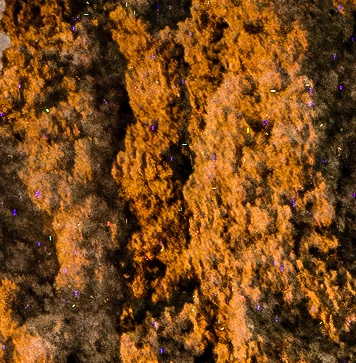
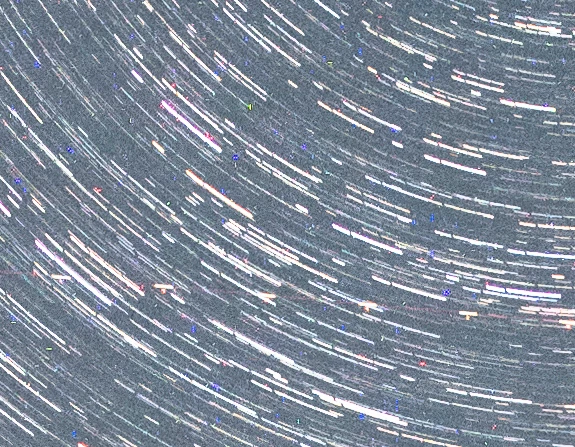
I'm trying to remove color noise from a star trails picture.  The color noise is quite obvious when you blow up the image but I've tried many things to no avail. Using the noise filter/dust and scratches does the most but is far from perfect or even good.  I've included two small sections of the picture one for sky and one for foreground.  If there's a good solution for sky verses foreground that's fine.  Any ideas would be most appreciated.

foreground.jpgsky.jpg

8.0K
Translate
Report
Community guidelines
Be kind and respectful, give credit to the original source of content, and search for duplicates before posting. Learn more
community guidelines
Adobe
Community Expert ,
Sep 02, 2018 Sep 02, 2018

Have you tried color noise reduction in the Camera Raw filter? What version of Photoshop do you use? You’ll find it in the filter menu of Photoshop CC.

Translate
Report
Community guidelines
Be kind and respectful, give credit to the original source of content, and search for duplicates before posting. Learn more
community guidelines
Explorer ,
Sep 03, 2018 Sep 03, 2018

I did try the the color noise reduction in LightRoom which looks very much the same as camera raw filter in PS.  In fact the next suggestion also suggested using the camera raw filter.  I played around with the color noise sliders and saw no improvement.  If you tried what you're suggesting on my files perhaps I'm missing something.  Thanks for the suggestion.

Translate
Report
Community guidelines
Be kind and respectful, give credit to the original source of content, and search for duplicates before posting. Learn more
community guidelines
Explorer ,
Mar 01, 2022 Mar 01, 2022
LATEST

I using version 23.2.1 of photoshop.  I'm not sure which filter option you ment so I used noise/noise reduction.  The main problem is it turns the noise to white which doesn't really help.

Translate
Report
Community guidelines
Be kind and respectful, give credit to the original source of content, and search for duplicates before posting. Learn more
community guidelines
Community Expert ,
Sep 02, 2018 Sep 02, 2018

hi check this video i think its very easy to do it...thanks

Ali Sajjad / Graphic Design Trainer / Freelancer / Adobe Certified Professional
Translate
Report
Community guidelines
Be kind and respectful, give credit to the original source of content, and search for duplicates before posting. Learn more
community guidelines
Explorer ,
Sep 03, 2018 Sep 03, 2018

The video had two suggestions neither of which had much if any effect.  Thanks for the suggestion.

Translate
Report
Community guidelines
Be kind and respectful, give credit to the original source of content, and search for duplicates before posting. Learn more
community guidelines
Community Expert ,
Sep 02, 2018 Sep 02, 2018

This “colour noise” is more like a “dead/stuck pixel”… If you convert a copy of the image to Lab mode, then the A and B channels could be used to isolate the errant pixels and create a mask using curves or filters to increase the contrast etc. The mask could then be used to isolate corrections, content aware fills etc. Good luck!

Translate
Report
Community guidelines
Be kind and respectful, give credit to the original source of content, and search for duplicates before posting. Learn more
community guidelines
Explorer ,
Sep 03, 2018 Sep 03, 2018

Going to lab mode looks interesting.  I can see the possibilities of using the a and b channels to create masks.  I need to read up a bit more on how to use the lab channels.  I also need to find some info on content aware fills.  Looks promising. 

I'm not sure how I'd classify this noise.  Probably stuck pixels is close as it seems temperature dependent.  These are long exposures and the night this picture was taken was in the low 60's.  The previous two night shooting the temperature was in the high 40's and much much less noise of this sort.

Again thanks to everyone for taking the time to reply.

Translate
Report
Community guidelines
Be kind and respectful, give credit to the original source of content, and search for duplicates before posting. Learn more
community guidelines
Community Expert ,
Sep 03, 2018 Sep 03, 2018

in video method one try to increase blur value i tried its working

Ali Sajjad / Graphic Design Trainer / Freelancer / Adobe Certified Professional
Translate
Report
Community guidelines
Be kind and respectful, give credit to the original source of content, and search for duplicates before posting. Learn more
community guidelines
Explorer ,
Sep 04, 2018 Sep 04, 2018

I tried using the gaussian blue again and what I see is the color noise changes to while noise.  Here's a small screen shot of my result: 

Screen Shot 2018-09-04 at 1.30.17 PM.png

Translate
Report
Community guidelines
Be kind and respectful, give credit to the original source of content, and search for duplicates before posting. Learn more
community guidelines
Community Expert ,
Sep 03, 2018 Sep 03, 2018

I shoot Astro Photography long exposures and I find the Color Noise reduction helps a lot in the RAW editor you are using. Whether that is LR or ACR, or Camera Raw Filter. But you won't see it do much unless you are zoomed in to 100% scale int he preview window. Otherwise that color noise just stays looking noisy.

Translate
Report
Community guidelines
Be kind and respectful, give credit to the original source of content, and search for duplicates before posting. Learn more
community guidelines
Explorer ,
Sep 04, 2018 Sep 04, 2018

I agree the dust and scratches works well in some cases.  In my case the foreground was cleaned up pretty well. It's a bit of a balancing act trying to remove the color noise without killing off the detail.  What did not work well was the sky.  The dust and scratches kill off a significant portion of my star trails.  What I finally did was to combine and image with dust and scratches applied with an unaltered version to create a composite of unaltered sky with filtered foreground.  While I can see the color noise in the sky if you pixel peep it's not noticible at a reasonable magnification.  The trails are to busy to notice the noise.

I'm still trying to play around with the lab suggestion.  I need to work a bit more trying to fine tune the masks from the a and b channels.

Translate
Report
Community guidelines
Be kind and respectful, give credit to the original source of content, and search for duplicates before posting. Learn more
community guidelines
Explorer ,
Sep 06, 2018 Sep 06, 2018

I'm still not happy with what I've been able to do.  I have not been very successful using the lab channels as masks.  It's pretty hard to get just what you want masked without including much more or the opposite of not including what shouldn't be there but excluding what you want to change.  The dust and scratches works pretty well for the foreground but does poorly in the sky.  If you look at this color noise at the pixel level is looks pretty obvious what needs to be removed. If you run the cursor over these areas you see very significant changes reported in the info pane.  The real problem for the sky is that it has these sudden transitions (star trails) like the color noise but they extend for much longer than the noise.  I'm including another screen shot a piece of the sky at a pixel level that has a small part of a star trail and some color noise.  Any more ideas?

Screen Shot 2018-09-06 at 10.28.28 AM.png

Translate
Report
Community guidelines
Be kind and respectful, give credit to the original source of content, and search for duplicates before posting. Learn more
community guidelines
Community Expert ,
Sep 06, 2018 Sep 06, 2018

Here is a crop of a very quick b channel mask. Curves and some painting to remove the crud, a minimum filter of 1px to expand, blur and then invert to black background and white dot mask:

b-mask.png

And here is an enlarged animation of the same crop area, before/after content aware fill:

sky-b-anim.gif

Translate
Report
Community guidelines
Be kind and respectful, give credit to the original source of content, and search for duplicates before posting. Learn more
community guidelines
Community Expert ,
Sep 06, 2018 Sep 06, 2018

Are you shooting RAW files, or JPEGs? Camera Raw (not the filter) should eliminate the stuck pixels from RAW files when converting.

Translate
Report
Community guidelines
Be kind and respectful, give credit to the original source of content, and search for duplicates before posting. Learn more
community guidelines
Explorer ,
Sep 07, 2018 Sep 07, 2018

Yes the original images were raw.  The image I'm playing with was made by taking my 5 images from lightroom to layers in PS, create a smart object from the 5 layers and stack taking the max value.  This was perhaps not the best way to make a star trail image but it was simple.  So the noise in the pieces of image I've been including is the worst case situation.  When I look and compare the 5 images against each other I see some of the noise is the same across all the images and some is individual.  These images were all in the 6 minute exposure area.  I do not see this noise in the images I took earlier in the night that were shorter.

Arnold:  I'm not sure what you had in mind using the stamp tool.  Could you elaborate please?

Stephen: You realize the piece of the image in included was a very small part of the whole image.  How much painting did you need to do?  I'd say there's a good chance painting would be impractical for the whole image.

Thanks again for the replies.

Translate
Report
Community guidelines
Be kind and respectful, give credit to the original source of content, and search for duplicates before posting. Learn more
community guidelines
Community Expert ,
Sep 07, 2018 Sep 07, 2018

create a smart object from the 5 layers and stack taking the max value.

For retouching purposes, you could do the same using median or mean blending in the stack to see if that cancels out most of the stuck pixels, then blend and mask this in to your existing image.

Translate
Report
Community guidelines
Be kind and respectful, give credit to the original source of content, and search for duplicates before posting. Learn more
community guidelines
Explorer ,
Sep 11, 2018 Sep 11, 2018

There's common stuck pixels and non-common pixels between the 5 frames so changing the stack method won't help much.  When I get a chance I can try creating a dark frame.  The fact that the frames don't have exactly the problems means it won't be perfect but perhaps it will be enough.

Translate
Report
Community guidelines
Be kind and respectful, give credit to the original source of content, and search for duplicates before posting. Learn more
community guidelines
Community Beginner ,
Sep 07, 2018 Sep 07, 2018

Take the Stamp tool and do alt-click to determine the source and paint.

Translate
Report
Community guidelines
Be kind and respectful, give credit to the original source of content, and search for duplicates before posting. Learn more
community guidelines
Community Expert ,
Sep 07, 2018 Sep 07, 2018

Hi Arnold, if resorting to manual cleanup, I’d suggest the spot healing tool (no need to select a source).

This reminds me of having to “spot” drum scans, which I had to do 20 years or so ago, before we had healing tools.

There are two approaches: Perfectionist and Pragmatic.

If the image warrants perfection, then hit the home key, start in the upper left at say 200% zoom, then manually spot clean each offending dot working away to the far right. Then page down and repeat moving back to the left etc. Eventually you will end up on the bottom right and have a pristine image.

If you need to be pragmatic, you zoom out, 50% or 25% and only clean the “big dots” knowing that the smaller ones will be averaged out by output and viewing factors and it is not worth spending the time pixel peeping, making busy work. I found that uneven zoom views were actually better as the viewing algorithm would amplify the major spots/blemishes rather than smooth them away as would happen at even zoom views.

Translate
Report
Community guidelines
Be kind and respectful, give credit to the original source of content, and search for duplicates before posting. Learn more
community guidelines
LEGEND ,
Sep 07, 2018 Sep 07, 2018

As the others have already mentioned, these are "dead pixels." When taking exposures longer than 20-30 seconds, these defective pixels become more and more prominent.  There is an easy way to get rid of these dead pixels - unfortunately it may require the "shoot it again filter."

The idea is to take your main exposure, then immediately take a second "dark frame" of the same exposure time and ISO, with the lens cap on. This works because, generally speaking, those dead pixels are always in the same spot; however their characteristics can change due to exposure settings and sensor temperature.

Once you have that data, the two files can be loaded into Photoshop as a stack. You'll then have two options:

  1. Set the "dark frame" to "Subtract" blend mode.
  2. Select black of dark frame using Color Range, invert Selection, Content Aware Fill the main image.

The catch to the first method is all the subtracted areas will be black, so depending on the image this may not yield satisfactory results.

Here are embellished examples:

1.jpg2.jpg3.jpg4.jpg5.jpg

There is a possibility that simply taking another image at this point (with the exact settings as the problem image) may suffice. Worth a try.

Translate
Report
Community guidelines
Be kind and respectful, give credit to the original source of content, and search for duplicates before posting. Learn more
community guidelines
Community Expert ,
Sep 07, 2018 Sep 07, 2018

This is great Benjamin. I have heard of this process, but never explained this well. I'm curious for myself and Bangert, if he looks at the metadata of his images and sets his camera to the same exact settings, can he accomplish the second "dark shot" after the fact?

Translate
Report
Community guidelines
Be kind and respectful, give credit to the original source of content, and search for duplicates before posting. Learn more
community guidelines
LEGEND ,
Sep 07, 2018 Sep 07, 2018

There is a possibility taking the dark frame now might work. I've never tried it myself so far after the fact, but I have had it work several minutes later. I'd think the main issue that could negatively affect the dead pixels would be the sensor temperature. Depending on how long the sensor had been in use prior to taking the image in question, I think this should work. Or at least get things close!

Just got done editing that possibility into my previous reply before I saw your post.

Translate
Report
Community guidelines
Be kind and respectful, give credit to the original source of content, and search for duplicates before posting. Learn more
community guidelines
Explorer ,
Sep 23, 2018 Sep 23, 2018

Benjamin,

First off I've been distracted from working on my star trail photo and have come back to it.  I seem to be having trouble with the content aware fill command.  I've created what looks like a pretty good mask of the color noise in the foreground. I'll work on the sky later.  When I do the content fill command I end up with a big mess meaning something not recognizable.  I'm going to describe in detail what I did and hope you or someone can point out my error.  I'm also sure there are better ways to do what I did and would appreciate any pointers.

* Loaded image and went to channels

* I duplicated the red, green, and blue channels

* I copied each channel into a new document

* For each color channel I used levels and threshold to make a black and white image of the noise

* I then copied the three rgb channel documents as layers in a new document, turned the layers to a smart object, used smart stacking maximum to create a sum of the three layers, flattened and now had my mask

* I went back to my original image (less the colored channels), duplicated the background layer, added a new layer, and finally copied my mask document into the new layer

* At this point I had three layers, mask, duplicate of background, and background

* Having seen a Youtube video on content aware fill I saw I needed to make my mask a selection.

* I created a mask for the duplicate background, applied my mask, and now had the duplicate with the noise mask

* I command clicked on the mask to create a selection and then inverted it (mask layer originally was black with white showing noise)

* I then deleted the layer that just had the mask and also deleted the mask from the duplicate background

* At this point I now had the duplicate and original background as layers and a selection for the color noise

* With the duplicate layers selected I issued the content aware fill command.  My iMac churned for some time and finally produced the mess I mentioned.

My first attempt at content aware fill failed with this message:  "Could not fill because there are not enough opaque source pixels.".  I used the select/modify command to make the selected areas larger by one pixel and this allowed the fill command to run.

OK I'm sure I went about this in a very inefficient manner but I thought I ended up with what I needed to run the fill content aware command.  From the video I saw I needed the original background, a duplicate, and a selection.  I'm pretty sure I had that.  I can see the crawling ants showing the selection and I have the two layers.  What's wrong?  I'm including a snapshot of the mess.

Again any help is much appreciated.Screen Shot 2018-09-23 at 10.30.09 AM.png

Translate
Report
Community guidelines
Be kind and respectful, give credit to the original source of content, and search for duplicates before posting. Learn more
community guidelines
LEGEND ,
Sep 27, 2018 Sep 27, 2018

I command clicked on the mask to create a selection and then inverted it (mask layer originally was black with white showing noise)

If I read that quote correctly, the selection didn’t need to be inverted; the white will be selected, black will not. Dead pixels were shown as white before inverting.

My first attempt at content aware fill failed with this message:  "Could not fill because there are not enough opaque source pixels.".  I used the select/modify command to make the selected areas larger by one pixel and this allowed the fill command to run.

Providing my first thought is correct, the majority of the image (except for the dead pixels, which are not selected) is trying to be filled, and Photoshop could not work with the limited number of pixels left to collect data from.


Translate
Report
Community guidelines
Be kind and respectful, give credit to the original source of content, and search for duplicates before posting. Learn more
community guidelines