

- Home
- Photoshop ecosystem
- Discussions
- Re: Scaling Images with shift no longer works afte...
- Re: Scaling Images with shift no longer works afte...

Copy link to clipboard
Copied
After updating to CC 2019, I am not longer able to scale images evenly simply by holding shift.
I went to keyboard shortcuts and found a "scale" shortcut that was unassigned, so i assigned it to "S" as it simply wouldn't let me assign shift:
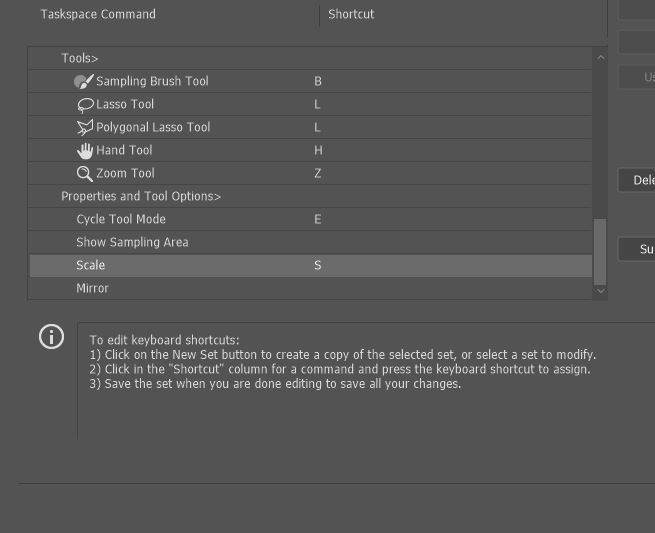
Now it seems to only want to scale evenly and won't let me scale however I want simply by dragging the corner of the image. Sometimes it doesn't go evenly when I transform with Ctrl+T and scales evenly after I press S, but wont let me go back to scaling unevenly.
Any Ideas?


 3 Correct answers

Proportional scaling (without holding Shift) is now a default. Holding Shift while scaling now behaves in precisely the opposite manner, despite decades of precedent and the fact that every other application uses Shift-drag for proportional scaling.
Why? Who knows. This is easily one of the most unnecessary and counterintuitive changes Adobe has ever made.
Details and instructions for how to disable it are at the link below.

Lots of people reporting this as a bug but it's a new feature. The behaviour in previous versions has now been reversed. Default is now proportional (constrain) - no Shift required. Shift for non-proportional.
New and enhanced features | Latest release of Photoshop CC
Scaling Images with shift no longer works after update (20.0)
It can be disabled if required (refer "New and enhanced..." link above - steps from that link reproduced below).
How do I turn off the new proportional scaling by default be
...
It's a new feature. The old behaviour has been reversed. Default = proportional (constrain). Shift for non-proportional. Few people see any logic in this change.
Plenty of forum posts on this
Scaling Images with shift no longer works after update (20.0)
CC20 transform tool: Shift doesn't keep Aspect ratio
The new behaviour can be disabled.
To revert to the legacy transform behavior, do the following:
- Use Notepad (Windows) or a text editor on Mac OS to create a plain text file (.txt).
- Type the text belo
Explore related tutorials & articles
 481
Replies
481
481
Replies
481
Copy link to clipboard
Copied
Proportional scaling (without holding Shift) is now a default. Holding Shift while scaling now behaves in precisely the opposite manner, despite decades of precedent and the fact that every other application uses Shift-drag for proportional scaling.
Why? Who knows. This is easily one of the most unnecessary and counterintuitive changes Adobe has ever made.
Details and instructions for how to disable it are at the link below.
Copy link to clipboard
Copied
Thanks so much. I followed the instructions and got it fixed. Still seems silly its not a simple check box somewhere
The "AppData" folder was a hidden folder so I had to make is show up by going to "View" and checking "Hidden Items"

Copy link to clipboard
Copied
Thank god this is working.
Changing something like this which worked the same way for years is not very useful...
To revert to the legacy transform behavior, do the following:
- Use Notepad (Windows) or a text editor on Mac OS to create a plain text file (.txt).
- Type the text below in the text file:
TransformProportionalScale 0 - Save the file as "PSUserConfig.txt" to your Photoshop settings folder:
- Windows: [Installation Drive]:\Users\[User Name]\AppData\Roaming\Adobe\Adobe Photoshop CC 2019\Adobe Photoshop CC 2019 Settings\
- macOS: //Users/[User Name]/Library/Preferences/Adobe Photoshop CC 2019 Settings/

Copy link to clipboard
Copied
Note that on a Mac the folder below is hidden. You will need to go to the finder and hit Shift-Command-G. Then hit "go."
- macOS: //Users/[User Name]/Library/Preferences/Adobe Photoshop CC 2019 Settings/

Copy link to clipboard
Copied
This does not work.
Copy link to clipboard
Copied
dans52574335 wrote
This does not work.
I'm not sure exactly what you are saying doesn't work.
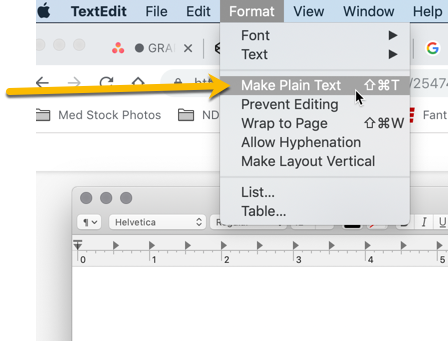
As far as the text file goes, at first it didn't work for me either on Mac. TextEdit on a Mac wants to use a .rtf extension. I had to get someone on a PC to make the text file. I'd post the file here but doesn't seem like that is an option. I'm an using Mac High Sierra 10.13.6.

Copy link to clipboard
Copied
I use a Mac and this worked. I opened TextEdit, went to File > New to start a new document. Then go to the top menu and select: Format > Make Plain Text. Then paste the code in: TransformProportionalScale 0 and then follow the directions to save this .txt file into the appropriate location.

Copy link to clipboard
Copied
Many Thanks, now it works with "Plain Text" !!!

Copy link to clipboard
Copied
in TextEdit, just open a new file then go to the Format menu and choose "make plain text" it will then save as a .txt file unless you say otherwise by naming the file. xxx.somethingotherthantxt
Hope that helps

Copy link to clipboard
Copied
I was having trouble getting to my user/library (Shift-Command-G.) to adjust this gawd awful scaling issue..this helps too
https://appletoolbox.com/2018/02/how-to-show-your-user-library-in-macos-high-sierra-and-sierra/
To revert to the legacy transform behavior, do the following:
- Use Notepad (Windows) or a text editor on Mac OS to create a plain text file (.txt).
- Type the text below in the text file:
TransformProportionalScale 0 - Save the file as "PSUserConfig.txt" to your Photoshop settings folder:
- Windows: [Installation Drive]:\Users\[User Name]\AppData\Roaming\Adobe\Adobe Photoshop CC 2019\Adobe Photoshop CC 2019 Settings\
- macOS: //Users/[User Name]/Library/Preferences/Adobe Photoshop CC 2019 Settings/

Copy link to clipboard
Copied
Need to make the text "plain text" and follow this to find the file to save the Text Edit to:
Or use the 'Go to folder…' command in finder (Shift + Apple + G)
Copy and paste the following into the dialogue box:
~/Library/Preferences/Adobe Photoshop CC 2019 Settings/
…and that should take you to the folder.
Copy link to clipboard
Copied
I used command+shift+G to find Adobe Photoshop CC 2019 Settings folder,
but there is no folder named like that.
Where can I find it?

Copy link to clipboard
Copied
You don't need anymore, just follow instructions in my post No. 146:
Re: Scaling Images with shift no longer works after update (20.0)

Copy link to clipboard
Copied
this didn't work for me. i checked the spelling and everything is correct. please help!

Copy link to clipboard
Copied
This still isn't working for me. There is no Library under my User Name folder. This update is going to make me lose my mind.
Copy link to clipboard
Copied
Or use the 'Go to folder…' command in finder (Shift + Apple + G)
Copy and paste the following into the dialogue box:
~/Library/Preferences/Adobe Photoshop CC 2019 Settings/
…and that should take you to the folder.
Copy link to clipboard
Copied
After an hour of looking for solutions that did it! Thanks so much!
Copy link to clipboard
Copied
This has worked for me on Mac High Sierra 10.13.6.
Thank you for posting.
And Adobe Japan Support - this was a totally unnecessary update that caused more aggravation than it did helpfulness.

Copy link to clipboard
Copied
This worked for me (PC), thank you very much.
@adobe think before doing nonsense modifications to a program that work well, thank you

Copy link to clipboard
Copied
Thank God AKS666 for this solution – it works! Last two days were cruel misery.
WTF Adobe? Seriously, I mean who thought this was good idea, who implemented it, tested it, approved and was absolutely sure this is good idea to change one of the basic shortcuts, used hundreds times a day and made it inconsitent with all other adobe apps, and even within Photoshop. And did it without simple checkbox to go back to previous behavior? What were you thinking? Why can't you change and develop things users really want, bugs that they report that are waiting for months, or even years?!
Copy link to clipboard
Copied
It's only copy and paste from this site  :
:

Copy link to clipboard
Copied
I think we should all ask for a credit on our CC subscriptions for the collective amount of our wasted time spent trying to fix something that was broken intentionally by Adobe. I'm certain it's past 7 figures right now.

Copy link to clipboard
Copied
THANK YOU SO MUCH!
Mac users — the Library folder in the described path is hidden by default. Go to the 'View' menu in Finder and enabled viewing it.

Copy link to clipboard
Copied
THANK YOU SO MUCH!!! @AKS666


Find more inspiration, events, and resources on the new Adobe Community
Explore Now
 AdChoices