• Global community
    • Language:
      • Deutsch
      • English
      • Español
      • Français
      • Português
  • 日本語コミュニティ
    Dedicated community for Japanese speakers
  • 한국 커뮤니티
    Dedicated community for Korean speakers
Exit
0

Script for resize to 1000x1000px and save as .jpg in 300dpi

Community Beginner ,
Dec 26, 2016 Dec 26, 2016

Copy link to clipboard

Copied

Hello,

I am trying to do that

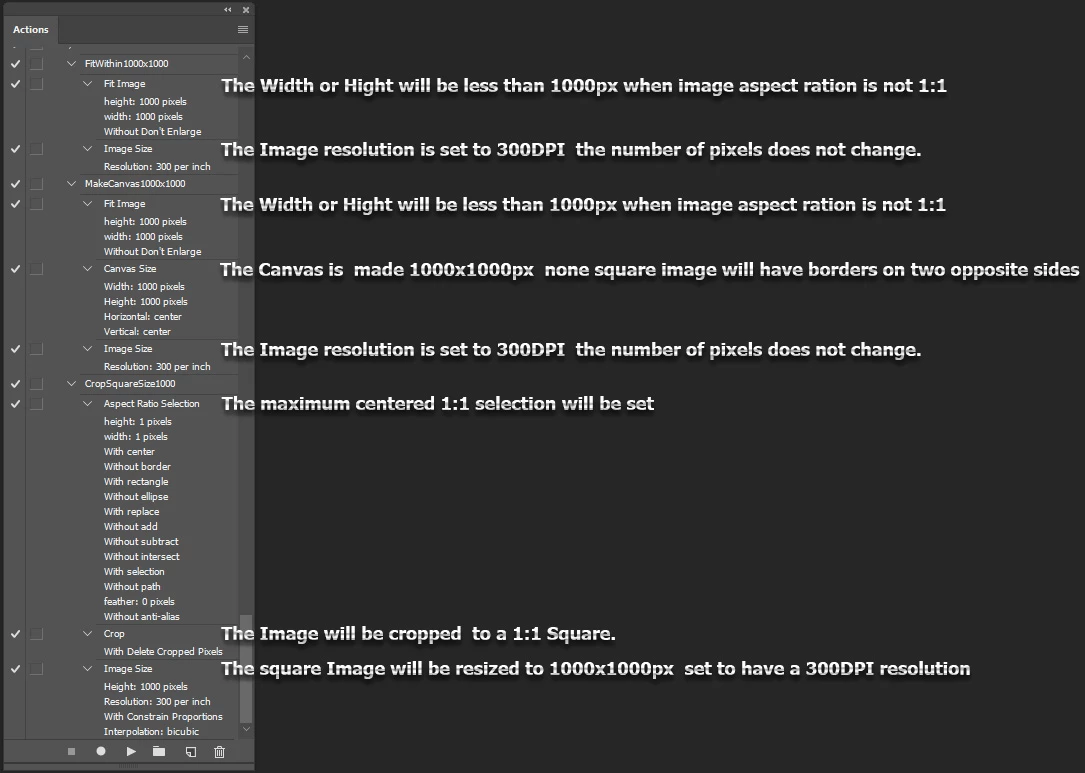
take a folder of images, bring into Photoshop, adjust to 1000 x 1000 pixels in size, then export and save as a high quality .jpg image into another folder (to keep it neat).

But when go to Image -> Image Size-> and change width and height in 1000 pixel if i select width to 1000x than height automatically change and dont let me change to 1000 px.... is there anything wrong am i doing? 

Actually I am trhying to record an action to do that take all images from a folder changed size and save to another folder in 1000x1000px

Resize image.PNG

TOPICS
Actions and scripting

Views

12.2K

Translate

Translate

Report

Report
Community guidelines
Be kind and respectful, give credit to the original source of content, and search for duplicates before posting. Learn more
community guidelines

correct answers 1 Correct answer

Community Expert , Dec 27, 2016 Dec 27, 2016

mirzaa26404547 wrote:


When I go to image size and change to pixel in 1000x1000 with 300dpi than one of the height or width will not same if i select width to 1000px than height automatically change to 750px?

You did not record the Canvas size step or steps correctly if you want a square image.

The canvas size steps prior to the Image size step should made the canvas size 1000x1000 pixels so there is nothing that need be done about the number of pixels the canvas has. So in the images size step you

...

Votes

Translate

Translate
Adobe
Community Expert ,
Dec 26, 2016 Dec 26, 2016

Copy link to clipboard

Copied

Are you image square to begin with.  If not you if you do not use restrain in images size you will be able to set 1000px by 1000px in Image size and all you none square images will be distorted into a 1000px by 1000px square image.  I do not think this is actually what you really want to do.  If you want 1000px by 1000px image files you have two other choices. Crop you image to square then resize to 1000px by 1000px or, Add extra canvas to make your  resized image square 1000px by 1000px.  Images that were not square to begin with will have borders on the width or height.

Which of the three do you want to do. The is a Forth option the results will be your image will fit within 1000px by 1000px however none square imags will be smaller the height or width will be less than 1000px.

In your screen capture Imags Size Constrain is on Width and Height are linked setting one will change the  other to constrain the resize to the current aspect ratio.

To do option 4 Fit Image all you need do is use photoshop menu File>Scripts>Image Processor....

Or Frome Bridge use menu Tools>Photoshop>Images Precessor....

JJMack

Votes

Translate

Translate

Report

Report
Community guidelines
Be kind and respectful, give credit to the original source of content, and search for duplicates before posting. Learn more
community guidelines
Community Beginner ,
Dec 26, 2016 Dec 26, 2016

Copy link to clipboard

Copied

Thanks JJMackactually I have different sizes images including psd tiff, eps etc.... Images are all different sizes but I want to make sure that at least one side is 1000 pixels

Votes

Translate

Translate

Report

Report
Community guidelines
Be kind and respectful, give credit to the original source of content, and search for duplicates before posting. Learn more
community guidelines
Community Expert ,
Dec 26, 2016 Dec 26, 2016

Copy link to clipboard

Copied

If You want to save the same File type simply batching a single step action can  do that. You need to set menu File>Automate>Batch... dialogs settings correctly.   All the Action needs is a single step reciord Photoshop menu File>Automate>Fit Image... in the fit image dialog record 1000px Width and Height.  That is option 4.....

It you just want to save flat jpeg imags for all imput file types you would use menu  File>Scripts>Image Prpcessor....  Also option 4....

Not sure if PDF and EPS files would be done the way you want they open differently then normal image files in Photoshop. Photoshop SVG support is also not good.

JJMack

Votes

Translate

Translate

Report

Report
Community guidelines
Be kind and respectful, give credit to the original source of content, and search for duplicates before posting. Learn more
community guidelines
Community Beginner ,
Dec 26, 2016 Dec 26, 2016

Copy link to clipboard

Copied

so is this possible to make jpp form folder that contain .psd and EPS etc as well?

Votes

Translate

Translate

Report

Report
Community guidelines
Be kind and respectful, give credit to the original source of content, and search for duplicates before posting. Learn more
community guidelines
Community Expert ,
Dec 26, 2016 Dec 26, 2016

Copy link to clipboard

Copied

If not with Batch there is a Plu-in  you can download and install Image Processor Pro.  There will be a menu File>Automate>Image Processor Pro...

JJMack

Votes

Translate

Translate

Report

Report
Community guidelines
Be kind and respectful, give credit to the original source of content, and search for duplicates before posting. Learn more
community guidelines
Community Beginner ,
Dec 31, 2016 Dec 31, 2016

Copy link to clipboard

Copied

Now I have some difficulties i want to be able to make one side for example 1000 pixels and the other side stays in proportion, its makes everythig 1000 x 1000 and the images are distorted. I want to make one size proportion? How can i achieve this?

Votes

Translate

Translate

Report

Report
Community guidelines
Be kind and respectful, give credit to the original source of content, and search for duplicates before posting. Learn more
community guidelines
Community Expert ,
Jan 01, 2017 Jan 01, 2017

Copy link to clipboard

Copied

If your requirements have now changed, simply ignore the two canvas size steps 2+3 and only use steps 1+4 (fit image & image size) from earlier in the topic thread (your choice on whether to enlarge smaller images or not):

1000px.png

Votes

Translate

Translate

Report

Report
Community guidelines
Be kind and respectful, give credit to the original source of content, and search for duplicates before posting. Learn more
community guidelines
Community Beginner ,
Jan 02, 2017 Jan 02, 2017

Copy link to clipboard

Copied

Thanks

but when i resize image to 1000x1000px than how one size will be adjust automatically??? still confused..

Votes

Translate

Translate

Report

Report
Community guidelines
Be kind and respectful, give credit to the original source of content, and search for duplicates before posting. Learn more
community guidelines
Community Expert ,
Jan 02, 2017 Jan 02, 2017

Copy link to clipboard

Copied

IMO you would just use the Image Processor to save the  file types you want.  The actions you use you in this case does the cropping, resize and canvas add.   You would not use the Image Processor resize option at all.  The image processor  uses Photoshop's Plug-in Fit Image to resize documents which will retain the image aspect ratio.  If you want square image files you need to add any needed canvas in the action.

If you want to use the Photoshop Plug-in Image Processor Pro.  The image processor can run the user Actions before or after the processor doe the resize.  The standard image Processor I believe runs the user action  before the image processor resize the document.  So with the Image Processor Pro you could have it resize the image document and then have the action add the canvas required.

It is much easier to see what is being done if the resize and canvas add is done in the action and either image processor is used just save the output files you want with the names you want where you want them saved.  Actions have limited file saving capabilities when it come down to it.  Scripts can use logic when saving file. They can creat a Paths when needed a use file a name you want the files to have.  Action can not. Additionally The image processor scripts will not overwrite existing files.  In the file you wan saved existe the image processors will add a suffix to the name an save.  You will not destroy previous work.

JJMack

Votes

Translate

Translate

Report

Report
Community guidelines
Be kind and respectful, give credit to the original source of content, and search for duplicates before posting. Learn more
community guidelines
Community Beginner ,
Jan 02, 2017 Jan 02, 2017

Copy link to clipboard

Copied

NO actually i not want square image i want just one side 1000px and other will be proportional (any size) because there are so many images one having landscape or portrait etc so i just want one side either 1000px

Votes

Translate

Translate

Report

Report
Community guidelines
Be kind and respectful, give credit to the original source of content, and search for duplicates before posting. Learn more
community guidelines
Community Expert ,
Jan 02, 2017 Jan 02, 2017

Copy link to clipboard

Copied

LATEST

My screen shot and updated instructions mentioned the use of the fit image command and 300ppi resize with resample off, ignoring the two letterbox resizing steps to square. As JJ mentions, this can also be done via Image Processor Pro without an action.

Votes

Translate

Translate

Report

Report
Community guidelines
Be kind and respectful, give credit to the original source of content, and search for duplicates before posting. Learn more
community guidelines
Community Expert ,
Dec 26, 2016 Dec 26, 2016

Copy link to clipboard

Copied

The Fit Image command will fit the longest edge to 1000px, however if you require a square output of 1000x1000px from a rectangular original, then you will need to add two steps to your action to resize both canvas edges to 1000px. This will “letterbox” or “pillarbox” the original rectangular content into a square. In this example, the current colour picker background colour is used to letterbox, however you could preset white, black etc into the action. A final step to resize the image with resampling OFF (no pixels added or removed) to 300ppi/118.11pcm is also added to set the pixels per inch metadata value (which may or may not be retained depending on the save method).

1000px.png

The save to JPEG could be included in the action as a 5th step, or as JJ mentions the file format output could be handled via Image Processor/Image Processor Pro and then you don’t need the JPEG save recorded into the action (which would then require the use of “override” options in the batch command).

This of course presumes that you are OK with having the images “letterboxed” – otherwise you would need them to be cropped to a square first. This can be automated, however you would likely wish to decide which pixels are included rather than have this automated.

Votes

Translate

Translate

Report

Report
Community guidelines
Be kind and respectful, give credit to the original source of content, and search for duplicates before posting. Learn more
community guidelines
Community Expert ,
Dec 27, 2016 Dec 27, 2016

Copy link to clipboard

Copied

I think the three action would be more like these. You would want images smaller then 1000px enlarged,

Capture.jpg

JJMack

Votes

Translate

Translate

Report

Report
Community guidelines
Be kind and respectful, give credit to the original source of content, and search for duplicates before posting. Learn more
community guidelines
Community Beginner ,
Dec 27, 2016 Dec 27, 2016

Copy link to clipboard

Copied

Can these three action's step make in one action? if possible can you please upload this action for preview?

Votes

Translate

Translate

Report

Report
Community guidelines
Be kind and respectful, give credit to the original source of content, and search for duplicates before posting. Learn more
community guidelines
Community Expert ,
Dec 27, 2016 Dec 27, 2016

Copy link to clipboard

Copied

The three actions are in a single action set IMO. You should record the actions yourself.  In any cast you would need to install my Photoshop Aspect Ratio Selection Plug-in before you can record and play that third action.  That plugin is in my crafting Action Package.  The step is recorded via menu File>Automate>Aspect Ratio Selection...

Note: Adobe introduce a bug is CS6 that bakes some scripts in the package.  The bug was fixed in the subscription version of CS6.  Adobe also introduced a bug in CC 2015.5 scripting that brakes some scripts and the bug is also in CC 2017.

Capture.jpg

Crafting Actions Package UPDATED Aug 10, 2014 Added Conditional Action steps to Action Palette Tips.

Contains

Example

Download

JJMack

Votes

Translate

Translate

Report

Report
Community guidelines
Be kind and respectful, give credit to the original source of content, and search for duplicates before posting. Learn more
community guidelines
Community Beginner ,
Dec 27, 2016 Dec 27, 2016

Copy link to clipboard

Copied

Thanks Stephen, can you please explain this "

A final step to resize the image with resampling OFF (no pixels added or removed) to 300ppi/118.11pcm is also added to set the pixels per inch metadata value (which may or may not be retained depending on the save method)."

When I go to image size and change to pixel in 1000x1000 with 300dpi than one of the height or width will not same if i select width to 1000px than height automatically change to 750px?

Votes

Translate

Translate

Report

Report
Community guidelines
Be kind and respectful, give credit to the original source of content, and search for duplicates before posting. Learn more
community guidelines
Community Expert ,
Dec 27, 2016 Dec 27, 2016

Copy link to clipboard

Copied

mirzaa26404547 wrote:


When I go to image size and change to pixel in 1000x1000 with 300dpi than one of the height or width will not same if i select width to 1000px than height automatically change to 750px?

You did not record the Canvas size step or steps correctly if you want a square image.

The canvas size steps prior to the Image size step should made the canvas size 1000x1000 pixels so there is nothing that need be done about the number of pixels the canvas has. So in the images size step you uncheck RESAMPLE the current number of pixels in the canvas will not changed,  The Width and High will linked so it you change one side the other side will change to keep the aspect ration the same as it currently is.  All you want to do is set resolution to 300dpi you do bot care if the width is shown in pixels, inches, cm, percent. With resample NOT checked the current number of pixels are not going to change.  If you enter 1in in the width the hight will change to 1in and the resolution will change 1000dpi.  

Capture.jpg

JJMack

Votes

Translate

Translate

Report

Report
Community guidelines
Be kind and respectful, give credit to the original source of content, and search for duplicates before posting. Learn more
community guidelines
Community Expert ,
Dec 27, 2016 Dec 27, 2016

Copy link to clipboard

Copied

As JJ mentioned, this indicates that your image was not square before changing the PPI value.

resample-off.png

Votes

Translate

Translate

Report

Report
Community guidelines
Be kind and respectful, give credit to the original source of content, and search for duplicates before posting. Learn more
community guidelines
Community Expert ,
Jan 02, 2017 Jan 02, 2017

Copy link to clipboard

Copied

Then all you need to do is use one of the image processors you just need to use the resize option and set width and height to 1000.  If you use the Image Processor Pro  Plug-in script you can also specify the interpolation method to use, No Action is required.

Capture.jpg

Capture.jpg

JJMack

Votes

Translate

Translate

Report

Report
Community guidelines
Be kind and respectful, give credit to the original source of content, and search for duplicates before posting. Learn more
community guidelines