• Global community
    • Language:
      • Deutsch
      • English
      • Español
      • Français
      • Português
  • 日本語コミュニティ
    Dedicated community for Japanese speakers
  • 한국 커뮤니티
    Dedicated community for Korean speakers
Exit
0

Script help: Crop based on select subject

New Here ,
Apr 11, 2019 Apr 11, 2019

Copy link to clipboard

Copied

I have been trying to create an action, but think it's going to take a little more than that to accomplish what I am trying to do.  Please let me know if for some reason it would not be possible.

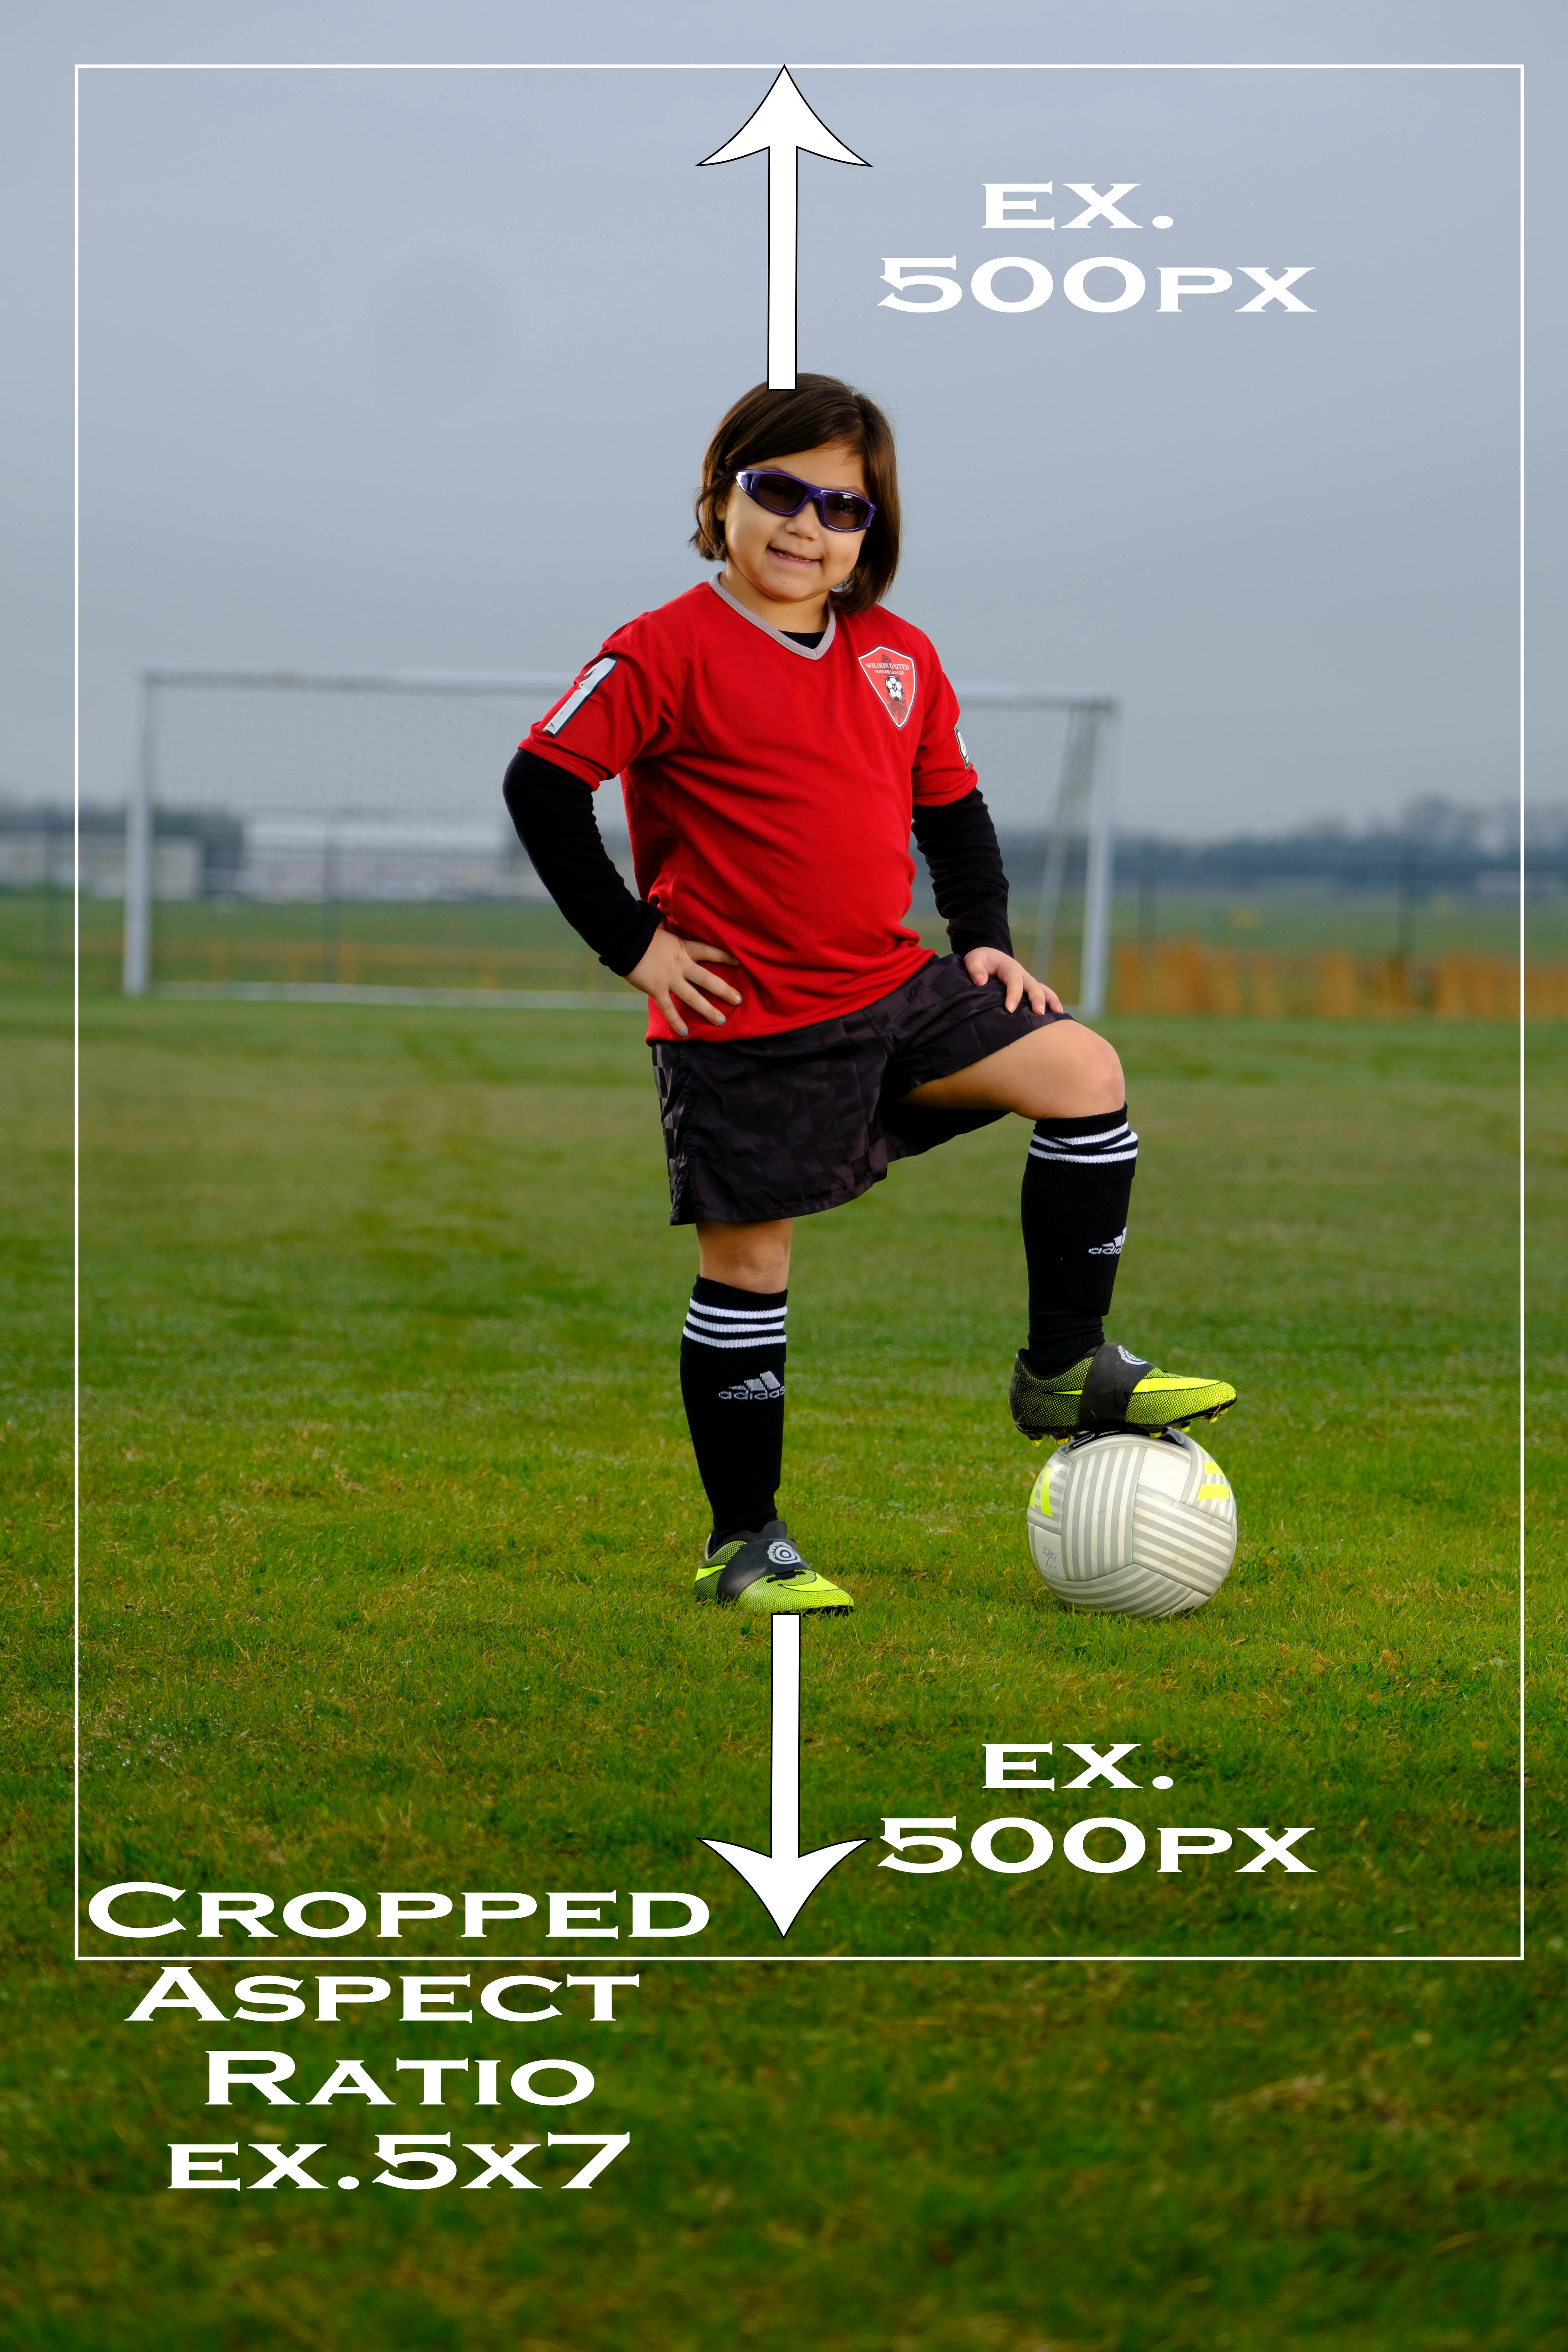
I photograph full length portraits(natural background-Not Green screen).  I am looking to be able to auto crop based on a set amount of pixels above the head and feet(based on the select subject) and then be able to crop in a certain aspect ratio(5x7,8x10,7x10, ect....) keeping the padding above the head and feet keeping the subject in the middle of the photo.

_DSF2838.jpg

TOPICS
Actions and scripting

Views

8.6K

Translate

Translate

Report

Report
Community guidelines
Be kind and respectful, give credit to the original source of content, and search for duplicates before posting. Learn more
community guidelines
Adobe
Community Expert ,
Apr 11, 2019 Apr 11, 2019

Copy link to clipboard

Copied

The following script from JJMack may be of help in an action:


AspectRatioSelection.jsx

JJMacksCraftingActions.zip


I am kicking this around and will post back once I have a workable solution incorporating the script with an action… Otherwise a full custom script would be required.


You may also find this recent discussion helpful:


Guide Lines for Print Sizes Action?

Votes

Translate

Translate

Report

Report
Community guidelines
Be kind and respectful, give credit to the original source of content, and search for duplicates before posting. Learn more
community guidelines
New Here ,
Apr 12, 2019 Apr 12, 2019

Copy link to clipboard

Copied

Awesome, Thank you!  I will take a look at JJmack's action too, 

Votes

Translate

Translate

Report

Report
Community guidelines
Be kind and respectful, give credit to the original source of content, and search for duplicates before posting. Learn more
community guidelines
Community Expert ,
Apr 12, 2019 Apr 12, 2019

Copy link to clipboard

Copied

Cropping can be complicated for an automated process, it combines both mathematical and artistic processes. It will also depend on the composition of the original shots. If the images consistently offer a roughly centred subject that is roughly framed with the same space and orientation then you will have more success with an automated process.

(A) Therefore fully automating the process may lead to compromises and potential errors. This would be the preferred approach if there was a large volume of images and working through them fast was the most important factor.

(B) A semi-automated process will speed this up greatly, while still offering you some flexibility if not artistic control over the crop.

Knowing these issues and the pros/cons, my question is – which of the two approaches do you wish use, A or B?

Votes

Translate

Translate

Report

Report
Community guidelines
Be kind and respectful, give credit to the original source of content, and search for duplicates before posting. Learn more
community guidelines
New Here ,
Apr 12, 2019 Apr 12, 2019

Copy link to clipboard

Copied

I would lean towards Option A.......I know it won't be perfect every time, but if can be the majority of the time, it would save a ton of time!

Votes

Translate

Translate

Report

Report
Community guidelines
Be kind and respectful, give credit to the original source of content, and search for duplicates before posting. Learn more
community guidelines
Community Expert ,
Apr 12, 2019 Apr 12, 2019

Copy link to clipboard

Copied

Are all of your images shot with the same original pixel dimensions of 4160 x 6240 at an original portrait ratio of 2:3?

If so I tentatively believe that I have workable automated 5:7 and 4:5 solutions using only an action, however the proof of concept needs testing on more than one image. If they work as intended, you should be able to easily modify these actions to account for other aspect ratios.

Can you post links to 3 other different original images or private message me the download links? They can be proportionally resized smaller and the faces redacted for privacy if you like and I can resize them back to the original resolution for testing as I don’t really need the full original resolution.

Votes

Translate

Translate

Report

Report
Community guidelines
Be kind and respectful, give credit to the original source of content, and search for duplicates before posting. Learn more
community guidelines
New Here ,
Apr 13, 2019 Apr 13, 2019

Copy link to clipboard

Copied

All the images are shot at a 2:3 ration, but the pixel dimensions may change slightly based on the camera used.  If I had to do an action for reach camera, it wouldn't be the end of the world.  I normally only use 2-3 different cameras.  I messaged you a link to a handful of photos.  Thanks

Votes

Translate

Translate

Report

Report
Community guidelines
Be kind and respectful, give credit to the original source of content, and search for duplicates before posting. Learn more
community guidelines
Community Expert ,
Apr 13, 2019 Apr 13, 2019

Copy link to clipboard

Copied

Hi Howard, the various sample images did help… I had to revise my original action as it did not work consistently with your original goal of having the 500px padding at the head and foot of the image. It did work well to scale the images to the desired aspect ratio, however the crops would have been too variable. In the end I did have to reference two “helper” scripts to get the job done.


auto-crop.png


The action to auto crop takes about 10 seconds per picture on my old laptop. The action can be batched through the standard Image Processor script or the third party Image Processor Pro script. The action presumes that the start point is a flattened image. Any existing guides will be removed. It may be possible to optimise the run of the action, I went down the path of flexibility over speed.


You can then double check the batch output in Bridge using the filter panel for aspect ratio and isolate any shots that have failed due to the image content and canvas size breaking the aspect ratio crop.


If you process to PSD format, you can then open up the PSD and you will have access to the un-cropped image, which allows fine tuning of position and size etc. The action set offers a “revert” action that will reset the processed PSD back to the original 4160 x 6240 canvas size so that you can potentially use the crop tool set to the desired aspect ratio to manually crop if required.


You will need to install Downloading and Installing Adobe Scripts the two helper scripts before running the action. I have zip compressed the action set and helper scripts for download Auto Crop Sports Portraits.zip.


I have only offered a 5:7 crop action in the set, it should be easy enough to duplicate and rename the action for other aspect ratio crops. You should only need to edit/replace 2 steps in a duplicated action to repurpose it for a new crop aspect ratio such as 8:10 etc. I’m of course happy to discuss this when needed.


P.S. You may also find the following script of use for quickly checking the aspect ratio of an open image in Photoshop:


Prepression: Photoshop – Document Info: Aspect Ratio Value Script


Doc-Info-Script.png

Votes

Translate

Translate

Report

Report
Community guidelines
Be kind and respectful, give credit to the original source of content, and search for duplicates before posting. Learn more
community guidelines
New Here ,
Apr 14, 2019 Apr 14, 2019

Copy link to clipboard

Copied

Hey Stephan,

That's awesome!  Thank you!  Would the two steps be to re-record the selection to say: 700px x 1000px for a 7x10 crop, and change the layer name or is there a second step I am missing. 


Also what would be the process for for changing it for a different sized image?  Say: 3456x5184px instead of 4160x6240px?

Thanks

Crop.jpg

Votes

Translate

Translate

Report

Report
Community guidelines
Be kind and respectful, give credit to the original source of content, and search for duplicates before posting. Learn more
community guidelines
Community Expert ,
Apr 14, 2019 Apr 14, 2019

Copy link to clipboard

Copied

That is correct, the two steps are the selection at the required aspect ratio and the selection of the layer with the hard coded aspect ratio name. You could just replace the hard coded layer name selection with a relative selection recording shortcut so that would be one less thing to change, such as ALT/OPT + , or ALT/OPT + . (bottom or top layers) or ALT/OPT + [ or ALT/OPT + ] next layer down/up. It depends on your layer structure, I went with the “safe” option of hard coding the name to ensure an explicit selection of the required layer.

It should work the same with a different size image, as long as there was around 500px at the head and foot and that the selection centred on the subject did not fall off the edge of the canvas. In my tests of your outdoor shots, every image worked flawlessly... However only one image on the greenscreen was successfully cropped. I did not try to work out why only one worked and all others failed, however I am guessing that it was due to one of the issues noted in italic above.

Votes

Translate

Translate

Report

Report
Community guidelines
Be kind and respectful, give credit to the original source of content, and search for duplicates before posting. Learn more
community guidelines
Community Expert ,
Apr 14, 2019 Apr 14, 2019

Copy link to clipboard

Copied

If the select subject does an acceptable job. If you expand the selection by 500 pixels and crop you will have the 500px boarders you want around the subject.  But most likely not a standard print Aspect Ratio like 4:5. 8:10.  You seem to want a 7:10 aspect ratio sized one for the web to 700px by 1000px.   If the select subject expand selection by 500 px come close to the standard aspect ratio.  You may be able to get what you want using an Action that uses my plug-in script Aspect Ratio Section  to crop the wrong aspect ratio crop to the correct aspect ratio which will lose some of the 500PX expansion borders.  Once you have the correct aspect ratio image you can use Adobe's Plug-in Fit Image to resize the cropped image to 700px by 1000px.

JJMack

Votes

Translate

Translate

Report

Report
Community guidelines
Be kind and respectful, give credit to the original source of content, and search for duplicates before posting. Learn more
community guidelines
Community Expert ,
Apr 15, 2019 Apr 15, 2019

Copy link to clipboard

Copied

Two helper scripts were instrumental in my action. I’ll post the code here as the DropBox link will no doubt be broken at a future point in time:


// Add Guides to Selection Bounds.jsx

// Photoshop: Add guides to a selection (a javascript solution)


#target Photoshop


main();

function main(){

if(!documents.length) return;

var startRulerUnits = preferences.rulerUnits;

try{

preferences.rulerUnits = Units.PIXELS

var SB = activeDocument.selection.bounds;

}catch(e){return;}

guideLine(SB[1].value,"Hrzn");

guideLine(SB[3].value,"Hrzn");

guideLine(SB[0].value,"Vrtc");

guideLine(SB[2].value,"Vrtc");

preferences.rulerUnits = startRulerUnits;

}

function guideLine(position, type){

var desc = new ActionDescriptor();

var desc2 = new ActionDescriptor();

desc2.putUnitDouble( app.charIDToTypeID ('Pstn'), app.charIDToTypeID('#Pxl'), position );

desc2.putEnumerated( app.charIDToTypeID('Ornt'), app.charIDToTypeID('Ornt'), app.charIDToTypeID(type) );

desc.putObject( app.charIDToTypeID('Nw  '), app.charIDToTypeID('Gd  '), desc2 );

executeAction( app.charIDToTypeID('Mk  '), desc, DialogModes.NO );

};


// https://forums.adobe.com/message/8732179#8732179

// https://forums.adobe.com/message/8728770#8728770


// 2019 - Uncomment line 116 to enable the layer mask, which has been disabled to retain the proportions of the resized layer


// FitImageToGuides.jsx


/* ==========================================================

// 2014  John J. McAssey (JJMack) 

// ======================================================= */ 


// This script is supplied as is. It is provided as freeware.  

// The author accepts no liability for any problems arising from its use. 


/* Help Category note tag menu can be used to place script in automate menu

<javascriptresource>

<about>$$$/JavaScripts/FitImageToGuides/About=JJMack's FitImageToGuides .^r^rCopyright 2014 Mouseprints.^r^rFour and only four guides are required</about>

<category>JJMack's Script</category>

</javascriptresource>

*/ 


// enable double-clicking from Mac Finder or Windows Explorer 

#target photoshop 


// bring application forward for double-click events 

app.bringToFront(); 


// ensure at least one document open 

if (!documents.length) alert('There are no documents open.', 'No Document'); 

else { 

  // declare Global variables 


  //main(); // at least one document exists proceed 

  app.activeDocument.suspendHistory('Fix Image to Guides','main()');  //problem if there is a selection a layer resize Photoshop back up a history step ? 

/////////////////////////////////////////////////////////////////////////////// 

//                            main function                              

/////////////////////////////////////////////////////////////////////////////// 

function main() { 

  // declare local variables 

  var orig_ruler_units = app.preferences.rulerUnits; 

  var orig_type_units = app.preferences.typeUnits; 

  var orig_display_dialogs = app.displayDialogs; 

  app.preferences.rulerUnits = Units.PIXELS; // Set the ruler units to PIXELS 

  app.preferences.typeUnits = TypeUnits.POINTS;   // Set Type units to POINTS 

  app.displayDialogs = DialogModes.NO; // Set Dialogs off 

  try { code(); } 

  // display error message if something goes wrong 

  catch(e) { alert(e + ': on line ' + e.line, 'Script Error', true); } 

  app.displayDialogs = orig_display_dialogs; // Reset display dialogs  

  app.preferences.typeUnits  = orig_type_units; // Reset ruler units to original settings  

  app.preferences.rulerUnits = orig_ruler_units; // Reset units to original settings 

/////////////////////////////////////////////////////////////////////////////// 

//                           main function end                             

/////////////////////////////////////////////////////////////////////////////// 


/////////////////////////////////////////////////////////////////////////////////////////////// 

// The real code is embedded into this function so that at any point it can return  

// to the main line function to let it restore users edit environment and end       

////////////////////////////////////////////////////////////////////////////////////////////// 

function code() { 

  if (app.activeDocument.guides.length != 4) { alert("Four and only four Guides are required"); return; } // quit 

  // get guides; 

  var theVert = new Array; 

  var theHor = new Array; 

  for (var m = 0; m < app.activeDocument.guides.length; m++) { 

  if (app.activeDocument.guides.direction == Direction.HORIZONTAL) {theVert.push(app.activeDocument.guides.coordinate)} 

  else {theHor.push(app.activeDocument.guides.coordinate)} 

    }; 

  if (theHor.length != 2 || theVert.length != 2) { alert("Four Guides two vertical and two horizontal are required"); return; } // quit 

  getTarget=getSelectedLayersIdx(); 

  if (getTarget.length!=1){ alert("The number of layers targeted is " + getTarget.length ); return; } // quit 

  if (app.activeDocument.activeLayer.isBackgroundLayer ) { alert("Can not resize the background layer"); return; } // quit 

  if (!app.activeDocument.activeLayer.visible ) { alert("Active layer is  not visible"); return; } // quit 

  //if (hasLayerMask()) { alert("Active layer is  Masked"); return; } // quit 

  if (app.activeDocument.activeLayer.kind == LayerKind.NORMAL  || app.activeDocument.activeLayer.kind == LayerKind.SMARTOBJECT && hasLayerMask()) { deleteLayerMask ();} 

  if (app.activeDocument.activeLayer.kind != LayerKind.NORMAL  && app.activeDocument.activeLayer.kind != LayerKind.SMARTOBJECT )  {  

  alert("Active layer is " + app.activeDocument.activeLayer.kind); return; } // quit 

  // set selection to the area defined but the guide lines the selection may get undone by the bug in .resize() backing up a step in histoty ??? 

  app.activeDocument.selection.select([[theHor[0], theVert[0]], [theHor[1], theVert[0]], [theHor[1], theVert[1]], [theHor[0], theVert[1]]]); 

  // resize current normal layer or smart object layer to just cover selection canvas area aspect ratio and size and mask off any overflow 

  var SB = app.activeDocument.selection.bounds; // Get selection bounds 

  var SWidth = (SB[2].value) - (SB[0].value); // Area width 

  var SHeight = (SB[3].value) - (SB[1].value); // Area height 

  var LB = app.activeDocument.activeLayer.bounds; // Get Active layers bounds 

  var LWidth = (LB[2].value) - (LB[0].value); // Area width 

  var LHeight = (LB[3].value) - (LB[1].value); // Area height 

  var userResampleMethod = app.preferences.interpolation; // Save interpolation settings 

  app.preferences.interpolation = ResampleMethod.BICUBIC; // resample interpolation bicubic 

  app.activeDocument.selection.deselect(); // This deselect work around Adobe Bug in CS5, CS6, CC and CC 2014 

  // Since Adobe does not fix old releases of Photoshop this is a necessary work around for many releases of Photoshop 

  //alert("Before re-size history");  // Added to debug Adobe Resize Bug 

  try { 

  if (LWidth/LHeight<SWidth/SHeight) { // layer's Aspect Ratio less the Canvas area Aspect Ratio  

  var percentageChange = ((SWidth/LWidth)*100); // Resize to canvas area width 

  app.activeDocument.activeLayer.resize(percentageChange,percentageChange,AnchorPosition.MIDDLECENTER); 

  } 

  else {  

  var percentageChange = ((SHeight/LHeight)*100); // resize to canvas area height 

  app.activeDocument.activeLayer.resize(percentageChange,percentageChange,AnchorPosition.MIDDLECENTER); 

  } 

  } 

  catch(e) {  

  app.preferences.interpolation = userResampleMethod; // Reset interpolation setting 

  selectFront(); // Photoshop make top layer current when none are targeted 

  code(); // Retry  with top visible layer selected targeted  

  return; // rest would have been done during the retry 

  } 

  //alert("After re-size history");    // Added to debug Adobe Resize Bug 

  app.preferences.interpolation = userResampleMethod; // Reset interpolation setting 

  // Seems to be a bug in  resize() the document seems to first be backed up a step in history 

  app.activeDocument.selection.select([[theHor[0], theVert[0]], [theHor[1], theVert[0]], [theHor[1], theVert[1]], [theHor[0], theVert[1]]]); // redo the selection 

  align('AdCH'); // align to horizontal centers 

  align('AdCV'); // align to vertical centers 

  // addLayermask(); // add layer mask to mask off excess

///////////////////////////////////////////////////////////////////////////////////////////////////////////////////////////////////////////////////////////////////// 

// Helper Functions 

///////////////////////////////////////////////////////////////////////////////////////////////////////////////////////////////////////////////////////////////////// 

function align(method) { 

  var desc = new ActionDescriptor(); 

  var ref = new ActionReference(); 

  ref.putEnumerated( charIDToTypeID( "Lyr " ), charIDToTypeID( "Ordn" ), charIDToTypeID( "Trgt" ) ); 

  desc.putReference( charIDToTypeID( "null" ), ref ); 

  desc.putEnumerated( charIDToTypeID( "Usng" ), charIDToTypeID( "ADSt" ), charIDToTypeID( method ) ); 

  try{executeAction( charIDToTypeID( "Algn" ), desc, DialogModes.NO );} 

  catch(e){} 

///////////////////////////////////////////////////////////////////////////////    

// Function: hasLayerMask    

// Usage: see if there is a raster layer mask    

// Input: <none> Must have an open document    

// Return: true if there is a vector mask    

///////////////////////////////////////////////////////////////////////////////    

function hasLayerMask() {    

  var hasLayerMask = false;    

  try {    

  var ref = new ActionReference();    

  var keyUserMaskEnabled = app.charIDToTypeID( 'UsrM' );    

  ref.putProperty( app.charIDToTypeID( 'Prpr' ), keyUserMaskEnabled );    

  ref.putEnumerated( app.charIDToTypeID( 'Lyr ' ), app.charIDToTypeID( 'Ordn' ), app.charIDToTypeID( 'Trgt' ) );    

  var desc = executeActionGet( ref );    

  if ( desc.hasKey( keyUserMaskEnabled ) ) { hasLayerMask = true; }    

  } 

  catch(e) { hasLayerMask = false; }    

  return hasLayerMask;    

}    

function getSelectedLayersIdx(){ 

      var selectedLayers = new Array; 

      var ref = new ActionReference(); 

      ref.putEnumerated( charIDToTypeID("Dcmn"), charIDToTypeID("Ordn"), charIDToTypeID("Trgt") ); 

      var desc = executeActionGet(ref); 

      if( desc.hasKey( stringIDToTypeID( 'targetLayers' ) ) ){ 

         desc = desc.getList( stringIDToTypeID( 'targetLayers' )); 

          var c = desc.count 

          var selectedLayers = new Array(); 

          for(var i=0;i<c;i++){ 

            try{ 

               activeDocument.backgroundLayer; 

               selectedLayers.push(  desc.getReference( i ).getIndex() ); 

            }catch(e){ 

               selectedLayers.push(  desc.getReference( i ).getIndex()+1 ); 

            } 

          } 

       }else{ 

         var ref = new ActionReference(); 

         ref.putProperty( charIDToTypeID("Prpr") , charIDToTypeID( "ItmI" )); 

         ref.putEnumerated( charIDToTypeID("Lyr "), charIDToTypeID("Ordn"), charIDToTypeID("Trgt") ); 

         try{ 

            activeDocument.backgroundLayer; 

            selectedLayers.push( executeActionGet(ref).getInteger(charIDToTypeID( "ItmI" ))-1); 

         }catch(e){ 

            selectedLayers.push( executeActionGet(ref).getInteger(charIDToTypeID( "ItmI" ))); 

         } 

      } 

      return selectedLayers; 

}; 

function selectFront() { 

// Alt+. shortcut select ftont visible layer 

var idslct = charIDToTypeID( "slct" ); 

    var desc250 = new ActionDescriptor(); 

    var idnull = charIDToTypeID( "null" ); 

        var ref207 = new ActionReference(); 

        var idLyr = charIDToTypeID( "Lyr " ); 

        var idOrdn = charIDToTypeID( "Ordn" ); 

        var idFrnt = charIDToTypeID( "Frnt" ); 

        ref207.putEnumerated( idLyr, idOrdn, idFrnt ); 

    desc250.putReference( idnull, ref207 ); 

    var idMkVs = charIDToTypeID( "MkVs" ); 

    desc250.putBoolean( idMkVs, false ); 

executeAction( idslct, desc250, DialogModes.NO ); 

function deleteLayerMask (apply) { 

// Delet Layer mask default to not apply first 

if (apply == undefined) {var apply = false}; 

try { 

var idDlt = charIDToTypeID( "Dlt " ); 

    var desc9 = new ActionDescriptor(); 

    var idnull = charIDToTypeID( "null" ); 

        var ref5 = new ActionReference(); 

        var idChnl = charIDToTypeID( "Chnl" ); 

        var idChnl = charIDToTypeID( "Chnl" ); 

        var idMsk = charIDToTypeID( "Msk " ); 

        ref5.putEnumerated( idChnl, idChnl, idMsk ); 

    desc9.putReference( idnull, ref5 ); 

    var idAply = charIDToTypeID( "Aply" ); 

    desc9.putBoolean( idAply, apply ); 

executeAction( idDlt, desc9, DialogModes.NO ); 

catch (e) {} 

}; 

function addLayermask(){ 

// Add layer Mask 

var idMk = charIDToTypeID( "Mk  " ); 

    var desc52 = new ActionDescriptor(); 

    var idNw = charIDToTypeID( "Nw  " ); 

    var idChnl = charIDToTypeID( "Chnl" ); 

    desc52.putClass( idNw, idChnl ); 

    var idAt = charIDToTypeID( "At  " ); 

        var ref19 = new ActionReference(); 

        var idChnl = charIDToTypeID( "Chnl" ); 

        var idChnl = charIDToTypeID( "Chnl" ); 

        var idMsk = charIDToTypeID( "Msk " ); 

        ref19.putEnumerated( idChnl, idChnl, idMsk ); 

    desc52.putReference( idAt, ref19 ); 

    var idUsng = charIDToTypeID( "Usng" ); 

    var idUsrM = charIDToTypeID( "UsrM" ); 

    var idRvlS = charIDToTypeID( "RvlS" ); 

    desc52.putEnumerated( idUsng, idUsrM, idRvlS ); 

executeAction( idMk, desc52, DialogModes.NO ); 

// Un link layer mask just added fron the layers content 

var idsetd = charIDToTypeID( "setd" ); 

    var desc2 = new ActionDescriptor(); 

    var idnull = charIDToTypeID( "null" ); 

        var ref1 = new ActionReference(); 

        var idLyr = charIDToTypeID( "Lyr " ); 

        var idOrdn = charIDToTypeID( "Ordn" ); 

        var idTrgt = charIDToTypeID( "Trgt" ); 

        ref1.putEnumerated( idLyr, idOrdn, idTrgt ); 

    desc2.putReference( idnull, ref1 ); 

    var idT = charIDToTypeID( "T   " ); 

        var desc3 = new ActionDescriptor(); 

        var idUsrs = charIDToTypeID( "Usrs" ); 

        desc3.putBoolean( idUsrs, false ); 

    var idLyr = charIDToTypeID( "Lyr " ); 

    desc2.putObject( idT, idLyr, desc3 ); 

executeAction( idsetd, desc2, DialogModes.NO ); 

}

Votes

Translate

Translate

Report

Report
Community guidelines
Be kind and respectful, give credit to the original source of content, and search for duplicates before posting. Learn more
community guidelines
Enthusiast ,
Apr 16, 2019 Apr 16, 2019

Copy link to clipboard

Copied

I have a two messages to post about this. First, in response to the code posted, below is streamlined code that should accomplish the desired result. But after this I will make a separate post, with a fully automated solution, I think what was desired to begin with. More about that in the next post.


The first helper script, to make guides, is straightforward but could be simplified. I'll assume it's old code before certain properties of the Photoshop DOM were exposed, requiring the call to Execute Action. Below accomplishes the same using 'guides.add()' function, and with the addition of clearing all guides before adding the new ones, a helpful addition.


As already indicated, create a Photoshop Action that does Select Subject then calls this code. Result is guides on the image that can then be adjusted if the fit isn't just right. Then it's ready for the next script.


Code is below or either script may be downloaded here...


add-guides-to-selection-bounds.zip


crop-5x7.zip


// Add guides to selection bounds.jsx
#target Photoshop
if (app.documents.length) {
    // Get doc.
    var doc = app.activeDocument;
    // Get bounds of selection.
    var bounds = doc.selection.bounds;
    doc.selection.deselect();
    // Clear current guides.
    executeAction(stringIDToTypeID("clearAllGuides"), undefined, DialogModes.NO);
    // Add guides to match bounds of selection.
    doc.guides.add(Direction.VERTICAL, bounds[0]);
    doc.guides.add(Direction.HORIZONTAL, bounds[1]);
    doc.guides.add(Direction.VERTICAL, bounds[2]);
    doc.guides.add(Direction.HORIZONTAL, bounds[3]);
}


The second helper script is cryptic, hard to follow. Seems a lot is calls to Execute Action when direct manipulation of the Photoshop DOM would do the trick. And it's not clear why layer masks are involved. ??? Again I'll assume it's older code, before some of the Photoshop DOM was exposed. Not sure, I can only guess.


A simplified approach is to directly manipulate what needs to happen, as shown below, which ends up less code and is clearer, enhancing its reuse for other needs.


After using the above script in conjunction with Select Subject (to lay down guides that show the subject bounds), create a Photoshop Action that calls the script below. The code presented is an example that fits the image to 5x7 inches. Edit the variables at top of the script for other sizes/margin and "save as" with the new size name to create multiple scripts for multiple sizes needed. The script does recognize the subject orientation (wide vs tall) and swaps the dimensions as needed. If that is not the desire, let me know and I'll point out what part of the code is doing that.


One other note -- the script does not resample the image. It changes the resolution so the cropped image is the dimensions in inches requested. So don't be alarmed if resolution turns out high, like 6-8 hundred for a typical digital image converted to 5x7. I am a believer in non-destructive editing whenever possible. Don't throw away those valuable pixels! At least not in working files. I have another script for outputting final files downsampled and color converted, and more, from working files. Go here for more info and free download: Batch Multi Save 


// Crop 5x7.jsx

#target photoshop

// Target values for result (in inches).
// Adjust these values as desired then rename script and save as the new size.
var w = 5; // width (inches)
var h = 7; // height (inches)
var m = 1; // minimum margin to any edge (inches)

if (app.documents.length) {
    // Proceed.
    var bounds = []; // ( array = [left, top, right, bottom] )
    var doc = app.activeDocument;
    var finalHeight;
    var finalWidth;
    var layerBottom;
    var preserveRulerUnits = app.preferences.rulerUnits;
    var resHigh;
    var resWide;
    var resolution;
    var visible;
    app.preferences.rulerUnits = Units.PIXELS;
    bounds = guidesToBounds(doc);
    if (!bounds) {
        alert("Insufficient guides defined.");
    } else {
        // Proceed.
        // Make bottom layer a layer, not background.
        // (to preserve pixels while resizing canvas)
        // And preserve 'visible' property to reset when done.
        layerBottom = doc.layers[doc.layers.length - 1];
        visible = layerBottom.visible;
        layerBottom.isBackgroundLayer = false;
        // Crop image to bounds using resize canvas to preserve pixels outside bounds.
        // Resize canvas to crop out above bounds.
        doc.resizeCanvas(null, doc.height - bounds[1], AnchorPosition.BOTTOMCENTER);
        // Resize canvas to crop out below bounds.
        doc.resizeCanvas(null, bounds[3] - bounds[1], AnchorPosition.TOPCENTER);
        // Resize canvas to crop out left of bounds.
        doc.resizeCanvas(doc.width - bounds[0], null, AnchorPosition.MIDDLERIGHT);
        // Resize canvas to crop out right of bounds.
        doc.resizeCanvas(bounds[2] - bounds[0], null, AnchorPosition.MIDDLELEFT);
        // Swap h and w if needed to match orientation of subject.
        if (doc.width > doc.height) {
            finalHeight = Math.min(h, w);
            finalWidth = Math.max(h, w);
        } else {
            // Image is tall or square.
            finalHeight = Math.max(h, w);
            finalWidth = Math.min(h, w);
        }
        // Resize image to target w x h less m (margin) doubled.
        resHigh = doc.height / (finalHeight - (m * 2));
        resWide = doc.width / (finalWidth - (m * 2));
        resolution = Math.max(resHigh, resWide);
        doc.resizeImage(null, null, resolution, ResampleMethod.NONE);
        // Resize canvas to add margin.
        doc.resizeCanvas(finalWidth * resolution, finalHeight * resolution, AnchorPosition.MIDDLECENTER);
        // Restore original bottom layer properties, but leave
        // as layer, not background, to preserve cropped pixels.
        layerBottom.visible = visible;
        // Restore ruler units.
        app.preferences.rulerUnits = preserveRulerUnits;
    }
}

function guidesToBounds() {
    // Convert guides to bounds.
    var bounds = []; // ( array = [left, top, right, bottom] )
    var doc = app.activeDocument;
    var guidesH = [];
    var guidesV = [];
    var i;
    for (i = 0; i < doc.guides.length; i++) {
        if (doc.guides.direction === Direction.HORIZONTAL) {
            guidesH.push(parseInt(doc.guides.coordinate, 10));
        }
    }
    guidesH.sort(function (a, b) {
        return (a > b) ? 1 : ((a < b) ? -1 : 0);
    });
    for (i = 0; i < doc.guides.length; i++) {
        if (doc.guides.direction === Direction.VERTICAL) {
            guidesV.push(parseInt(doc.guides.coordinate, 10));
        }
    }
    guidesV.sort(function (a, b) {
        return (a > b) ? 1 : ((a < b) ? -1 : 0);
    });
    if (guidesV.length < 2 || guidesH.length < 2) {
        // Not enough guides. Fail.
        return null;
    }
    bounds[0] = guidesV[0];
    bounds[1] = guidesH[0];
    bounds[2] = guidesV[1];
    bounds[3] = guidesH[1];
    return bounds;
}


In the next post I'll show how to do this to a folder full of images.

William Campbell

Votes

Translate

Translate

Report

Report
Community guidelines
Be kind and respectful, give credit to the original source of content, and search for duplicates before posting. Learn more
community guidelines
Enthusiast ,
Apr 16, 2019 Apr 16, 2019

Copy link to clipboard

Copied

Edit 08/26/2020: I have put this code into a script with interface along with further features. Download free here Auto Crop


Here is an automated solution. Not sure I'd recommend this approach -- it relies on Photoshop 'Select Subject' to get it right. It does a lot, but not always. I think it could be better to have two solutions. One to Select Subject and set guides based on the result, but allow the operator to adjust the guides if Select Subject isn't quite right, then a second script, like this one, that processes the entire folder of working files to output a particular size/margin. Please anyone with feedback say something -- if the need is great I may conjure a combination of scripts as I've described. The code below is just a quick "here ya go" stab at it. Not much in the way of error checking and interface simply selecting a folder, that's it. Bare minimum proof of concept. This was whipped up quick so please anything doesn't work right say something. I'll fix it.


Size/margin is hard-coded at top of script, so if this works, edit as needed and save as other sizes. Then make multiple Actions each calling the particular size. If the need is great enough, I'll take this to the next level with full interface to define/select sizes and save them as presets. I'll do that if enough others give feedback that it would be useful to have.


The script will scan a folder for valid image types (eps|gif|jpg|png|psd|tif) and process each: select subject, then use the selection bounds to crop to the desired size/margin. Guides aren't needed here -- the bounds of the result of select subject are used directly. Each file processed is saved as JPG to a subfolder "Cropped" and with the size (in this case, "_5x7") as a suffix to the file name. All of that is easy to see in the code if anyone wants the script to behave differently (see function 'saveAndClose').


Use with care -- Photoshop's Select Subject is good, but it ain't perfect. Review the results and for any that come out wonky, fix manually. In any case it should save some users a good deal of time, the first goal of scripting.


Code is below or may be downloaded here...


auto-crop-5x7.zip


// Auto Crop 5x7.jsx

#target Photoshop

// Target values for result (in inches).
// Adjust these values as desired then rename script and save as the new size.
var w = 5; // width (inches)
var h = 7; // height (inches)
var m = 0.5; // minimum margin to any edge (inches)

var folder = Folder.selectDialog("Select folder of images to process:");
if (folder) {
    process(folder);
    alert("Processing complete.");
}

function process(folder) {
    var doc;
    var files;
    var i;
    files = folder.getFiles(function (f) {
        if (f instanceof File && !f.hidden) {
            if (/eps|gif|jpg|png|psd|tif$/i.test(f.name)) {
                return true;
            }
        }
        return false;
    });
    if (!files.length) {
        alert("No files found.");
        return;
    }
    progress(files.length);
    // Loop through files in folder.
    for (i = 0; i < files.length; i++) {
        progress.message(File.decode(files[i].name));
        doc = app.open(files[i]);
        processDoc(doc);
        saveAndClose(doc);
        progress.increment();
    }
    progress.close();
}

function processDoc(doc) {
    var bounds;
    var finalHeight;
    var finalWidth;
    var layerBottom;
    var resHigh;
    var resWide;
    var resolution;
    var resolutionOriginal = doc.resolution;
    var rulerUnits = app.preferences.rulerUnits;
    var visible;
    app.preferences.rulerUnits = Units.PIXELS;
    // Make bottom layer a layer, not background.
    // (to preserve pixels while resizing canvas)
    // And preserve 'visible' property to reset when done.
    layerBottom = doc.layers[doc.layers.length - 1];
    visible = layerBottom.visible;
    layerBottom.isBackgroundLayer = false;
    // Invoke Photoshop 'Select Subject'
    selectSubject();
    // Get bounds of selection.
    bounds = doc.selection.bounds;
    doc.selection.deselect();
    // Crop image to bounds using resize canvas to preserve pixels outside bounds.
    // Resize canvas to crop out above bounds.
    doc.resizeCanvas(null, doc.height - bounds[1], AnchorPosition.BOTTOMCENTER);
    // Resize canvas to crop out below bounds.
    doc.resizeCanvas(null, bounds[3] - bounds[1], AnchorPosition.TOPCENTER);
    // Resize canvas to crop out left of bounds.
    doc.resizeCanvas(doc.width - bounds[0], null, AnchorPosition.MIDDLERIGHT);
    // Resize canvas to crop out right of bounds.
    doc.resizeCanvas(bounds[2] - bounds[0], null, AnchorPosition.MIDDLELEFT);
    // Swap h and w if needed to match orientation of subject.
    if (doc.width > doc.height) {
        // Subject is wide.
        finalHeight = Math.min(h, w);
        finalWidth = Math.max(h, w);
    } else {
        // Subject is tall or square.
        finalHeight = Math.max(h, w);
        finalWidth = Math.min(h, w);
    }
    // Resize image to target w x h less m (margin) doubled.
    resHigh = doc.height / (finalHeight - (m * 2));
    resWide = doc.width / (finalWidth - (m * 2));
    resolution = Math.max(resHigh, resWide);
    doc.resizeImage(null, null, resolution, ResampleMethod.NONE);
    // Resize canvas to add margin.
    doc.resizeCanvas(finalWidth * resolution, finalHeight * resolution, AnchorPosition.MIDDLECENTER);
    // Restore original bottom layer properties, but leave
    // as layer, not background, to preserve cropped pixels.
    layerBottom.visible = visible;
    // Restore document's original resolution.
    // Uncomment below to keep original resolution.
    // (image is cropped to 5x7 aspect ratio, but not sized to actual 5x7 inches)
    //    doc.resizeImage(null, null, resolutionOriginal, ResampleMethod.NONE);
    // Restore ruler units.
    app.preferences.rulerUnits = rulerUnits;
}

function progress(steps) {
    var w = new Window("palette", "Progress");
    var b;
    var t = w.add("statictext");
    t.preferredSize = [450, -1];
    if (steps) {
        b = w.add("progressbar", undefined, 0, steps);
        b.preferredSize = [450, -1];
    }
    w.add("statictext", undefined, "Press ESC to cancel");
    progress.close = function () {
        w.close();
        app.refresh();
    };
    progress.increment = function () {
        b.value++;
    };
    progress.message = function (message) {
        t.text = message;
        app.refresh();
    };
    w.show();
    app.refresh();
}

function saveAndClose(doc) {
    var folder = new Folder(doc.path + "/Cropped");
    var name = doc.name.replace(/\.[^\.]*$/, "") + "_" + w + "x" + h + ".jpg";
    var saveOptions = new JPEGSaveOptions();
    // Ensure the folder exists.
    if (!folder.exists) {
        folder.create();
    }
    // Save.
    saveOptions.quality = 10;
    saveOptions.formatOptions = FormatOptions.STANDARDBASELINE;
    saveOptions.embedColorProfile = true;
    doc.saveAs(new File(folder + "/" + name), saveOptions);
    doc.close(SaveOptions.DONOTSAVECHANGES);
}

function selectSubject() {
    var desc1 = new ActionDescriptor();
    desc1.putBoolean(stringIDToTypeID("sampleAllLayers"), false);
    executeAction(stringIDToTypeID('autoCutout'), desc1, DialogModes.NO);
}


William Campbell

Votes

Translate

Translate

Report

Report
Community guidelines
Be kind and respectful, give credit to the original source of content, and search for duplicates before posting. Learn more
community guidelines
Community Expert ,
Apr 16, 2019 Apr 16, 2019

Copy link to clipboard

Copied

I added some action manager code in case the subject was not well centered subject selection.

// Auto Crop 5x7.jsx 

#target Photoshop 


// Target values for result (in inches). 

// Adjust these values as desired then rename script and save as the new size. 

var w = 5; // width (inches) 

var h = 7; // height (inches) 

var m = 1; // minimum margin to any edge (inches) 


var folder = Folder.selectDialog("Select folder of images to process:"); 

if (folder) { 

    process(folder); 

    alert("Processing complete."); 


function process(folder) { 

    var doc; 

    var files; 

    var i; 

    files = folder.getFiles(function (f) { 

        if (f instanceof File && !f.hidden) { 

            if (/eps|gif|jpg|png|psd|tif$/i.test(f.name)) { 

                return true; 

            } 

        } 

        return false; 

    }); 

    if (!files.length) { 

        alert("No files found."); 

        return; 

    } 

    progress(files.length); 

    // Loop through files in folder. 

    for (i = 0; i < files.length; i++) { 

        progress.message(File.decode(files.name)); 

        doc = app.open(files); 

        processDoc(doc); 

        saveAndClose(doc); 

        progress.increment(); 

    } 

    progress.close(); 


function processDoc(doc) { 

    var bounds; 

    var finalHeight; 

    var finalWidth; 

    var layerBottom; 

    var resHigh; 

    var resWide; 

    var resolution; 

    var rulerUnits = app.preferences.rulerUnits; 

    var visible; 

    app.preferences.rulerUnits = Units.PIXELS; 

    // Make bottom layer a layer, not background. 

    // (to preserve pixels while resizing canvas) 

    // And preserve 'visible' property to reset when done. 

    layerBottom = doc.layers[doc.layers.length - 1]; 

    visible = layerBottom.visible; 

    layerBottom.isBackgroundLayer = false; 

    // Invoke Photoshop 'Select Subject' 

    selectSubject(); 

    // Get bounds of selection. 

    bounds = doc.selection.bounds; 

    doc.selection.deselect(); 

    // Crop image to bounds using resize canvas to preserve pixels outside bounds. 

    // Resize canvas to crop out above bounds. 

    doc.resizeCanvas(null, doc.height - bounds[1], AnchorPosition.BOTTOMCENTER); 

    // Resize canvas to crop out below bounds. 

    doc.resizeCanvas(null, bounds[3] - bounds[1], AnchorPosition.TOPCENTER); 

    // Resize canvas to crop out left of bounds. 

    doc.resizeCanvas(doc.width - bounds[0], null, AnchorPosition.MIDDLERIGHT); 

    // Resize canvas to crop out right of bounds. 

    doc.resizeCanvas(bounds[2] - bounds[0], null, AnchorPosition.MIDDLELEFT); 

    // Swap h and w if needed to match orientation of subject. 

    if (doc.width > doc.height) { 

        // Subject is wide. 

        finalHeight = Math.min(h, w); 

        finalWidth = Math.max(h, w); 

    } else { 

        // Subject is tall or square. 

        finalHeight = Math.max(h, w); 

        finalWidth = Math.min(h, w); 

    } 

    // Resize image to target w x h less m (margin) doubled. 

    resHigh = doc.height / (finalHeight - (m * 2)); 

    resWide = doc.width / (finalWidth - (m * 2)); 

    resolution = Math.max(resHigh, resWide); 

    doc.resizeImage(null, null, resolution, ResampleMethod.NONE); 

    // Resize canvas to add margin. 

    doc.resizeCanvas(finalWidth * resolution, finalHeight * resolution, AnchorPosition.MIDDLECENTER); 

   try{

// =======================================================

var idsetd = charIDToTypeID( "setd" );

     var desc33 = new ActionDescriptor();

     var idnull = charIDToTypeID( "null" );

        var ref10 = new ActionReference();

         var idChnl = charIDToTypeID( "Chnl" );

        var idfsel = charIDToTypeID( "fsel" );

        ref10.putProperty( idChnl, idfsel );

     desc33.putReference( idnull, ref10 );

     var idT = charIDToTypeID( "T   " );

        var ref11 = new ActionReference();

        var idChnl = charIDToTypeID( "Chnl" );

         var idChnl = charIDToTypeID( "Chnl" );

         var idTrsp = charIDToTypeID( "Trsp" );

         ref11.putEnumerated( idChnl, idChnl, idTrsp );

    desc33.putReference( idT, ref11 );

executeAction( idsetd, desc33, DialogModes.NO );

// =======================================================

var idInvs = charIDToTypeID( "Invs" );

executeAction( idInvs, undefined, DialogModes.NO );

// =======================================================

var idFl = charIDToTypeID( "Fl  " );

     var desc38 = new ActionDescriptor();

    var idUsng = charIDToTypeID( "Usng" );

    var idFlCn = charIDToTypeID( "FlCn" );

    var idcontentAware = stringIDToTypeID( "contentAware" );

    desc38.putEnumerated( idUsng, idFlCn, idcontentAware );

    var idcontentAwareColorAdaptationFill = stringIDToTypeID( "contentAwareColorAdaptationFill" );

     desc38.putBoolean( idcontentAwareColorAdaptationFill, true );

     var idcontentAwareRotateFill = stringIDToTypeID( "contentAwareRotateFill" );

     desc38.putBoolean( idcontentAwareRotateFill, false );

     var idcontentAwareScaleFill = stringIDToTypeID( "contentAwareScaleFill" );

    desc38.putBoolean( idcontentAwareScaleFill, false );

     var idcontentAwareMirrorFill = stringIDToTypeID( "contentAwareMirrorFill" );

     desc38.putBoolean( idcontentAwareMirrorFill, false );

     var idOpct = charIDToTypeID( "Opct" );

     var idPrc = charIDToTypeID( "#Prc" );

     desc38.putUnitDouble( idOpct, idPrc, 100.000000 );

     var idMd = charIDToTypeID( "Md  " );

    var idBlnM = charIDToTypeID( "BlnM" );

    var idNrml = charIDToTypeID( "Nrml" );

    desc38.putEnumerated( idMd, idBlnM, idNrml );

executeAction( idFl, desc38, DialogModes.NO );

}

catch(e) {}

    // Restore original bottom layer properties, but leave 

    // as layer, not background, to preserve cropped pixels. 

    layerBottom.visible = visible; 

    // Restore ruler units. 

    app.preferences.rulerUnits = rulerUnits; 


function progress(steps) { 

    var w = new Window("palette", "Progress"); 

    var b; 

    var t = w.add("statictext"); 

    t.preferredSize = [450, -1]; 

    if (steps) { 

        b = w.add("progressbar", undefined, 0, steps); 

        b.preferredSize = [450, -1]; 

    } 

    if (File.fs == "Macintosh") { 

        // ESC only works on Mac. 

        w.add("statictext", undefined, "Press ESC to cancel"); 

    } 

    progress.close = function () { 

        w.close(); 

    }; 

    progress.increment = function () { 

        b.value++; 

    }; 

    progress.message = function (message) { 

        t.text = message; 

    }; 

    w.show(); 


function saveAndClose(doc) { 

    var displayDialogs = app.displayDialogs; 

    var folder = new Folder(doc.path + "/Cropped"); 

    var name = doc.name.replace(/\.[^\.]*$/, "") + "_" + w + "x" + h + ".jpg"; 

    var saveOptions = new JPEGSaveOptions(); 

    app.displayDialogs = DialogModes.NO; 

    // Ensure the folder exists. 

    if (!folder.exists) { 

        folder.create(); 

    } 

    // Save. 

    saveOptions.quality = 10; 

    saveOptions.formatOptions = FormatOptions.STANDARDBASELINE; 

    saveOptions.embedColorProfile = true; 

    doc.saveAs(new File(folder + "/" + name), saveOptions); 

    doc.close(SaveOptions.DONOTSAVECHANGES); 

    // Restore displayDialogs value. 

    app.displayDialogs = displayDialogs; 


function selectSubject() { 

    var desc1 = new ActionDescriptor(); 

    desc1.putBoolean(stringIDToTypeID("sampleAllLayers"), false); 

    executeAction(stringIDToTypeID('autoCutout'), desc1, DialogModes.NO); 

JJMack

Votes

Translate

Translate

Report

Report
Community guidelines
Be kind and respectful, give credit to the original source of content, and search for duplicates before posting. Learn more
community guidelines
New Here ,
Apr 17, 2019 Apr 17, 2019

Copy link to clipboard

Copied

Hey Guys,

This is great!  Couple things.  JJMack, when I ran your code after about 6-8 photos it started putting out all white images(see screen shot). 

William

1.  What does the minimum 1 inch base off of?  1 inch from the select subject or is it 1 inch from the select subject +500px?  

2.  Is there an easy way to keep the image the size that it is and just crop in a certain aspect ratio without having to size up and down?

Will when I ran your script, some of the photos had white border(see screenshot), but I assume that was because the image did not have enough space on the side to make that 1" minimum.  However when I ran Stephan's action/script the images all cropped correctly.  Would this have something to do with cropping down to 5x7 inches instead of an aspect ratio?  Thanks!jj.jpgWill.jpg

Votes

Translate

Translate

Report

Report
Community guidelines
Be kind and respectful, give credit to the original source of content, and search for duplicates before posting. Learn more
community guidelines
Enthusiast ,
Apr 17, 2019 Apr 17, 2019

Copy link to clipboard

Copied

howardf39478514  wrote

William

1.  What does the minimum 1 inch base off of?  1 inch from the select subject or is it 1 inch from the select subject +500px?  

2.  Is there an easy way to keep the image the size that it is and just crop in a certain aspect ratio without having to size up and down?

Will when I ran your script, some of the photos had white border(see screenshot), but I assume that was because the image did not have enough space on the side to make that 1" minimum.  However when I ran Stephan's action/script the images all cropped correctly.  Would this have something to do with cropping down to 5x7 inches instead of an aspect ratio?  Thanks!

Because you've requested a size (or aspect ratio) in inches, the margin too should be inches. If you mix inches and pixels, you can get unpredictable results depending on the resolution of the image. If using for example "500 pixels" for a minimum margin, and the image is say 2000 x 3000 pixels, that's a big margin compared to an image that is 6000 x 9000 pixels.

From the example images you posted, probably 1 inch is too much. I just tossed out an example margin. Maybe it would work better to set at 1/2 inch (0.5) instead? That would also reduce the instance of white on the sides. You're getting that because the subject in your example is tall and narrow, making top and bottom the nearest to margin, so those two are set 1 inch away. Change it to 0.5 and essentially the subject will be cropped tighter. You see?

The script can easily be edited to set margin by pixels instead of inches, but that introduces the unpredictability of mixing inches and pixel measurements. Edit the script to a lower margin value and try it. See if it then works better.

About cropping to the aspect ratio, well that is what it is doing. It just happens to set the resolution to bring the image to the inches size as well. I assumed that was the desire. The image isn't down-sampled any. If you want the resolution constant instead, the script could be edited to do so, or an easy way to is simply add to the Action calling the script, after the script is done, resize image with resample off. Set resolution back to whatever you know it began as (240? 300?) whatever the value may be, and then the image is again whatever large size (16x20~ or whatever). You see?

It would help to understand your complete workflow, and the desired end result ( I mean end, as in what is provided to the client). I assume you have working files then run this process to produce output files, why I assumed you would want a specific size. Edit the value at top of the script and save as another size, then use that copy to produce other sizes of final output like 2x3, 8x10, whatever, right?

William Campbell

Votes

Translate

Translate

Report

Report
Community guidelines
Be kind and respectful, give credit to the original source of content, and search for duplicates before posting. Learn more
community guidelines
New Here ,
Apr 17, 2019 Apr 17, 2019

Copy link to clipboard

Copied

Hey Will,

The workflow looks like:

1.We photograph the athletes.

2.Then we are looking for this auto crop feature to:

    Batch Crop in an aspect ratio of 5x7 or 7x10  leaving x amount above the heads and feet  in order to be able to crop as an 8x10,3x5 or      different aspect ratio when ordering without cutting off heads or feet.

3. Edit and order images.

Because you've requested a size (or aspect ratio) in inches, the margin too should be inches. If you mix inches and pixels, you can get unpredictable results depending on the resolution of the image. If using for example "500 pixels" for a minimum margin, and the image is say 2000 x 3000 pixels, that's a big margin compared to an image that is 6000 x 9000 pixels.

The actual size of the image really isn't such a factor as the aspect ratio is.   Ideally the image size really wouldn't change, other than loosing the cropped off pixel's (based on the size of the subject+padding in the photo and the aspect ratio it was being cropped to).   

The important parts are:

1. We can set X(500px or 1 inch,ect) padding above head and feet of subject

2. We can crop in a certain ratio set(5x7,7x10,ect)

3. The subject is centered

Votes

Translate

Translate

Report

Report
Community guidelines
Be kind and respectful, give credit to the original source of content, and search for duplicates before posting. Learn more
community guidelines
Enthusiast ,
Apr 17, 2019 Apr 17, 2019

Copy link to clipboard

Copied

I've revised the code to keep the image's original resolution. And moved setting displayDialogs.NO up to suppress other messages I didn't see until testing this morning for the resolution change.


Also I reduced the margin to 0.5 inch. That should help instances of white showing up in margins. For an automated solution, there isn't much that can be done about this short of adding overly complex intelligence to not crop beyond original bounds. But then the head and feet would be cut off. So these odd ones will require manual intervention anyway. Best to use the smaller margin (or any other smaller value you might prefer for desired result) then browse the results in Bridge to see which (hopefully few) have white in the margins. Then go work on those manually to figure out a solution in each case. At least the bulk will get done automated.


Here is the revised code...


// Auto Crop 5x7.jsx

#target Photoshop

// Target values for result (in inches).
// Adjust these values as desired then rename script and save as the new size.
var w = 5; // width (inches)
var h = 7; // height (inches)
var m = 0.5; // minimum margin to any edge (inches)

var folder = Folder.selectDialog("Select folder of images to process:");
if (folder) {
    process(folder);
    alert("Processing complete.");
}

function process(folder) {
    var doc;
    var files;
    var i;
    app.displayDialogs = DialogModes.NO;
    files = folder.getFiles(function (f) {
        if (f instanceof File && !f.hidden) {
            if (/eps|gif|jpg|png|psd|tif$/i.test(f.name)) {
                return true;
            }
        }
        return false;
    });
    if (!files.length) {
        alert("No files found.");
        return;
    }
    progress(files.length);
    // Loop through files in folder.
    for (i = 0; i < files.length; i++) {
        progress.message(File.decode(files[i].name));
        doc = app.open(files[i]);
        processDoc(doc);
        saveAndClose(doc);
        progress.increment();
    }
    progress.close();
}

function processDoc(doc) {
    var bounds;
    var finalHeight;
    var finalWidth;
    var layerBottom;
    var resHigh;
    var resWide;
    var resolution;
    var resolutionOriginal = doc.resolution;
    var rulerUnits = app.preferences.rulerUnits;
    var visible;
    app.preferences.rulerUnits = Units.PIXELS;
    // Make bottom layer a layer, not background.
    // (to preserve pixels while resizing canvas)
    // And preserve 'visible' property to reset when done.
    layerBottom = doc.layers[doc.layers.length - 1];
    visible = layerBottom.visible;
    layerBottom.isBackgroundLayer = false;
    // Invoke Photoshop 'Select Subject'
    selectSubject();
    // Get bounds of selection.
    bounds = doc.selection.bounds;
    doc.selection.deselect();
    // Crop image to bounds using resize canvas to preserve pixels outside bounds.
    // Resize canvas to crop out above bounds.
    doc.resizeCanvas(null, doc.height - bounds[1], AnchorPosition.BOTTOMCENTER);
    // Resize canvas to crop out below bounds.
    doc.resizeCanvas(null, bounds[3] - bounds[1], AnchorPosition.TOPCENTER);
    // Resize canvas to crop out left of bounds.
    doc.resizeCanvas(doc.width - bounds[0], null, AnchorPosition.MIDDLERIGHT);
    // Resize canvas to crop out right of bounds.
    doc.resizeCanvas(bounds[2] - bounds[0], null, AnchorPosition.MIDDLELEFT);
    // Swap h and w if needed to match orientation of subject.
    if (doc.width > doc.height) {
        // Subject is wide.
        finalHeight = Math.min(h, w);
        finalWidth = Math.max(h, w);
    } else {
        // Subject is tall or square.
        finalHeight = Math.max(h, w);
        finalWidth = Math.min(h, w);
    }
    // Resize image to target w x h less m (margin) doubled.
    resHigh = doc.height / (finalHeight - (m * 2));
    resWide = doc.width / (finalWidth - (m * 2));
    resolution = Math.max(resHigh, resWide);
    doc.resizeImage(null, null, resolution, ResampleMethod.NONE);
    // Resize canvas to add margin.
    doc.resizeCanvas(finalWidth * resolution, finalHeight * resolution, AnchorPosition.MIDDLECENTER);
    // Restore original bottom layer properties, but leave
    // as layer, not background, to preserve cropped pixels.
    layerBottom.visible = visible;
    // Restore document's original resolution.
    // Uncomment below to keep original resolution.
    // (image is cropped to 5x7 aspect ratio, but not sized to actual 5x7 inches)
    //    doc.resizeImage(null, null, resolutionOriginal, ResampleMethod.NONE);
    // Restore ruler units.
    app.preferences.rulerUnits = rulerUnits;
}

function progress(steps) {
    var w = new Window("palette", "Progress");
    var b;
    var t = w.add("statictext");
    t.preferredSize = [450, -1];
    if (steps) {
        b = w.add("progressbar", undefined, 0, steps);
        b.preferredSize = [450, -1];
    }
    w.add("statictext", undefined, "Press ESC to cancel");
    progress.close = function () {
        w.close();
        app.refresh();
    };
    progress.increment = function () {
        b.value++;
    };
    progress.message = function (message) {
        t.text = message;
        app.refresh();
    };
    w.show();
    app.refresh();
}

function saveAndClose(doc) {
    var folder = new Folder(doc.path + "/Cropped");
    var name = doc.name.replace(/\.[^\.]*$/, "") + "_" + w + "x" + h + ".jpg";
    var saveOptions = new JPEGSaveOptions();
    // Ensure the folder exists.
    if (!folder.exists) {
        folder.create();
    }
    // Save.
    saveOptions.quality = 10;
    saveOptions.formatOptions = FormatOptions.STANDARDBASELINE;
    saveOptions.embedColorProfile = true;
    doc.saveAs(new File(folder + "/" + name), saveOptions);
    doc.close(SaveOptions.DONOTSAVECHANGES);
}

function selectSubject() {
    var desc1 = new ActionDescriptor();
    desc1.putBoolean(stringIDToTypeID("sampleAllLayers"), false);
    executeAction(stringIDToTypeID('autoCutout'), desc1, DialogModes.NO);
}
William Campbell

Votes

Translate

Translate

Report

Report
Community guidelines
Be kind and respectful, give credit to the original source of content, and search for duplicates before posting. Learn more
community guidelines
Community Expert ,
Apr 17, 2019 Apr 17, 2019

Copy link to clipboard

Copied

Try setting your Photoshop performance setting to use legacy composition.  The code I added was designed to fill added empty canvas with content aware fill. So it would not turn Background white when saves as a jpg.  On my workstation with a Nvidia Quadro K2200 I would get strand thing like that if I do have Photoshop CC 2019 use legacy composition

JJMack

Votes

Translate

Translate

Report

Report
Community guidelines
Be kind and respectful, give credit to the original source of content, and search for duplicates before posting. Learn more
community guidelines
New Here ,
Apr 12, 2019 Apr 12, 2019

Copy link to clipboard

Copied

It seems to be that the AspectRatioSelection.jsx script will select, but the image->Crop function is greyed out.  Also you cannot deselect.

Votes

Translate

Translate

Report

Report
Community guidelines
Be kind and respectful, give credit to the original source of content, and search for duplicates before posting. Learn more
community guidelines
Community Expert ,
Apr 12, 2019 Apr 12, 2019

Copy link to clipboard

Copied

While the select subject in the case selection bounds would most likely have a portrait aspect ratio where the height is lager than the width. That will not always be the case.  So you can not simply add 1000 Pixels to the height and set a standard portrait Aspect Ratio that height.  If the select subject selection has a landscape aspect ratio the a standard portrait selection crop would crop off  parts of the subject.

However you could select subject expand the selection 500px and crop to a none standard aspect ratio which may be a portrait or square or landscape aspect ratio,  It would be a very easy action to record. It will work well as long as there are 500PX on all sides of the select subject selection bounds.

Capture.jpg

JJMack

Votes

Translate

Translate

Report

Report
Community guidelines
Be kind and respectful, give credit to the original source of content, and search for duplicates before posting. Learn more
community guidelines
New Here ,
Apr 12, 2019 Apr 12, 2019

Copy link to clipboard

Copied

Yes you are correct, I have gotten that far, the problem is the crop is then based on the height of the person(+500px) and not an set aspect ratio.  So the the tall athletes, you get a long and skinny crop. 

Votes

Translate

Translate

Report

Report
Community guidelines
Be kind and respectful, give credit to the original source of content, and search for duplicates before posting. Learn more
community guidelines
Community Expert ,
Apr 12, 2019 Apr 12, 2019

Copy link to clipboard

Copied

If you know how to script Photoshop you could calculate a standard Landscape or Portrait aspect ratio crop once  you get the select subject bounds.  However Select subject does not always get it right IMO. And there would need to be sufficient room for the crop. If the subject is not well centered with room for the crop you will run out of canvas to make the crop

JJMack

Votes

Translate

Translate

Report

Report
Community guidelines
Be kind and respectful, give credit to the original source of content, and search for duplicates before posting. Learn more
community guidelines
New Here ,
Apr 12, 2019 Apr 12, 2019

Copy link to clipboard

Copied

Would you then run the script as part of the action?  My scripting knowledge is very minimum, but I am not above paying you or someone else to do it but if all else fails I am also not above putting in the time to learn, if you know of any good resources?   Thanks for your help.  

Votes

Translate

Translate

Report

Report
Community guidelines
Be kind and respectful, give credit to the original source of content, and search for duplicates before posting. Learn more
community guidelines