• Global community
    • Language:
      • Deutsch
      • English
      • Español
      • Français
      • Português
  • 日本語コミュニティ
    Dedicated community for Japanese speakers
  • 한국 커뮤니티
    Dedicated community for Korean speakers
Exit
2

Script to import, warp, resize and move layers

Participant ,
May 17, 2024 May 17, 2024

Copy link to clipboard

Copied

Hey, all the generous and bright minds out there 🤩


I would like help reducing the time it takes to make a collage of multiple photos of wooden boxes. In the past months, I had amazing help from c.pfaffenbichler and Stephen_A_Marsh regarding this process.


c.pfaffenbichler created a script to skew smart objects that worked most of the time - See post HERE. However, a bug created stretched images very inconsistently. I read online this happened to others using actions and Smart Objects. Besides this my "input files" changed, instead of jpgs, I am now dealing with PSD files with a layer mask created by Remove.bg.


I would like to have the layer mask of transparency in my input files directly editable in my template file. It made me decide to abandon the desire to keep the original photo information and quality. Unfortunately, this also means the powerhouse of a script he created for me can't do the job anymore. 🥺


I would like to ask again for help 🙏🏻


Process steps

  •  Start ingredients:
    - Template file (Framefoto-template NEW v2.psd)
    - Multiple PSD files containing 2 layers, where 1 is a layer of the photo with a layer mask (box 1.psd, box 2.psd, box 5.psd)
  • 1st step script desired - fetch and copy layers with mask:
    - Pop-up to multi-select PSD files of the boxes
    - Script to look for layers with a mask (if needed, currently always is 1 named remove.bg)
    - Layer, including the mask, copied to the active document (Template file) into the layerset "FOTOS"
    - Layer name renamed to the original file (if this is even possible)
    - IF layer > then canvas height/width resize to fit
    - Center on canvas

    2 - After Copy Layers.png


          See result example PSD file

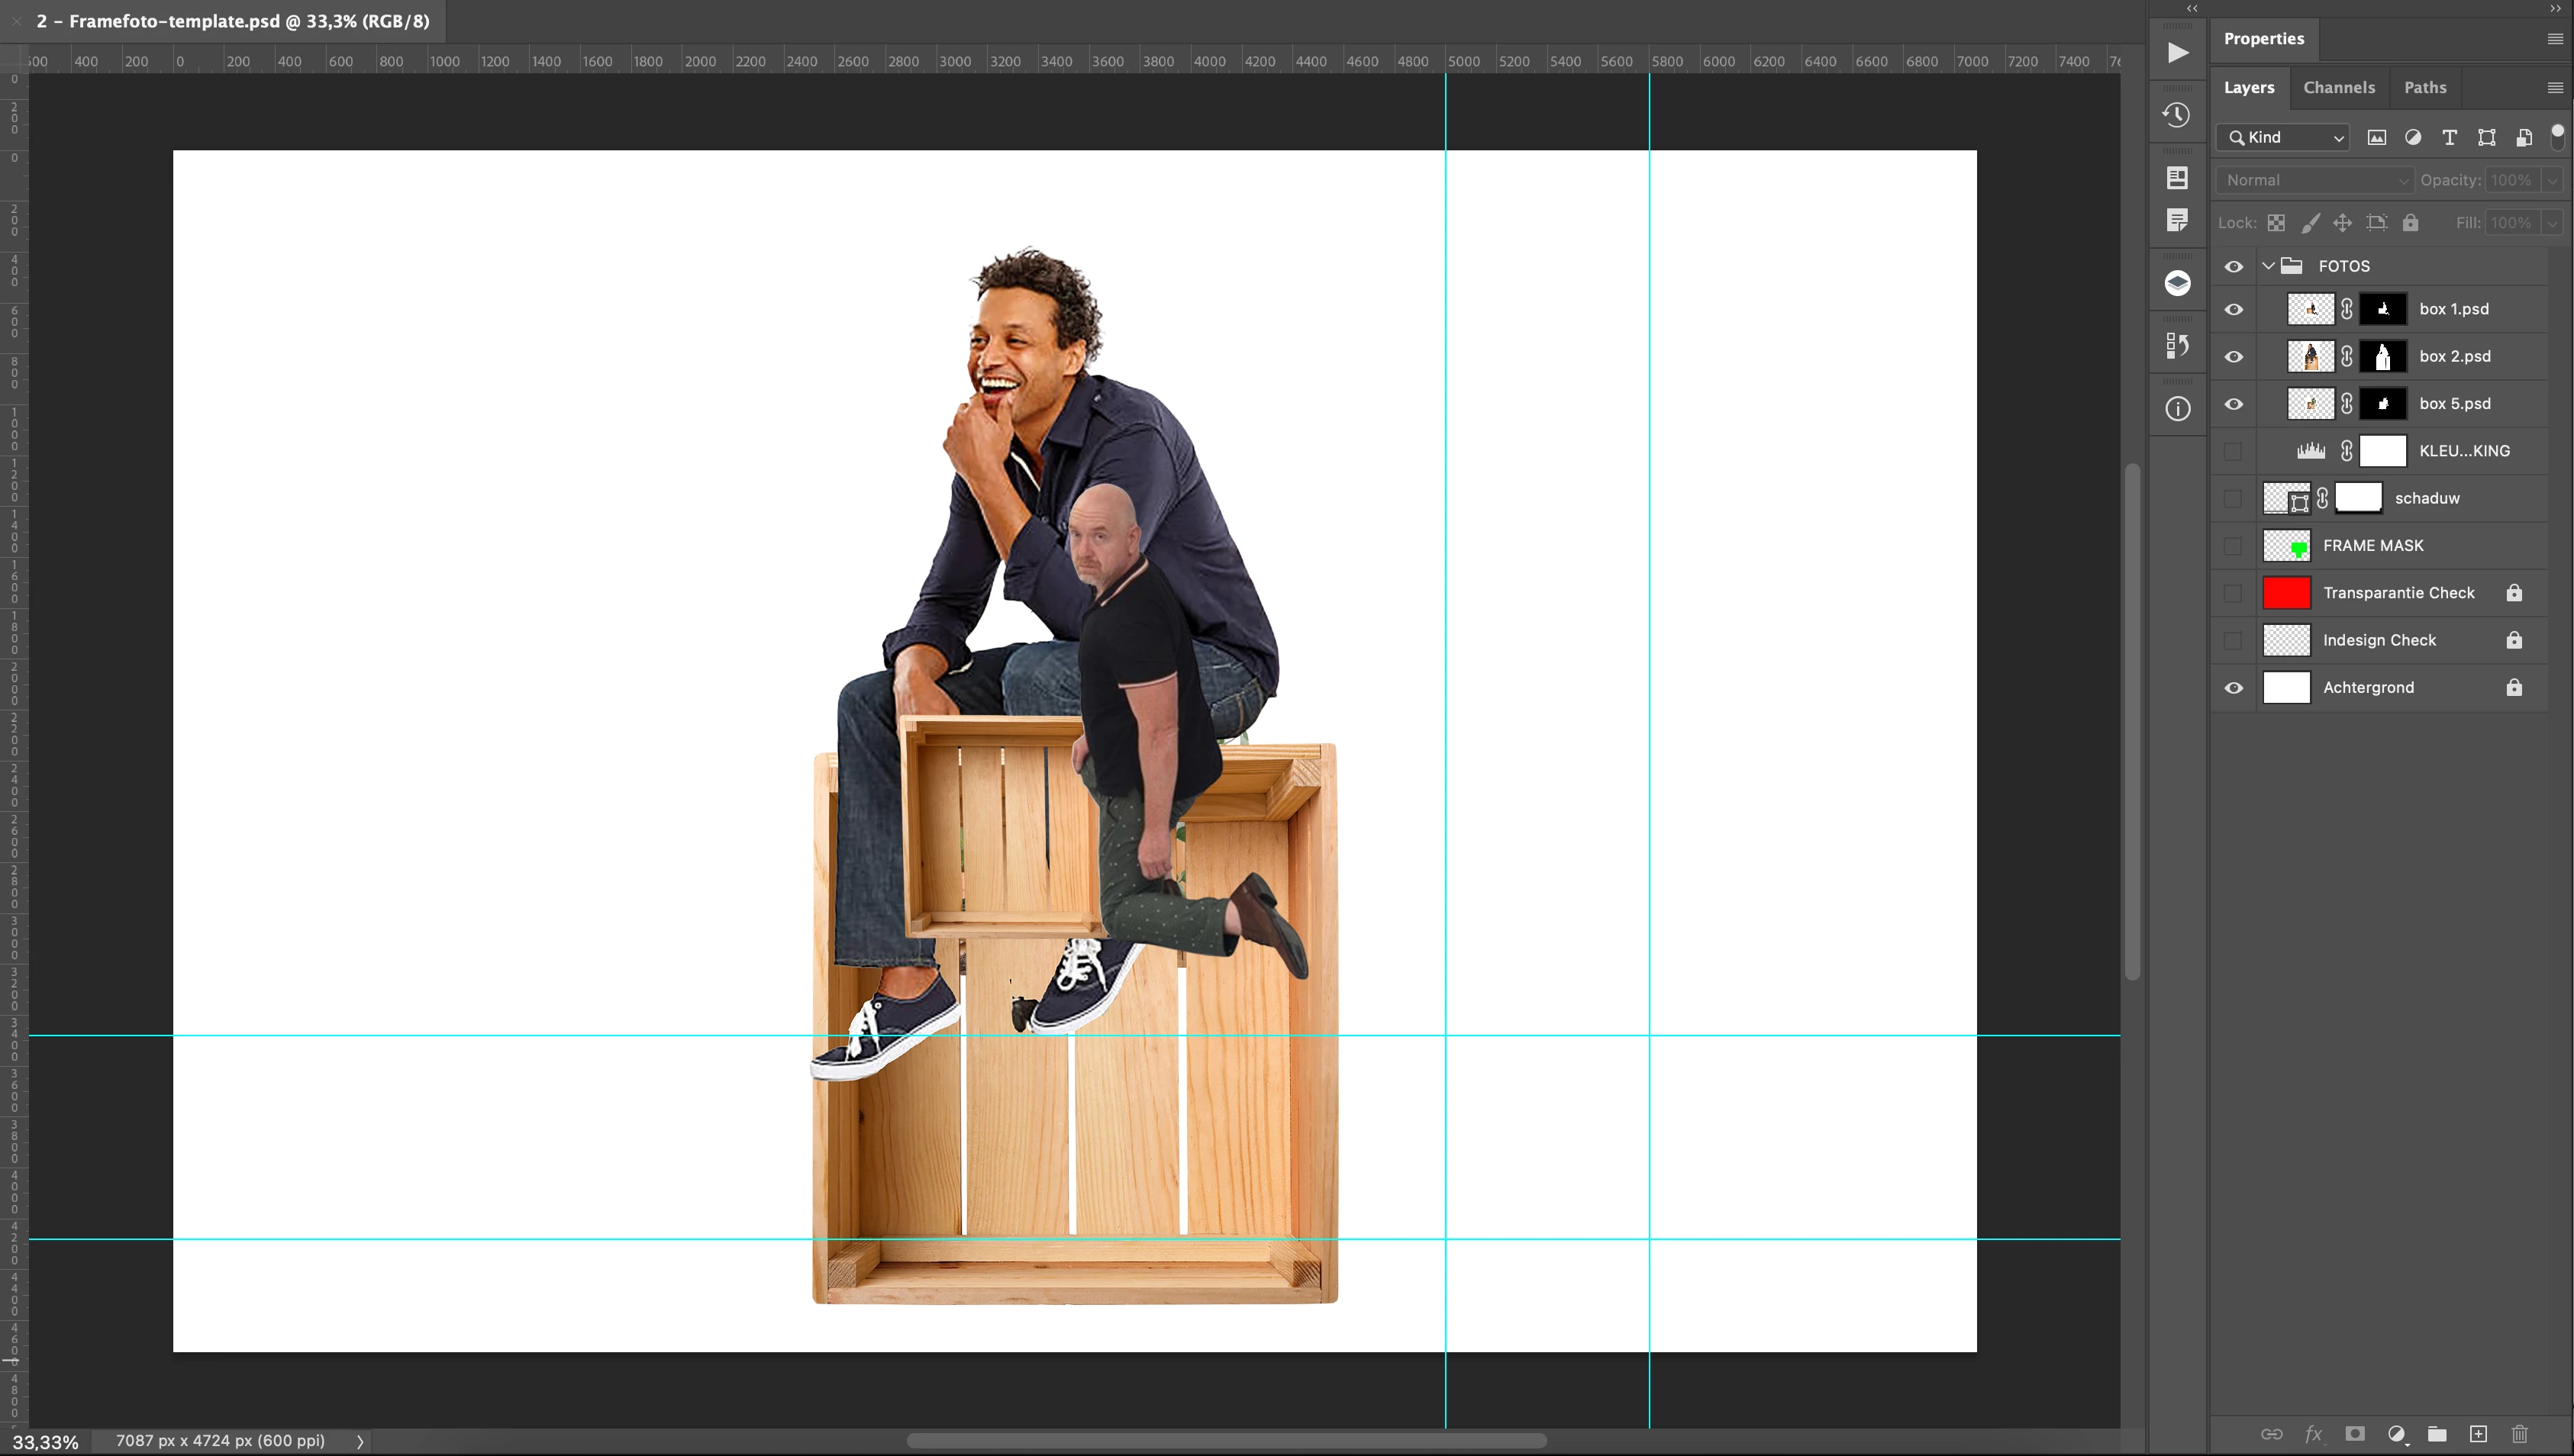
  • 2nd step script desired - transform per photo:
    - manually 4 points will be assigned by the user
    - based on the 4 points, skew/perspective warp to make corners 90˚
    - based on the 4 points area, Resize image + mask to make the area 800x800 pixels
    - based on the 4 points area, Move the layer to static coordinates

    3 - After Skew and Resize.png


          See result example PSD file

Video of the process manually

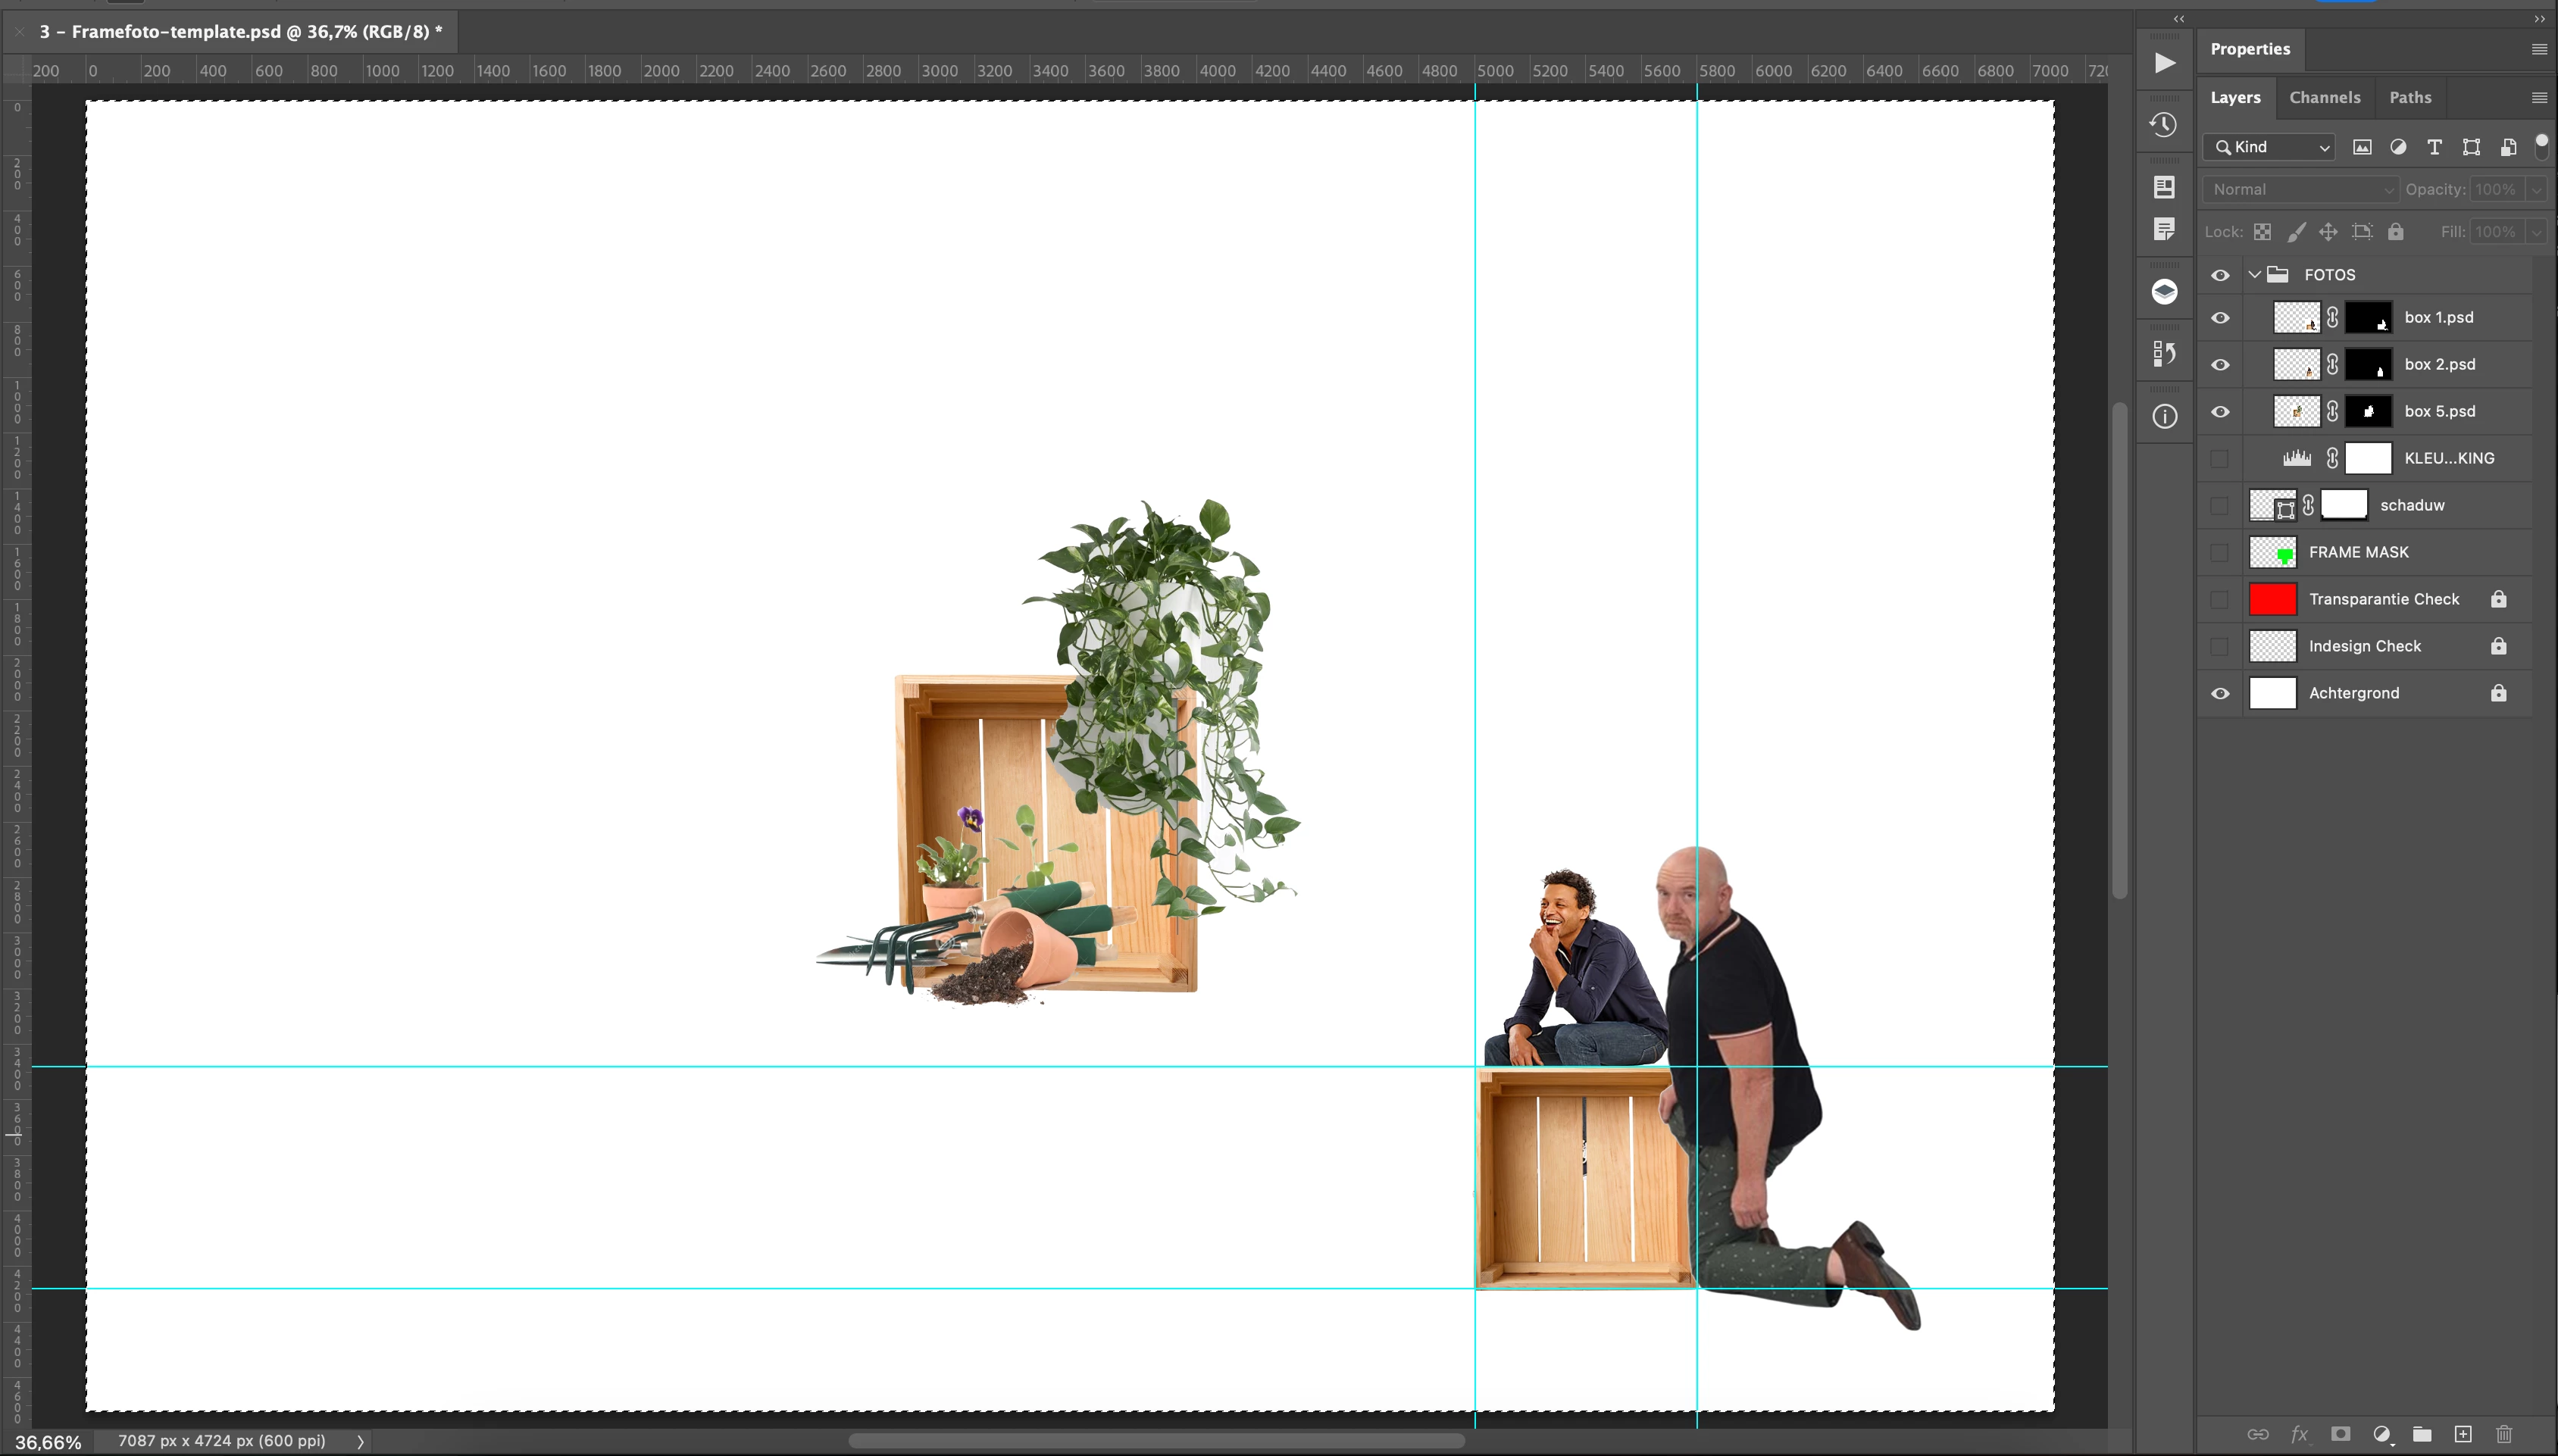
Folder containing all example files


Potential useful Information

The information below was recorded during the perspective warp action. I replaced the parts that should be based on the manual assigned 4 points by the user. 


Action:
Perspective Warp current layer
Mode: Warp
Reference Bounds: rectangle
Top: [VARIABLE INPUT] pixels
Left: [VARIABLE INPUT] pixels
Bottom: [VARIABLE INPUT] pixels
Right: [VARIABLE INPUT] pixels
Vertices: point list
point: [VARIABLE INPUT] pixels, [VARIABLE INPUT] pixels 
point: [VARIABLE INPUT] pixels, [VARIABLE INPUT] pixels
Warped Vertices: point list 
point: 2500 pixels, 1740 pixels 
point: 2900 pixels, 1740 pixels 
point: 2900 pixels, 2140 pixels 
point: 2500 pixels, 2140 pixels
Quads: Quad list
Quad
Vertex Indices: 0, 1, 2, 3


TOPICS
Actions and scripting , macOS

Views

658

Translate

Translate

Report

Report
Community guidelines
Be kind and respectful, give credit to the original source of content, and search for duplicates before posting. Learn more
community guidelines

correct answers 2 Correct answers

Community Expert , May 20, 2024 May 20, 2024

@Esther Netherlands 


Try this:


/*
Stack Masked Doc Layers to Template Doc.jsx
v1.0 - 21st May 2024, Stephen Marsh
https://community.adobe.com/t5/photoshop-ecosystem-discussions/script-to-import-warp-resize-and-move-layers/td-p/14623443
*/

#target photoshop

if (app.documents.length) {

    (function () {
        if (app.activeDocument.name == 'Framefoto-template.psd') {
            main();
        } else {
            var theConfirmation = (confirm("The active doc isn't named 'Framefoto-tem
...

Votes

Translate

Translate
Participant , May 21, 2024 May 21, 2024

It is probably a Frankenstein code, but I got it to work 😅


/*
Stack Masked Doc Layers to Template Doc.jsx
v1.0 - 21st May 2024, Stephen Marsh
https://community.adobe.com/t5/photoshop-ecosystem-discussions/script-to-import-warp-resize-and-move-layers/td-p/14623443
*/

if (app.documents.length) {

    (function () {
        if (app.activeDocument.name == 'Framefoto-template.psd') {
            main();
        } else {
            var theConfirmation = (confirm("The active doc isn't named 'Framefo
...

Votes

Translate

Translate
Adobe
Participant ,
May 20, 2024 May 20, 2024

Copy link to clipboard

Copied

@Stephen_A_Marsh, For the first step, I am trying to adjust the script you shared in another post, which you referred to in my previous post. But I am not succeeding. Would you be able to help me?


If not, absolutely no problem at all! I am already grateful to you and all the experts for sharing your knowledge so freely with me and all the other Photoshop users who are not really scripters! 🙏🏻

Hope to hear from you!

Votes

Translate

Translate

Report

Report
Community guidelines
Be kind and respectful, give credit to the original source of content, and search for duplicates before posting. Learn more
community guidelines
Community Expert ,
May 20, 2024 May 20, 2024

Copy link to clipboard

Copied

@Esther Netherlands  - I should be able to help with step 1. 

Votes

Translate

Translate

Report

Report
Community guidelines
Be kind and respectful, give credit to the original source of content, and search for duplicates before posting. Learn more
community guidelines
Community Expert ,
May 20, 2024 May 20, 2024

Copy link to clipboard

Copied

@Esther Netherlands 


Try this:


/*
Stack Masked Doc Layers to Template Doc.jsx
v1.0 - 21st May 2024, Stephen Marsh
https://community.adobe.com/t5/photoshop-ecosystem-discussions/script-to-import-warp-resize-and-move-layers/td-p/14623443
*/

#target photoshop

if (app.documents.length) {

    (function () {
        if (app.activeDocument.name == 'Framefoto-template.psd') {
            main();
        } else {
            var theConfirmation = (confirm("The active doc isn't named 'Framefoto-template.psd' Continue?", false));
            if (theConfirmation === false) {
                return;
            }
            main();
        }
    })();

} else {
    alert('A document must be open to run this script!');
}


function main() {

    (function () {

        try {
            var savedRuler = app.preferences.rulerUnits;
            app.preferences.rulerUnits = Units.PIXELS;

            // Set the active doc as the template doc
            var templateDoc = app.activeDocument;
            var templateDocName = app.activeDocument.name;

            // Ensure that the contents of the FOTO group is active
            if (app.activeDocument.activeLayer.name != 'FOTOS') {
                app.activeDocument.activeLayer = app.activeDocument.layerSets.getByName('FOTOS').layers[0];
            }

            // Select the 'remove.bg' PSD source files
            var selectFile = File.openDialog('Select the file/s:', Multiselect = true);
            if (selectFile === null) {
                return;
            }

            // Loop over the selected files
            for (var i = 0; i < selectFile.length; i++) {

                // Open each selected file
                app.open(File(selectFile[i]));

                // Set the sourceDoc as the active document
                var sourceDoc = app.activeDocument;

                // Select the source layer
                //app.activeDocument.activeLayer = app.activeDocument.layers.getByName('remove.bg');
                app.activeDocument.activeLayer = app.activeDocument.layers[0];

                // Duplicate the source layer to the template doc
                dupeLayer(templateDocName, app.activeDocument.name.replace(/\.[^\.]+$/, ''));

                // Set the template doc as the active document
                app.activeDocument = templateDoc;

                // Conditionally resize the layer to fit the canvas
                var docWidth = app.activeDocument.width;
                var docHeight = app.activeDocument.height;
                var layerWidth = (app.activeDocument.activeLayer.bounds[2].value - app.activeDocument.activeLayer.bounds[0].value);
                var layerHeight = (app.activeDocument.activeLayer.bounds[3].value - app.activeDocument.activeLayer.bounds[1].value);
                if (layerWidth > docWidth) {
                    //alert('The layer is wider than the canvas!');
                    app.activeDocument.activeLayer.resize((docWidth / layerWidth) * 100, (docWidth / layerWidth) * 100, AnchorPosition.MIDDLECENTER);
                }
                if (layerHeight > docHeight) {
                    //alert('The layer is taller than the canvas!');
                    app.activeDocument.activeLayer.resize((docHeight / layerHeight) * 100, (docHeight / layerHeight) * 100, AnchorPosition.MIDDLECENTER);
                }

                // Centre the duped layer on the template canvas
                app.activeDocument.activeLayer.translate(docWidth / 2 - (app.activeDocument.activeLayer.bounds[0] + app.activeDocument.activeLayer.bounds[2]) / 2,
                    docHeight / 2 - (app.activeDocument.activeLayer.bounds[1] + app.activeDocument.activeLayer.bounds[3]) / 2);

                // Close the source doc
                sourceDoc.close(SaveOptions.DONOTSAVECHANGES);

            }

            app.preferences.rulerUnits = savedRuler;


            // Functions

            function dupeLayer(targetDocName, sourceLayerName) {
                function s2t(s) {
                    return app.stringIDToTypeID(s);
                }
                var descriptor = new ActionDescriptor();
                var list = new ActionList();
                var reference = new ActionReference();
                var reference2 = new ActionReference();
                reference.putEnumerated(s2t("layer"), s2t("ordinal"), s2t("targetEnum"));
                descriptor.putReference(s2t("null"), reference);
                reference2.putName(s2t("document"), targetDocName);
                descriptor.putReference(s2t("to"), reference2);
                descriptor.putString(s2t("name"), sourceLayerName);
                descriptor.putList(s2t("ID"), list);
                executeAction(s2t("duplicate"), descriptor, DialogModes.NO);
            }

        } catch (e) {
            alert('Error!' + '\r' + e + ', Line: ' + e.line);
        }

    })();

}


Votes

Translate

Translate

Report

Report
Community guidelines
Be kind and respectful, give credit to the original source of content, and search for duplicates before posting. Learn more
community guidelines
Participant ,
May 20, 2024 May 20, 2024

Copy link to clipboard

Copied

It works like a charm @Stephen_A_Marsh , Thank you so much for this!

Votes

Translate

Translate

Report

Report
Community guidelines
Be kind and respectful, give credit to the original source of content, and search for duplicates before posting. Learn more
community guidelines
Community Expert ,
May 20, 2024 May 20, 2024

Copy link to clipboard

Copied

You're welcome! I'm concerned with quality loss from multiple transforms, however, I'm not sure if creating a smart object beforehand would help or hinder your later moves?

Votes

Translate

Translate

Report

Report
Community guidelines
Be kind and respectful, give credit to the original source of content, and search for duplicates before posting. Learn more
community guidelines
Participant ,
May 20, 2024 May 20, 2024

Copy link to clipboard

Copied

I tested this:

  • Created a smart object from the background layer
  • Copied the mask to that
  • Copied this layer to Photoshop


This would be better for the quality; however, it seems that perspective warp cannot warp both the mask and SO. 


I created a video of the process... pictures say more than words 😉


This is why I decided to accept this quality loss and just hope the photos will never be used more than 2x bigger (the reason for the template being 600 DPI)


The current script works perfectly for what I asked for, but now I am debating if resizing as closely to the end size needed and moving it into a position of the guides would be easier. In that case, all I would need to do manually is the perspective warp, but without the extreme distance between the start and end. It's just tweaking, sort of, speak.


Would it be possible for you to adjust the script you wrote so I have both options? 


I have created these scripts for it already (a collaboration me and ChatGPT):


Scale to 800x800 if ratio is ±1:1 else 800 x undefined

// 29-04-2024 // Scale to 800px

if (app && app.documents.length > 0) {
    var doc = app.activeDocument;
    var foto = app.activeDocument.activeLayer;

    if (foto) {
        resizeLayer(foto);
    } else {
        alert("No active layer found.");
    }
}

function resizeLayer(layer) {
    // Get the bounds of the active layer
    var bounds = layer.bounds;
    var width = bounds[2] - bounds[0];
    var height = bounds[3] - bounds[1];

    // Calculate the aspect ratio
    var aspectRatio = Math.abs(width / height);
    var scaleFactorWidth = Math.abs(800 / width)
    var scaleFactorHeight = Math.abs(800 / height)

    // Calculate the scale factor
    var scale;
    if (aspectRatio <= 1.1 && aspectRatio >= 0.9) {
        // If aspect ratio within the threshold, scale to fit within 800x800
        layer.resize(scaleFactorWidth * 100,scaleFactorHeight * 100, AnchorPosition.BOTTOMRIGHT);
    } else {
        // If aspect ratio outside the threshold, resize to 800 width and maintain aspect ratio
        layer.resize(scaleFactorWidth * 100,scaleFactorWidth * 100, AnchorPosition.BOTTOMRIGHT);
    }

}


And 


Move to specific location

// 20-03-2024 // Scale and move Smart Object into position
if (app && app.documents.length > 0) {
    var doc = app.activeDocument;
    var originalRulerUnits = app.preferences.rulerUnits;
    app.preferences.rulerUnits = Units.PIXELS;
    
    // Show guides
    app.activeDocument.guidesVisibility = true;

    ////// Align Layer Top Left of Selection //////
    doc.selection.selectAll();
    var deltaX = doc.selection.bounds[0] - doc.activeLayer.bounds[0];
    var deltaY = doc.selection.bounds[1] - doc.activeLayer.bounds[1];
    doc.activeLayer.translate(deltaX, deltaY);

    ////// Move to Coordinates //////
    var docWidth = doc.width;
    var docHeight = doc.height;
    var offsetX = 5400;
    var offsetY = 4300;
    var layerBounds = doc.activeLayer.bounds;
    var layerWidth = layerBounds[2] - layerBounds[0]; // width of the layer
    var layerHeight = layerBounds[3] - layerBounds[1]; // height of the layer
    var newX = layerBounds[0] + offsetX - (layerWidth/2); // new X coordinate
    var newY = layerBounds[1] + offsetY - (layerHeight); // new Y coordinate
    doc.activeLayer.translate(newX, newY);
    }

    // Deselect the selection
    app.activeDocument.selection.deselect();


Votes

Translate

Translate

Report

Report
Community guidelines
Be kind and respectful, give credit to the original source of content, and search for duplicates before posting. Learn more
community guidelines
Community Expert ,
May 20, 2024 May 20, 2024

Copy link to clipboard

Copied

The smart object can be created from the remove.bg layer before it is copied to the template doc, then the perspective warp is only working an a self contained object with transparency with no mask on the transformed layer. This keeps the layer mask intact inside the smart object if it is required.


If you don't really need to access the layer mask later, then it could be applied before being copied to the template.


In both cases the original remove.bg file is closed without saving changes, this is just about getting the data into the template at a suitable start point.

Votes

Translate

Translate

Report

Report
Community guidelines
Be kind and respectful, give credit to the original source of content, and search for duplicates before posting. Learn more
community guidelines
Participant ,
May 20, 2024 May 20, 2024

Copy link to clipboard

Copied

I do need to access the layer mask to tweak the result from removal.bg (its not always perfect)

Votes

Translate

Translate

Report

Report
Community guidelines
Be kind and respectful, give credit to the original source of content, and search for duplicates before posting. Learn more
community guidelines
Participant ,
May 20, 2024 May 20, 2024

Copy link to clipboard

Copied

Although I always advocate keeping the quality of original images, I do not think the end result will be affected in a way that would be visible in print at this size. 


It also makes the processing faster and the end document smaller. For this reason I would be very appreciative if the working script could also be rewritten to resize and move to location. Maybe the process of perspective warping will not be as time-intensive that I could do without step 2 being automated.

Votes

Translate

Translate

Report

Report
Community guidelines
Be kind and respectful, give credit to the original source of content, and search for duplicates before posting. Learn more
community guidelines
Community Expert ,
May 20, 2024 May 20, 2024

Copy link to clipboard

Copied

So replacing the step where I conditionally resize, and replacing the step where the layer is centred?

Votes

Translate

Translate

Report

Report
Community guidelines
Be kind and respectful, give credit to the original source of content, and search for duplicates before posting. Learn more
community guidelines
Participant ,
May 20, 2024 May 20, 2024

Copy link to clipboard

Copied

Indeed, apologies for not realising this from the get-go and your time invested in those steps 🥴

Votes

Translate

Translate

Report

Report
Community guidelines
Be kind and respectful, give credit to the original source of content, and search for duplicates before posting. Learn more
community guidelines
Participant ,
May 20, 2024 May 20, 2024

Copy link to clipboard

Copied

Note that my examples show the extreme cases; I do realize 800x width is not ideal in those cases where items are besides the box if it is not an SO. But I need to investigate how much it affects and if too much I could easily adjust the script to make it 1000x

Votes

Translate

Translate

Report

Report
Community guidelines
Be kind and respectful, give credit to the original source of content, and search for duplicates before posting. Learn more
community guidelines
Community Expert ,
May 21, 2024 May 21, 2024

Copy link to clipboard

Copied

quote

Indeed, apologies for not realising this from the get-go and your time invested in those steps 🥴


By @Esther Netherlands


I have run out of time today.


I have clearly identified with comments where the conditional resize and centre layer code is. You could try replacing that with your code, however, I haven't tested if your code has any conflicts with my code yet... I presume that you have tested your code and that it works in isolation.


I'll come back to this tomorrow.

Votes

Translate

Translate

Report

Report
Community guidelines
Be kind and respectful, give credit to the original source of content, and search for duplicates before posting. Learn more
community guidelines
Participant ,
May 21, 2024 May 21, 2024

Copy link to clipboard

Copied

No worries, @Stephen_A_Marsh , I will give it a try myself again. I ran into some issues the first time, but I am sure with some dedication, I indeed can make it happen myself.

Votes

Translate

Translate

Report

Report
Community guidelines
Be kind and respectful, give credit to the original source of content, and search for duplicates before posting. Learn more
community guidelines
Participant ,
May 21, 2024 May 21, 2024

Copy link to clipboard

Copied

It is probably a Frankenstein code, but I got it to work 😅


/*
Stack Masked Doc Layers to Template Doc.jsx
v1.0 - 21st May 2024, Stephen Marsh
https://community.adobe.com/t5/photoshop-ecosystem-discussions/script-to-import-warp-resize-and-move-layers/td-p/14623443
*/

if (app.documents.length) {

    (function () {
        if (app.activeDocument.name == 'Framefoto-template.psd') {
            main();
        } else {
            var theConfirmation = (confirm("The active doc isn't named 'Framefoto-template.psd' Continue?", false));
            if (theConfirmation === false) {
                return;
            }
            main();
        }
    })();

} else {
    alert('A document must be open to run this script!');
}


function main() {

    (function () {

        try {
            var savedRuler = app.preferences.rulerUnits;
            app.preferences.rulerUnits = Units.PIXELS;

            // Set the active doc as the template doc
            var templateDoc = app.activeDocument;
            var templateDocName = app.activeDocument.name;

            // Ensure that the contents of the FOTO group is active
            if (app.activeDocument.activeLayer.name != 'FOTOS') {
                app.activeDocument.activeLayer = app.activeDocument.layerSets.getByName('FOTOS').layers[0];
            }

            // Select the 'remove.bg' PSD source files
            var selectFile = File.openDialog('Select the file/s:', Multiselect = true);
            if (selectFile === null) {
                return;
            }

            // Loop over the selected files
            for (var i = 0; i < selectFile.length; i++) {

                // Open each selected file
                app.open(File(selectFile[i]));

                // Set the sourceDoc as the active document
                var sourceDoc = app.activeDocument;

                // Select the source layer
                //app.activeDocument.activeLayer = app.activeDocument.layers.getByName('remove.bg');
                app.activeDocument.activeLayer = app.activeDocument.layers[0];

                // Duplicate the source layer to the template doc
                dupeLayer(templateDocName, app.activeDocument.name.replace(/\.[^\.]+$/, ''));

                // Set the template doc as the active document
                app.activeDocument = templateDoc;

                // Resize to 800 pixels according to ratio
                var docWidth = app.activeDocument.width;
                var docHeight = app.activeDocument.height;
                var layerWidth = (app.activeDocument.activeLayer.bounds[2].value - app.activeDocument.activeLayer.bounds[0].value);
                var layerHeight = (app.activeDocument.activeLayer.bounds[3].value - app.activeDocument.activeLayer.bounds[1].value);
            
                // Calculate the aspect ratio
                var aspectRatio = Math.abs(layerWidth / layerHeight);
                var scaleFactorWidth = Math.abs(800 / layerWidth)
                var scaleFactorHeight = Math.abs(800 / layerHeight)
            
                // Calculate the scale factor
                var scale;
                if (aspectRatio <= 1.1 && aspectRatio >= 0.9) {
                    // If aspect ratio within the threshold, scale to fit within 800x800
                    app.activeDocument.activeLayer.resize(scaleFactorWidth * 100,scaleFactorHeight * 100, AnchorPosition.BOTTOMRIGHT);
                } else {
                    // If aspect ratio outside the threshold, resize to 800 width and maintain aspect ratio
                    app.activeDocument.activeLayer.resize(scaleFactorWidth * 100,scaleFactorWidth * 100, AnchorPosition.BOTTOMRIGHT);
                }

                // Align Layer Top Left of Canvas
                app.activeDocument.selection.selectAll();
                var deltaX = app.activeDocument.selection.bounds[0] - app.activeDocument.activeLayer.bounds[0];
                var deltaY = app.activeDocument.selection.bounds[1] - app.activeDocument.activeLayer.bounds[1];
                app.activeDocument.activeLayer.translate(deltaX, deltaY);

                // Move the duped layer on the template canvas
                var offsetX = 5400;
                var offsetY = 4300;
                var layerBounds = app.activeDocument.activeLayer.bounds;
                var layerWidth = layerBounds[2] - layerBounds[0]; // width of the layer
                var layerHeight = layerBounds[3] - layerBounds[1]; // height of the layer
                app.activeDocument.activeLayer.translate(layerBounds[0] + offsetX-(layerWidth/2),layerBounds[1] + offsetY-(layerHeight));

                // Deselect the selection
                app.activeDocument.selection.deselect();

                // Close the source doc
                sourceDoc.close(SaveOptions.DONOTSAVECHANGES);

            }

            app.preferences.rulerUnits = savedRuler;


            // Functions

            function dupeLayer(targetDocName, sourceLayerName) {
                function s2t(s) {
                    return app.stringIDToTypeID(s);
                }
                var descriptor = new ActionDescriptor();
                var list = new ActionList();
                var reference = new ActionReference();
                var reference2 = new ActionReference();
                reference.putEnumerated(s2t("layer"), s2t("ordinal"), s2t("targetEnum"));
                descriptor.putReference(s2t("null"), reference);
                reference2.putName(s2t("document"), targetDocName);
                descriptor.putReference(s2t("to"), reference2);
                descriptor.putString(s2t("name"), sourceLayerName);
                descriptor.putList(s2t("ID"), list);
                executeAction(s2t("duplicate"), descriptor, DialogModes.NO);
            }

        } catch (e) {
            alert('Error!' + '\r' + e + ', Line: ' + e.line);
        }

    })();

}


Votes

Translate

Translate

Report

Report
Community guidelines
Be kind and respectful, give credit to the original source of content, and search for duplicates before posting. Learn more
community guidelines
Community Expert ,
May 22, 2024 May 22, 2024

Copy link to clipboard

Copied

@Esther Netherlands – you did a great job!


There are some unused variables left, you can comment out or remove them if you like:


// Resize to 800 pixels according to ratio
//var docWidth = app.activeDocument.width;
//var docHeight = app.activeDocument.height;


And:


// Calculate the scale factor
//var scale;


Votes

Translate

Translate

Report

Report
Community guidelines
Be kind and respectful, give credit to the original source of content, and search for duplicates before posting. Learn more
community guidelines
Participant ,
May 22, 2024 May 22, 2024

Copy link to clipboard

Copied

Thanks @Stephen_A_Marsh now I also know why there is a colour difference blue in my visual studio... never to old to learn!

Votes

Translate

Translate

Report

Report
Community guidelines
Be kind and respectful, give credit to the original source of content, and search for duplicates before posting. Learn more
community guidelines
Participant ,
May 22, 2024 May 22, 2024

Copy link to clipboard

Copied

@Stephen_A_Marsh Can I take a little more of your generosity? 🙏🏻


I just realised remove.bg is using a color decontamination feature and this removes original information. In the case remove.bg is not accurate (which happens unfortunately often) I cannot "bring" back removed parts.


Could you adjust my script by adding the following steps in the duplication method:

  • Unlock the background layer, called "remove.bg - Original Image" (which causes it to change name to "Layer 0" ?!)
  • Move the mask from the layer "remove.bg" to the unlocked layer
  • Copy only this layer to the template file


I can not express my gratitude for all your hard work here in the forums! If there is anything I could do for you, please do let me know! From all the way across the world (assuming you do not live in the tiny European country The Netherlands hihi) a huge shout out to you and all the other helpers in this forum!

Votes

Translate

Translate

Report

Report
Community guidelines
Be kind and respectful, give credit to the original source of content, and search for duplicates before posting. Learn more
community guidelines
Community Expert ,
May 22, 2024 May 22, 2024

Copy link to clipboard

Copied

@Esther Netherlands 


I am partial to the Apply Image command to "stamp" the Background layer pixels onto the remove.bg layer.


After this current step:


// Select the source layer
//app.activeDocument.activeLayer = app.activeDocument.layers.getByName('remove.bg');
app.activeDocument.activeLayer = app.activeDocument.layers[0];


Add this new code:


// Ensure that the RGB channels are selected and not the layer mask
app.activeDocument.activeChannels = app.activeDocument.componentChannels;

// Apply the Background to the remove.bg layer
var s2t = function (s) {
	return app.stringIDToTypeID(s);
};
var descriptor = new ActionDescriptor();
var descriptor2 = new ActionDescriptor();
var reference = new ActionReference();
reference.putEnumerated( s2t( "channel" ), s2t( "channel" ), s2t( "RGB" ));
reference.putName( s2t( "layer" ), "Background" );
descriptor2.putReference( s2t( "to" ), reference );
descriptor.putObject( s2t( "with" ), s2t( "calculation" ), descriptor2 );
executeAction( s2t( "applyImageEvent" ), descriptor, DialogModes.NO );


Before this current step:


// Duplicate the source layer to the template doc
dupeLayer(templateDocName, app.activeDocument.name.replace(/\.[^\.]+$/, ''));


This should do what you want without having to mess around with the layers and masks.

Votes

Translate

Translate

Report

Report
Community guidelines
Be kind and respectful, give credit to the original source of content, and search for duplicates before posting. Learn more
community guidelines
Participant ,
May 29, 2024 May 29, 2024

Copy link to clipboard

Copied

LATEST

Apologies for the delay. I was vacationing...

This step works as desired!


Obviously, I wish there was a way to keep the quality of the image (like a SO) and still be able to do the transformations and do the final and second step to skew/perspective warp... Reducing/Losing quality always hurts, but it seems to be an unsolvable puzzle, and I should move on.


In case you, @c.pfaffenbichler, or any other genius here in the forum is able to solve it in the future, I am all ears!


In the meantime 🙏🏻 many thanks @Stephen_A_Marsh, for your time, wisdom and generosity!

Votes

Translate

Translate

Report

Report
Community guidelines
Be kind and respectful, give credit to the original source of content, and search for duplicates before posting. Learn more
community guidelines
Participant ,
May 20, 2024 May 20, 2024

Copy link to clipboard

Copied

I just checked skewing and this works with a SO and Mask. Skewing was the method @c.pfaffenbichler used in my earlier this year post. Not sure if he will be able to help this time, but if you have time, could you rewrite the script to make the layer image an SO (and keeping the layermask)? 🙏🏻


Like I did in my video example of the perspective warp not working.

Votes

Translate

Translate

Report

Report
Community guidelines
Be kind and respectful, give credit to the original source of content, and search for duplicates before posting. Learn more
community guidelines