

- Home
- Photoshop ecosystem
- Discussions
- Re: The agony of flattening layers with blend mode...
- Re: The agony of flattening layers with blend mode...

Copy link to clipboard
Copied
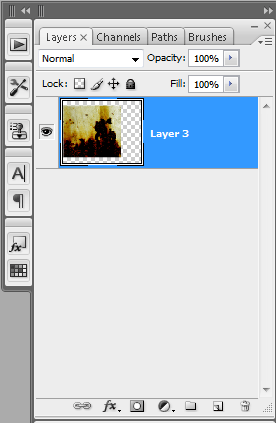
I need to flatten a series of layers within a group, which have different blend modes. I've tried merging group, that resorts all layers to 'normal mode', I have also tried merge visible which does the same as 'merging group', convert to smart object, same results. I don't want to go the route of flatten image, it has worked to a degree, my photoshop file is organized how I want it and I want to strictly take the group or select those layers and merge them while keeping the blend mode in tact.
've searched for answers and none of the answers were anything I haven't tried. Is there not a script, filter that can solve this dilemma it's quite common as you may or may not be aware of.


 1 Correct answer

View at 100% and try again!
The blend modes are preserved. What you see is something else.
Adjustment and blending previews are calculated based on the on-screen image for performance reasons. Zoomed out, that means a scaled and softened version. With all these noise effects, that means a lot of intermediate values that aren't there in the full data.
To be absolutely clear - the final result is correct. The preview is misleading because you don't see it at 100%.
100% is a very significan
...Explore related tutorials & articles
 91
Replies
91
91
Replies
91

Copy link to clipboard
Copied
emil thank you soo you resolved my problems i had... and yes problem is the semitransparent pixels on my EXR shadows that was causing me problems at the moment i was merging

Copy link to clipboard
Copied
Oh, the agony of defeat!

Copy link to clipboard
Copied
Obviously merged layers become one layer and you can't have more than one blending mode per layer. So, if I understand you correctly, when you say: you want to keep the blending mode intact, you apparently mean to keep the same appearance after the layers are merged. Well, this is impossible if the bottom layer from the group is not fully opaque where the other layers have semi-transparent pixels.
If you flatten everything with fully opaque white layer at the bottom, the appearance will be preserved. In fact you should never create images without a fully opaque layer at the bottom.
How can you keep the semi-transparent pixels in tact, upon merging the group ? I applied a fully opaque layer at the bottom of the group and the semi-transparent pixels (blend modes) were not preserved.
I am sorry if you feel I have in any way been condescending. That was not my goal or intension.
I too have been made to feel that way on this forum at times by some of the better known posters.
I am trying to look at your question with new eye.
That is why you, and others should re-read what they write. Unless you want to come off as agressive, condescending etc you may notice what you wrote does not sound what your intention is.
Are you saying that when you flatten or merge a series of layers, whether in a predefined group or individual, that have different blend modes that those blend mode adjustments, the way the image looks, are not being retained in the final merged or flattened image and the image looks different?
Read read my post and post #17, all of which target the problem head on.
Copy link to clipboard
Copied
It strikes me here that there's a good possibility, in very general terms, that:
1. You made a fundamental assumption about how something should be done.
2. You started with #1 then were not able to achieve your goal no matter what you did afterward.
Because you based so much further thought and work on that fundamental assumption, and you even got close to your desired result, you're unwilling to let it go easily so as to take another path entirely. You keep thinking "there's got to be a way to finish this". You don't want to hear that people may be questioning your fundamental assumption.
Unfortunately, when an impasse is reached, what sometimes has to happen is that one has to abandon that fundamental assumption and "go back to square 1". There's a reason that phrase is in common use.
Trust me, I've been there.
Keep an open mind.
-Noel

Copy link to clipboard
Copied
StrongBeaver wrote:
Obviously merged layers become one layer and you can't have more than
one blending mode per layer. So, if I understand you correctly, when
you say: you want to keep the blending mode intact, you apparently mean
to keep the same appearance after the layers are merged. Well, this is
impossible if the bottom layer from the group is not fully opaque where
the other layers have semi-transparent pixels.If you flatten
everything with fully opaque white layer at the bottom, the appearance
will be preserved. In fact you should never create images without a
fully opaque layer at the bottom.How can you keep the semi-transparent pixels in tact, upon merging the group ? I applied a fully opaque layer at the bottom of the group and the semi-transparent pixels (blend modes) were not preserved.
...
The fully opaque layer must participate in the merging.
For those who are trying to understand StrongBeaver, I think his problem can be quickly visualized by this: create a new image, add a new layer, and paint some strokes with large soft brush. Now with the transparency grid turned off in the preferences, hide/show the background layer to see the difference. Making the brush or layer with some transparency will make the problem more obvious.
The change in appearance is affected from the combined color of the semitransparent pixels and what is on the layers below. When the semitransparent pixels are on different layers with different blending modes they all contribute differently to the appearance. After they are merged they can only contribute to the appearance in one way (by default Normal mode). In such cases the only way to keep the appearance is to include a bottom layer in the merging group with fully opaque pixels under the semitransparent pixels of the other layers.
When I need to do that, I make a selection of all fully transparent pixels of the layers to be merged (Magic Wand with 0 tolerance). Then go to the opaque layer at the bottom of the merging group and delete its pixels from the selection. If there are multiple layers below the merging group, then I first duplicate and merge them all (in the layers palette, Shift select all those layers - the bottom should be fully opaque, Alt drag to duplicate, and Ctrl + E to merge).
The price for this is that it is no longer possible to move around the merged group and be able to see the same original interaction with the layers below.
Copy link to clipboard
Copied
For those who are trying to understand StrongBeaver, I think his problem can be quickly visualized by this: create a new image, add a new layer, and paint some strokes with large soft brush. Now with the transparency grid turned off in the preferences, hide/show the background layer to see the difference. Making the brush or layer with some transparency will make the problem more obvious.
The change in appearance is affected from the combined color of the semitransparent pixels and what is on the layers below. When the semitransparent pixels are on different layers with different blending modes they all contribute differently to the appearance. After they are merged they can only contribute to the appearance in one way (by default Normal mode). In such cases the only way to keep the appearance is to include a bottom layer in the merging group with fully opaque pixels under the semitransparent pixels of the other layers.
I gave this example a go and I understand what you mean.
While everyone else kept repeating the same question (Noel) over and over with a lack of understanding, someone was making sense of it and came with a concrete demo to try, making some progress. Otherwise this thread could have went on for infinity with 'I don't understand you Strong Beaver, you don't explain yourself clearly, I need you to explain yourself so clearly that you probably need to come to my house and talk to me face to face over a game of pictionary, maybe and that is a big maybe will the game of pictionary open my eyes to such a easily understood question"
When I need to do that, I make a selection of all fully transparent pixels of the layers to be merged (Magic Wand with 0 tolerance). Then go to the opaque layer at the bottom of the merging group and delete its pixels from the selection. If there are multiple layers below the merging group, then I first duplicate and merge them all (in the layers palette, Shift select all those layers - the bottom should be fully opaque, Alt drag to duplicate, and Ctrl + E to merge).
It probably is easy and it could be fatique to the reason why I didn't understand these instructions emil  If you could a little more in depth explination so I can give it a go on a practice run, then on my composition in hopes it works on my composition
Copy link to clipboard
Copied
LOL, in the same post you criticize others for asking you to explain yourself to be able to help you better, then you turn right around and ask Emil to explain himself.
Priceless.
-Noel
Copy link to clipboard
Copied
Emil is excluded from this tiff. It's not a matter of explaining himself it's a matter of me understanding. He was the one who understood the situation without requiring a white paper report to understand <cough>
Besides I explained myself, I don't know what language I need to speak in to be understood. Could it be that is it being choosen not to understand me, I think it's the latter.

Copy link to clipboard
Copied
I just fail to understand why doing a simple thing, such as posting a screenshot of the
layers panel, as several people have requested is so hard.
It would certainly go along way in knowing whether what your requesting is possible or not.
MTSTUNER
Copy link to clipboard
Copied
StrongBeaver take it easy dude
People are really trying to help here but sometimes it is hard to communicate a problem and we should keep it cool
In my workflows I have encountered that issue and that made it easier for me to figure out what you were trying to say.
Anyway, in more details how to include in the merging group a layer with fully opaque pixels representing the layers under it:
- Make sure you have a fully opaque white layer (not background) at the bottom of all layers. In some cases this is not needed but it doesn't hurt to have it and it ensures the expected result.
- Hide all layers except the layers in the group to be merged. If you have a complex hierarchy of layers with different visibility, use Layer Comps to save a layer visibility stage.
- With a layer in the merging group selected, take the Magic Wand tool making sure the Tolerance is 0, Contiguous is unchecked, Sample All Layers is checked, and click on a fully transparent pixel to select all fully transparent pixels in the merging group.
- Show the previously hidden layers and in the Layers panel select all layers under the merging group.
- Right click in the Layers panel and choose Duplicate, alternatively hold Alt and drag them under the merging group.
- Add the layers from the merging group to the selection of duplicated layers (Shift + clicking the top layer of the merging group makes this easy)
- Right click in the Layers panel and choose Merge Layers (Ctrl + E)
- Press the Delete key to delete the pixels that were fully transparent in the merging group
As I said earlier, this will keep the same appearance at the price of loosing the interaction when you move the merged layer or the layers under it. It still gives you the flexibility under the fully transparent pixels but not with moving things around independently, so this should be done after the final composition with these layers has been determined.
I think Adobe can eventually make a feature similar to the nested compositions in After Effects which is a fully editable layer like any other but through an updatable link connected to another Photoshop layered file. The idea is similar to the symbols in Flash and Illustrator.
Copy link to clipboard
Copied
Anyway, in more details how to include in the merging group a layer with fully opaque pixels representing the layers under it:Make sure you have a fully opaque white layer (not background) at the bottom of all layers. In some cases this is not needed but it doesn't hurt to have it and it ensures the expected result.
- Hide all layers except the layers in the group to be merged. If you have a complex hierarchy of layers with different visibility, use Layer Comps to save a layer visibility stage.
- With a layer in the merging group selected, take the Magic Wand tool making sure the Tolerance is 0, Contiguous is unchecked, Sample All Layers is checked, and click on a fully transparent pixel to select all fully transparent pixels in the merging group
Take a look at this photoshop file, I when I try to select one of the layers with the magic want tool and a 0 tolerance etc etc, the selection is random 'specks' there is not a broad selection as I would expect so I can merge the layers with their different blend modes.
I think Adobe can eventually make a feature similar to the nested compositions in After Effects which is a fully editable layer like any other but through an updatable link connected to another Photoshop layered file. The idea is similar to the symbols in Flash and Illustrator.
Hopefully Adobe introduces this feature.
Copy link to clipboard
Copied
Is this something like your trying to do?

MTSTUNER
Copy link to clipboard
Copied
That is correct, that is what Emil was on target about.
Copy link to clipboard
Copied
Using the file you posted as an example and with all the layers visible:
1. Ctrl click on the Layer 1 thumbnail (loads the selection of layer 1)
2. Ctrl+Alt+Shift click on the _NIKO164 layer thumbnail (intersects the selection
of layer 1 with the _NIKO164 layer) (or right clicking on the _NIKO164 layer
thumbnailand choosing Intersect Transparency Mask)
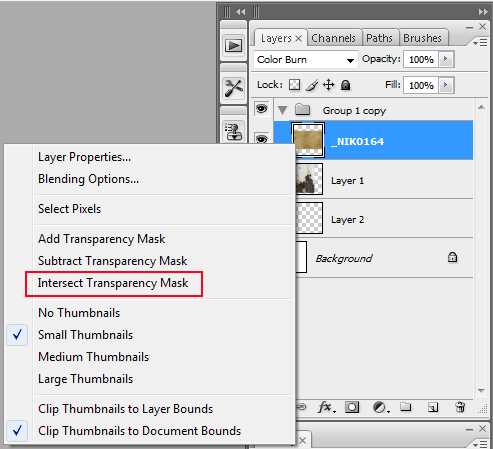
3. Make sure the _NIKO164 layer is tha active one (the active in the layers panel)
4. Use the keyboard shortcut Shift+Ctl+Alt+E (stamps the visible layers into a new layer
above the _NIKO164 layer)
5. Add a layer mask to the newly created layer using the Add Layer Mask icon at the bottom
of the layers panel. (this hides everything but the selected areas)

6. Right click on the newly created layers thumbnail to the right of the layer name and
choose duplicate layer and new for the destination.
(creates a new document from that layer)

If you don't want to retain the layer mask, you can right click on the layer mask and choose
apply layer mask.
MTSTUNER
Copy link to clipboard
Copied
This method is for a perfect clean cut out. My composition as tranparanies as demostrated by Emil, I posted a scene file for Emil in relation to Emil reply.
Copy link to clipboard
Copied
You can look at this file and see that the transparency that was in the original
file you posted is in this file (png).
Right click on the image and save (should save as a png file with transparency)
MTSTUNER

Copy link to clipboard
Copied
I *think* what StrongBeaver meant is that the file he posted is NOT the file he has problems with (which obviously is not exactly helpful).
I *think* the file he posted was just an example, to exemplify the problems in his not-posted-file which unfortunately is quite different and more complex (i.e. layers are not "clean-cut" as he put it, i.e. there are semi-transparent pixels [soft edge, etc.])
Therefore solutions to the posted file might not apply to the not-posted-file for which he actually needs the solution.
Emil, was on track to the solution of my problem. I posted the sample composition and it is very close to the actual composition which I'm working on. The composition has (2) layers within a group, each layer has a different blend mode if you merge the group the blend mode is lost and the merged group has a normal blend mode. The sample-composition I posted was more for Emil, just read what I and especially Emil has posted.
Emil posted a technique where the magic want was used in my sample-composition the layers both have a wide area of semi-transparent areas which I want to merge while keeping the blend mode, the problem if you paint with the brush tool on a transparent layer with red with a brush with opacity and follow Emil procedure it does work, from what I tried. If you try it on my sample-composition with the magic want tool all you get is little selection 'specks' that do no select the semi-transparent layer in which you cannot proceed with Emil procedure no further due to that problem. Try it.
Copy link to clipboard
Copied
StrongBeaver wrote:
I *think* what StrongBeaver meant is that the file he posted is NOT the file he has problems with (which obviously is not exactly helpful).
I *think* the file he posted was just an example, to exemplify the problems in his not-posted-file which unfortunately is quite different and more complex (i.e. layers are not "clean-cut" as he put it, i.e. there are semi-transparent pixels [soft edge, etc.])
Therefore solutions to the posted file might not apply to the not-posted-file for which he actually needs the solution.
I posted the sample composition and it is very close to the actual composition which I'm working on.
Exactly. That's what I meant. Thank you for confirming.
So why don't you post the real thing (the "actual composition") ?
You can reduce the resolution of the entire doc if file size is too big (ALT+CTRL+I).
Copy link to clipboard
Copied
Christian Davideck wrote:
So why don't you post the real thing (the "actual composition") ?
Don't be such a tease beaver, we are dying to help you 
Copy link to clipboard
Copied
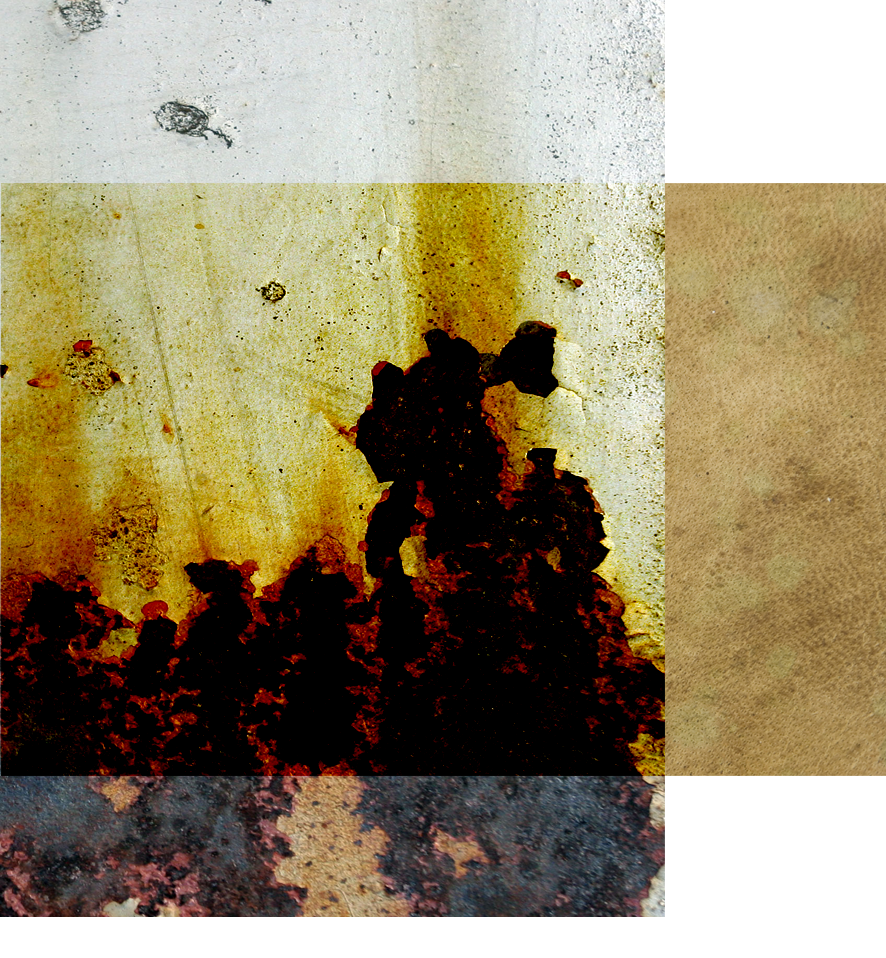
StrongBeaver, you have posted a PSD file with 3 layers in a group, one of which is fully transparent and does absolutely nothing. The other two are using two different blending modes, "Normal", and "Color Burn".
First, as has been stated a number of times there is NO WAY this can be flattened into one layer and do all the exact same things it does as a stack of layers with different blending modes. A single layer can blend in only one way, so BY DEFINITION some of the blending modes must be lost when you reduce the number of layers to 1. That's the way it works, whether you like it or not!
Second, the rightmost part of your _NIK0164 layer, with Color Burn blending shows up as fully opaque on top of background transparency because it simply doesn't make any sense to try to Color Burn a fully transparent pixel (i.e., nothing at all), so we can only guess that the person programming the Color Burn blending code at Adobe tried to make it do something useful in that case. However, the same "keep these pixels showing" decision simply cannot be taken when you show the layer against a real, opaque background. Color Burning White, in your example, always yields White. That's just the way it works!
Given that with merging the Color Burn blending mode WILL be lost (see the first item above):
A. If you Color Burn over a transparent area you get a copy of the pixels in the Color Burn layer.
B. If you Color Burn a White background you get... White.
There are two things you can do:
1. Layer - Merge Group, which preserves the transparency in the fully transparent parts, and shows you the Color Burn layer pixels to the right, just as you see when the layers are displayed over a transparent background.
2. Layer - Flatten, which shows you what would happen when you try to Color Burn white pixels (i.e., they stay white).
What you see is what you get.
Since neither merging the group or flattening the image is giving you the result you want, clearly you expect different behavior than what Photoshop is programmed to deliver. Have you ever heard the phrase "You can't get there from here!"?
So DEFINE WHAT YOU'RE TRYING TO ACCOMPLISH INSTEAD OF GETTING BOGGED DOWN IN THE DETAILS OF HOW YOU'RE DOING IT WRONG! There's most likely another way to get there than the way you've set this up.
-Noel
Copy link to clipboard
Copied
StrongBeaver wrote:
...
Take a look at this photoshop file, I when I try to select one of the layers with the magic want tool and a 0 tolerance etc etc, the selection is random 'specks' there is not a broad selection as I would expect so I can merge the layers with their different blend modes....
I checked the file but if the final result is what MTSTUNER showed, then with this particular file you don't have a blending issue problem at all but only a selection problem which is basically how to delete everything outside the intersected area between the two layers which is easy with reversing the intersected selection, merging, and deleting. In your file merging the intersected area doesn't change appearance because first, the Layer 1 is in Normal mode and second, there is no semitransparent pixels in the intersected area of the merged layer. If I understood your correctly your original problem was not that you are ending with a Normal mode merged layer but because the appearance is changing when you merge. If so, this is not the case with this file if the end result is what MTSTUNER showed.
My instructions will make sense if for example in your file the Layer 1 is changed to 50% opacity and you want to preserve appearance after merging. Then following the idea from my instructions and also excluding everything outside the intersection, first select the intersection as MTSTUNER explain in his instructions with step 1 and 2. Next select the Background layer and press Ctrl + J to make a new layer with white only in the selected area. Ctrl + click on the icon of that new layer to bring the selection back. Ctrl + Shift + I to inverse it, merge the whole group (Ctrl + E when group is selected) and press Delete. The apearance doesn't change because of that white patch under the 50% semitransparent pixels of Layer 1, merging without it would change the appearance.
With more complex files the idea is the same but may require selecting fully transparent pixels with the magic wand as I explained before. As I sad, with the magic wand, you have to click on a fully transparent pixel that is also fully transparent on all layers of the merging group. In your file this is like, after hiding the background layer, to click on the top or bottom area at the right side of the image - this will select all fully transparent pixels in the group. Then after merging with a completely opaque white layer in the bottom of the group, delete using the selection.
As Christian suggested if you upload your original file or file more similar to it, it will be much more helpful to check what we can do.
Copy link to clipboard
Copied
Emil, do you actually have an understanding of what he really wants to accomplish from this? If so, could you please summarize it, since he seems unwilling?
-Noel
Copy link to clipboard
Copied
StrongBeaver, you have posted a PSD file with 3 layers in a group, one of which is fully transparent and does absolutely nothing. The other two are using two different blending modes, "Normal", and "Color Burn".
First, as has been stated a number of times there is NO WAY this can be flattened into one layer and do all the exact same things it does as a stack of layers with different blending modes. A single layer can blend in only one way, so BY DEFINITION some of the blending modes must be lost when you reduce the number of layers to 1. That's the way it works, whether you like it or not!
The third layer in the group which was fully transparent was following Emil steps and for him to take a look at the file. If you read what Emil posted in message #29 you'll see he had a transparent layer. Noel you say that a single layer can blend in only way one, how come Emil to a extent has done it in post #29 I can't say he has completely succeeded because I didn't complete the steps on my composite but it is in the right direction from what I did follow though.
Second, the rightmost part of your _NIK0164 layer, with Color Burn blending shows up as fully opaque on top of background transparency because it simply doesn't make any sense to try to Color Burn a fully transparent pixel (i.e., nothing at all), so we can only guess that the person programming the Color Burn blending code at Adobe tried to make it do something useful in that case. However, the same "keep these pixels showing" decision simply cannot be taken when you show the layer against a real, opaque background. Color Burning White, in your example, always yields White. That's just the way it works!
Given that with merging the Color Burn blending mode WILL be lost (see the first item above):
A. If you Color Burn over a transparent area you get a copy of the pixels in the Color Burn layer.
B. If you Color Burn a White background you get... White.
There are two things you can do:
1. Layer - Merge Group, which preserves the transparency in the fully transparent parts, and shows you the Color Burn layer pixels to the right, just as you see when the layers are displayed over a transparent background.
2. Layer - Flatten, which shows you what would happen when you try to Color Burn white pixels (i.e., they stay white).
What you see is what you get.
Since neither merging the group or flattening the image is giving you the result you want, clearly you expect different behavior than what Photoshop is programmed to deliver. Have you ever heard the phrase "You can't get there from here!"?
So DEFINE WHAT YOU'RE TRYING TO ACCOMPLISH INSTEAD OF GETTING BOGGED DOWN IN THE DETAILS OF HOW YOU'RE DOING IT WRONG! There's most likely another way to get there than the way you've set this up.
The _NIK0164 layer is not top of a background transparency layer it's ontop of layer 1, look again.
Look at the composition again, really look at it instead of going off on a tangent how I don't understand Photoshop. It is such a simple thing yet I'm reading paragraphs of text that is turning a mountain out of a molehill. The composition has _NIK0164 ontop of Layer one, the right side of the composition is white, why is it white ? It's white because the blend mode for _NIK0164 is 'color burn' change blend mode from 'color burn' to 'normal' and layer1 has no more semi-transparent pixels, correct ?!?!?!?
Merge the layer group, what are the results ? The results are that the _NIK0164 layer is no longer semi-transparent, flattening the image successfully does the task yet why is my sample-composition in a group ?!?!?! Is their a reason for this ?!?!?! Yes there is, my original composition has a specific group with layers I want to merge while keeping their original blend modes and while leaving all other layers and groups UNMERGED.
I'm not the one bogging down the thread with details, I explained it over the course of atleast three posts like I said in one post a game of pictionary seems to be the only likely way this will get solved, or for Noel to understand.
Emil, could you post your results using the sample composition and what I had just wrote in this thread.
Copy link to clipboard
Copied
StrongBeaver wrote:
my original composition has a specific group with layers I want to merge while keeping their original blend modes
Not possible. But for some reason you won't listen to people with more experience than you have. People who actually understand how layering works.
One can do some quite fancy stuff with Photoshop layers, inasmuch as a single layer can have a combination of transparency, masks, a blend mode (singlular!), and opacity and fill percentages. But you can't have more than one blending mode per layer. How many times does this have to be said and by how many people before it sinks in?
There might be an acceptable way to get an effect closer to what you want - beside just leaving the layers as they are and just closing up the group to keep your composition tidy. What's your obsession with merging, anyway? But for some reason you refuse to describe your actual goals.
My advice is to go read everything you can, watch all the videos you can, and learn how layers really work in Photoshop, rather than focusing on this specific problem. Then you'll be able to combine them intelligently and do all the things Photoshop can do, rather than trying to tell experts they don't know how things work.
I wanted to help you understand Photoshop, but you won't accept reality, so I'm through here. Have fun!
-Noel

Find more inspiration, events, and resources on the new Adobe Community
Explore Now
 AdChoices