

- Home
- Photoshop ecosystem
- Discussions
- Re: The color brown in hue/saturation layer
- Re: The color brown in hue/saturation layer

Copy link to clipboard
Copied
I am adding color to an infrared photo. After making a selection with Color Range, I add a Hue/Saturation layer and check "colorize." No trouble with blue sky and green foliage, but shades of brown for a tree trunk? Does not happen. Thanks for help.


 1 Correct answer
I think I have it. For step 4 I added a Curves adjustment layer using the previous layer as a clipping mask.
Thanks again.
Explore related tutorials & articles
 13
Replies
13
13
Replies
13

Copy link to clipboard
Copied
Hi Lanecito,
Could you please share the screenshot of the image and your Photoshop work space?
Photoshop doesn’t colorize pure white pixels and pure black pixels because colorization affects only gray pixels (from a brightness value of 1 to 254).
Regards,
Sahil

Copy link to clipboard
Copied
As Sahil.Chawla advised, it would help if we could see the image. That said, assuming you chose a precise brown but the value is too dark or weak to show adequate tonal variation or depth, you may consider then switching to Lab Color. By adjusting the L curve you can change the tone values and contrast of the tree trunk without altering its brown color value. Then return to RGB.

Copy link to clipboard
Copied
Hi, Can you please share a screenshot with us so that we can see the problem that you are facing ?
Thanks.

Copy link to clipboard
Copied
One thing you could do is set your foreground color to a color you like, and in the Color panel, set it to HSB Sliders, and then copy these values into the Hue/Saturation panel:
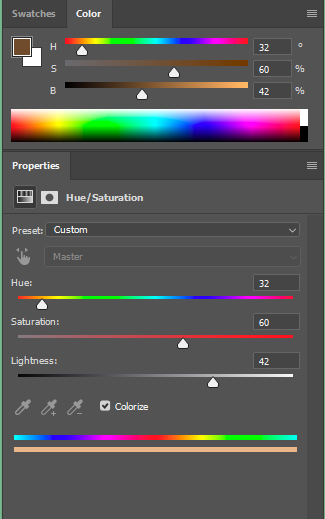
It can also help to set the Blending Mode of the Hue/Saturation layer to Color.
Copy link to clipboard
Copied
The Backgrou
nd is a CR2 from Lightroom. Here the active layer is the tree trunk
selection.
Copy link to clipboard
Copied
Use this to post an image here:

Copy link to clipboard
Copied
I think I have a screen shot jpeg, but I can't figure out how to insert it
where you want it. Sorry....
On Fri, Oct 5, 2018 at 9:34 AM norman.sanders <forums_noreply@adobe.com>
Copy link to clipboard
Copied
Your Post, it is #5, indicated that you had an image to show us. Just choose Reply in the flower right to get a new panel. Click click on the symbol in the new panel that is indicated in Post #6. You will then have an opportunity, from the list of files on your computer, to choose on the file you want to post. Click on it. Then click on Add Reply in the lower left of your reply panel.
Copy link to clipboard
Copied
.jpg)
Copy link to clipboard
Copied
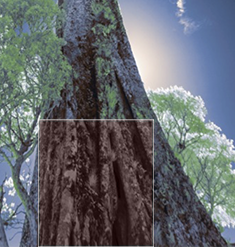
Choose a Foreground color Brown and Edit > Fill with the Layer Blending Mode set to Color.
Then adjust the intensity and contrast with a Curves adjustment (and the Mask you have created).
Copy link to clipboard
Copied
Hi Norman,
When I do as you direct, the brown foreground color is gray in the H/S mask layers and brown everywhere in the Background layer. I don't know the next step which is to apply the brown to a layer with everything but the tree trunk masked out. Thanks for your patience.
Copy link to clipboard
Copied
1.Since you are satisfied with the rest of the image, add a composite Layer (Cmd+Opt+Shift+E) to the top of the stack and duplicate the composite.
2. Then choose the top composite layer, Edit > Fill with your choice of Brown. Set its Layer Blending Mode to Color.
3. Add a Mask to the top composite that is white in the area of trunk and black in the remainder of the mask.
4. Apply a curve to the top composite image (not the mask) to arrive at the desired density, contrast and modeling of the trunk.
Copy link to clipboard
Copied
I think I have it. For step 4 I added a Curves adjustment layer using the previous layer as a clipping mask.
Thanks again.

Find more inspiration, events, and resources on the new Adobe Community
Explore Now
 AdChoices