simpata
New Participant
November 12, 2018
Question

Tile assembly script - final touch help

  • November 12, 2018
  • 3 replies
  • 3136 views

Hello everyone,

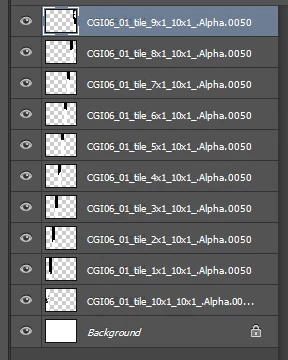
I need some help with this script. This script was written by Paul Riggott I believe and posted on the forums. It stitches together tiles of images. I've touched a few lines so it suits my needs (deleted mostly ). It works but I've hit a bump. The output tiles are numbered 1, 2, 3, ..., 10, 11, ..., etc. As you can seen in the image attached Photoshop sorts tile number 10 right before tile number 1.

Could you point me to what/how should I change the script code so Photoshop understands the sorting the way I need it? I really am a total newbie at this - first time I've touched PS script (or any other) was this morning so all your advises would be much appreciated

There is the script code I'm using:

if(version.substr(0,version.indexOf('.'))>9){

win.panel0.title.graphics.font = ScriptUI.newFont("Times","BOLDITALIC",20);

g = win.graphics;

var myBrush = g.newBrush(g.BrushType.SOLID_COLOR, [1.00, 1.00, 1.00, 1]);

g.backgroundColor = myBrush;

var myPen =g.newPen (g.PenType.SOLID_COLOR, [1.00, 0.00, 0.00, 1],lineWidth=1);

}

win.panel0.panel1.folder1.enabled=false;

win.center();

//var inputFolder = Folder.selectDialog("Please select the folder with Files to process");

win.panel0.panel1.Browse.onClick = function() {

inputFolder = Folder.selectDialog("Please select the folder with Files to process");

if(inputFolder !=null){

  win.panel0.panel1.folder1.text =  decodeURI(inputFolder.fsName);

  }

}

win.panel0.process.onClick = function() {

if(win.panel0.panel1.folder1.text == '') {

   alert("No input folder selected!");

   return;

  }

win.close(1);

ProcessFiles();

}

win.show();

function ProcessFiles(){

var fileList = inputFolder.getFiles(/\.(jpeg|tif|eps|psd|png)$/i);

var startRulerUnits = preferences.rulerUnits;

preferences.rulerUnits = Units.PIXELS;

var Down = (fileList.length);

fileList = fileList.sort();

var Across = Down;

open(fileList[0]);

app.activeDocument.duplicate(fileList[0].name.match(/(.*)\.[^\.]+$/)[1]+"-combined");

app.documents[0].close(SaveOptions.DONOTSAVECHANGES);

var FillColor = new SolidColor;

FillColor.rgb.hexValue = 'ffffff';

activeDocument.selection.selectAll();

activeDocument.selection.fill(FillColor);

activeDocument.selection.deselect();

var w=app.activeDocument.width*Down;

var h=app.activeDocument.height*1;

var offsetX = app.activeDocument.width.value;

var offsetY = app.activeDocument.height.value;

app.activeDocument.resizeCanvas(w, h, AnchorPosition.TOPLEFT);

TLX = 0; TLY = 0; TRX = offsetX; TRY = 0;

BRX = offsetX; BRY = offsetY; BLX = 0; BLY = offsetY;

var z =0;

for(var a = 0; a < Down; a++){

  for(var i = 0;i <Across; i++){

    activeDocument.selection.select([[TLX,TLY],[TRX,TRY],[BRX,BRY],[BLX,BLY]], SelectionType.REPLACE, 0, false);

    placeFile(fileList);

    if(!win.panel0.panel1.smart.value){

    rasterLayer();

    }

    activeDocument.activeLayer.name = fileList.name.match(/(.*)\.[^\.]+$/)[1];

    app.activeDocument.selection.deselect();

    z++;

TLX = offsetX * (i+1) ; TRX  = TLX + offsetX; BRX = TRX; BLX = TLX; 

    }

TLX = 0; TLY = offsetY * (a +1); TRX = offsetX; TRY = offsetY * (a +1);

BRX = offsetX; BRY = TRY + offsetY; BLX = 0; BLY = (offsetY * (a +1)+offsetY);

}

if(win.panel0.panel1.flatten.value){

activeDocument.flatten();

}

app.preferences.rulerUnits = startRulerUnits;

}

}

main();

function placeFile(placeFile) {

  function cTID(s) { return app.charIDToTypeID(s); };

    var desc21 = new ActionDescriptor();

    desc21.putPath( cTID('null'), new File(placeFile) );

    desc21.putEnumerated( cTID('FTcs'), cTID('QCSt'), cTID('Qcsa') );

        var desc22 = new ActionDescriptor();

        desc22.putUnitDouble( cTID('Hrzn'), cTID('#Pxl'), 0.000000 );

        desc22.putUnitDouble( cTID('Vrtc'), cTID('#Pxl'), 0.000000 );

    desc21.putObject( cTID('Ofst'), cTID('Ofst'), desc22 );

    executeAction( cTID('Plc '), desc21, DialogModes.NO );

};

function rasterLayer() {

    var desc9 = new ActionDescriptor();

        var ref4 = new ActionReference();

        ref4.putEnumerated( charIDToTypeID('Lyr '), charIDToTypeID('Ordn'), charIDToTypeID('Trgt') );

    desc9.putReference( charIDToTypeID('null'), ref4 );

    executeAction( stringIDToTypeID('rasterizeLayer'), desc9, DialogModes.NO );

};

    pngOptions = new PNGSaveOptions()

    pngOptions.compression = 0

    pngOptions.interlaced = false

    savePath = inputFolder;

    activeDocument.saveAs(savePath, pngOptions, false, Extension.LOWERCASE)

This topic has been closed for replies.

3 replies

schroef
Inspiring
April 26, 2021

You probably already solved the issue. But i had made a grid image stitcher couple years back. It could do column by column or row by row. I was making a grid cropper last week for some social design template i got. So i went on and tested my old stitcher and seemed the row by row had some issues. My idea was to perhaps combine these scripts into 1, i dropped that idea. But i do have them now combined in the script menu in their own tab, which is nice.

Both scripts allow you to now do either column by column or row by row. hahah tooks me many hours this weekend to get it properly working. I had taken some scripts from a Blender addon which does row by row, my earlier grid cropper only did column by column.


Mine works by sorting the images, it does that by the last part of the file name. Something what got me going nuts was the row by row naming. Somehow it was working correct, but because for both methods i use NAME + pos_col + pos_row the export showed a wrong order, it would always show as if it was export as column by column.


Currently, I have this delay in the script, so the use first picks the folder, then loads the images and sets orientation, then we choose the ordering. But i think all these settings can be done from the start. I think i used a couple parts of the stack-loader script and adjusted it. My first concept needed manual input of the tile-size to figure out the document size.
But i figured out a new approach and now i can skip that step. As the user now sets the orientation, it will figure out the correct columns and rows and does sizing automatically.


Mine is not directed as that one of JJMack, his seems more towards print and scales everything to the document size. Mine was created of the need for my 3d work i also do. I need to be able to stitch up big rendered tiles of scenes i render.

I do need to finish the panel for the cropper, that currently only does the orientation by altering the script. I will be same panel as the stitcher basically. I also want to implement the icons into the script. Currently they are separate small images aside of the script. But i want to make that cleaner.
  

Stephen Marsh
Community Expert
Community Expert
April 26, 2021

@schroef – If this is not a commercial project, then please do share the script code when you are happy with them, from the preview images above they look very useful.

JJMack
Community Expert
Community Expert
November 14, 2018

It look like you are trying to tile images. To do the evenly Images need be fitted to a tile size and then tile a canvas that the tiles will fill perfectly.,  There are a couple of potential  problem tiling Image that do not have an aspect ration close to the tile aspect ratio when you want the tile surface filled with image content.  And there is an additional  problem if you want to use PNG images that have transparent boarders and the  boarders are important for you to have borders around  your object subject For both Place and Paste will trim transparent boarder.  Images when fitted to a tile size will have a  tile image content that looks like a centered aspect ratio crop of your  image resized for the tile size.  The problem is Portrait to Landscape and Landscape to Portrait to Landscape centered crops image content in most cases will not be acceptable.  It easy to eliminate Transparent Png Boarder problems  by first eliminating these boarders by putting a 1% opacity pixel in the canvas top left and  bottom right corners.  No Human eye will see these pixels the image will look like it has transparent borders.

In my Photo Collage Toolkit there is a script the you most likely use to tile your image the way you want to.  You set up the paper width and tile size then select the image you want to tile. They need to be in a single folder but you need to select the Image files you want tiled from that folder.  The script's name is PasteImageRoll. About the Script and the PasteImageRoll.jsx

The script just created the tiled document. Your images  are fitted to the tiles  you can tweak the tile images content using  Photoshot  to transform the masked image layer content

JJMack
Stephen Marsh
Community Expert
Community Expert
November 12, 2018

I’m getting some errors with your script, so I can’t even run it to see what the result is… perhaps you cut too much?

Are the layer names the original filenames, or is the script creating the layer names differently to the input files?

I just hunted down the original thread and will take a look at the original code:

Re: Request for Script - Restitching image tiles

simpata
simpataAuthor
New Participant
November 13, 2018

Hello Stephen,

The layer names are the original file names - yes. The script doesn't interfere with file names. It just arranges them in sequentially. I think the problem comes from that PS needs a 0 for the digits ( for example - 01, 02, 03, etc.).

I can work around it by splitting the image in 9 tiles if there is no solution to the problem

By the way, the script is running on my side, I don't know why it misbehaves with you.

Stephen Marsh
Community Expert
Community Expert
November 13, 2018

So could you try changing the filenames first?