Known Participant
April 14, 2025
Question

Why does an Adobe RGB test image not show gamma compression on my monitor but does when printed

  • April 14, 2025
  • 2 replies
  • 2993 views

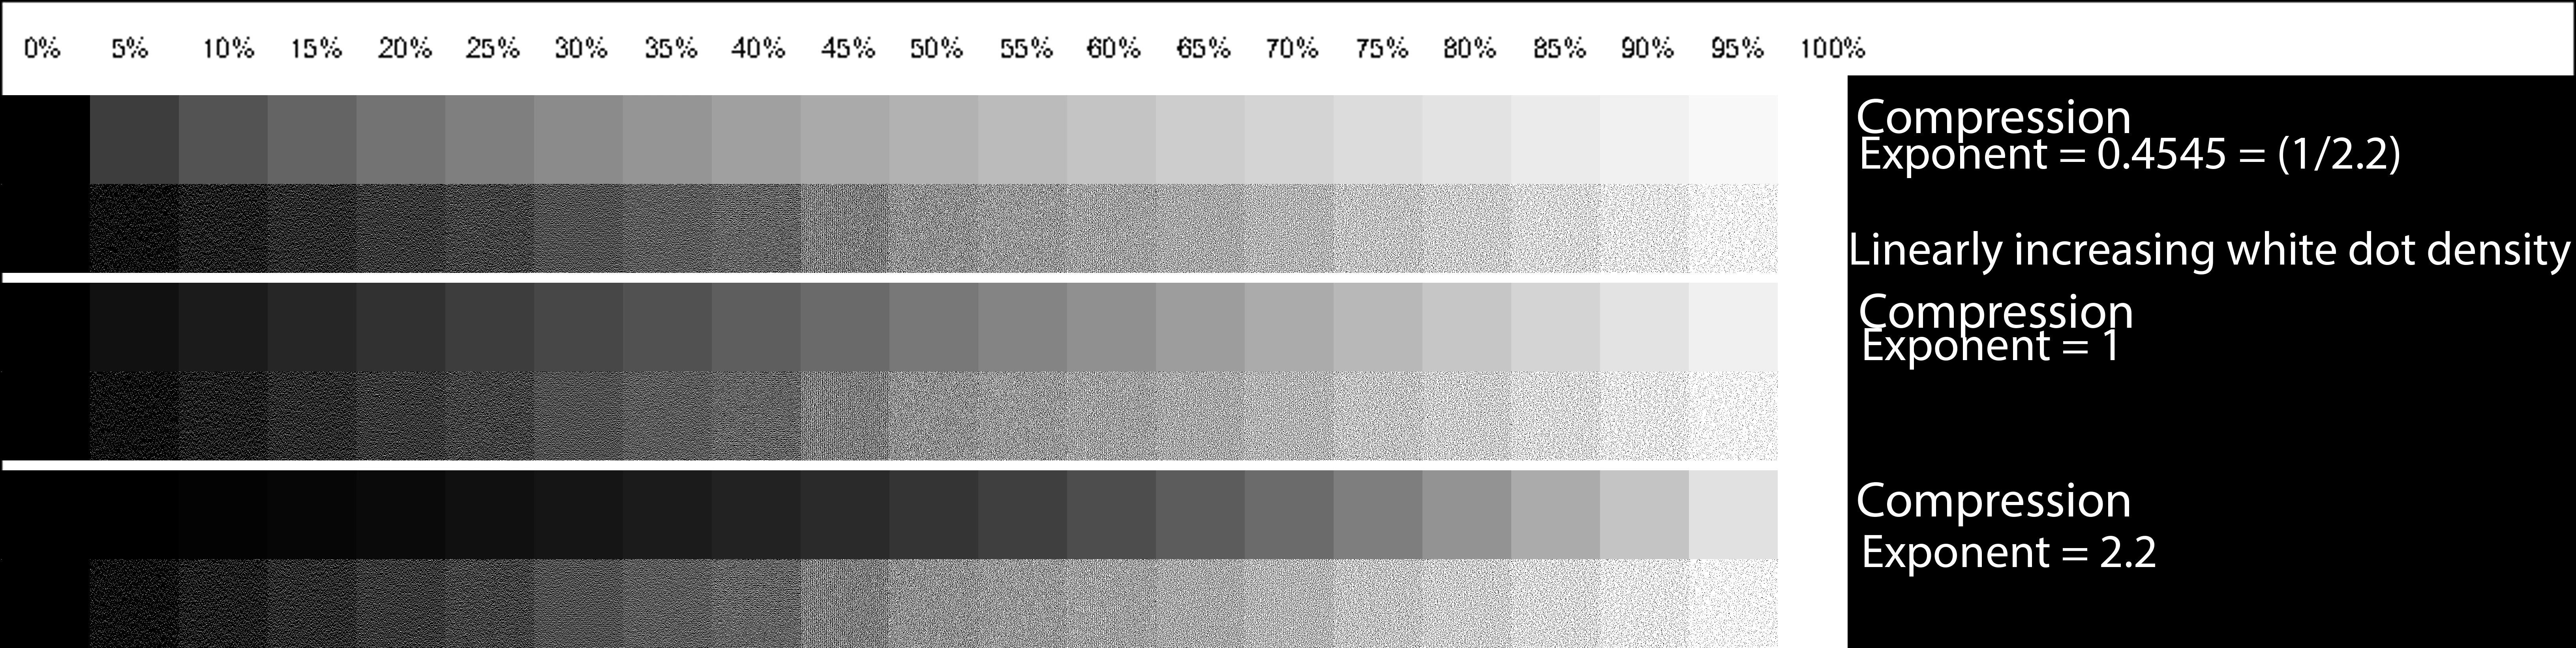
I created a test image with tiles of increasing luminance side by side with tiles with black and white pixels of linearly increasing white pixel density. The gamma compression factor is changed for each group of tiles. When I view this image in Photoshop, I expected to see a luminance match to the black and white pixel tiles on my monitor when gamma compression was 0..4545 (1/2.2) but the nearest visual match is with gamma = 1.0. When I print the image out however, the visually matching set is with gamma = 2.2. 


My monitor is calibrated to gamma = 2.2, 6500K white point. I did try recalibrating to gamma = 1.0 and the result was ugly but the visually matching set was still at the same gamma = 1.0.

I printed the test image with Photoshop two ways. One with Photoshop managing colours and one with the printer managing the colours.

This test image is Adobe RGB 1998 but I got similar results with sRGB test images.

I am working on a project that requires two layers of image. A background layer printed on white paper and a translucent layer printed on a digital transparency. The resultant image after light goes through the two layers is the product of the linear light amplitude of each layer for each pixel. This means that gamma compression needs to be taken into account so I need to understand gamma compression really well. When I see such a major difference in a simple monochrome image between my expectation, the image on the monitor and the printed image, it makes me wonder if my understanding of gamma compression is correct.

Would Adobe really make such a huge blunder and not remove the gamma correction before displaying it on the screen? As I see it, either they have indeed made that blunder, or else my understanding is wrong.

I presume that if other people look at my test image on their monitors they will see the same as I do, that the closest matching image is with Gamma = 1.

Can I ask readers please, which of the gammas is closest for your monitor setup? If you print the file, which set matches the dot

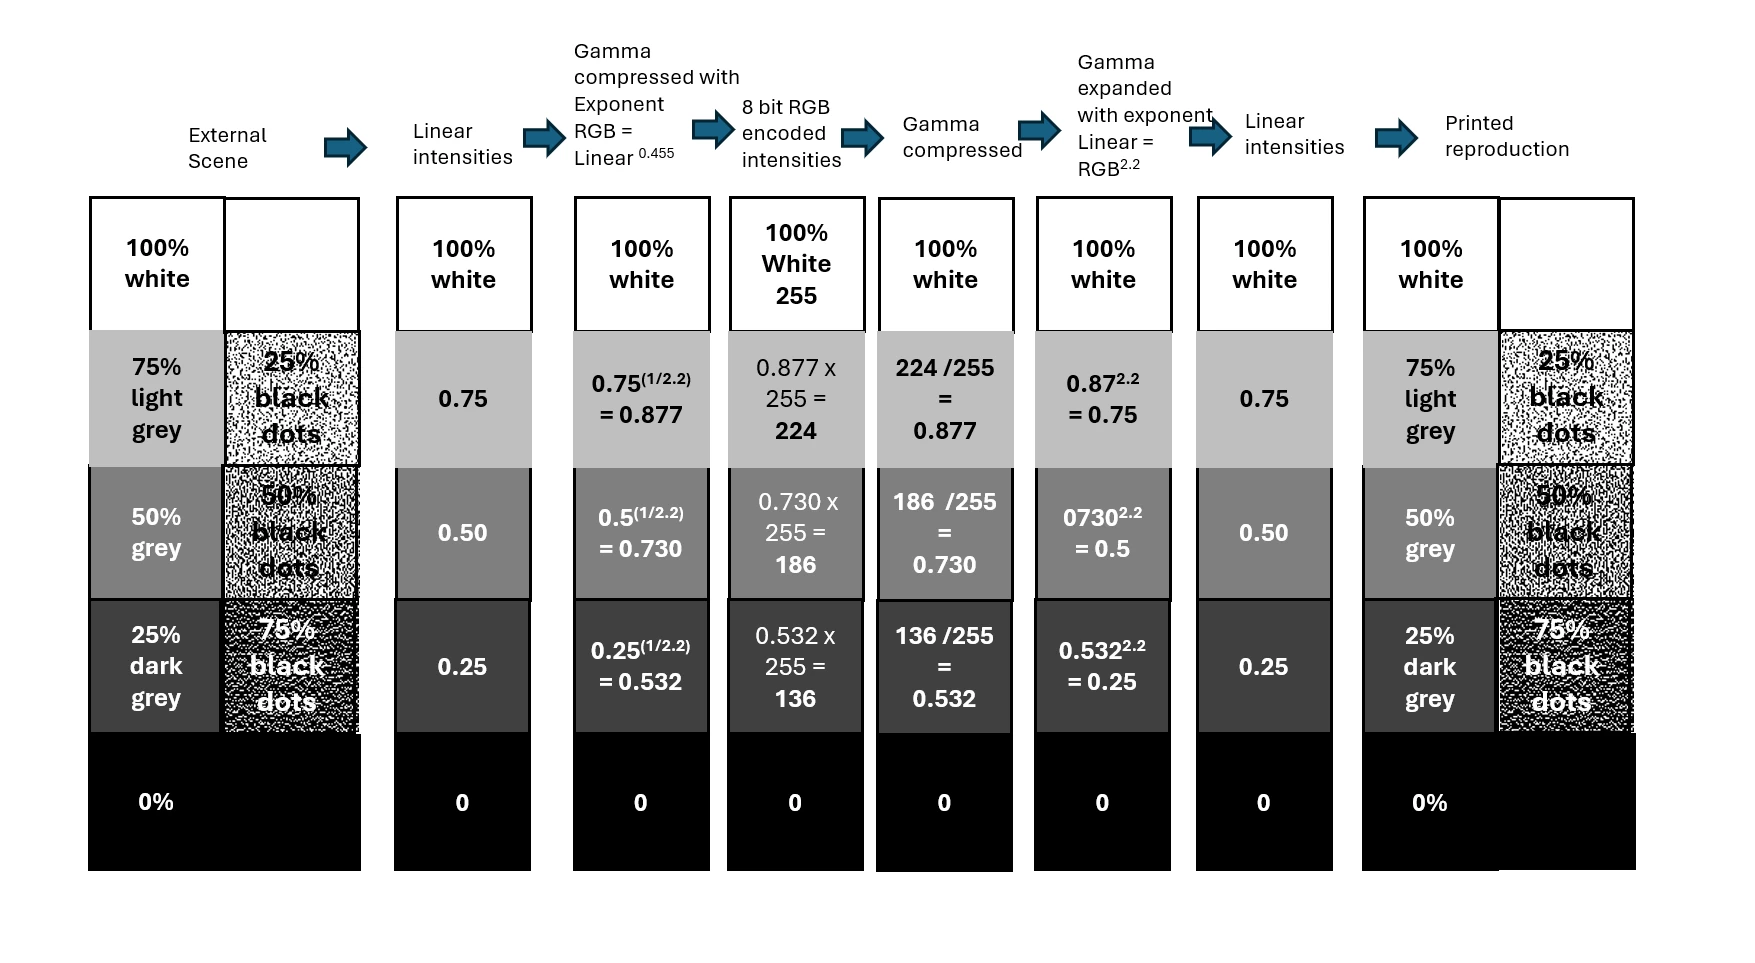
Here is my understanding of how Gamma compression and expansion should work:


2 replies

davescm
Community Expert
Community Expert
April 14, 2025

Your method looks flawed.
You have produced swatch values on your chart you have calculated to be at a specific gamma curve. However, your document is in Adobe RGB which already encodes those values using a transfer curve of 2.2 In other words the swatches you have labelled as gamma 1.0 are actually using values encoded in the document using a 2.2 transfer curve. Your middle value of 128 corresponds to a Luminance value of 54.  So the 'gamma 1.0' values should look closest to the dot swatches.

Photoshop, like any other colour managed application uses values in the document and translates them to the values that need to be sent to the screen using both the document profile and the monitor profile. It does not matter whether the monitor is calibrated to the same curve or not, provided that the profile installed in the operating system correctly describes the monitor in its current state. That is the purpose of colour management. Remember though that, if anything is changed on the monitor, a profile matching that change must be loaded in the operating system, and Photoshop must be closed and restarted in order to pick up that new display profile.

Similarly, the printer profile used by Photoshop must match the paper, ink and media settings that were used when the profile was made. If any settings are changed then the profile is invalid. Provided that the currect media, ink, driver settings and profile are selected then your chart should match closely what you see on the screen with View > Proof Colours and the printer profile selected. 


So here, I see that the closest on the monitor is the gamma 1.0 strip. I say closest as it is not a match. The 128 grey value, corresponding to L 54 is next to a dot swatch with a median value of  142.63 which I would expect to be lower. As a result the dot patch looks closest but not exactly the same.
When I print out the chart, using a print profile I created for the Canson paper I use, I see exactly the same. The closest match is the 1.0 strip. That is what I would expect, I want my prints to look as I see them on my display. So to answer the question in your title, I suspect your printer profile does not accurately reflect the paper, ink and media settings of your printer.


Dave 

Known Participant
April 15, 2025

Thanks so much Dave for putting the time in to explain this to me. What you say makes perfect sense. There must be something wrong with my prints. The thing is, I am also using Canson paper (Canson Infinity PhotoGloss Premium RC 270 gsm - Gloss) and I downloaded the printer profile from the Canson Website for my Epson SC P900 printer. I have told the printer that I am using Photo Glossy paper (It doesn't have a Canson specific setting, only Epson ones) so it should be good.


Do you mind if I ask what specific paper and printer you used?


This is a photo


NB, colourmanagement
Community Expert
Community Expert
April 21, 2025

Hi,

Unfortunately, I'm running out of ideas. Your printer settings look fine with one caveat, although I'm not sure it will make a difference. Canson recommend setting media to 'Premium Glossy (250)'. On my Epson P5000 that is separate to Premium Glossy. There is a choice of Premium Glossy, Premium Glossy (170) and Premium Glossy (250). You might want to try that. 


Other than that all settings look OK and as per Canson's recommendations.

The only thing left would be:
1. A reset of Photoshop print settings for that document (hold down the spacebar when clicking on Print)
2. A Photoshop Preference reset

3. A reinstallation of the Epson driver

Sorry I can't see anything else 😞

Dave


@Michael The Curate 

Perhaps as @davescm suggested -  after the 2 easy steps he listed - try a thorough reset of Photoshop preferences?

(read this entire text before acting please)


Unexpected behaviour of Photoshop may indicate damaged preferences, which are saved when Photoshop closes.. Restoring preferences to their default settings is a good idea when trying to troubleshoot unexpected behaviours in Photoshop.

When preferences become corrupt, then various issues can occur.


Here’s some info from Adobe about preferences:

Learn how to access and modify Photoshop preferences and customise according to your frequent workflows

https://helpx.adobe.com/photoshop/using/preferences.html#reset_preferences


According to Adobe, manually removing preferences files is the most complete method for restoring Photoshop to its default state. This method ensures that all preferences and any user presets which may be causing a problem are not loaded. More here: https://helpx.adobe.com/photoshop/using/preferences.html#Manually

The process:

  1. Quit Photoshop.
  2. Navigate to Photoshop's Preferences folder.
    macOS: Users/[user name]/Library/Preferences/Adobe Photoshop [version] Settings
    Windows: Users/[user name]/AppData/Roaming/Adobe/Adobe Photoshop [version]/Adobe Photoshop [version] Settings
     
    Note: The user Library folder is hidden by default on macOS. To access files in the hidden user Library folder, see How to access hidden user library files.
  3. Drag the entire Adobe Photoshop [Version] Settings folder to the desktop or somewhere safe for a backup of your settings
  4. Open Photoshop.
     New preferences files will be created in the original location.


You may want to back up your settings and custom presets, brushes & actions before restoring Photoshop's preferences.

Here is general info about that:  https://helpx.adobe.com/photoshop/using/preferences.html#BackupPhotoshoppreferences


And here’s an Adobe Quick Tips link as an aid to overall understanding

https://community.adobe.com/t5/photoshop-ecosystem-discussions/quick-tips-how-to-reset-photoshop-preferences/td-p/12502668


Thanks to Digitaldog for this quick and simple method:

Press and hold Alt+Control+Shift (Windows) or Option+Command+Shift (macOS) immediately after launching Photoshop. You will be prompted to delete the current settings.

You can also reset preferences on quit, if Photoshop is running, by going into General Preferences>General>Reset on Quit.

This action only affects the items found in the preferences dialog box. Numerous program settings are stored in the Adobe Photoshop Preferences file, including general display options, file-saving options, performance options, cursor options, transparency options, type options, and options for plug‑ins and scratch disks. Brushes (and lots of other settings) are not affected by the above instructions for deleting preferences.

You may wish to make a screen capture of the settings in the Preferences dialog to reset them prior to deleting this file. 


Before you reset your preferences, in case of future issues, I suggest you make a backup copy as Adobe may need one to check problematic preferences. 

Quit Photoshop.
Go to Photoshop's Preferences folder

Preferences file locations: https://helpx.adobe.com/photoshop/kb/preference-file-names-locations-photoshop.html\


  [on MacOS see: Users/[user name]/Library/Preferences/Adobe Photoshop [version] Settings

  Note for those on macOS: - Be aware that the user Library folder is hidden by default on macOS. More on that here:

  https://helpx.adobe.com/x-productkb/global/access-hidden-user-library-files.html

  In the Finder, open the “Go” menu whilst holding down the Option (Alt) key.

  "Library" will now appear in the list - below the current user's “home” directory. ]


Now you can drag the entire Adobe Photoshop [Version] Settings folder to the desktop or somewhere safe as a backup of your settings.


Note for macOS:

Preference preservation is affected by macOS permissions,

You’ll need to allow Photoshop ‘Full Disk Access’ in your Mac OS Preferences/Security and Privacy


If resetting preferences doesn't fix your issue:

Go to Preferences > Performance... and uncheck Multithreaded Compositing - and restart Photoshop.

Is Photoshop still hanging? 

Go to Preferences > Performance... click Advanced Settings... and uncheck "GPU Compositing" - then restart Photoshop. 


It may even be time to reinstall Photoshop.


It’s recommended that you use the Adobe CC cleaner tool to remove all traces first.

(See above about preserving preferences first, though! It’s worth preserving them unless they are corrupted.)

How and when to use the Creative Cloud Cleaner tool | Advanced steps

https://helpx.adobe.com/creative-cloud/kb/cc-cleaner-tool-installation-problems.html


Uninstall Photoshop BUT make sure to choose the option “Yes, remove app preference”.


Once that process finishes, start the installation process and look into the “Advanced Options”. Uncheck “Import previous settings and preferences” and choose to “Remove old versions”.


neil barstow - adobe forum volunteer,

colourmanagement consultant & co-author of 'getting colour right'

See my free articles on colour management

Help others by clicking "Correct Answer" if the question is answered.

Found the answer elsewhere? Share it here. "Upvote" is for useful posts


D Fosse
Community Expert
Community Expert
April 14, 2025

Gamma encoded image > inverse gamma in monitor = gamma 1.0


In a properly color managed process this is all remapped in high precision, so that the net visual result is always linear (gamma 1.0).


Without color management it's not entirely accurate, but most displays are fairly close to (inverse) 2.2 natively, so that a 2.2 encoded file will look roughly right. A gamma 1.8 file (e.g. ProPhoto) will look too dark.