mohamedh78426672
Known Participant
May 14, 2018
해결됨

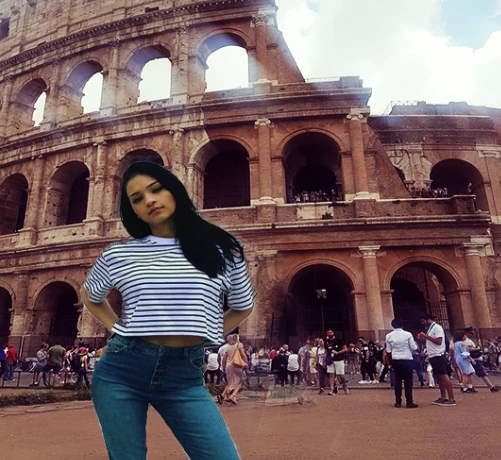
How to merge two pictures by altering colors and contrast?

  • May 14, 2018
  • 5 답변들
  • 3466 조회

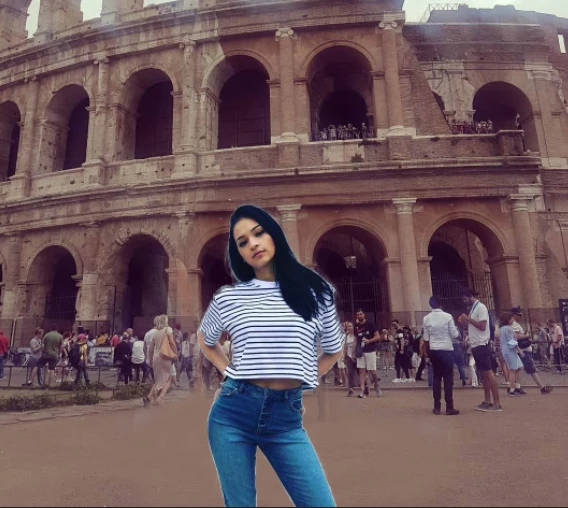
I guess this should be an easy task, all i want to do is make this picture look realitic. I think it looks already good in terms of matching size women-background.

The only thing that makes look photoshopped is different color tones.

The girl is in the upper layer, how can i work on her colors to give her a more dull greish look so it looks more realisitc?

The only tool i know is the oberlay color tool in blending option and it doesent work very well for me.

All the effects contained in the overlay color option dosent work. What other tools exist?

Thank you

    이 주제는 답변이 닫혔습니다.
    최고의 답변: davescm

    I have used 150 masks for such a poor job hahahahhah

    i even used interval color selection to selectively change jeans contrast and than shirt contrast, because i think that her skin actually need no work because it already matches the background!! But with poor results

    Its 23:30 pm for me now, so i have to sleep, but i will study your answer tomorrow davescm

    thank you all good night

    p.s.:

    i was able to work on the girl but creating a mask, but i still dont understand how mask work.

    From what i understand a white mask show dark colors and a white mask hide them? But if this the case, the mask should hide her hair and show her shirt


    A white area on a mask mask shows what is on the layer - a black area on a mask makes the layer pixels transparent so that the layer(s) underneath show through. Grey makes the layer pixels semi-transparent.

    Dave

    5 답변

    mohamedh78426672
    Known Participant
    May 15, 2018

    Yes i understand, seeing too many layers its just intimidating at first, as a newbie of course!

    thank you

    davescm
    Community Expert
    Community Expert
    May 15, 2018

    Hi

    You have to match the background to the girl or the girl to the background. Assuming you want to do the latter and retain the old "faded film" look then you only need two adjustment layers clipped to the girl

    1. A curve in which I've adjusted the red and blue at the black end to give that magenta cast in the shadows and the blue and combined RGB at the top end to reduce the contrast and match the whites to the whites in the background image

    2. A Hue and Saturation layer to reduce the overall saturation and to target the jeans color and shift them to the magenta - again to match other jeans in the background

    That is it for the color matching. The cloning still needs work though

    Dave

    mohamedh78426672
    Known Participant
    May 15, 2018

    I have used 150 masks for such a poor job hahahahhah

    i even used interval color selection to selectively change jeans contrast and than shirt contrast, because i think that her skin actually need no work because it already matches the background!! But with poor results

    Its 23:30 pm for me now, so i have to sleep, but i will study your answer tomorrow davescm

    thank you all good night

    p.s.:

    i was able to work on the girl but creating a mask, but i still dont understand how mask work.

    From what i understand a white mask show dark colors and a white mask hide them? But if this the case, the mask should hide her hair and show her shirt

    Community Expert
    May 15, 2018

    What you could do is adjust the brightness and contrast of the background to give it more colour and life. then adjust the colour balance. Here's what I produced just adjusting the 2 layers giving more red to the girl, a bit more blue to the background - so relate the colours in each layer more. Won't say this is the perfect blend (skin colour may not be exactly right) but another way for you to explore how to get the layers working better.

    mohamedh78426672
    Known Participant
    May 15, 2018

    Thank you Dean, adjusting the background color and brightness is a good idea, instead of only adjusting the upper layer and trying to make the model to fit in. Altering the recieving layer is a good idea. In fact i could blend it by almost making both black and white.

    But it would be a shourtcut without learning.

    c.pfaffenbichler

    yes you can decide where to sample, but the "+" will always be on your left. It could be i'm doing something wrong of course, as i'm a beginner.

    Abambo

    thank, cutting out people and landscapes is the simplest thing i have to do right now, unless i invent simpler exercise even if i dont need them. I'm trying to do the simpliest things i actualy need

    c.pfaffenbichler
    Community Expert
    Community Expert
    May 15, 2018
    yes you can decide where to sample, but the "+" will always be on your left. It could be i'm doing something wrong of course, as i'm a beginner.

    When you alt-click on the right side of the image with the Clone Stamp Tool and then (simple-)click further left what happens?

    Abambo
    Community Expert
    Community Expert
    May 15, 2018

    I stay with what I said in your forum entry before: Use simpler examples to start with. Pasting persons in an image is quite a very complex operation as you need to use a lot of techniques at the same time. If you do not know the basics, you will stay frustrated, because the image never looks good, even if you got parts of the work right.

    But I won't discourage you: I think that your progress is quite fast..

    ABAMBO | Hard- and Software Engineer | Photographer
    Nancy OShea
    Community Expert
    Community Expert
    May 14, 2018

    You need more than color adjustment.  The halos around the model are terrible.

    Nancy O'Shea— Product User & Community Expert
    mohamedh78426672
    Known Participant
    May 14, 2018

    what do you think of this job, ive run out of option, still im not sotisfied though

    this is the original pic

    c.pfaffenbichler
    Community Expert
    Community Expert
    May 15, 2018

    That does. not seem like a commercially acceptable result.

    Neither the hue nor the luminance of the person match the background.

    Can you provide the layered file or at the very least a screenshot including the Layers Panel?

    c.pfaffenbichler
    Community Expert
    Community Expert
    May 14, 2018

    You can use Adjustment Layers (Hue/Saturation, Curves, …) and Clipping Mask them to the clipped Layer.