• Global community
    • Language:
      • Deutsch
      • English
      • Español
      • Français
      • Português
  • 日本語コミュニティ
    Dedicated community for Japanese speakers
  • 한국 커뮤니티
    Dedicated community for Korean speakers
Exit
1

Scaling down image loss in quality?

Participant ,
Jan 13, 2021 Jan 13, 2021

Copy link to clipboard

Copied

Hi everyone,


I am working with drawings that need to be at x scale. I have a scanned drawing and it looks like this inside Photoshop:


ShynnSup_0-1610596691123.png


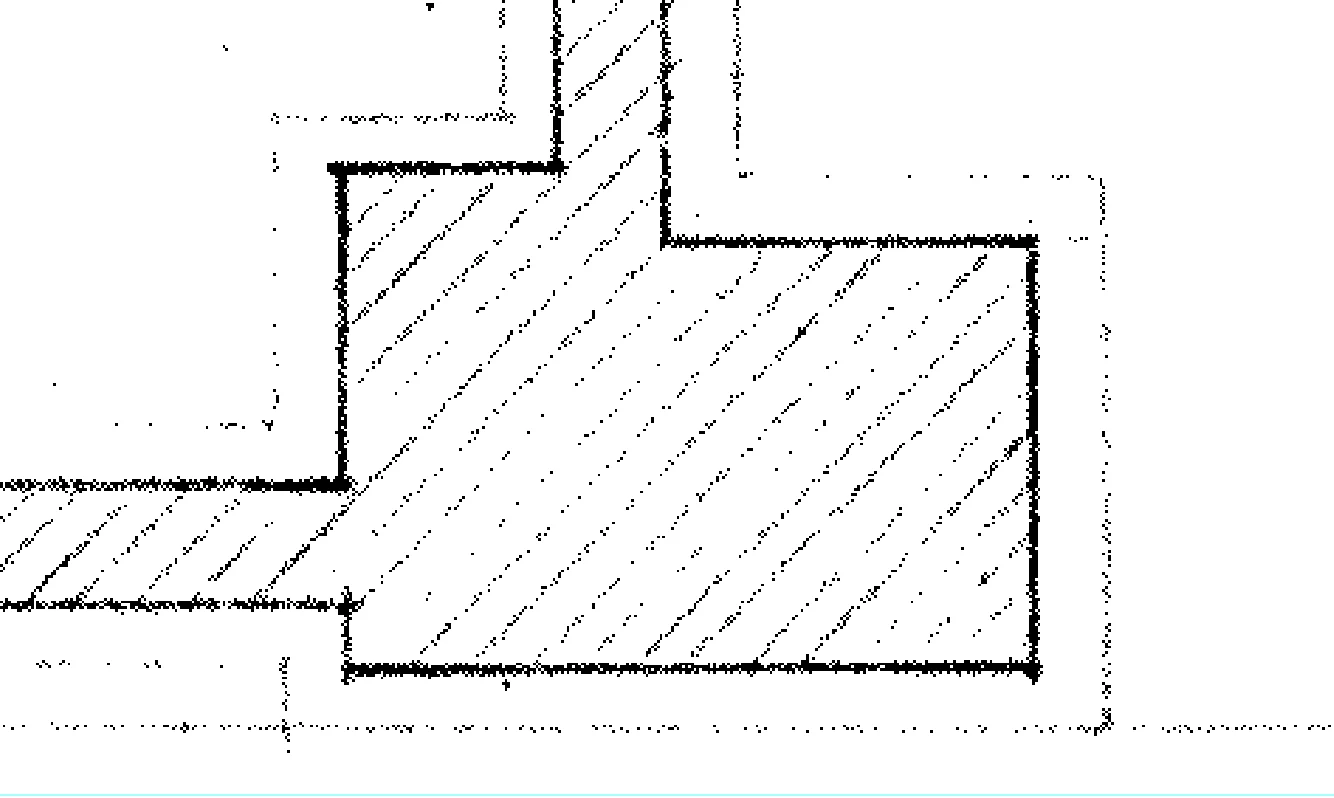
I now scale my image by Edit>Transform>Scale>check mantain aspect ratio>input 24%

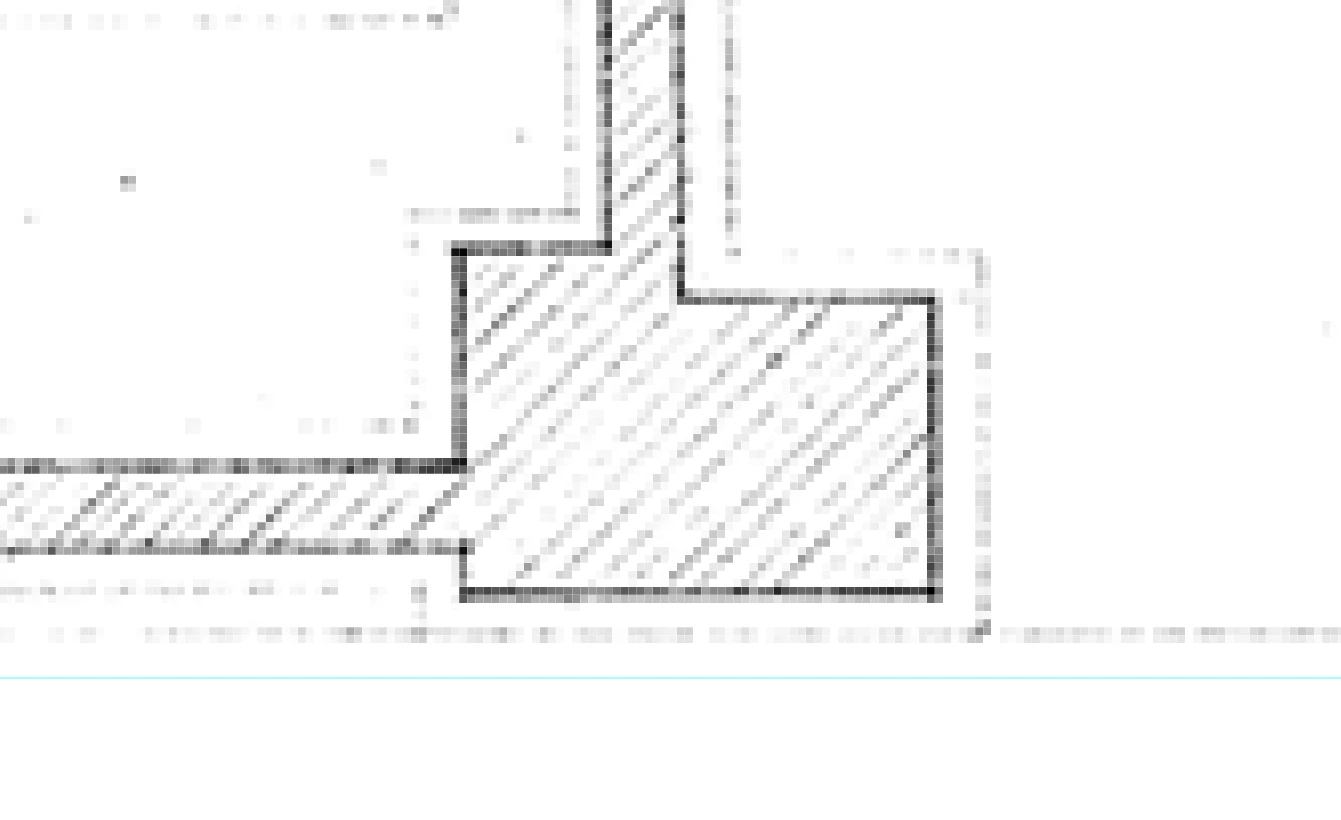
So I am scaling down my image from 100% to 24%. The result looks like this:


ShynnSup_2-1610596957286.png


Is this normal with raster software, am I having unreasonable expectations?


What troubles me the most is that the original image is a bitmap with only back and white colors, and when scaled I can see gray tones in the pixels. A simple down scale messed up by whole image! I thought up scaling was the problem as Photoshop has to create new pixels out of the blue. I never thought down scaling would result in a quality loss...


I guess I am looking for clarification whether this is normal and nothing can be done or if I am doing something wrong when scaling (which I doubt), but maybe there is a better method to scale images to x size.


Thank in advance.


TOPICS
Windows

Views

3.9K

Translate

Translate

Report

Report
Community guidelines
Be kind and respectful, give credit to the original source of content, and search for duplicates before posting. Learn more
community guidelines

correct answers 1 Correct answer

Community Expert , Jan 13, 2021 Jan 13, 2021

The reason you got gray tones is because of choices that have to be made when you reduce by 24% while resampling. 24% reduction means roughly one quarter of the height and width, or 1/16 of the original area. That means for every 16 pixels in the original, only one pixel can survive in the reduced version. So if one of those 16-pixel groups in the original has 8 black pixels (50% of the pixels are black), how should the one surviving pixel be set?

  • Make it white
  • Make it black
  • Make it 50% gray


...

Votes

Translate

Translate
Adobe
Community Expert ,
Jan 13, 2021 Jan 13, 2021

Copy link to clipboard

Copied

A pixel is a pixel. Raster images aren't scalable. They need to be resampled.


With binary bitmap images you might want the "nearest neighbor" resampling algorithm to maintain hard pixel edges.

Votes

Translate

Translate

Report

Report
Community guidelines
Be kind and respectful, give credit to the original source of content, and search for duplicates before posting. Learn more
community guidelines
Participant ,
Jan 13, 2021 Jan 13, 2021

Copy link to clipboard

Copied

I understand. Thanks! Follow up question. How can I resample to 24% of my current image? Because I cannot use the transform menu now right? Maybe it is as simple as multiplying 0,24xPixel amount and using that value as the new pixel amount? 

Votes

Translate

Translate

Report

Report
Community guidelines
Be kind and respectful, give credit to the original source of content, and search for duplicates before posting. Learn more
community guidelines
Community Expert ,
Jan 13, 2021 Jan 13, 2021

Copy link to clipboard

Copied

That is too bad. Here is what I get resampling your first uploaded image:

resampled to 24%.jpg

Perhaps you are viewing at extreme zoom ratio? If you are using Free Transform then you are probably in RGB or Grayscae mode, right?

Check zoom ratio or post screenshot.

Votes

Translate

Translate

Report

Report
Community guidelines
Be kind and respectful, give credit to the original source of content, and search for duplicates before posting. Learn more
community guidelines
Community Expert ,
Jan 13, 2021 Jan 13, 2021

Copy link to clipboard

Copied

The reason you got gray tones is because of choices that have to be made when you reduce by 24% while resampling. 24% reduction means roughly one quarter of the height and width, or 1/16 of the original area. That means for every 16 pixels in the original, only one pixel can survive in the reduced version. So if one of those 16-pixel groups in the original has 8 black pixels (50% of the pixels are black), how should the one surviving pixel be set?

  • Make it white
  • Make it black
  • Make it 50% gray


Because the right answer depends on the situation, Photoshop offers multiple image interpolation methods. The default would convert a not-fully-filled group of pixels into a gray shade. Nearest Neighbor would round off to black or white, which could result in unexpected artifacts.


You can reduce with no loss if you don’t resample…if you’ll keep every pixel, but just increase their density until it’s 24% of the original size. Scaling without resampling can be done if you scale the image as an object instead of just as pixels. You can scale an image as an object:

  • In a vector-based application such as Adobe Illustrator or Adobe InDesign
  • In Photoshop, after converting the layer into a Smart Object


Scaling as an object maintains quality only to the limit of the final output resolution. For example, if you’re going to print at 300 ppi, reducing an image maintains detail until the pixel density of that image hits 300 ppi, and then that is the limit of potential detail. In Photoshop, you’re additionally limited by the pixel density of the document, so reducing an layer to 24% as a Smart Object will keep more detail visible (per inch at the final output dimensions) if the document is set to a higher ppi value.

Votes

Translate

Translate

Report

Report
Community guidelines
Be kind and respectful, give credit to the original source of content, and search for duplicates before posting. Learn more
community guidelines
Community Expert ,
Jan 14, 2021 Jan 14, 2021

Copy link to clipboard

Copied

I agree, it is best to first resize without resampling, then evaluate the resulting PPI. Only then make decisions about what to do thereafter.

Votes

Translate

Translate

Report

Report
Community guidelines
Be kind and respectful, give credit to the original source of content, and search for duplicates before posting. Learn more
community guidelines
Participant ,
Jan 14, 2021 Jan 14, 2021

Copy link to clipboard

Copied

I rezised original by 24% and PPI went from 400 to 1666. Image quality is way superior to resizing with resample checked.


With this information, how do I know what to do thereafter?

Which sceneario would make me opt to resample instead?

Votes

Translate

Translate

Report

Report
Community guidelines
Be kind and respectful, give credit to the original source of content, and search for duplicates before posting. Learn more
community guidelines
Community Expert ,
Jan 14, 2021 Jan 14, 2021

Copy link to clipboard

Copied

Assuming resampling is necessary, one thing needs to be clear about smart objects:


It doesn't solve the problem, it just postpones it. Sooner or later the smart object has to be rasterized, and the pixels resampled.


Only vector data are truly scalable.

Votes

Translate

Translate

Report

Report
Community guidelines
Be kind and respectful, give credit to the original source of content, and search for duplicates before posting. Learn more
community guidelines
Community Expert ,
Jan 14, 2021 Jan 14, 2021

Copy link to clipboard

Copied

True…that’s why I wanted to point out that even if you are scaling down a Smart Object, its effective resolution is still limited by the pixel dimensions of the containing Photoshop document.

Votes

Translate

Translate

Report

Report
Community guidelines
Be kind and respectful, give credit to the original source of content, and search for duplicates before posting. Learn more
community guidelines
Community Expert ,
Jan 14, 2021 Jan 14, 2021

Copy link to clipboard

Copied

You know where the grey pixels come from now, resampling

Try this - to resize without resampling as Stephen suggested:

open - image / image size

uncheck 'resample'

set width to 'percent' and enter 24

click OK

it should look fine on the screen now if you view it at 100% / 50% etc, not an in-between number,

[click command 0 to get 100% then command + or - to shift between view values. ]


but what is the resulting PPI number - you may end up with a strange resolution


your next step depends on what you are doing with the final image 


I hope this helps
neil barstow, colourmanagement net :: adobe forum volunteer
google me "neil barstow colourmanagement" for lots of free articles on colour management
[please only use the blue reply button at the top of the page, this maintains the original thread title and chronological order of posts]

Votes

Translate

Translate

Report

Report
Community guidelines
Be kind and respectful, give credit to the original source of content, and search for duplicates before posting. Learn more
community guidelines
Participant ,
Jan 14, 2021 Jan 14, 2021

Copy link to clipboard

Copied

Okay.


I am trying to figure out the best workflow here:


The end goal is to place this image into InDesign on A4 and have it display at the correct scale. Of course with the best quality possible. 


My orignal image is:


Capture0.PNG

9548px x 9548 px

400 PPI

Scale 1:96 


This means my image is 606.3mm x 606.3mm:

400/25.4mm = 15.748px per mm

9548/15.748 = 606.3mm


Basically what photoshop does on the backgorund when I put units to mm.


Now I want a scale of 1:400. For that I need a scale factor of 0.24 regarding the current scale of 1:96.

I resized without resampling to 24% and the resolution went from 400PPI to 1666.667.

This means my image will now measure 145.5 mm x 145.5 mm:


1666.667/25.4mm = 65.616811px per mm

9548/65.616811 =145.5mm


Capture3.PNG


I guess this is the same as just placing the unedited image into InDesign, within a frame of 145.5 mm x 145.5 mm and fitting the image to frame. Notice how the actual PPI is 400 and the effective is 1666.


Capture1.PNG


Conclusion:

I guess not resampling is the way to go right?

Now I wonder if I should edit at all, maybe it is best to just calculate InDesign frame size and let InDesign do the resizing of the image...  What do you guys think?


Votes

Translate

Translate

Report

Report
Community guidelines
Be kind and respectful, give credit to the original source of content, and search for duplicates before posting. Learn more
community guidelines
Community Expert ,
Jan 14, 2021 Jan 14, 2021

Copy link to clipboard

Copied

LATEST

The last thing you said is pretty much what is done: There is no need to downsample in Photoshop before placing in InDesign, because if you downsample in advance you have limited the potential resolution up front. Just place it in InDesign at its original pixel dimensions, and you have the full resolution of the original available for scaling up or down.


What is going to happen with that effective resolution is that the limiting factor will be the printer you use for your A4 document:

  • If it’s a prepress device creating plates at 2400 dpi, then it will be a good thing you kept all the pixels because the scaled-down resolution of the image is 1666 ppi. If you had downsampled, the final effective ppi would have been less.
  • If it’s a desktop laser printer creating output at 600 dpi, then the final resolution of the image will be 600 ppi because the printer can’t resolve 1666 ppi. 


This brings us to the answer to your other question: When would you want to resample? The answer is whenever the originals are much too large for the workflow. Images take memory to process and store. If your project involves a large number of images that each have far more pixels than needed, then they’re needing more RAM to process and more storage/backup space than they should. It might also take longer to print. For example, if you’ll be printing on a 300 dpi printer, then an effective resolution of 1666 ppi is quite high, so in that case you could downsample it by a fair amount while keeping the effective resolution above the 300 ppi that would take advantage of the full resolution of the printer.


If there is a concern that oversampled images might generate too much data for a print job, you can set InDesign to downsample placed images on the fly, in the Print dialog box. (“Pour them all in and let InDesign sort it out”)


InDesign-Optimized-Subsampling.jpg

Votes

Translate

Translate

Report

Report
Community guidelines
Be kind and respectful, give credit to the original source of content, and search for duplicates before posting. Learn more
community guidelines