Copy link to clipboard
Copied
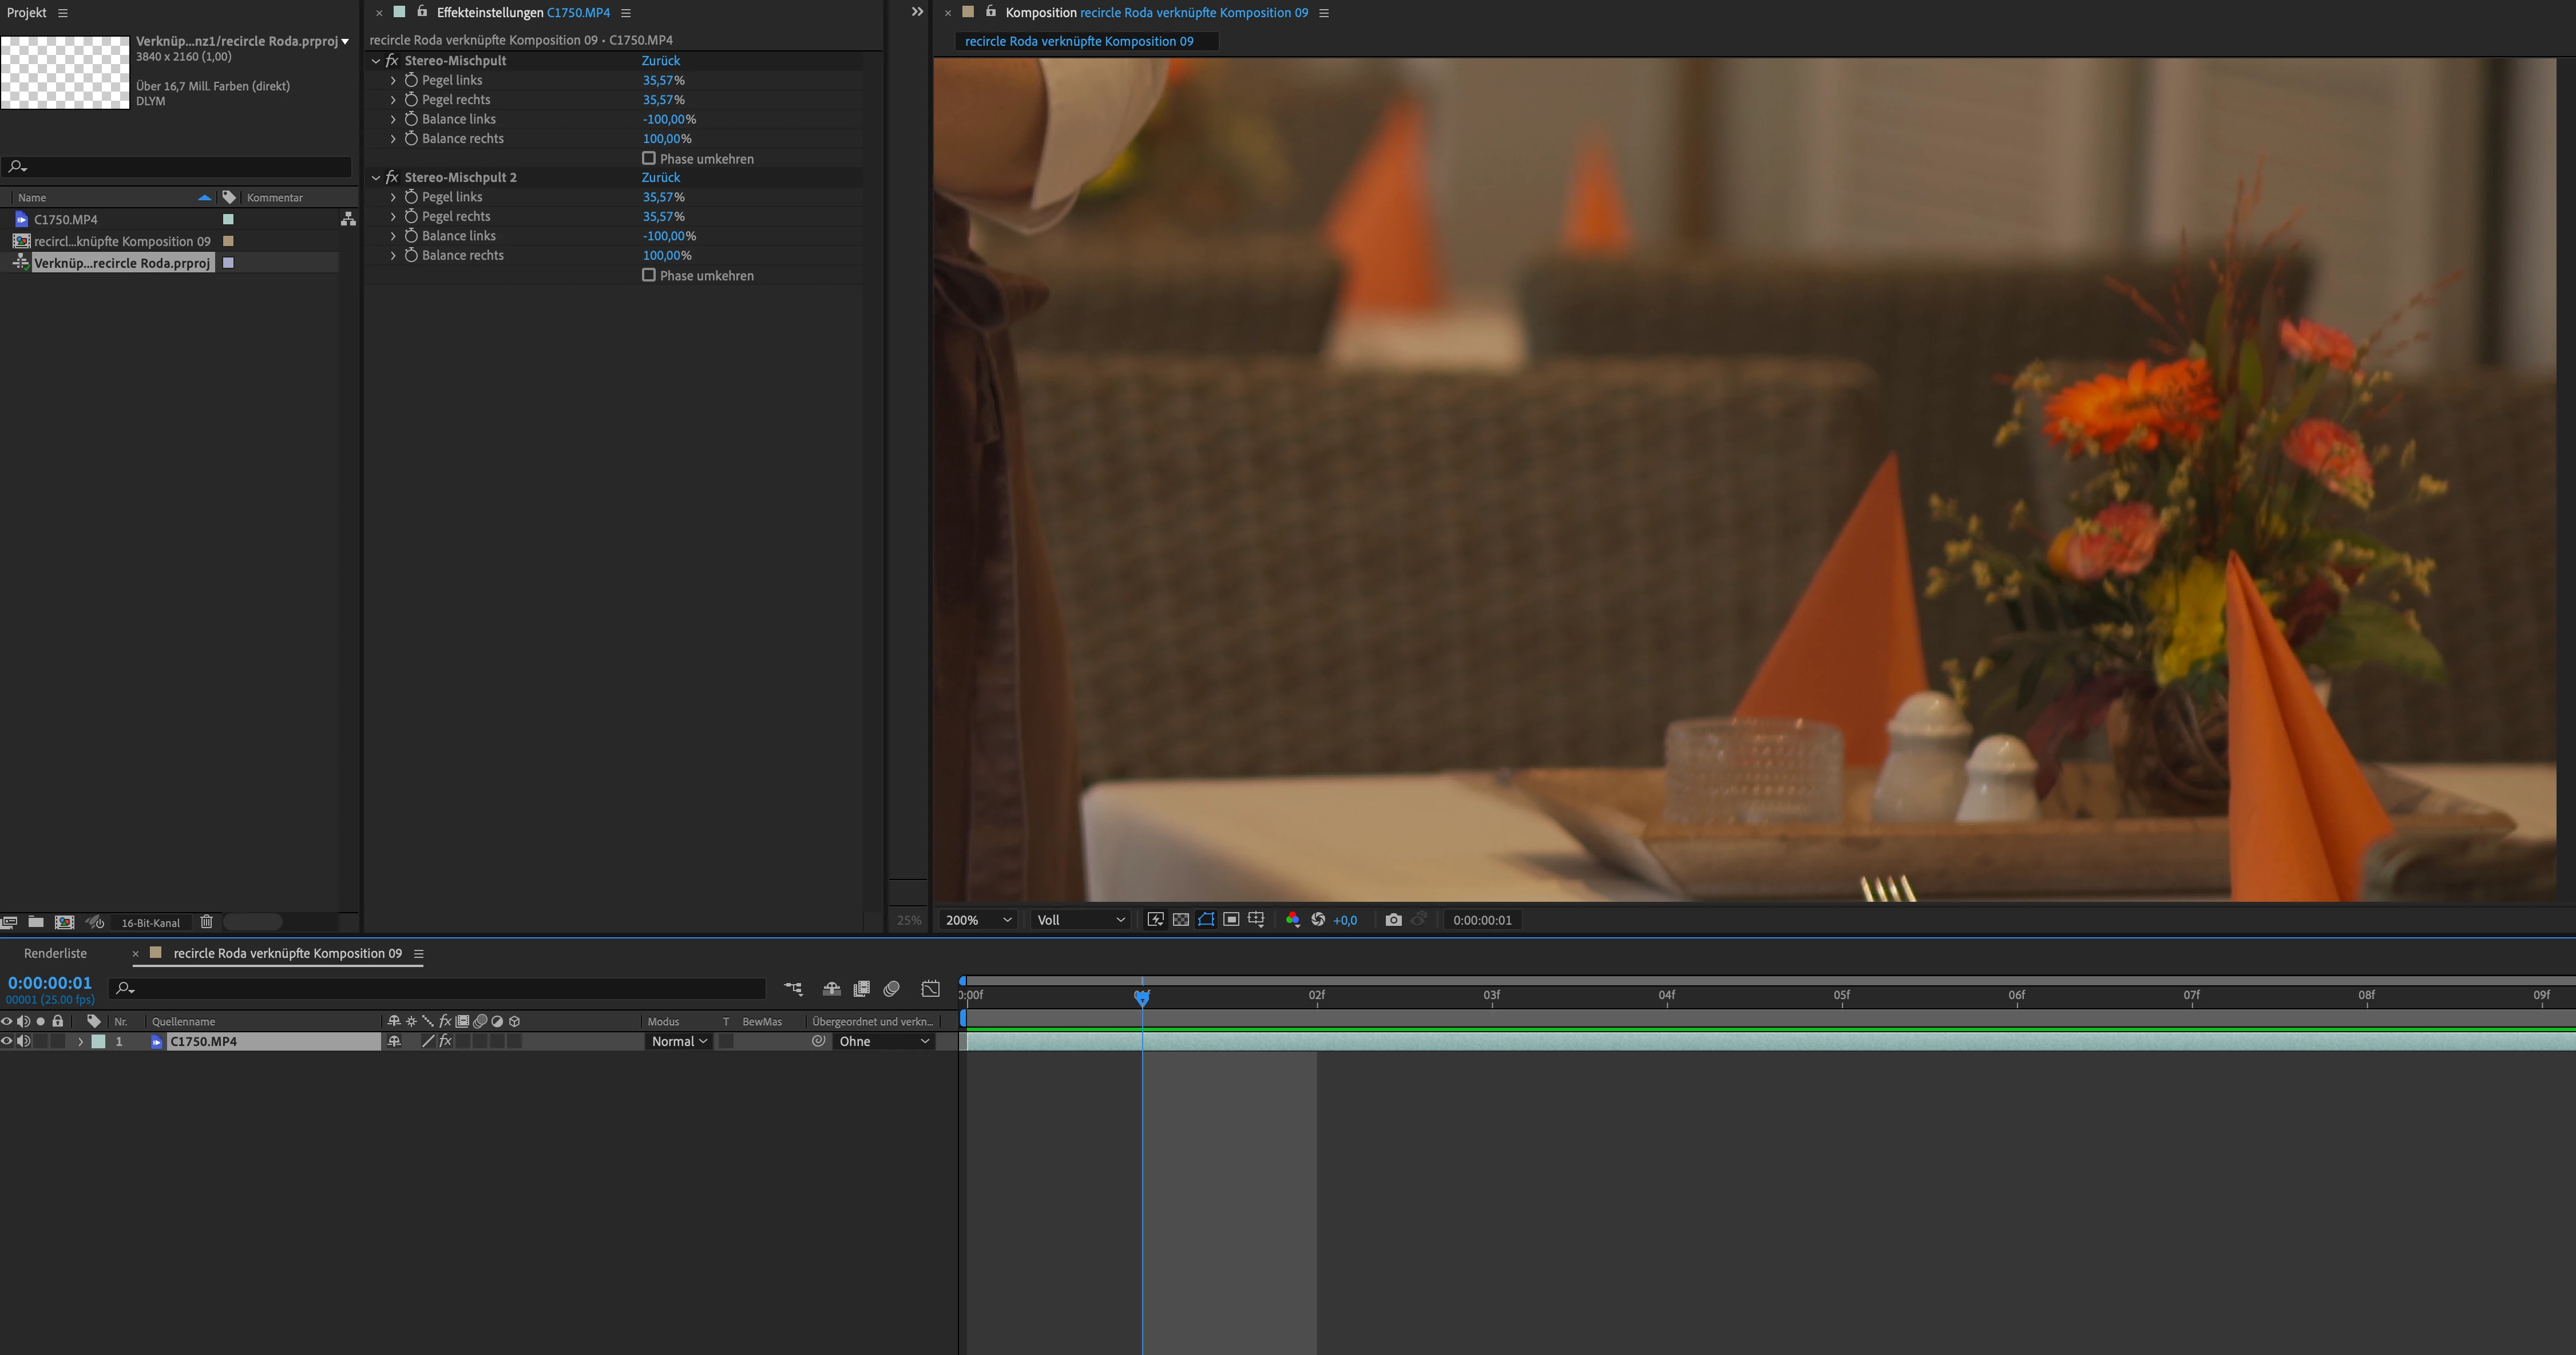
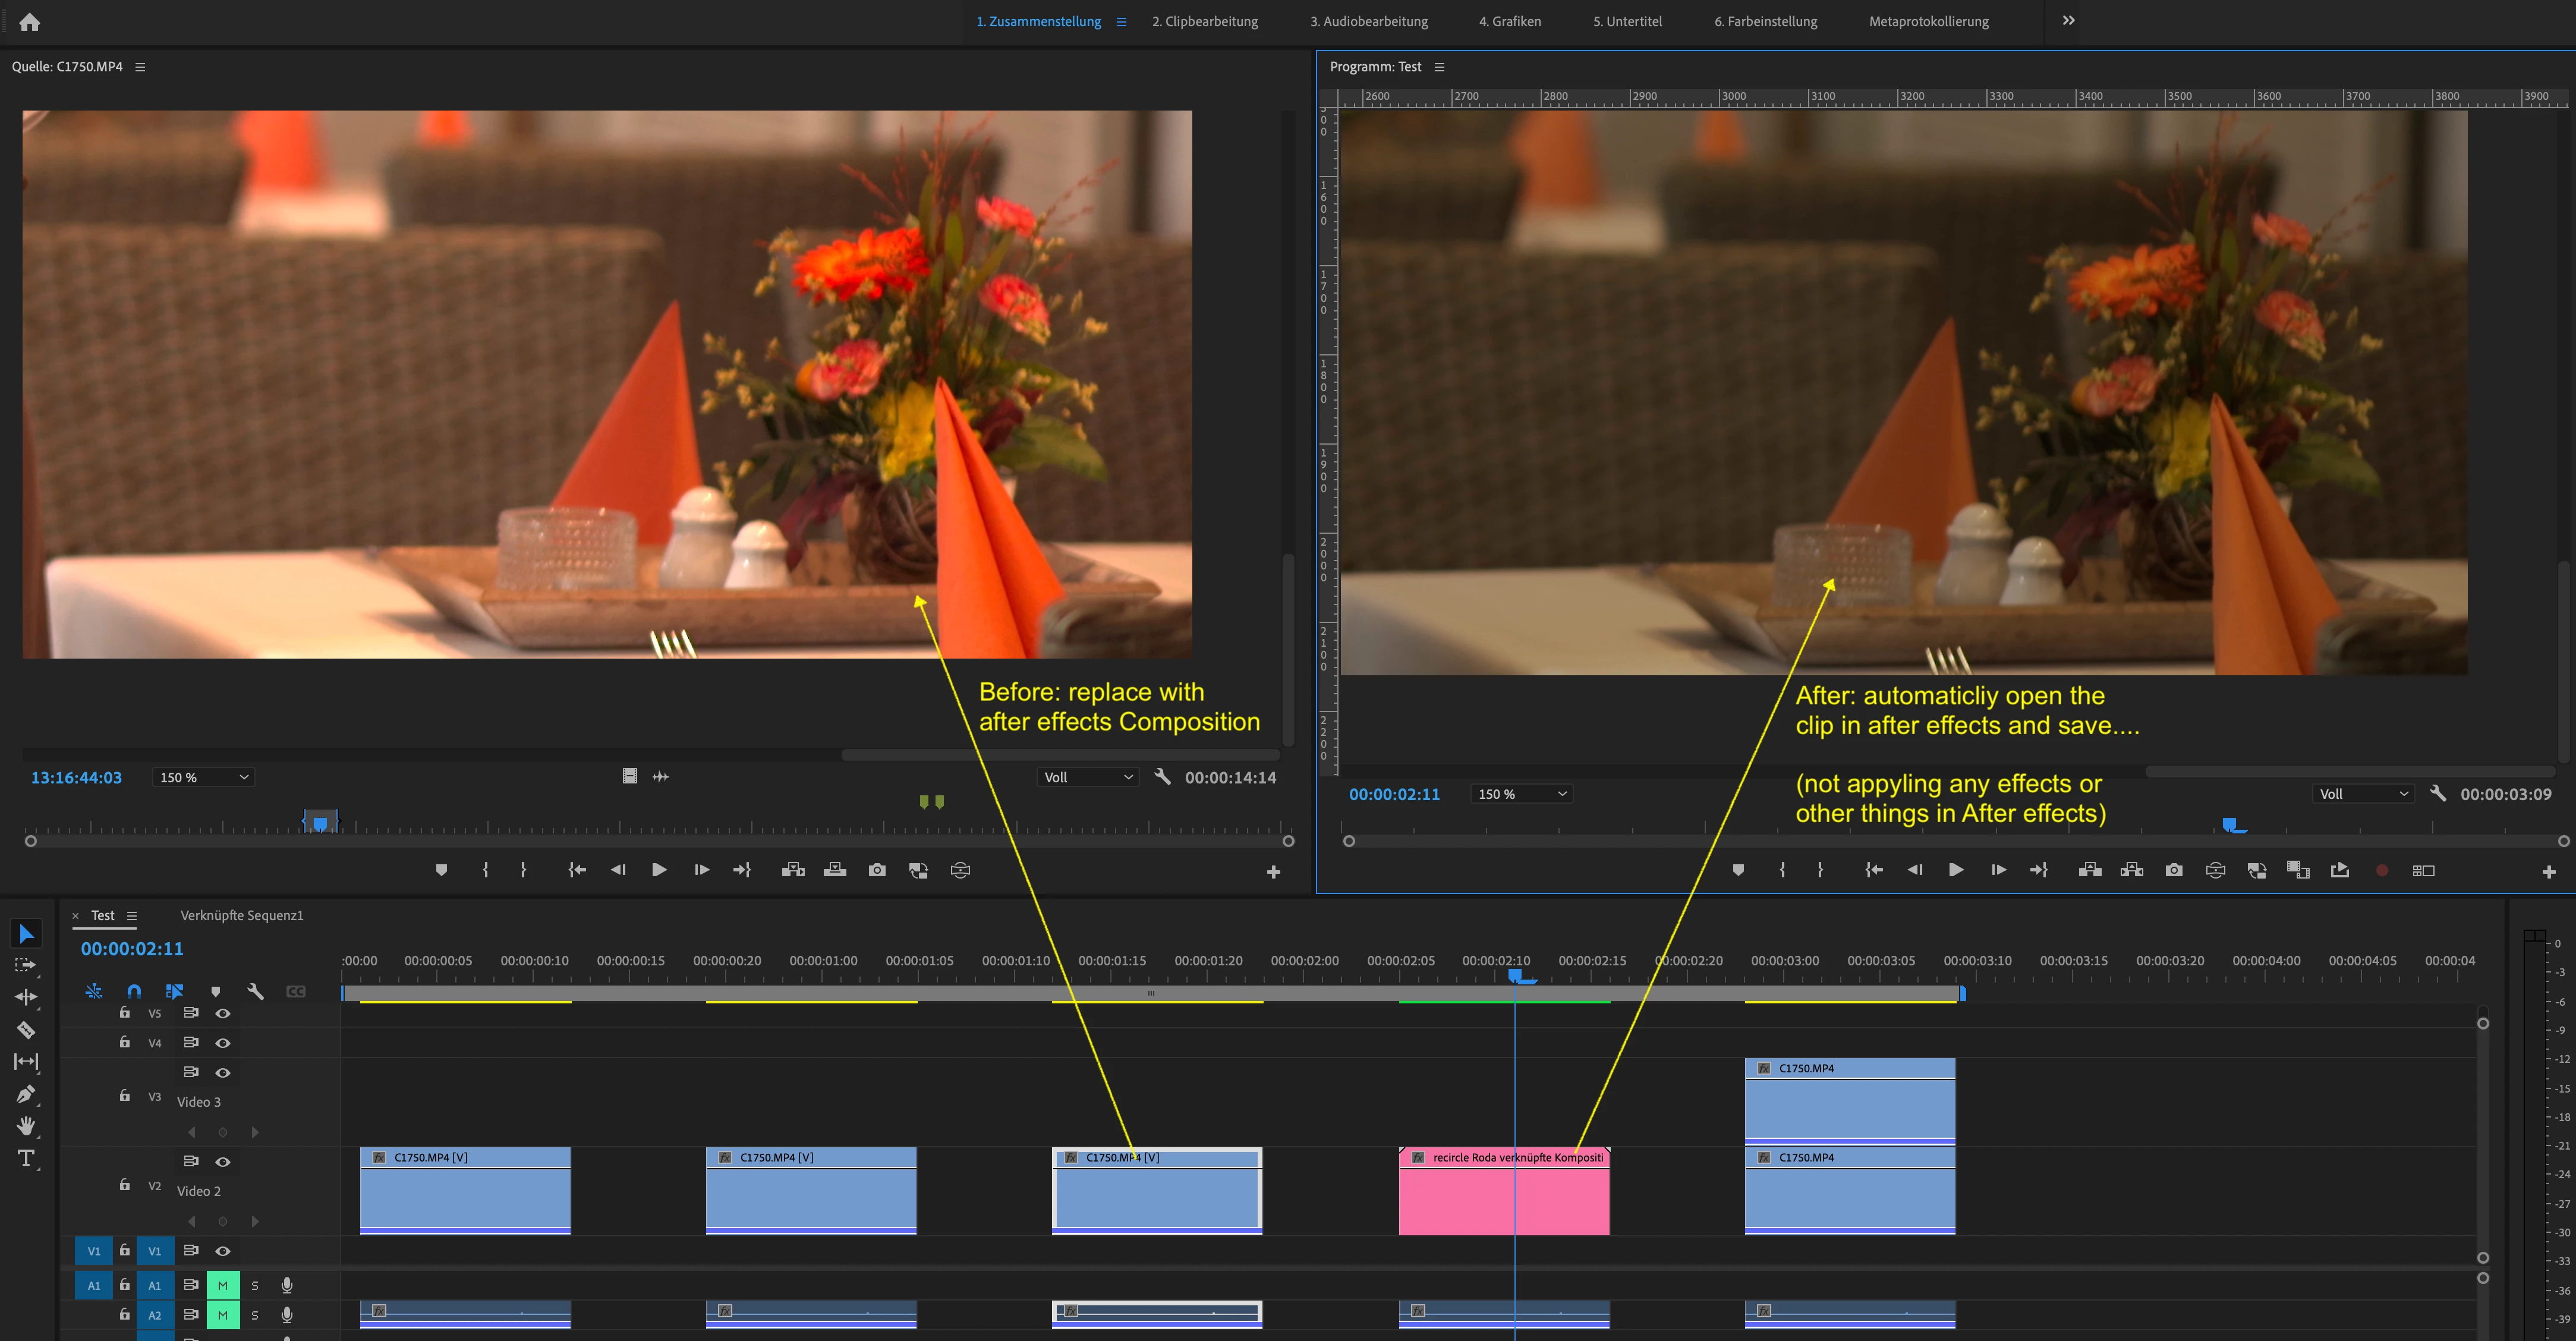
I work with the newest version of the adobe creative suite (update automaticly). I wanted to use the "Replace with after effects composition" yesterday but it gaves me horrible colors back. The copy of the clip in premiere semms ok but after opening the comp in after effects it looks darker and not saturated. In After Effects and in premiere too. Also the render-function gaves the colors not back. I cant remember that I had this issue in former versions. Whats going wrong. Where can a connect the color space and the color work to get the same color after using the manupulating in after effects.
The 2022 version of Premiere Pro added several color managment settings that were not in previous versions, and that's been tripping up a lot of users.
First ... for clips in a bin. Right-click/Modify/Interpret footage and check the color space options. For many things using color space over-ride to Rec.709 will be a good option if you're not actually working to get an HDR export.
Next ... the Sequence Settings dialog also has a color space setting. Make sure this is what you intend to both
...Hi lutz0815,
We're sorry about the poor experience. I agree with Neil's suggestion.
Let us know if it helps in sorting the preview issue.
Thanks,
Sumeet
Copy link to clipboard
Copied
It seems that the isue is relatet to the color space of the clip. I filmed the clip with my sony a7iii in color space Rec.2100 HLG. Looks nice in the premiere preview. If I interpret the color to Rec. 709 the nice looking preview will gone.
But the priview of the clip matches completly to the file in after effects and the preview of the clip from AE in premiere.
So far so good but when I am cutting our projects we got clips from some cameras.
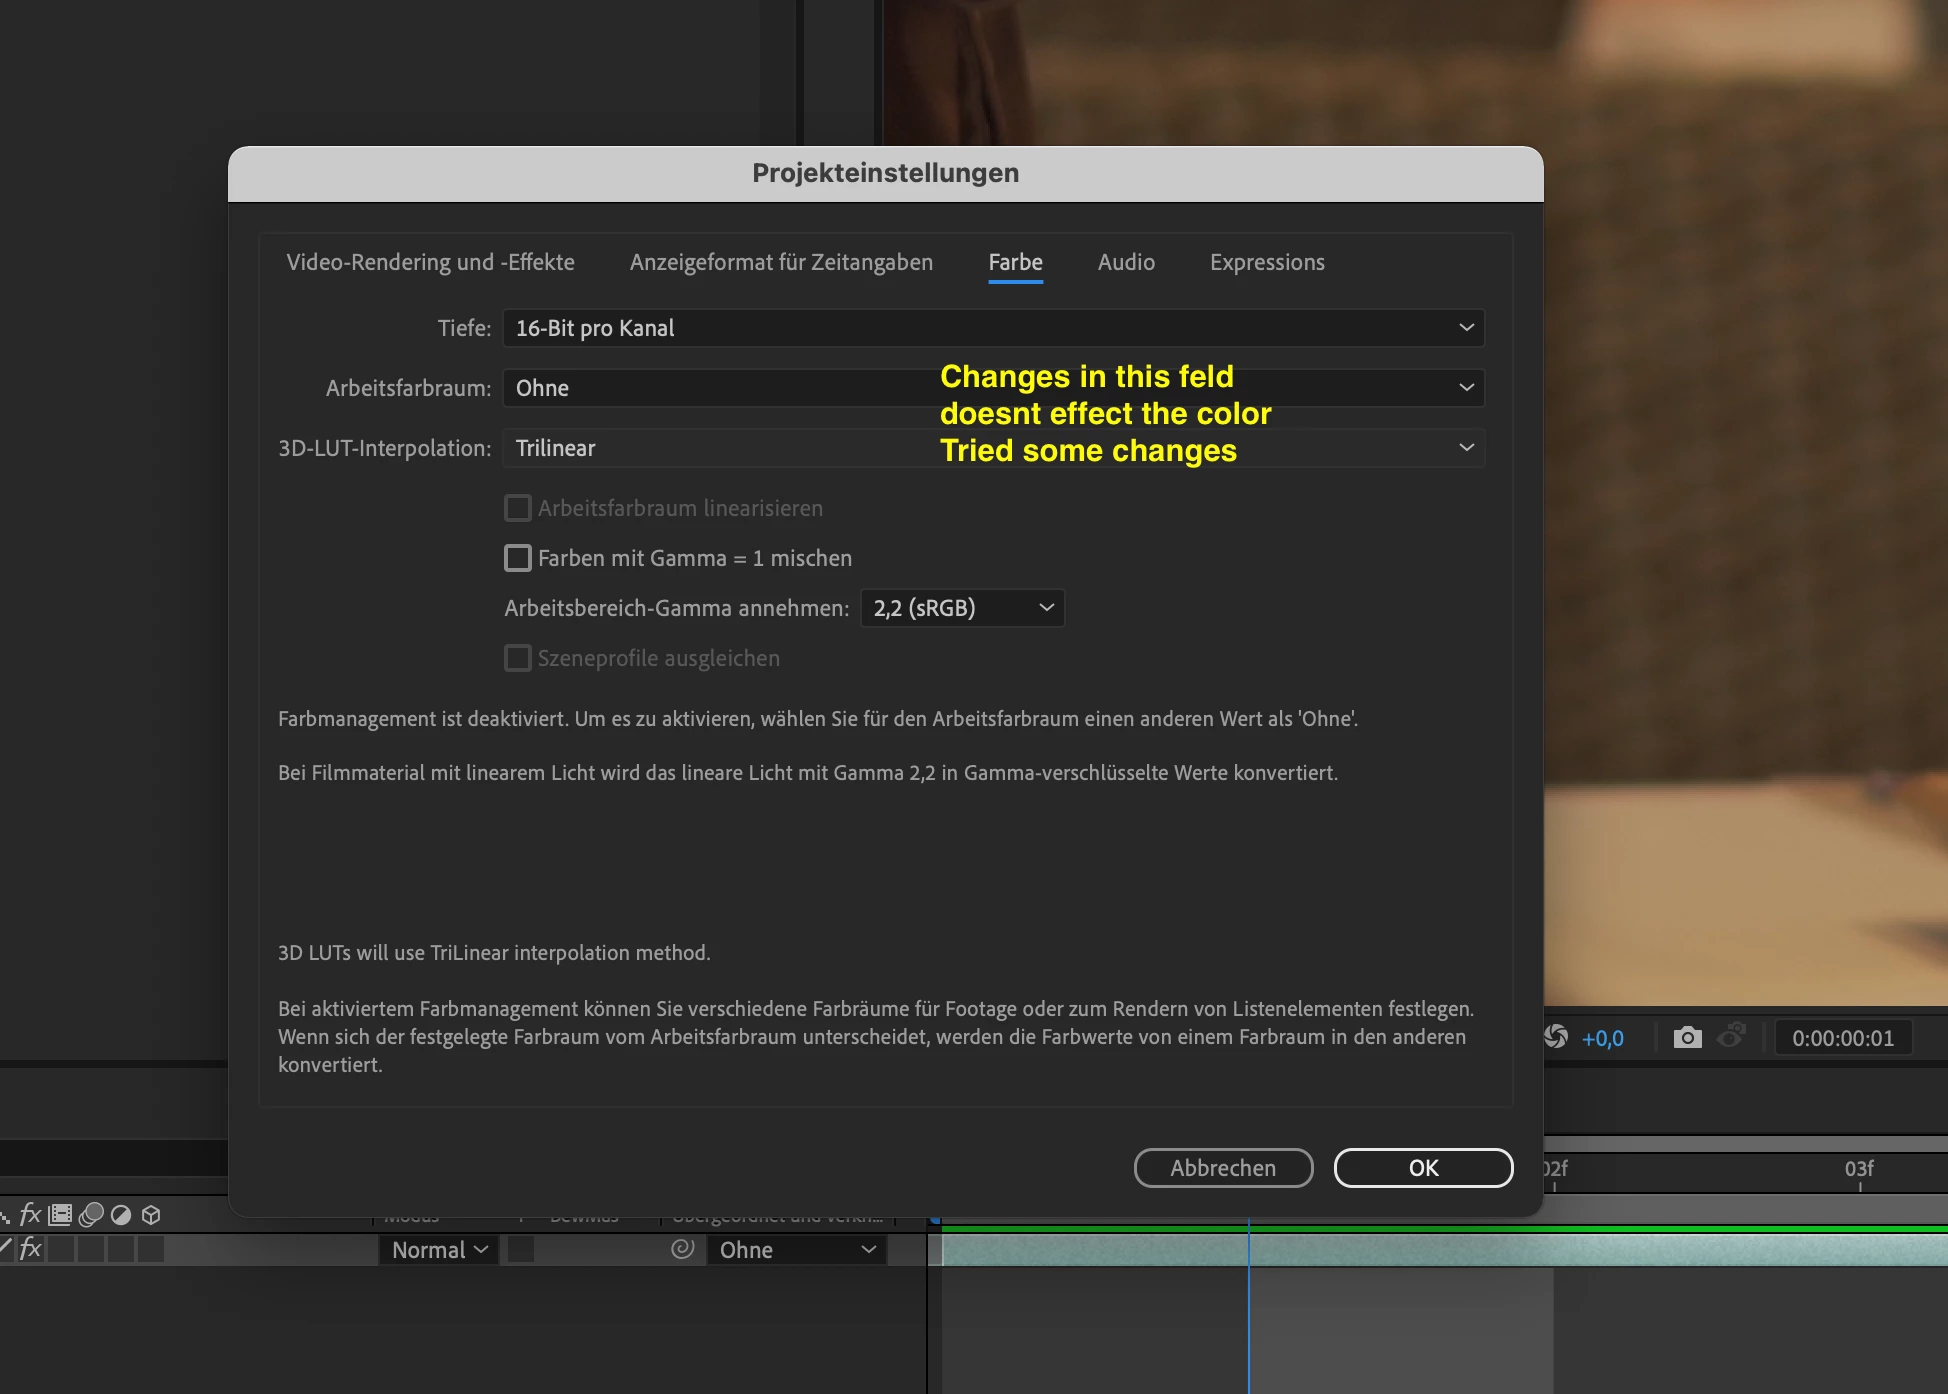
Is there a possibility to show the color space in the tabs in project window or did someone know a solution for getting right colorspace into after effects and back - clicking every clip to show properties isnt a solution. I tried some combinations in the project settings of after effects but didnt found the right settings. Does dynamic link only support Rec 709?
Copy link to clipboard
Copied
Hi lutz0815,
We're sorry about the poor experience. I agree with Neil's suggestion.
Let us know if it helps in sorting the preview issue.
Thanks,
Sumeet
Copy link to clipboard
Copied
Yes this solve it - i found on YT some comments that it seems: Premiere pro and after effects will work internaly best with rec.709
Copy link to clipboard
Copied
I have my footage recorded by iphone 13 pro max, my current sequence settings is
codec : Apple ProRes 422 HQ
Working color space : Rec.2100 HLG
When I replace a clip with After effect composition the color of the clip fades and it seems like brightness is decresed. When I checked properties of AE comp it shows color space : Rec 709.
But when i tried changing color override settings by modify Clip > Interpret Footage, all the options in color space are greyed out. Also i tried rendering the clip directly from aftereffects (with the text and motion tracking) with different settings Such as Hevc HDR 10 or Rec.2100 HLG. hell i even tried exporting it through media encoder but no success.
Please help - Either Someone please suggest me correct setting in after effect or media encoder to export iphone 13 pro HDR video without fading colors or please change the color space which was greyed out in Interpret footage settings of AE comp.
I have attached 3 photos please refer to them.
ae3 - properties of Ae comp
ae2 - greyed out color management
ae1 - comparision of original clip with AE comp
Copy link to clipboard
Copied
You have to choose which color space you are working in, and all parts of the project must be in that space.
Either you're working in HGL (HDR) or in Rec.709 (SDR). And the media and all CM settings in both Premiere and AfterEffects must then be in that color space.
Plus when you export, you must use a preset setup for the working color space of the project.
So if you keep bringing HLG clips in, but want to work SDR/Rec.709 ... then on import/ingest, you must do the Modify/Interpret Footage/Override to Rec.709 process for all HLG clips. Make sure your PrPro sequence settings CM is set to Rec.709, AND that your AfterEffects CM is also set to Rec.709/gamma 2.4.
Then things should work. But understand, HDR is still a fairly new thing, and many screens are still either not working with that yet or not working correctly with it yet. All screens can do SDR/Rec.709.
So I do recommend people change their phone settings back to recording in Rec.709 for now. It is both easier and far more reliable as a practical matter.
Neil
Copy link to clipboard
Copied
Thank you sir for your reply.
But please try to understand the situation. this time i'm gonna put it in points.
1. I want to export a HDR video, 4K 60fps HDR video to be specific for some youtube project.
2. So i recorded the footage in 4k 60 fps HDR from my iphone, which have following properties
File Path: F:\BUILD Footage\IMG_5382.MOV
Type: MPEG Movie
File Size: 51.92 MB
Image Size: 3840 x 2160
Frame Rate: 59.98
Source Audio Format: 44100 Hz - Compressed - Stereo
Project Audio Format: 44100 Hz - 32 bit floating point - Stereo
Total Duration: 00:00:08:07
Pixel Aspect Ratio: 1.0
Alpha: None
Color Space: Rec. 2100 HLG
Color Space Override: Off
Input LUT: None
Video Codec Type: HEVC 10 bit 4:2:0
Variable Frame Rate Detected
3. I completed editing in premier pro (mainly clipping, alingning music and using fading /blur effects) using several footage recorded from the same phone & identical properties.
4. Now I want some Hovering text using camera tracking which can be achieved by replacing clip with after effect composition.
5. After completion of editing in after effects and saving the ae project when i came back to premier pro there was a fade in color of the ae dynamic linked comp and when i checked it properties i found these :
Copy of 5950x with 3060ti Linked Comp 06/1f.aep
3840 x 2160
00:00:03:16, 59.99 fps
Color Space: Rec. 709
6. Now when i try to change oveeride color space settings from project window by right clicking > modify> Interpret footage every option in color management is greyed out as showin in pic
7. To overcome this i tried rendereing the after effect project directly using multiple settings as showin in pics below and then importing the output footage back to premier pro it still shows me properties such as color space Rec.709 also the color are not great.
Its like after effects is stuck at Rec.709 and even media encoder is failing to correct the color space even if i choose Rec.2100 HLG still the output that i would get is Rec.709
when importing above video in premier pro upon checking properties it again shows Rec.709 (very frustrating).
Now if any one have a clue please write me back as soon as possible. All my editing is complete I'm just stuck with the pre-render setting problem the finally export the video.
in above i've created two horizontal masks to clearly compre the ae footage and the original.
Copy link to clipboard
Copied
If you want to work in HLG then you need to also change Ae's color management to that setting.
They must match.
Copy link to clipboard
Copied
Thank you sir for your quick reply,
but problem is not color space, its just after changing color space in AE premier pro still recognises it as Rec.709 and colors are still not correct, also directly imported AE comps have greyed out color management setting which i can't change.
Sir I totally agree with you, but can u please suggest me the correct color space settings in After Effects that would support iphones color correctly, cause in AE i can se tons of options in Rec.2100 HLG and a separate Apple RGB option at the top of dropdown.
On top of that I already tried saving the AE comp and rendering the clip directly with different of these above settings but still if i import it in my premier pro color washes away. I just don't know why.
One of my friend suggested exporting out the video from premier pro and impoting it in da vinci resolve ot Fical cut pro to add my motion tracked text, but doing that will require me to scrub through the whole video at frame time level because premier pro just dosen't allow motion tracking, and in a 60 fps 15min video this will take whole day!
Copy link to clipboard
Copied
In AfterEffects, you should be using the Rec2100 HLG W 203 ... that last is for 'graphics white 203 nits' which should also be set in your Projects settings in Premiere.
So ... if your project settings in Premiere are for graphics white of 203 nits, your media and sequence settings are for Rec2100/HLG, and your comp setting is Rec.2100/w203, it should all match.
If it doesn't, yea, that's wrong.
Neil
Copy link to clipboard
Copied
Hi Neil
I realise you answered this question back in 2021 but I'm having the same problem in the latest editions of CC and wondered if you would be kind enough to help.
In Premiere my clips are all set to rec.2100 HLG which I have matched in my sequence settings, however when I go into After Effects via the dynamic link and go to: Project Settings > Color the settings options don't quite match, it presents me with an additional (W) setting on the rec.2100 set, for example: rec.2100 HLG W100,
How would I determine from my clips in Adobe Premiere which W number I need to use? I have tried all of the available settings and I still seem to have a colour difference when it relays back to Adobe Premiere.
Thanks in advance, Malc
Copy link to clipboard
Copied
Here is the difference, this is raw footage so please ignore the colours at the moment.
Impoted directly into premiere from Bin:
Dynamic Link footage:
The dynamic link footage looks like it has a grey cast over it, the colours are much duller as if the contrast has been altered. Literally pulling my hair out with this 😄
Copy link to clipboard
Copied
Don't you just love nomenclature? Wow.
Ok, the top ones are Scene referred, avoid those.
The others ... W is apparently meant to be the 'graphics White point' ... and in general, the 203 figure is what most colorists recommend of those and use.
So I would suggest testing to make sure the Rec2100 HLG W203 matches your PrPro sequence, with a project setting for Graphics White of 203, and exports using the same setting.
Neil
Copy link to clipboard
Copied
Hi Neil
Thanks for the response, you'd think Adobe would literally match the settings between it's two main digital apps. There doesn't seem to be a way to see what the White point value is in Premiere, at least, I can't find it, but even if there is I've literally tried every setting in After Effects and reimpotered the footage each time, it's hard to see with some of them what the actual difference is. but even resetting everything to something like rec.209 I just can't get the footage to match between the two, everytime I reimport into Premiere it puts this grey cast across like the contrast has been pulled down, beautiful bright colours in After effects.
My workaround has had to be to Dynamic link everything through to After Effects and then recolour it in Premiere using Lumetri so that all the clips match which wasn't easy and, of course, time consuming.
Very frustrating. Appreciate your advice and help, it was by far the best glimmer of hope I'd found. This really needs to be addressed by Adobe as 'the internet of users' seem to all be having the same problem in this scenario. I think the common factor from what I can see is if it is iPhone footage, which mine is, and I believe the OP was aswell, Apple/Adobe working seamlessly together again? hmmm...
Cheers, Malc
Copy link to clipboard
Copied
It'd also be good to be able to edit posts on here! 😄
*re-imported *rec.709
Copy link to clipboard
Copied
I've just found the white point settings in Premiere:
File > Project Settings > General > Colour Management, I'm going to try playing around in there and seeing if it has any effect.
Cheers, Malc
Copy link to clipboard
Copied
That setting is for the "graphics white" setting ... how bright the "brightest white with detail/texture" will be in an HDR sequence. 203 nits brightness is the most common used.
But that's not doing anything like say setting a white point of D65. Premiere simply uses the 'standard' D65 for everything btw.
Neil
Copy link to clipboard
Copied
Hi Neil,
Im having this same issue. Where are the CM settings in AE? I cannot figure out how to set up AE to read 2100.
TIA
Copy link to clipboard
Copied
Ae is a completely different beast. I think CM settings are still in the Project settings dialogs. And asking on the Ae forum is useful, as there are some major differences in CM capabilities, Ae able to do OCIO at this time I believe.
So it is wise to ask how to transmingle Ae and Pr CM issues on the Ae forum also ...
Copy link to clipboard
Copied
Dynamic Link should handle all of this. I can't understand why Adobe keeps breaking everything. Why can't you just make the software work consistently?
Copy link to clipboard
Copied
As noted, the two programs actually are quite a bit different in use. Pr being an editing app, Ae primarily a compositor's app. They have different, divergent user bases for many of the heavy Ae users too. So there's difference there that are native to the basic operations.
But it is very frustrating when they don't work as well together as we'd all like. For some things, it's simply still better to do an Ae comp, and then export media out of Ae to import into Pr for the edit.
Practically, that can get things done. But as a user, yea, it's a pain.
Pr has been in-process for increased CM handling capabilities for what, three years now? They keep rolling out new bits here and there, as well as pushing Ae 'forward' in color working processes. I sincerely hope that soon we get a fully updated Pr color system.
Copy link to clipboard
Copied
The 2022 version of Premiere Pro added several color managment settings that were not in previous versions, and that's been tripping up a lot of users.
First ... for clips in a bin. Right-click/Modify/Interpret footage and check the color space options. For many things using color space over-ride to Rec.709 will be a good option if you're not actually working to get an HDR export.
Next ... the Sequence Settings dialog also has a color space setting. Make sure this is what you intend to both work and export in.
Finally, the Scopes panel also has a color space setting.
Neil
Copy link to clipboard
Copied
Hello,
Thanks for the suggestion. This does not work fot any graphics imported to Premiere Pro neither to After effects Dynamic Link files. I filmed in HLG in my Sony A7RIII. I could interpret the footage but when I tried to make any graphics or text animation via After effects Dynamic Link, I could not find the way to change to the correct color space on Pr or AE for thos e clips/animations. My project settings are on HLG 2100 on Pr.
Copy link to clipboard
Copied
Same Problem with Dynamic Link here for me....
Copy link to clipboard
Copied
As of today the solutions didn't work as my footage was already interpreted as Rec.709 and the sequence settings are 709 as well..