

- Home
- Premiere Pro
- Discussions
- Re: color correction of underwater moivie
- Re: color correction of underwater moivie
color correction of underwater moivie

Copy link to clipboard
Copied
Hello, i'm a new guy of speedgrade user. i DL this software because i want tone the color of the movie which i took by my Gopro hero4 on my last diving trip.
i want to find some help on toning the color of my video chlips.
i lost my red filter underater when i just take a few video. i was in a 4 days 3 night boat trip. i couldn't buy a new filter to replace until i get back to the coast. i took the movie without a red filter afterwards.
anybody have some exp. sharing on toning the color of underwater movie? most of the red color almost disappear according to the lossing of red filter. rea, green & blue balance is really back according to the parade monitor, the differenc is too big. even i tried to adjust it to balance level. the color also very strange.
on the other hand, i took some pictures by the other camera, using RAW, i can adjust the color very easily just toning the tempreture and tint level.
is this because i took the movie in a compressed files(gopro default file), so some color lost?
help.


 7
Replies
7
7
Replies
7

Copy link to clipboard
Copied
I don't have the GoPro4, but 3's and 2's. Hopefully yours was not a silver version, or I should say - hopefully you recorded in Protune or raw (approximate terminology). For myself, I just began using GoPro Studio to encode my GoPro MP4 files into AVI files, so when you speak of gopro default file, I think of MP4. If you are able to convert your MP4 to AVI, try both tracks together in same Premiere sequence (ontop of each other) and Direct Link to Speedgrade, then obserb the difference in the scopes. Also try the Speedgrade color wheel - say the Overall, Offset and pull away from blue - or pull into the red.
I did not use any filters underwater also, but battery problems due to GoPro seeking WiFi inside camera case by accident, so limited footage to sample.
Carefull with AVI files inside Premiere.
Copy link to clipboard
Copied
thank you for your suggestions.
unfortunately, mine is go pro hero4 silver. this is my first time to take video underwater, so when i choose to buy silver or black, i made decision to buy silver just because of the monitor issue, i thought gopro with a monitor is easier to use underwater " what i'm taking and also the distance". also the sales gave me a wrong specification between silver and black. TT
by the way, i recorded all in Protune.
i tried to adjust the video clip in go pro studio before, but i cannot adjust the color as the pictures which i adjusted in photoshop(raw files adjustment). the result to totally different. so i import the gopro files directly to Speedgrade instead of convert it to AVI first. (i think it is close to the source format if i don't make any changes on the video clip???i have no idea exactly)
anyway, i have few more questions
1. when i recorded it in Protune, that means those MP4 files is a RAW video files? actually i have no idea on Gorpo file format, i just use my Canon cam to take video underwater before. all format is MOV. I use the white balance function to take video, so the color is close enough to eye sight.
2. do u mean i just convert the MP4 to AVI by Gopro studio without making any adjustment before i start working on Speedgrade?
3. i have Premiere, but didn't use it because i just want color correction only. what is your main purpose of using Premiere before Speedgrade?
4. i tried to to balance blue and green to equal level of red. the whole scene get very dark even i tried to balance all color brighter. the actual red elements look disappear. seems not ever record in the files. i don't know how to describe.
e.g. i tune the color of RAW format PICTURES in photoshop, even the red color disappear in the original pictures, i can adjusted it back again because RAW file record everything (as much as data). but it is very difficult to adjust in Jpeg format( everything is permanent, cannot be recovered because never store in the files). is this because of this issue? so i cannot recover some color.
thank you very much for you exp sharing.
Copy link to clipboard
Copied
ah, the Hero 4 silver does Protune - nice. My Hero 3 silver does not.
And you are ingesting into SpeedGrade without Direct link from Premiere - I have not attempted that with my AVI's yet - only my Cinema dng, so I would think it would be different then linked from PP. I won't be able to fully concentrate on ingesting directly to SpeedGrade as I am mid- project. My main purpose of Premiere first is to assemble 200G of assorted video clips before color grading.
My interpretation of GoPro MP4 is that they are compressed and GoPro Studio uncompresses the MP4 into AVI.
As for using Camera Raw - when I use it, I duplicate the frame and color the copy. And in Camera Raw, I can always 'reset' back to the original.
How about Speedgrade Color Match? Color your frame in Camera Raw as you like and save as a Targa for SpeedGrade color match - or even find an underwater shot you like from another source, save as Targa and use for color match. That might help you to proceed to where you want.
you can always upload a shot as a sample and i am sure Neil would be happy to suggest ways to get to the color you want. Try increasing input saturation and output saturation, but for me am not sure as to how compressed your MP4s are.
All my time for now. Good luck.
Copy link to clipboard
Copied
one observation I want to add after launching Speedgrade (without Premiere) and trying to import my underwater MP4 file was that only the AVI file shows up as 'Supported Media'.
Yes, I can import the MP4 into Speedgrade, after I choose 'All Files' in the Media Browser.
All I did after importing both MP4 and AVI versions of the same underwater file, was to place directly ontop of one another and watch the scopes as turning on and off the upper video track.
Note: I do not 'play' the video files - only mouse click different parts of the timeline.
So, as for 'Supported Media' - just noting my observation. Seems the MP4 is handled anyway in Speedgrade.

Copy link to clipboard
Copied
One of the main reasons to use a PrPro/SpeegGrade "Direct Link" (only in the CC versions, not available in the older CS6) is the wide range of codecs that PrPro supports without transcoding, versus the much narrower list of codecs that Sg can handle. If you have footage in PrPro, then use the "Send direct to SpeedGrade" option to do a Direct Link (DL) path, it doesn't matter what your footage is, if PrPro can handle it, using that PrPro project file ... Sg can now handle it also. AVI? Mp4? Most anything, works just fine in the DL workflow.
Within that process you create a project in PrPro, navigate to your footage in the Media browser, select & right-click "Import", then from the Project panel choose a clip to drop onto the empty timeline/sequence area ... PrPro creates a sequence for that footage, you add/trim clips as desired. Then select "send to Sg" ... do your work in Sg. Save the project through either the "save" icon or clicking the "PR" icon at the top left of Sg, then back in PrPro, continue working.
Especially for as much correction as you're going to need, you'd want to be in Sg and not using PrPro's "Fast" or "3 Way Corrector" color controls ... they're very basic and the scopes aren't nearly as good as in Sg. A bit of warning here ... mp4 and other well-compressed codecs (including mov) don't grade to quite the extremes that say RAW footage will go. You simply don't have the data depth and range in a "cooked" codec compared to the RAW and Log files. This is where unfortunately losing that red filter will cause some consternation as you work.
I think I'd suggest going to the Overall tab first, and getting your clip as good for top to bottom range without spilling "out" the scopes for light to dark ... then go to the " + " icon circled in red ...

click the Curves item and from the opened list, choose "HueSatCurve" which will then open both the control panel for that and put a new layer on your layer's stack.
You'll see this ... down where the color wheels were. You can click anywhere on that line and "set a point" and anywhere else to set another one.

Then if you click & drag in-between them you increase or decrease the saturation of the colors on that area. What isn't necessarily obvious is you can work both ends ... together? Watch what that line does when I set a point by clicking on the left side of the line on the edge of the yellow area, and on the right side of the screen near the magenta/red boundary, then drag up down anywhere between the two points ... and up anywhere outside those two points.
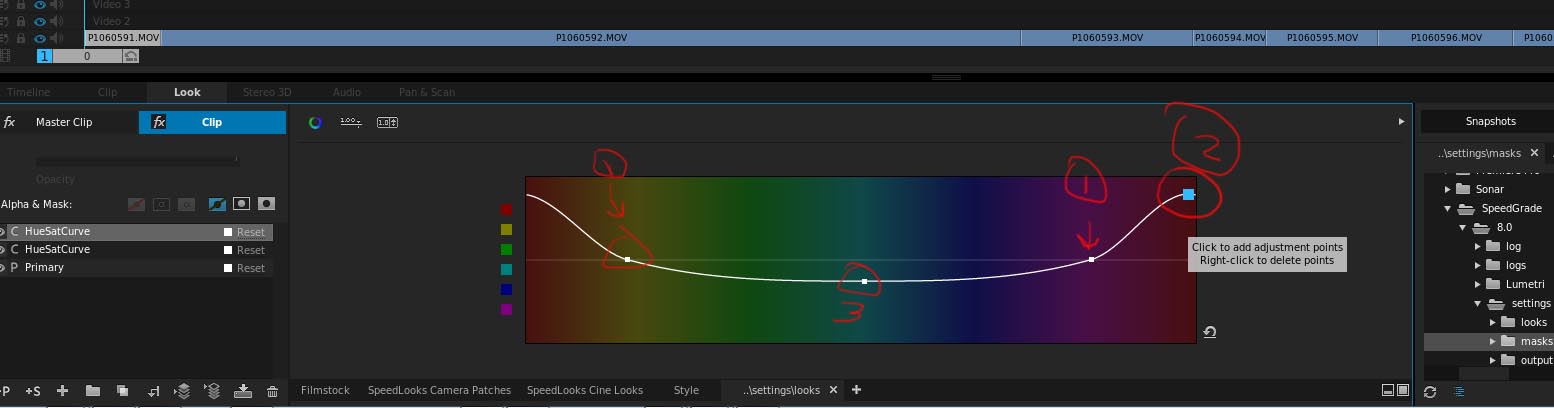
The two points identified as 1 were where I clicked to set points that would then hold the line there. I then clicked to the right ... the 2 or blue dot area, and lifted the reds saturation. Note that it lifted the reddish tones on the OTHER end of the line also. Then I went to the middle, and clicked & dragged down, lowering the non-reddish tone saturation. The reason the blue #2 dot is blue ... is that was where the mouse cursor was hovering when I took the screen grab.
You'll want to get a "base exposure/contrast setting first as noted about ... then come to this and hit it pretty good some color up & the rest down ... work your selection points for best effect, and you can make totally vertical lines if you wish!
Then I'd re-check the luma/contrast controls, and work the input/output saturation some. I don't normally mess with input sat, but you'll probably want to up your input to give you enough data to change your output enough. When you've got sat about as much as you can get, then I'd to go the color wheels or sliders of the main corrections panel, and adjust color balance and tint and color push/pull using all the controls available to ... whatever you can get.
Neil
Copy link to clipboard
Copied
Dear Neil,
thank you very much for your instruction. i will try tonight.
actually, i have one more question, when i record the video in gopro with protune finction, that means i record a video like a RAW picture file? this is the first time for me to use a video camera. so i'm not sure the structure and different kind format of a video. i just focus on using photoshop on adjustment before.
the main purpose of importing the gopro files (MP4) to PR CC first, because of a better trascoding, then i can easier to make some adjusment on SG, is this correct? so, the gopro studio is not neccessary for me anymore.
Copy link to clipboard
Copied
for myself I plan on using the MP4s in Premiere to build sequences and pool into a master sequence. After that I plan to offline the MP4s and re-link to AVIs converted with GoPro Studio. Then with the AVIs in the sequences, Direct Link to SpeedGrade And back to Premiere to render out. Yes, EDL is an option for SpeedGrade to render out, but not necessary for myself.
Only thing I foresee is all the crashing Premiere will do with the AVIs, and turning off GPU Acceleration in Premiere to render out with software only might make me reconsider. I am hoping I can render out AVI files in Premiere with the assistance of my GPU, so as I say, it is my plan.
I suggest for yourself just to try converting an MP4 into an AVI and see for yourself. I missed out on all the colors and action in my underwater footage, so it is not as dramatic as it could have been, so converting mine is not really necessary, but all the footage from above the water, the AVIs really shine.

Get ready! An upgraded Adobe Community experience is coming in January.
Learn more
 AdChoices