• Global community
    • Language:
      • Deutsch
      • English
      • Español
      • Français
      • Português
  • 日本語コミュニティ
    Dedicated community for Japanese speakers
  • 한국 커뮤니티
    Dedicated community for Korean speakers
Exit
26

FAQ: Premiere Pro 2022 Color Management for Log/RAW Media

LEGEND ,
Nov 26, 2021 Nov 26, 2021

Copy link to clipboard

Copied

The Premiere 2022 release, the 22.X build series, introduced several new Color Management options and changed the default handling for several LOG and RAW media types. Also changed were the default handling for 'device produced' media in HLG or PQ. Users need to be aware of the changes to continue using several Sony, Canon, and Panasonic cameras in particular. And with the media now produced from most phones and "devices".


I'll give a short practical control setting list, and then a more complete explanation below.


(Also check out this article on monitoring HDR within PrPro2022)


Clip Color Management

There are now color management settings for clips in the Project panel. Right-click one or more clips, Modify/Interpret Footage. Down at the bottom are several color management options. If your media is 'blown out' on a working timeline, this is where you will start to correct it. For most work at this time, you will want to use the Rec.709 override option.

RNeilHaugen_0-1637967042034.png

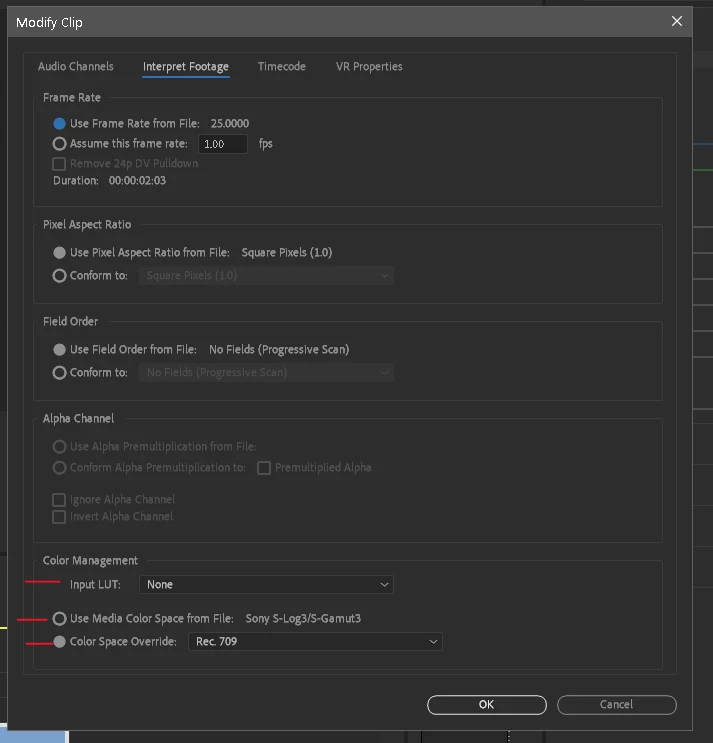
There were a few manufacturer Log formats that had default transform behaviors in the previous version. Those have all been changed, and many more log formats are now recognized as such.


In Premiere Pro 2022, recognized Log formats may or may not be transformed into Rec.709, the user may need to do so in the Project panel.


And any phone or other "device" produced media that has an HLG or PQ color tag, may or may not be transformed to Rec.709 on import.


Again, unless the user chooses to do so in the project panel.


One further caveat: if you have a clip that Premiere recognizes as HLG or PQ, and use the command to "create new sequence from clip" ... Premiere may still create a sequence with a Rec.709 color space. While dropping the HLG clip onto that sequence without applying color management to Rec.709.


You must check the Sequence color space now.


These are major changes in default color management behavior. And at this time there may be inconsistencies in the process. And still, some media types allow a user CM setting in the Project panel, but some do not.


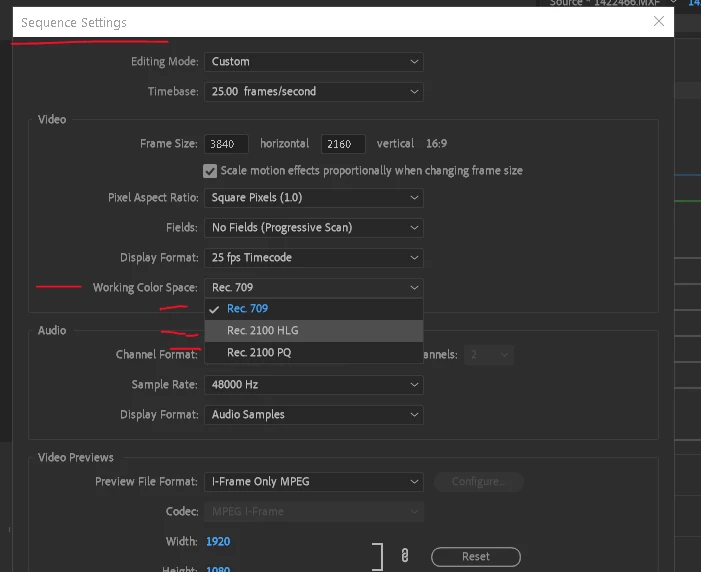
Sequence Color Management

There are now color management settings for Sequences. With the timeline panel 'active', with a blue line, go to the Sequence/Sequence Settings menu. There are now options for sequence color space there. Again, for most work, using the Rec.709 color space is still the 'normal' expected one for output deliverables and monitors. This should (nearly) always be set the same as the clip's color management.


At this time, Premiere may still 'default' to creating a Rec.709 sequence even when you drop an HLG or PQ on a blank timeline, or use the "new sequence from clip" command from the bin. Yet not apply any transform to fit the clip to the sequence. You have to check and correct sequence settings as needed.

RNeilHaugen_1-1637967139938.png


Scopes Color Management

There are also color management settings in the Scopes panel. Right-click, select the desired color space from the list of Rec.601, Rec.709, Rec.2020, and Rec.2100 in either HLG or PQ. If you are working in HDR, then after setting the scopes to an HDR color space option, you will need to also set the scope scales to HDR with the control in the lower right corner of the Scopes panel.

RNeilHaugen_2-1637967239398.png


Export Color Management

To export in HLG or PQ, anything other than Rec.709, you should scroll down through the Preset list for your desired Format to select the HDR options, for either HLG or PQ. They now do have the presets, and it makes exporting in an HDR format much easier and more reliable.


But you do need to SELECT the HDR presets to get a proper HDR export.


SDR Exports from HLG/PQ Media*

To get "standard dynamic range" or SDR exports from sequences or clips that are HLG/PQ, you need to set your format/preset in the Export dialog, but also go to the Export Dialog Effects tab and select the "SDR Conform" option.


The default settings for Brightness, Contrast, and Soft Knee may work to at least get the image within usable values. To get an exact result, you would need to test those settings yourself.


Making SDR Proxies from HDR/HLG/PQ Media*


To make proxies from HLG/PQ media that can be used in an SDR/Rec.709 timeline, you need to (as above) go to the  Effects tab of the Export dialog, and select the SDR Conform option.


Why did things change?


The nature of the business and the gear is changing rapidly. As of this date, 26 November of 2022, most of the many colorists I know have still not delivered a single HDR job professionally. A few others have done quite a number. But the vast majority of content being produced at the moment is still Rec.709's "SDR" ... standard dynamic range.


So why are changes being implemented in Premiere Pro at this time?


Because first, the cameras are changing rapidly. Many prosumer and pro cameras are now able to set a CM for a clip to either HLG or PQ. Camera operators are frequently selecting those settings because they want the widest dynamic range possible. So for many editors, the HLG or PQ or other wide dynamic range media is what they are getting handed to work with.


Even though many of the other visual assets of a job, and the final output, will still be in Rec.709.


Second, many phones and "devices" are now defaulting to recording in HLG/PQ, and so many prosumer users have media that is in those wider color spaces. Many of the clips that have been posted on this forum since the 2022 release are phone media with HLG or PQ 'tags'.


And third, more content is being produced or delivered as HDR, and the percentage of content produced as HDR is going to go up perhaps fairly rapidly over the next year. The users need an app that can accomodate the new dynamic range and tonal range needs.


What are SDR, HDR, and Rec.709 versus "wide gamut color"?


There are two differences between Rec.709 media and most HDR media, whether P3, HLG or PQ.


The first is the tonal range difference. Total image brightness, or contrast range. Rec.709 is now referred to as SDR, or standard dynamic range. It has a far narrower tonal range limitation for the visual data. It is designed to be used compressing the visual tonal range into a 100 nit total brightness range. It is what we've been using all along. The broadcast TV standard.


HDR media, whether HLG or PQ, is non-limited for tonal range values. And may vary up to several "stops" of tonal difference past what SDR allowed.


The second difference between HDR and Rec.709/SDR is the color space and gamut difference.


Rec.709 specifies the color space using the sRGB color primaries. It is also a fairly "shallow" color gamut.


HDR can be one of several wider color gamuts such as P3/D65 or Rec.2100HLG/PQ or Rec.2020. The difference is not only that the color space is "wider", the gamut ... think of this as the 'depth' of color hues available ... is also "deeper". (Currently Premiere handles all wide-gamut media in a Rec.2020 or Rec.2100 "container".)


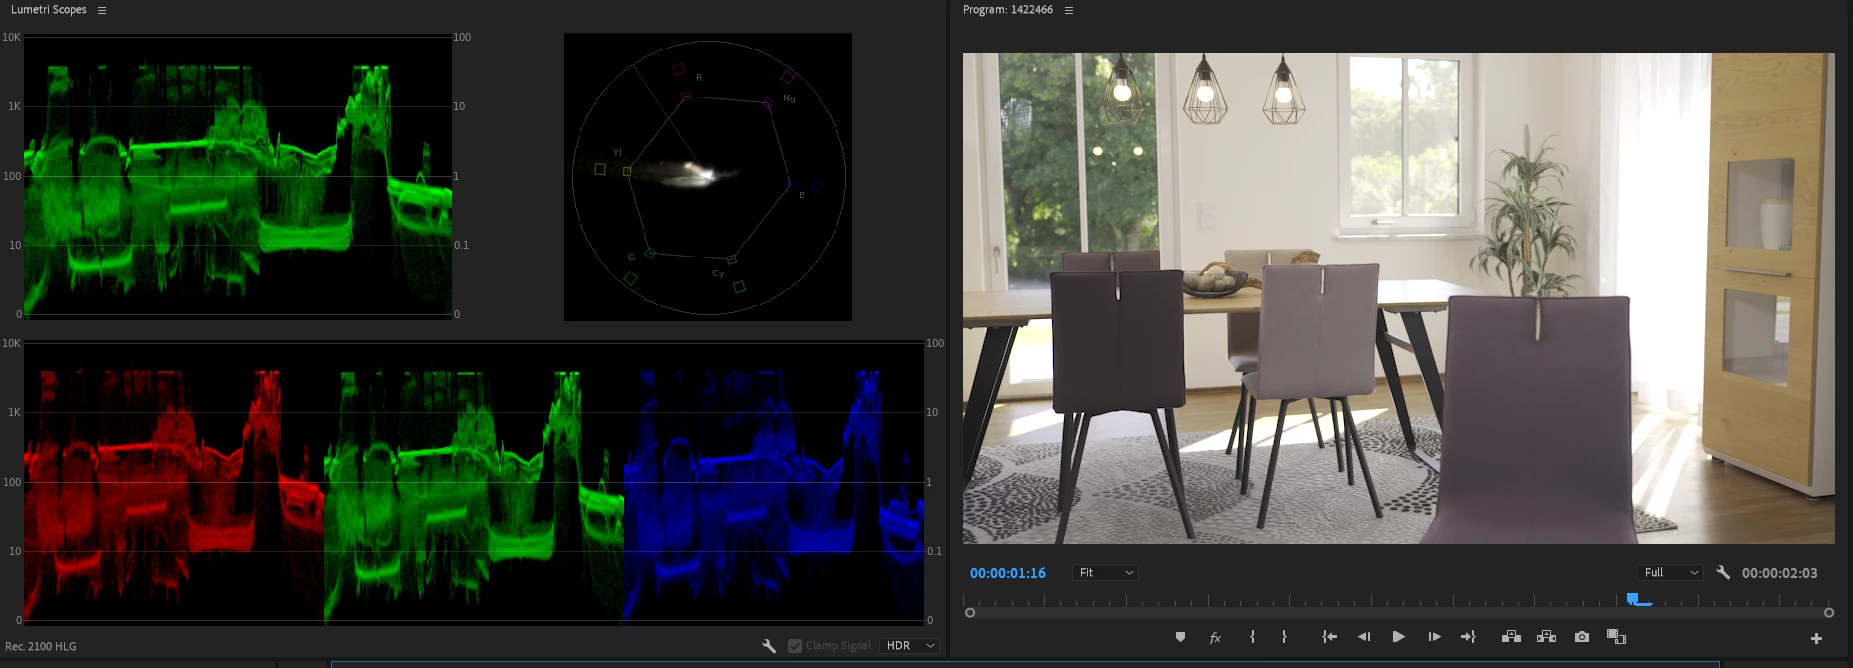
To demonstrate the difference, this Sony S-log-3 MXF clip shows dramatic dynamic range and color space/gamut differences in the Lumetri scopes and Program monitor, depending on how it is "managed". As imported, it was interpreted as an HLG clip in the bin. Creating a sequence from the clip, Premiere made a Rec.709 color space timeline.


But when this HLG clip is placed on a Rec.709 timline, the scopes and the image will be completely blown out.


That HLG-interpreted clip will not be displayed in a usable fashion on a Rec.709 sequence. This shows the scopes of the Rec.709 sequence, scopes set to Rec.709, but the clip properties set by Premiere to HLG.

Sony S-log3 HLG on Rec709 Scopes.PNG

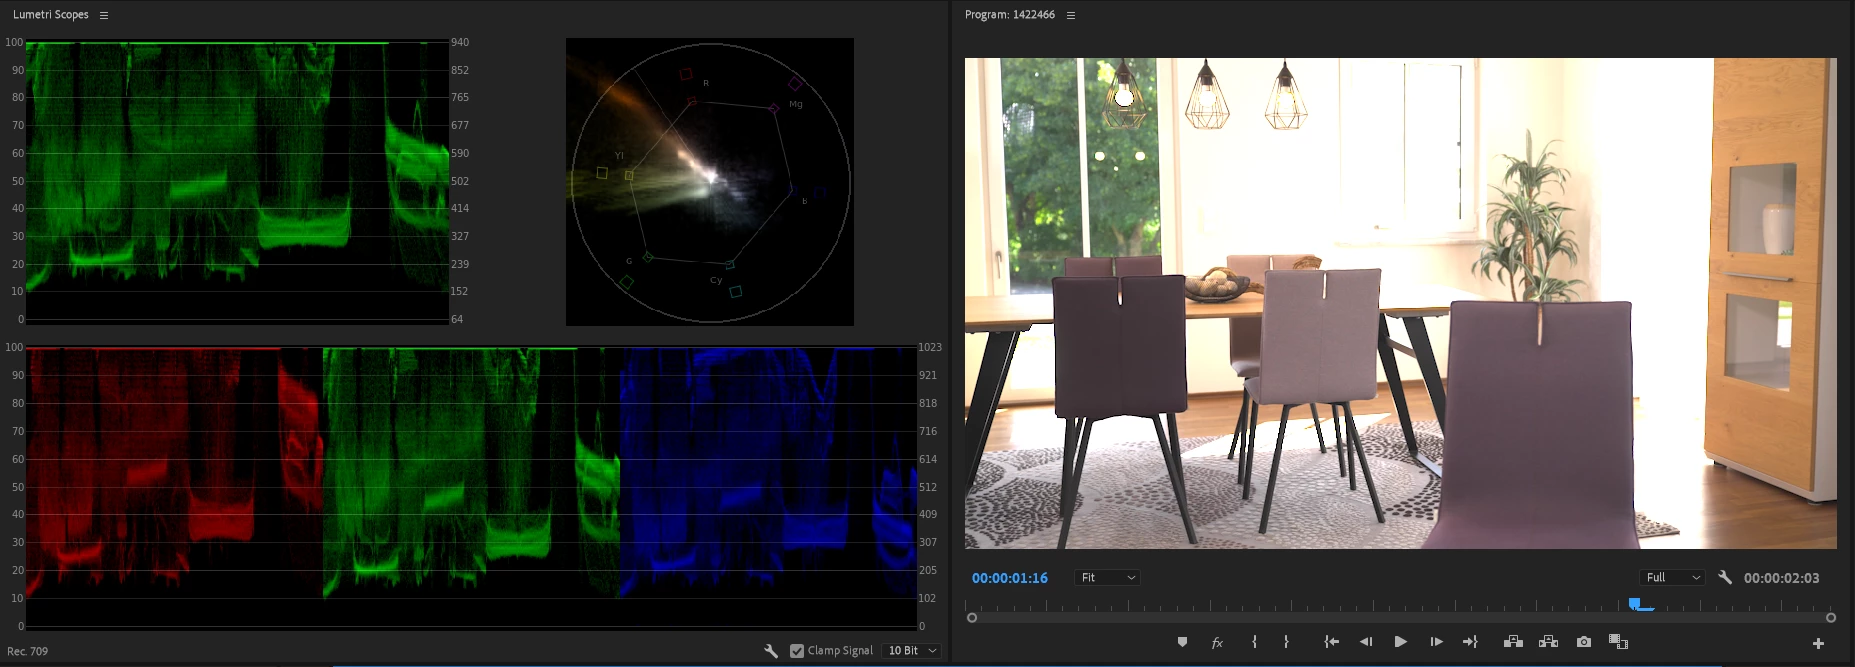
Note how note only is this clip totally 'blown out' to whites for much of the image, but the Vectorscope YUV color data is way outside of allowable range.


This next graphic shows the same clip. I went into the bin, using Modify/Interpret Footage, and selecting the CM option  to Override to Rec.709. Now Premiere showed it in visual "log" manner within the Rec.709/SDR range, with tonal values from 18 to 85 nits.

Sony S-log3 as Rec.709.PNG


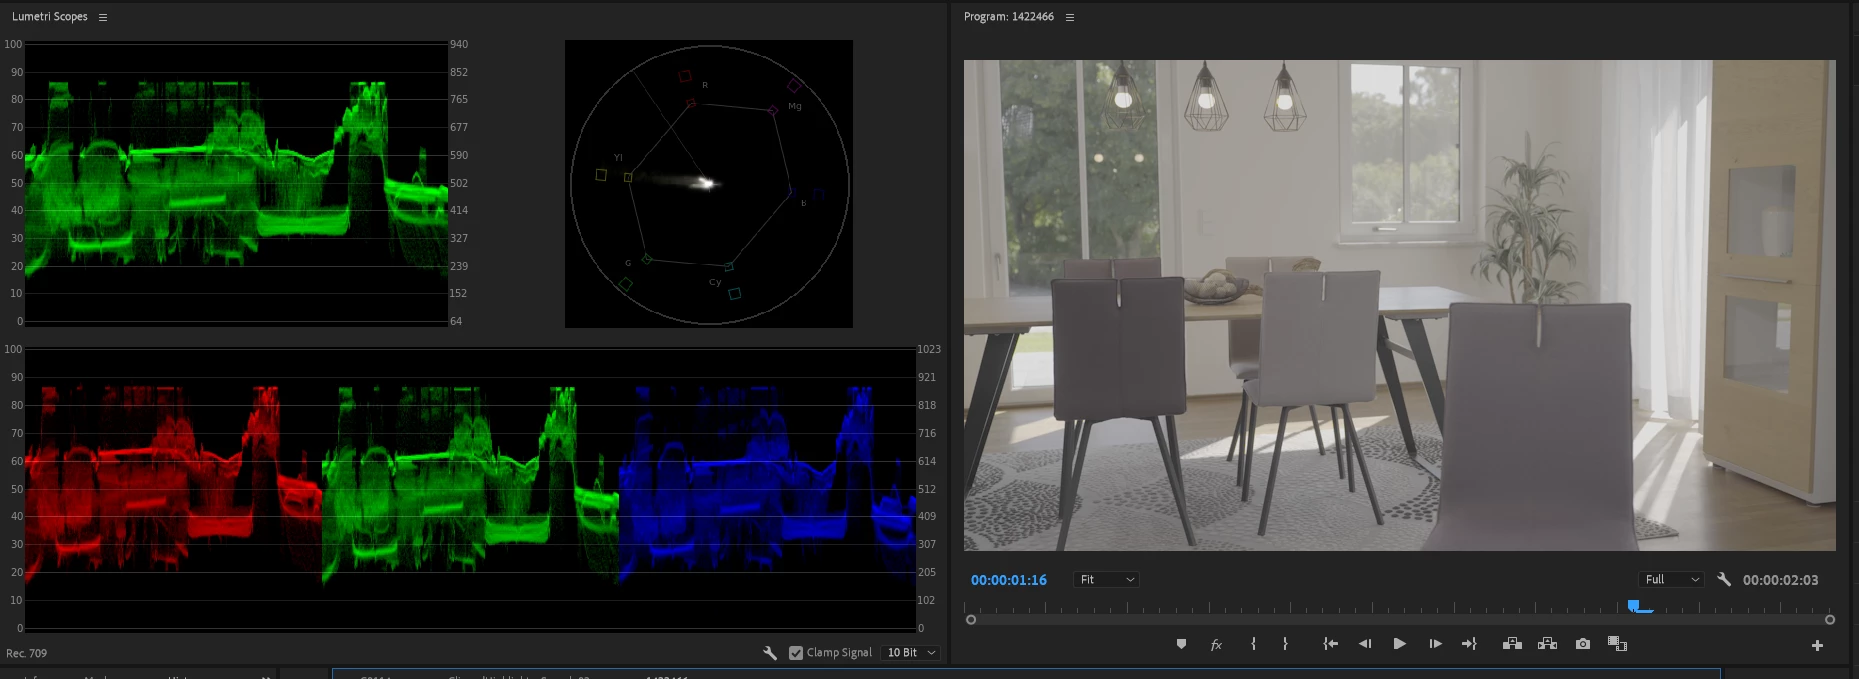
Just to get it to the full 0-100 nits of SDR took expansion of the image via contrast controls. And after a slight contrast expansion, it was a very nice image. This is the behavior we have expected in the past.


But the same clip, using the "original" Sony S-log-3 Interpretation in the clip properties, but with a change in the Sequence Settings and the Scope color management settings to HLG/HDR, is shown here:

Sony S-log3 HLG on HLG timline and scopes.PNG

The only clipping is the whites of an outside window, and there are no color excursions. You would need an HDR capable monitor set properly between the OS and Premiere to see the image correctly in the Program monitor, of course. And note those nit values on the left-side scale! In excess of 4,000 nits!


By simply adjusting the Exposure slider down, and lifting the Color Wheels 'shadow' tonal slider, I was able to get a very good HDR image displayed with very little clipping anywhere. This on my little 358 nit monitor in its "HDR Emulation" mode.


That is a massive difference in the display of the same image: from a 69 nit tonal range in SDR, to a 4,000 nit tonal range in HDR! And both images are quite nice images when the entire color management 'chain' is set properly. The image can be used either Rec.709 or HLG.


How usable are HDR videos at the moment?

Very few current consumer devices can even sustain 1,000 nits. The only displays fully capable of 4,000 nits and up that I know of currently in use, are the high-end Grade 1 Reference monitors by FSI and Sony. Those monitors sell for above $20,000 USD.


Relatively few screens can actually show brightnesses above 400 nits. And most colorists consider an absolute minimum of 600 nits as necessary to allow for a 'base' feel of HDR-ness to the content. It is coming yes, but ... fully HDR capable screens of the 800 or better nits for consumer use are still spendy and not that common.


Previous Behavior for LOG/RAW Media


In 2021 and prior releases, the log and RAW media types, where PrPro had any 'default' behavior, it was to apply a manufacturer's transform process to conform the clip to a Rec.709 "view". Most users were unaware of this process. There were only a few formats where Premiere applied a default transform.


And if Premiere applied a default transform, any changes the user made in the Lumetri color panel were applied after the default transform process. If the transform process clipped whites or crushed blacks, that image data was simply gone.


Many other log media types were simply displayed as "log" images, but with an assumption of Premiere Pro within the Rec.709 standards. And showed in the monitor with the narrow or compressed 'native' tonal range we are all used to seeing for Log media. The user needed to manually 'normalize' the contrast to a full Rec.709 tonal range.


There were (and are) several formats where there is a special panel on a sequence for Source settings. Such as for RED, Arri's ArriRAW, and BlackMagic BRAW camera media. Those haven't changed.


Changes in Premiere 2022


The Log and RAW media types that had a default transform to Rec.709 in previous versions may not do so anymore. Premiere Pro 2022 also does recognize many more of the Sony, Canon, and Panasonic log formats on import. And then may or may not apply a transform to Rec.709 when those images are applied to a timeline.


We users understand and expect that a Log image, displayed on a Rec.709 timeline, looks very "log-ish". That grayed-out look, no blacks, whites, or saturated colors.


But take that same clip, without any transform process, and drop it on an HDR sequence. The image will show as the full range image from the camera. In fact, with a very high dynamic range from blacks to whites, and full color. Yet again, this is without any "interpretation" or transform on the part of the program.


HLG is 'Hybrid LOG Gamma"


And that is what it seems we are all seeing with Premiere Pro 2022 and some log media formats. Log media is at times simply displayed at full image values as if on an HDR timeline set to HLG, unless the user overrides the new display default. And those values are typically well above the 100 nits max of an SDR/Rec.709 timeline.


Again, until and unless the user changes the clip properties.


The old default: transform to Rec.709. The new default at this time seems to be:: no transform unless the user chooses to do so.


That is a massive difference in how the same file is 'interpreted'. How it is displayed.


Processing changes: bringing back clipped White values


The processing 'chain' has also been changed. For "clipped" data due to any auto-tranform, the Lumetri panel tonal controls may all be used to bring down too-bright values. The Exposure slider in the Basic tab has by far the widest capablitity for White tonal value changes so that should be your 'default' control to bring back blown out whites.


If additional control is needed, the Basic Whites control, the RGB Curves tool, and the Color Wheels tonal slider can provide additional changes. Clearly, the default transform is applied after the Lumetri controls.


Both the Rec.709 and HDR/HLG images will be useful and valid for certain workflows. But the user MUST know how to manage the color management within Premiere Pro to get the desired result for each job.


R. Neil Haugen

(image used by permission, and courtesy user " maRedlich ")

[Edited 7 December 2021]

[* Edits added 5 January 2022]

TOPICS
Editing , Export , FAQ , Formats , How to , Import , User interface or workspaces

Views

75.7K

Translate

Translate

Report

Report
Community guidelines
Be kind and respectful, give credit to the original source of content, and search for duplicates before posting. Learn more
community guidelines
replies 101 Replies 101
Community Beginner ,
Mar 03, 2022 Mar 03, 2022

Copy link to clipboard

Copied

If there's any way you could access a beta that isn't the current one, I
may have a solution for you. Neil, is there a way to do that? If so, I
could look up the date of that beta.

Votes

Translate

Translate

Report

Report
Community guidelines
Be kind and respectful, give credit to the original source of content, and search for duplicates before posting. Learn more
community guidelines
LEGEND ,
Mar 03, 2022 Mar 03, 2022

Copy link to clipboard

Copied

Going into the Beta apps tab of the Creative Cloud desktop app ... the three-dot menu to the right of the Premiere Pro Public Beta line ... "other versions" ... but it only lists the current version (22.3), and the 22.2 version.


Neil

Votes

Translate

Translate

Report

Report
Community guidelines
Be kind and respectful, give credit to the original source of content, and search for duplicates before posting. Learn more
community guidelines
Community Beginner ,
Apr 04, 2022 Apr 04, 2022

Copy link to clipboard

Copied

I just wanted to let anyone know that this issue was resolved a few weeks ago.
I do not know how but possibly a patch?
Thank you for your support.

Votes

Translate

Translate

Report

Report
Community guidelines
Be kind and respectful, give credit to the original source of content, and search for duplicates before posting. Learn more
community guidelines
Community Beginner ,
Mar 14, 2022 Mar 14, 2022

Copy link to clipboard

Copied

I don't want to come out guns blazing, but this implementation feels like Adobe execs just went over to the engineers one day and said "I heard about this Color Management thing. Put it in, but you only have a week!".


Color Management is a great tool, but not everyone needs or wants it. I for one, don't want Adobe, or any company for that matter, to decide how my footage is going to be interpreted from how it was recorded. You can't inherently know exactly what every single one of your customers wants to do with their footage.


I imagine Adobe doesn't want to look like they're copying Resolve, but BM handles this properly and it's what your customers deserve, too. You can choose if you want to use color management or not, it's not forced on you by default when you make a new sequence, and you have full control over your Input, Timeline, and Output color space and gamma, as well as your timeline luminance, and if you want tone mapping or not.


Tone mapping is my other big gripe. Log will almost always have more dynamic range and a wider color gamut than Rec709 natively supports, and without tone mapping, footage is broken by Premiere's current color management. Pulling back clipped information with Lumetri isn't the same thing, and shouldn't have to be done.


If you want Premiere to be taken seriously as a color grading product, then you need to give control, not take it away with forced color space transforms, or make people use weird workarounds that you either have to spend a bunch of time trying to figure out or happen to have inherant knowledge about. SDR is still a bigger market than HDR, and as much as I wish I could snap my fingers and replace all SDR with HDR, unfortunately SDR will probably be around forever. Or at least for decades to come.


I love that you guys are trying to make Premier better and add new fuctionality, but please put in something like a checkbox in the New Project window to click if you want color management enabled, and a separate tab in Sequence Settings where we can set the color management to work correctly for our needs. You've got the color management engine now, and you already have a way to turn it off, so making a simple way for your customers to set things up properly for their needs shouldn't be out of reach.


And while I'm venting 😉, please let us use srgb. It's 2022. The internet is srgb, and Rec709 is for broadcast (oversimplifying, but you get the point). We should be able to work in the color space and gamma that's the default for web content when using the world's most popular NLE. This one has always been weird to me.


Last thing and sorry if this is too off topic, but per display Display Color Management please. It's a really useful feature if your display has a wider gamut than your project, but if your displays are different then it can help one display while breaking another.

Votes

Translate

Translate

Report

Report
Community guidelines
Be kind and respectful, give credit to the original source of content, and search for duplicates before posting. Learn more
community guidelines
LEGEND ,
Mar 14, 2022 Mar 14, 2022

Copy link to clipboard

Copied

First ... Rec.709 is sRGB ... there is a very slight difference between using the 2.2 gamma that some recommend for web use and "broadcast" 2.4. Most colorists I work with don't feel there's an obvious enough difference over the array of screens out there to bother with it. Some certainly do. I always advocate for more choices, not fewer.


I and others have been pushing for the controls you'd like for some time. Where we're at right now is a partial rollout of a few controls. They have X number of bodies, and haven't simply had the staffing level to do the entire bit, including not only the underlying system for processing (which is what we've got now), but adding all the tonemapping and controls for every possible media out there.


We need the whole shebang before it's really usable though. And the partial rollout thing is simply rough on too many users.


I've been pushing for the control panel to make this all usable ... which it seems is something you would like also, so please, go upvote this ...

Color Management Panel


As we need to have that one place where we can set the defaults and of course, the overrides. And engineer I've discussed this with wasn't sure why I'd want one panel to handle everything from inputs through working space through display space through outputs. To him, that seems entirely counter-intuitive.


He felt the controls should go where "most users would expect them ... " which to him meant clip CM in the Interpret Footage, scopes CM in the Scopes panel, working space CM in the Sequence settings dialog, display space probably staying in the preferences, and output chosed in your export presets.


I told him that to me, that's an untenable mess. How are you supposed to be able to see at a glance how the entire system is set up for this job? In their design, you won't.


So ... go upvote that UserVoice!


They now have a tonemapping for the Sony S-log3.cine that's only available for some S-log3.cine clips for some reason. It's a very, very nice bit of work. The first tonemapping I've seen added, and if we can get more like that, I'll be thrilled.


And it would be nice to get your comments to @Francis-Crossman  and maybe get a response.


Neil


Votes

Translate

Translate

Report

Report
Community guidelines
Be kind and respectful, give credit to the original source of content, and search for duplicates before posting. Learn more
community guidelines
Community Beginner ,
Mar 14, 2022 Mar 14, 2022

Copy link to clipboard

Copied

Thanks so much for your thoughtful response, Neil, and the link to your Voice post. Voted and posted a comment!


sRGB is certainly very similar to Rec709, and was built on it, but the biggest difference is that Rec709 uses Legal range of 16-235 and sRGB uses Full range of 0-255. People have complained for years that their footage looks washed out after uploading to YouTube, because Premiere isn't showing them what their footage will look like when it's displayed on the platform they're using. I'm a Colorist and have had clients upset over things much less noticable than a levels issue. I don't want to deal with a late night phone call from a pissed client because their video on their clients website, social media campaign, or on YouTube doesn't look the way that they paid for. Part of the reason why no one can do serious color work in Premiere, is because we don't have full control to configure it. I know that sounds like a hot take, and of course anyone can color grade anything in Premiere, but when you have a lot of money and your reputation on the line, are you going to pick a program where you know you can set everything to work exactly as you need it to, or a program where it's "close enough"?


I completely understand that developming a full CM tool takes a lot of time, which is why I made the joke at the beginning of my reply 😉 (it was meant to be tongue in cheek, not sure if it actually came across that way!). I also get wanting to do a partial roll out so that you can have new features to tell people about, but this implementation completelly wrecks footage without Adobe clearly communicating that anything is different at all.


If you chat with that engineer again, let him know that most people probably don't have any clue that Interpret Footage exists, and also that having CM isn't inherantly better than not having it. I color grade all of my serious work in Resolve and haven't once use a CM sequence. I do use their Color Space Transform effect all the time and would REALLY love to see that brought to Premiere, but I never have Resolve automatically do the exact same transformation to every clip. In some cases I'm using LUTs built specifically to work with footage as it's natively recorded, or if I'm using CST's I might manually adjust the tone mapping's Input/Output because there's variance in the peak highlights from one clip to the next, or I like the DaVinci tone mapping on one scene while prefering the more simple Luminance Mapping on another. I've also used the CST when I have clips from multiple cameras in the same project, to convert everything into the same color space and gamma curve which makes grading the different cameras to match so much easier.


Back to Interpret Footage, because I've used it before and have inherent knowledge about it, as soon as I dropped FX6 footage in a timeline and saw the CST, the first thing I did was to go there and figure out how to turn it off, but I'm pretty comfortable in this sort of world and even I was confused by what to select. When CM is enabled, it looks like it isn't because Premiere says that the file's color space is Slog3.SGamut3Cine in my case, and then to override the CM, it feels like you're telling Premiere to override the clips native color space and convert it to Rec709. That's just semantics and maybe most people view the setting as the engineers intend, but not everone will, and no one is likely to be confused about if color management is on or off and what it's doing if there's a simple on/off toggle and a drop down menu where you can pick your clip's color space and your timeline color space. I know you feel the same way, Neil, just spelling it out in case any engineers happen to read this 🙂.


In short, I know some people want global tone mapping, but not everyone does, which is why we need a simple, on/off toggle for it in the Sequence Settings. Give me a Color Space Transform effect where I can pick the input and output from a large variety of every recording and delivery color space and gamme curve, and how tone mapping is handled, per clip, and I'll be a happy camper!

Votes

Translate

Translate

Report

Report
Community guidelines
Be kind and respectful, give credit to the original source of content, and search for duplicates before posting. Learn more
community guidelines
LEGEND ,
Mar 15, 2022 Mar 15, 2022

Copy link to clipboard

Copied

As to the web, the colorists I work with ... and they did the training videos for DolbyLabs on how colorists are supposed to work within DolbyVision ... say always assume legal unless a client asks specifically and and has a valid reason for full range Rec.709.


The whole YouTube thing is a total mess of course. It's been fascinating watching the discussions and presentations of colorists trying to either simply figure out how to work their 'system', or trying to game it. Testing different codecs in the uploads with different color space settings and all.


The real 'take' I've had from all those (often lengthy) presentations: YouTube SchmooTube ... they can muss and muck up anything. And if the client's Mac based, their experience can depend on whether it's their desktop or iPad. iPads tend to handle video a lot better. A desktop or laptop Mac is probably gonna give it the low-gamma view. What a joy ...


Oh, that Interpret Footage thing ... who in the world would think something hidden via right-clicking a clip in a bin is the best most obvious place for CM options?

I've had several discussions about this, and ... I think I've been pretty clear that it's a not-too-bright idea.


They think that most everyone would think to look there to modify anything about a clip.


What the ... ?????????


And you're right, the language is nearly backwards to what you think is gonna happen.


And btw ... totally agree with your last paragraph!

Votes

Translate

Translate

Report

Report
Community guidelines
Be kind and respectful, give credit to the original source of content, and search for duplicates before posting. Learn more
community guidelines
New Here ,
Jun 05, 2022 Jun 05, 2022

Copy link to clipboard

Copied

well, its really a problem around how devs think and the actual users who make content think. I want all my CM in one place - cos - that makes sense. I have been so confused trying t find a way to get rid of that terrible 709 default look that is applied to footage....if devs are reading. Filmmakers do the following. 1 Shoot footage. 2 edit footage 3. grade the footage. I found the CM workaround after a lot of searching and it was a pain - the end result is that I am moving to Resolve and giving up on Premier Pro. 

Votes

Translate

Translate

Report

Report
Community guidelines
Be kind and respectful, give credit to the original source of content, and search for duplicates before posting. Learn more
community guidelines
Community Expert ,
Jun 05, 2022 Jun 05, 2022

Copy link to clipboard

Copied

The order you're describing is somewhat traditional. If I have two single interview clips (medium and close-up), I tend to grade before I edit, as it saves me a lot of time in copy/pasting grades on all the edited portions. Also, grading as you go helps to establish a certain look that, in turn, may influence your editing style.


I do miss the quick access bar of switching between editing and color workspace, though. Hope Adobe will bring this back in a future release.

Votes

Translate

Translate

Report

Report
Community guidelines
Be kind and respectful, give credit to the original source of content, and search for duplicates before posting. Learn more
community guidelines
New Here ,
Jun 06, 2022 Jun 06, 2022

Copy link to clipboard

Copied

that's a choice though if you shot two interview frames CU and MID presumably they already match - same lighting and cameras etc. 

Votes

Translate

Translate

Report

Report
Community guidelines
Be kind and respectful, give credit to the original source of content, and search for duplicates before posting. Learn more
community guidelines
LEGEND ,
Jun 05, 2022 Jun 05, 2022

Copy link to clipboard

Copied

So, you'll leave Premiere's CM, because it now requires CM on media, and go to Resolve.... which also applies CM to media.


Yup, I use Resolve near daily.  😉


Neil

Votes

Translate

Translate

Report

Report
Community guidelines
Be kind and respectful, give credit to the original source of content, and search for duplicates before posting. Learn more
community guidelines
New Here ,
Jun 06, 2022 Jun 06, 2022

Copy link to clipboard

Copied

It's the way the CM is managed that is troublesome and not intuitive 

Votes

Translate

Translate

Report

Report
Community guidelines
Be kind and respectful, give credit to the original source of content, and search for duplicates before posting. Learn more
community guidelines
LEGEND ,
Jun 06, 2022 Jun 06, 2022

Copy link to clipboard

Copied

Ahh, that I can agree with!


Resolve's CM is very complex as it is very comprehensive. You can really get your media/sequence screwed up there if you make the wrong choices. BUT ... it's very easy to find all the CM controls.


I've have both email/message and in-person discussions with program heads and engineers for Premiere, and ... they seem to think that putting "media" CM in the Modify/Intepret Footage panel is the obvious place everyone would assume to find such things.


I've told them that's NOT a panel you can find in ANY menu search, so ... why on earth would you put those controls there? "Because ... again ... that's where anyone would go look for them ... " is their "patient" response.


And when I complain but you have media CM here, sequence CM there (without even mentioning that is also the display CM) ... and scopes CM there ... that's clearly a mess for the user.


"Those are all in the logical places for them ... "


WRONG!!!!!!!!!!!!!!!!!


So I put up a UserVoice request for ONE panel for all CM, accessible from the Menu system, usable as either docked or floating panel ... please, everyone, go upvote this!


Color Management Panel


Neil

Votes

Translate

Translate

Report

Report
Community guidelines
Be kind and respectful, give credit to the original source of content, and search for duplicates before posting. Learn more
community guidelines
Community Beginner ,
Jul 05, 2022 Jul 05, 2022

Copy link to clipboard

Copied

this didn't help at all. My footage still is blown/washed out. I can't get a project done in Adobe anymore. Sad, but me and millions of others are moving on to a program that works for people who don't have time to fiddle with this bs.

Votes

Translate

Translate

Report

Report
Community guidelines
Be kind and respectful, give credit to the original source of content, and search for duplicates before posting. Learn more
community guidelines
LEGEND ,
Jul 05, 2022 Jul 05, 2022

Copy link to clipboard

Copied

Tinal ...


What media are you using, made by what? And precisely what have you done with it in Premiere? I haven't found any media yet that can't be worked in Pr2022, and I've tested a ton for other users.


I'd be happy to test a clip or two of yours also.


Understand, I'm not best pleased with the way they've rolled out the new color system. It's been done piecemeal, without adequate warning and explanations as far as I'm concerned. And the CM controls are spread out and nearly hidden, which I've also complained about.


Here, in emails to the devs, and in person at NAB this April.


All that said, they had to make the changes they've made to get the program able to properly work with both SDR and HDR media. And give users the controls we need for those. They haven't done it as well as they could for certain. But it had to be done.


And the other main app you could go to has a blinding array of CM controls ... so to learn to use it, you'd have to learn how CM works in that app. Either way, you're going to need to learn to use your NLE's color management.


Neil

Votes

Translate

Translate

Report

Report
Community guidelines
Be kind and respectful, give credit to the original source of content, and search for duplicates before posting. Learn more
community guidelines
Participant ,
Jul 13, 2022 Jul 13, 2022

Copy link to clipboard

Copied

Interestingly enough I find I like the new colour management on Adobe PP. Admitedly I only skirt round the edges as my videos tend to be big picture stuff but the opportunity to pull in a clip, press the auto button on COLOR and then tweak from there (which generally seems to involve adjusting WB and stretching highlights and shadows to get better contrast) really works well for me. I'm keeping things simple and working in SDR at the moment but I'll see how I get on when I switch back to HDR. As you said above so much depends on your monitor - sending a HDR video to YouTube is often a leap of faith and you may have to pull it back if it doesn't look right on your TV. 


Certainly rendering makes the cooling system on my PC work hard so PP is thinking about something!


And finally I agree with what you say about the daunting complexity of these apps. Wanted to put a speech bubble on a photo the other day so used Photoshop; why is such a simple task so complicated? 

Votes

Translate

Translate

Report

Report
Community guidelines
Be kind and respectful, give credit to the original source of content, and search for duplicates before posting. Learn more
community guidelines
LEGEND ,
Jul 13, 2022 Jul 13, 2022

Copy link to clipboard

Copied

And finally I agree with what you say about the daunting complexity of these apps. Wanted to put a speech bubble on a photo the other day so used Photoshop; why is such a simple task so complicated?


Yea, right? lol


Although there are times when someone says ... um, why don't you just do this? ... where you go ... shessh ... that looking back shoulda been obvious ... and feel pretty minimalist in the brains department!


Glad things are working ok for you now.


Neil

Votes

Translate

Translate

Report

Report
Community guidelines
Be kind and respectful, give credit to the original source of content, and search for duplicates before posting. Learn more
community guidelines
Contributor ,
Aug 26, 2022 Aug 26, 2022

Copy link to clipboard

Copied

I have a question :


We have footage  from a Sony S-log-3 MXF clips. So like told if we put in timeline: looks like a blown out (like you told us).

So i use Modify - interpret footage and apply Rec. 702 and all looks fine. 


Problem we have. : when a precutter cutted the interviews, he not remove "the wrong look". So the pictures not looks greyed out. We ADD this project to a PRODUCTION. (like 10 other projects) Now when we add that precut sequence and drag it into our assembel sequence all look still same. Now the editor likes to remove the "wrong look" by going to the clips in browser and use the MODIFY command. But what we see that if we load that clip after modify in the Browser window the picture looks : greyed like we expect and want (we want to go to color grading lader). But in our Assemble sequence  that same clip is still in the "wrong look"... Anybody has any idea ??  i will do some extra test tomorrow. 

Votes

Translate

Translate

Report

Report
Community guidelines
Be kind and respectful, give credit to the original source of content, and search for duplicates before posting. Learn more
community guidelines
LEGEND ,
Aug 26, 2022 Aug 26, 2022

Copy link to clipboard

Copied

It could be that the use on a sequence in a different project may not update immediately ... or need to have the project closed/reopened or something?


@Bruce Bullis is really the one that would know ...


Neil

Votes

Translate

Translate

Report

Report
Community guidelines
Be kind and respectful, give credit to the original source of content, and search for duplicates before posting. Learn more
community guidelines
Adobe Employee ,
Aug 26, 2022 Aug 26, 2022

Copy link to clipboard

Copied

Sounds like DVAPR-4226826, "Input LUTs are not sync'd through XREF"; fix is present in current beta.

Votes

Translate

Translate

Report

Report
Community guidelines
Be kind and respectful, give credit to the original source of content, and search for duplicates before posting. Learn more
community guidelines
Contributor ,
Aug 29, 2022 Aug 29, 2022

Copy link to clipboard

Copied

We tested more : When you import the project into productions and then look at sequence : you can still modify the video and say : it is rec709 . But when you do not change and drag that sequence into the Assemble sequence (thats in another project assemble). then you not able any more to change the Look on sequence. Because on the project folder you change it to rec709 you get washed out images as it would be. But that same file stays same blow out oversaturated image on the timeline, even in match frame it goes to the greyed out one in the source. So indeed it looses somewhere the link. 

Votes

Translate

Translate

Report

Report
Community guidelines
Be kind and respectful, give credit to the original source of content, and search for duplicates before posting. Learn more
community guidelines
Guide ,
Aug 31, 2022 Aug 31, 2022

Copy link to clipboard

Copied

@R Neil Haugen 

  And if Premiere applied a default transform, any changes the user made in the Lumetri color panel were applied after the default transform process. If the transform process clipped whites or crushed blacks, that image data was simply gone.

@Baffy19 

These are very, very significant words and should be understood by everyone who is currently working with the transformation of the color space of clips. Before rebalancing (PrPro version 22), the chromaticity was already deformed before it was necessary to proceed with color correction and grading. We were losing some of the data. That's right. But, again. If we take a source shot in HLG and interpret it into the REC 709 color space, don't we lose part of the dynamic range by limiting HLG to a narrower color space? How best to approach the topic of material transformation to put the material into a sequel in SDR format. What to do in this case? What is the right thing to do so as not to spoil the material on the timeline and its export? To use the interpretation of the material before the start of color correction, what will we trim part of the data or not interpret the material and transfer it in the HLG color space to the SDR timeline?

Votes

Translate

Translate

Report

Report
Community guidelines
Be kind and respectful, give credit to the original source of content, and search for duplicates before posting. Learn more
community guidelines
LEGEND ,
Aug 31, 2022 Aug 31, 2022

Copy link to clipboard

Copied

Transforms ... and well-designed tech LUTs ... have carefully crafted roll-off sections at both ends. And for a transform as major as say HLG/PQ to Rec.709, the entire 'shape' is a roll-off, a curve.


In effect, a compression of data, but with enough bits in the original file, preferably at least 10, it's not a 'loss' of data. The data is just displayed differently.


The dynamic range is actually the far easier problem to solve in a transform or tech LUT. Color ... that's the difficult part.


Because the 'shape' of the color volume ... the total array of 'actual' colors of any color space ... is quite different from those either 'larger' or 'smaller'. The typical CIE "flat" or triangle-shaped diagrams of color space are not a very useful display of the actual color differences.


There are cubes and cylinder displays that show the actual colors far better ... a tetrahedral one is probablly best. When vieiwing one of those, and shifting say from sRGB to P3, two "apparentlly" fairly close color spaces on the CIE diagram, the volume is stunningly different.


So remapping the color data is the difficult part. And this is where keeping the original file available can be crucial. Colorists typically display Rec.709 while grading something with a larger volume, if that's their display volume available. And then can move to a system with a display with a larger color volume, and simply do a trim pass to get the show done up right.


Neil

Votes

Translate

Translate

Report

Report
Community guidelines
Be kind and respectful, give credit to the original source of content, and search for duplicates before posting. Learn more
community guidelines
New Here ,
Sep 16, 2022 Sep 16, 2022

Copy link to clipboard

Copied

Hey there,

I discovered the color space transform of PP22 and tried it out: Although I'm using V-Log footage the dropdown only lets me choose from REC and HLG formats. Is there any solution to it? Do I have to set specific metadata in the master clip? 

best,

chris 

Votes

Translate

Translate

Report

Report
Community guidelines
Be kind and respectful, give credit to the original source of content, and search for duplicates before posting. Learn more
community guidelines
LEGEND ,
Sep 16, 2022 Sep 16, 2022

Copy link to clipboard

Copied

They only have a very few format/codecs in their finished group of ones with a built in reading and default handling of the format/codec. And they don't have the V-log (Panny) variants in that finished group yet. I'd been hoping they'd be rolling out more format/codec defaults sooner, but they have added only 2-3 over the eight months.


You can put an input transform LUT in the say Program-Package folder/Adobe/Common/Input folder, and it should appear in the CM controls in the Modify/Interpret Footage Input dropdown.


And if you do, you may still wish to apply the Override to Rec.709 option to "complete" the CM handling of the file, test. That's been recommended by program manager Francis Crossman.


I will note ... transform/tech/normalization LUTs can at times clip or crush pixels if you don't match the expected exposure/contrast/saturation information in those files that the LUT was built for.


If you get clipped or crushed values, don't apply that LUT in the Interpret Footage dialog. Use the Creative Tab's slot of Lumetri to apply the LUT ... then go up to the Basic tab and "trim" the Exposure/Contrast and Shadow/Highlights/Saturation controls to fit the clip into what the LUT expects to see.


Neil

Votes

Translate

Translate

Report

Report
Community guidelines
Be kind and respectful, give credit to the original source of content, and search for duplicates before posting. Learn more
community guidelines