

- Home
- Premiere Pro
- Discussions
- Re: How to create simple opacity gradient?
- Re: How to create simple opacity gradient?

Copy link to clipboard
Copied
So, I have wasted an entire workday trying to find an answer to this simple question.
This my final effort before I completely loose my marbles.
Can anyone, for the love of god please tell me
How can I gradually fade away a black matte, from 100% opacity to 0% opacity, across the entire image, from top to bottom.
I'm trying to hide a top of someone's face with black gradient, the face is already partly in the shadow.
I've tried using the 'edge feather' -tool which is useless in this case, using directional blur with terrible results, and finally masking the opacity, which so far is the most effective way, (and most likely the correct one) but somehow I just can't fade the matte gradually.
Apparently no other person on this planet has had this issue and I'm just an idiot. I have come to this conclusion after going through hundreds of forum posts and tutorial videos with nothing even close to my issue.
Pls help.
-Idiot


 2 Correct answers

I would:
1) Create a video clip of black
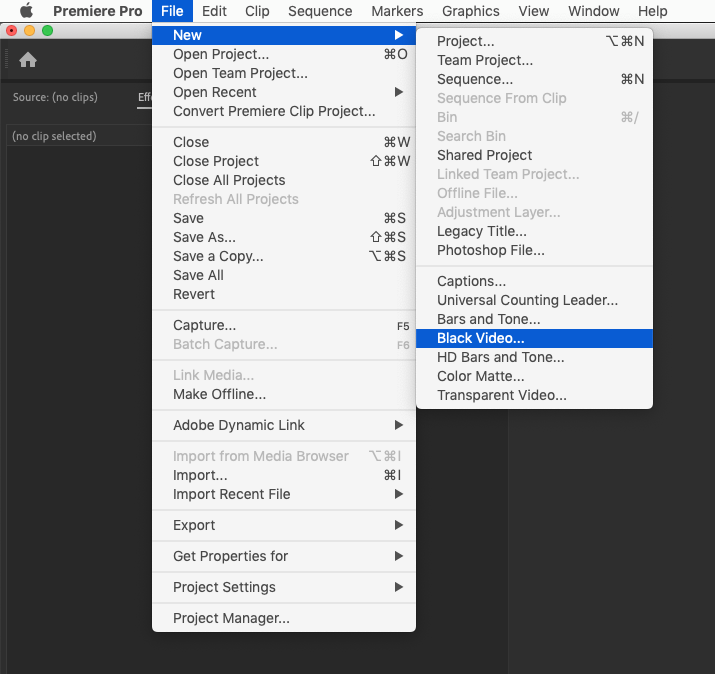
Drop it on the timeline on a track above the clip I wanted to fix
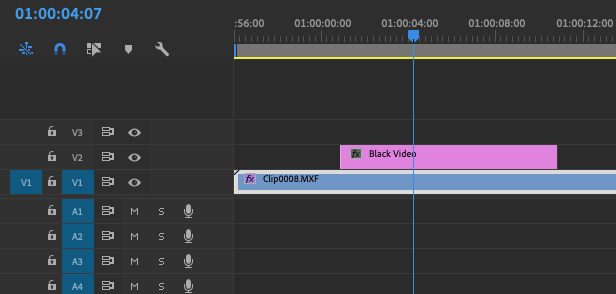
Create an opacity mask on the black video clip
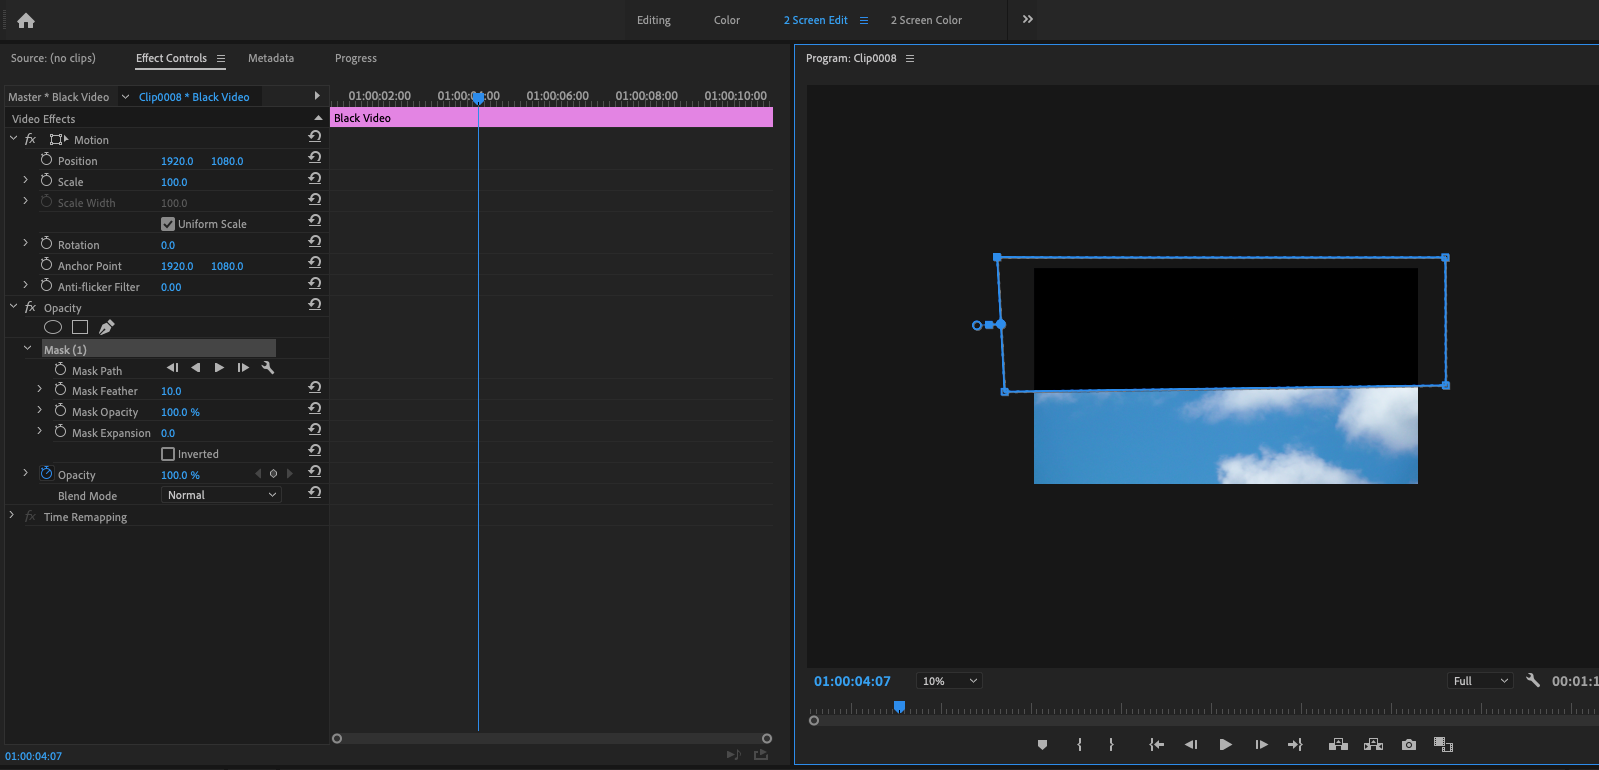
Feather the mask and adjust to taste

Add a fade in and fade out on the black clip

Depending on the horsepower of your computer, you many need to render the clip before being able to see the effect in real time.
MtD

There is an easier way to do this since Pr 13.n at least.
1. Make a shape using the shape tool in the tools panel
2. Click on the Fill swatch
3. Set the Gradient pulldown as needed
4. Set all your color/opacity stops as needed
It looks like this:

 19
Replies
19
19
Replies
19
Copy link to clipboard
Copied
I would:
1) Create a video clip of black
Drop it on the timeline on a track above the clip I wanted to fix
Create an opacity mask on the black video clip
Feather the mask and adjust to taste
Add a fade in and fade out on the black clip
Depending on the horsepower of your computer, you many need to render the clip before being able to see the effect in real time.
MtD
Copy link to clipboard
Copied
Thank you MtD for a quick response.
That was pretty much what I did before, just failed miserably with the mask settings.
After reading your reply and calming my nerves I managed to get over this issue... Finally!
Copy link to clipboard
Copied
Meg The Dog's answer would work. Another way to do this is to create a rectangle in an essential graphic with a gradient fill.
In the File/Edit menu at the top of the screen click Graphics > New Layer > Rectangle. Adjust the Rectangle size in your program monitor with the blue dots on the corners.
In the Essential graphics window (Window > Essential Graphics if it isn't already open) click the Edit tab, then click Shape 01. Scroll down and click the grey box next to fill.
In the Color Picker box that pops up change from Solid to Linear Gradient. Click the arrows in the gradient bar to change the color, the arrows on top are the opacity level and the arrows on the bottom are the color. For your question you will want to make both the bottom arrows black and make one of the top arrows 100% and on 0%.
If you want to add more colors or opacity levels in between the arrows just click an empty space between them.

Copy link to clipboard
Copied
Excellent suggestion. There are normally alternate ways of doing X, many not ... obvious, to be polite ... and sometimes quicker & more elegant a solution than the expected solutions.
Neil

Copy link to clipboard
Copied
This is EXACTLY what i was looking for today. Thanks!
Copy link to clipboard
Copied
There is an easier way to do this since Pr 13.n at least.
1. Make a shape using the shape tool in the tools panel
2. Click on the Fill swatch
3. Set the Gradient pulldown as needed
4. Set all your color/opacity stops as needed
It looks like this:

Copy link to clipboard
Copied
Hey, thanks for posting that James ... again, even simpler ...
Neil
Copy link to clipboard
Copied
Interesting, didn't know there were rectangle or ellipse tools. They're kind of placed in a strange spot, you'd think it would be grouped in with the text tool since they are both tools for Essential Graphics.
Copy link to clipboard
Copied
Thanks for your post.
I tried that as well, but I guess in my frustration I couldn't make sense of the controls.
I'll try that again next time!

Copy link to clipboard
Copied
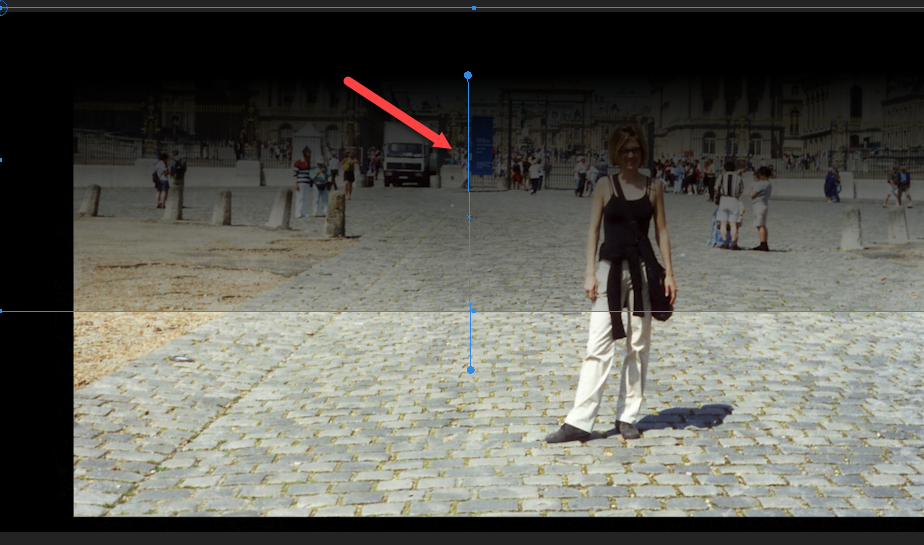
I followed Tucker's instructions and it works well, one thing I needed to change was the gradient direction from horizontal to vertical. That's the gradient line from Jame's photo, move those point up and down, and then it works. Between Tucker and James it's just a difference of how you get the rectangle.
Copy link to clipboard
Copied
Good point, Myer. Yes that blue line is the Direct Manipulation UI for Gradients. You can set gradient Angle, Start, Stop and Mid Points with it right inside your Program Mon.

Copy link to clipboard
Copied

Copy link to clipboard
Copied
Hi Nicktacula,
Please try adjusting the positions of the start, end, and midpoint on the gradient line to modify how the gradient fades across the shape. Hope it helps.
Thanks,
Sumeet
Copy link to clipboard
Copied
Hi Sumeet, thanks for the response.
I did try that but it still continued to have that hard cut off

Copy link to clipboard
Copied
The people that help here are amazing, but honestly, there are answers for questions like this at YouTube that have very specific examples. I just watched one the other day opacity gradients that was really good.

Copy link to clipboard
Copied
How to use this as a greenscreen?
Copy link to clipboard
Copied
I'm not sure I'm understanding. A bit more specifics of what you're trying to do would help. But I think you should create a new post with details about what you are trying to do, I think it may have actually nothing to do with the effect this thread is about.
Neil

Copy link to clipboard
Copied
Nothing worked for me the way i wanted so i did the followin that gave me the effect i wanted...
I doubled the backround and resized the window on the second layer to fit perfectly with the first layer.
In between i created some scroling text, naturally when the text reached the second backround layer was
continuing scrolling but this time in behind of the second layer giving me the result i wanted.
Probably is a crude method but works.
For the sake of knowledge if somebody has a different way to do the exact same thing please share it.
Thanx
Nick
Copy link to clipboard
Copied
In addition to Color and Opacity (Linear and Radial) Gradients for shapes we're happy to announce the implementation of Text Gradients as of the latest public release of PrPro 15.2. Please try it out when you can and let us know what you think.
For information about how to apply Text Gradients as well as a couple of short how-to videos, go to this link:
https://helpx.adobe.com/premiere-pro/using/text-gradient.ug.html
Here is a snapshot of a Text Gradient in the Program Monitor:


Get ready! An upgraded Adobe Community experience is coming in January.
Learn more
 AdChoices