Insert Keyframes at Playhead
Copy link to clipboard
Copied
Question: Is there a way to create a custom effect (or anything) which allows you insert keyframes on a track at the playhead?
After hours of Googling, I can't seem to find what I am looking for. I feel like this should exist already, but I don't know.
I have tried using custom effects but I need something more modular.
I am working on a project in which I am adding slides to a series of recorded lectures and I am switching between full and half screen slides. I want the full-screen slides to animate to half the screen after an indeterminate amount of time. I know I can copy keyframes but that feels messy.
If that's the only solution then I guess that's what I'll have to do, but I feel there needs to be a cleaner way.
Afterthought: Is it possible to apply some sort of class effect which, when changed, would update all the instances where it has been applied?
Anyways, thanks!
Copy link to clipboard
Copied
Option 1:
- Create one master slide (clip) with the animation
- Place this clip in your timeline, wherever you need a new slide - yes, it will initially have the wrong content
- From the Project Panel, Alt/Option + drag the correct slide onto this clip - this will replace the existing clip with the new clip, but retain the animation
Option 2:
- Create your animation on one clip, ensuring that the first keyframe is at the start of the clip
- Select the clip with the animation and Edit > Copy
- For your target, make a cut exactly where you need the animation to occur
- Edit > Paste Attributes and select whatever you need to transfer
Copy link to clipboard
Copied
I decided to just go with option 2. I created the custom effect and anchored it to the out point. Then I just slice the clip where I want the animation to end.
Seems to work fine for now.
Many thanks!
Copy link to clipboard
Copied
In the Effect Controls panel, keyframes are always applied at the playhead position.
The playead in the Effect Controls panel matches the playhead in the sequence.
Copy link to clipboard
Copied
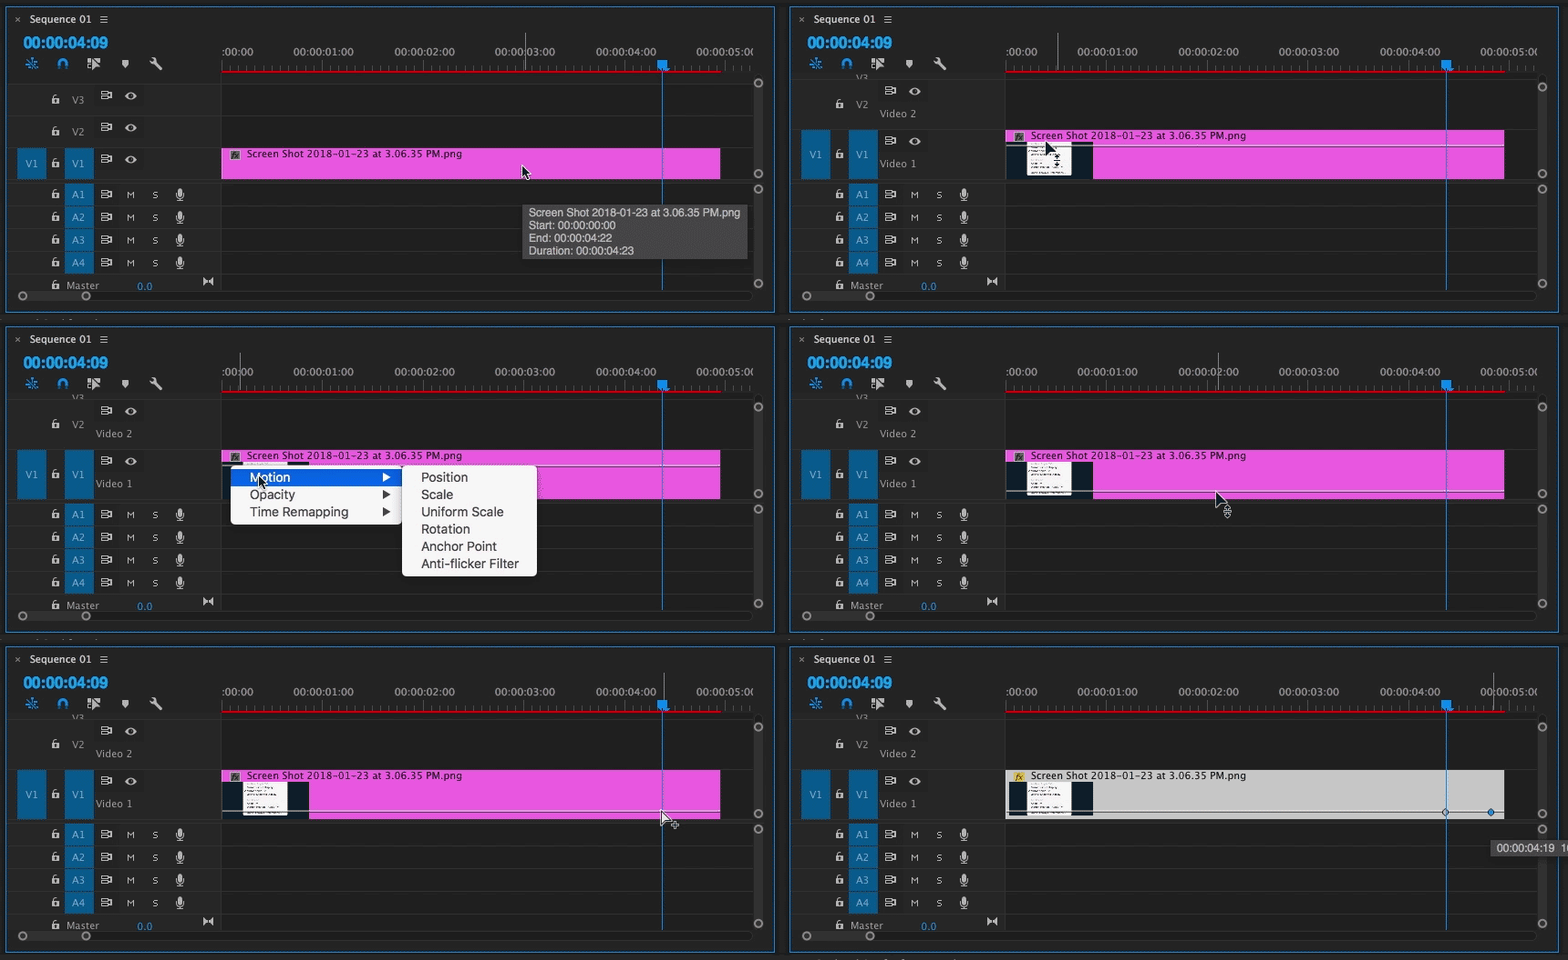
You can add keyframes on a clip boundary in any track of the Timeline as long as you show the connector line of the corresponding parameter first:
- If you can't see the connector line on the clip boundaries in the Timeline, expand the video tracks to a track hight that shows the connector line (command =, Mac; control =, Windows).
- Set the connector line property to be shown on the clip by right clicking the fx badge and choosing the parameter. It defaults to Opacity.
- Command click, Mac or control clic, Windows on the connector line to add a keyframe.
A tricky thing about the Scale connector line: The range from 100% to 0% is very, very shallow. It's still easier to set the value in the Effect Controls panel.

Copy link to clipboard
Copied
I have attached a video of all methods, in case you cannot download it from my safe dropbox link,
I have written the explanations : Dropbox - custom scale comp.mp4 https://www.dropbox.com/s/4x8ub941cg4miqg/custom%20scale%20comp.mp4?dl=0http://
create a new 'Adjustment Layer' and drag it to the timeline above the layer you want to animate
Apply an effect called 'Transform' to the adjustment layer
This effect has all of the basic properties found in the Motion in effect controls + it affects the layers (clips) beneath the adjustment.
Apply the keyframes and animation you want to the adjustment layer using the 'Transform' parameters not the Motion parameters.
Now you can Alt+drag the adjustment layer to where you want the motion to start above your stills, where the playhead is,
and make as many copies of this layer as you would like, the keyframes are preserved as long as you are Alt dragging from timeline.
If you have other clips behind the stills you want to animate through the adjustment layer and you do not want them to be affected
by the transform on the adjustment, finish all your stills animations, then select just the animated stills and the adjustment layers
and right click then choose nest, this will create 1 nested sequence with other clips, layers or stills underneath not affected.
If you want to create a custom animation, and when you apply changes it affects all other same animations, you have to save
a 'preset' of your animation. when you apply a preset, then update its keyframes, you save another preset under another name,
maybe 'scale 01' and 2nd preset 'scale 02', then select all adjustment layers, right click, choose remove attributes and check
only the transform effect. select all adjustment layers back and drag the 'scale 02' preset to any one of them, it will drop on
all the selected adjustment layers.
Get ready! An upgraded Adobe Community experience is coming in January.
Learn more