• Global community
    • Language:
      • Deutsch
      • English
      • Español
      • Français
      • Português
  • 日本語コミュニティ
    Dedicated community for Japanese speakers
  • 한국 커뮤니티
    Dedicated community for Korean speakers
Exit
25

iPhone 12 pro max and 13 pro HDR footage blown out in Premiere Pro 2022 (v22.0)

Community Beginner ,
Nov 01, 2021 Nov 01, 2021

Copy link to clipboard

Copied

After upgrading to Premiere Pro 2022 (v22.0) all my HDR footage from my iPhone 12 ProMax and 13 Pro are blown out (screen shot below)


Screenshot_2.pngScreenshot_3.png


There are actually similar disscussion here that talks about this issue, but i thought i would make new discussion that spesifically talks about this issue on iPhone 12 Promax series and above. So whoever having similar issue hopefully could find this thread when they're googling


There are two solution to fix this issue

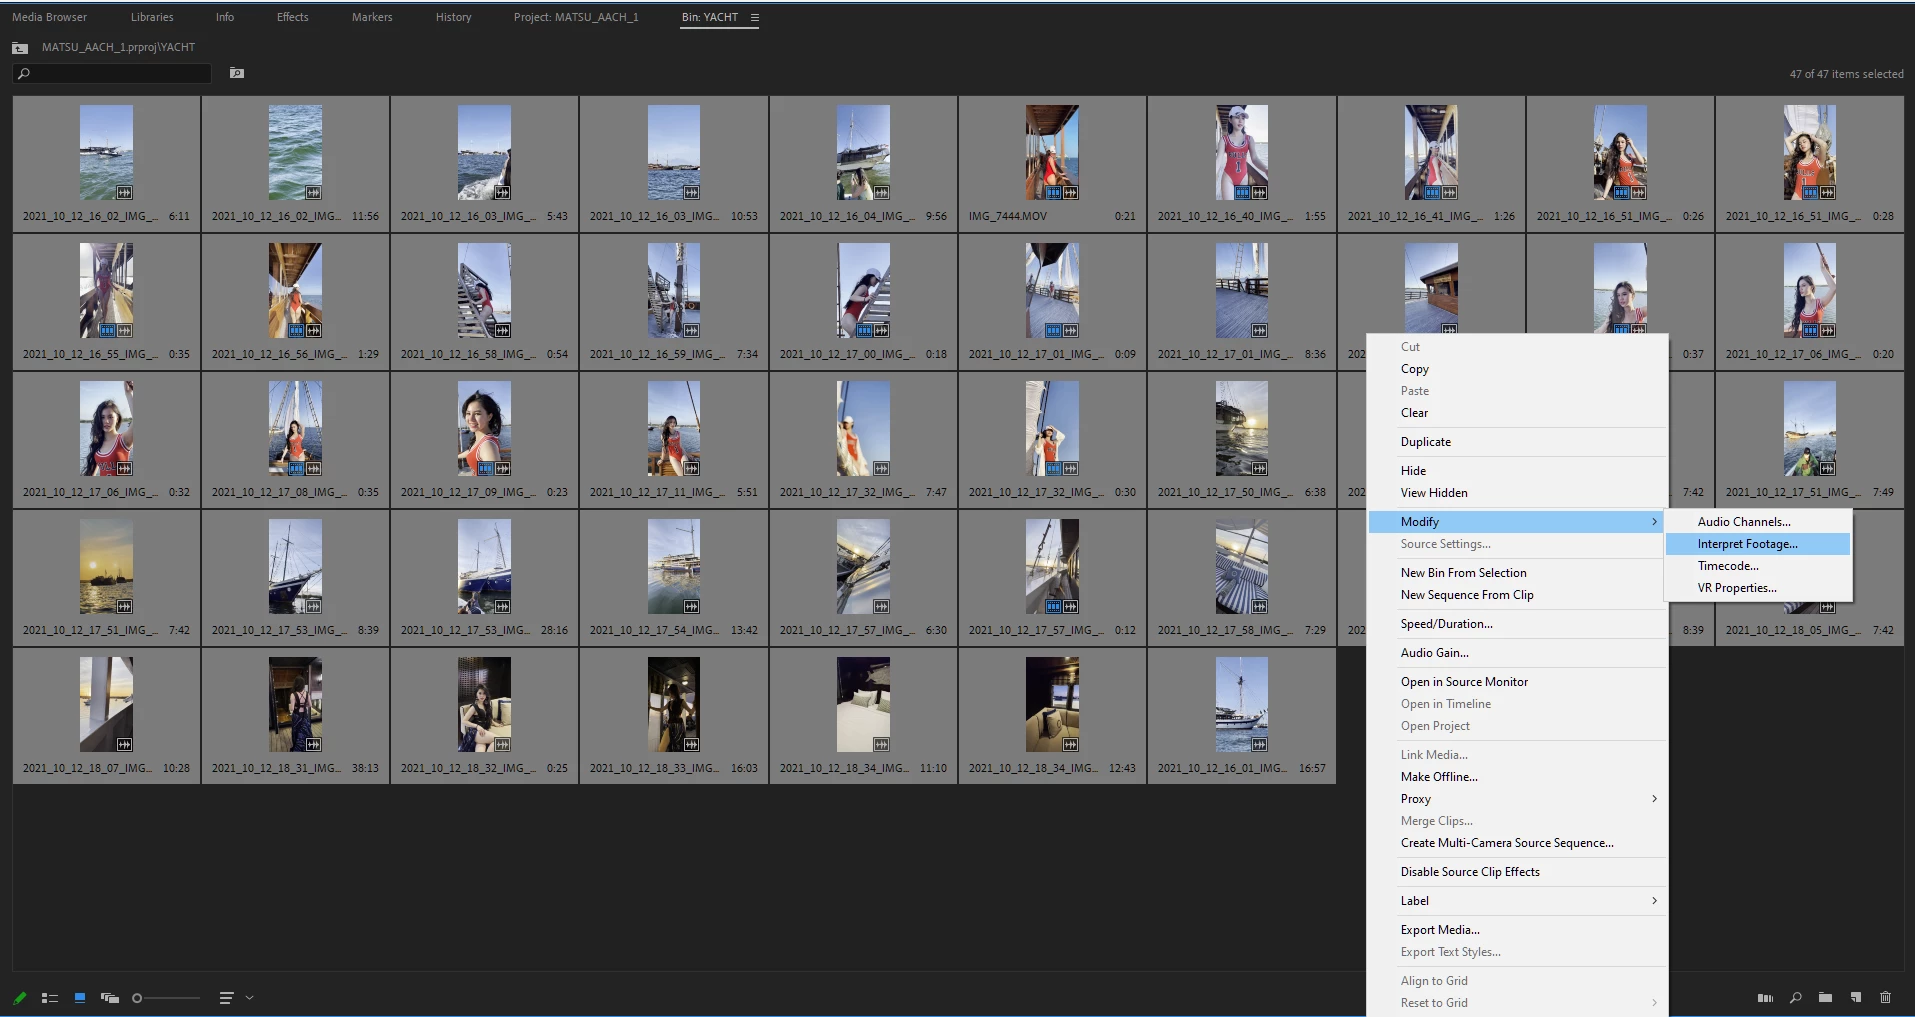
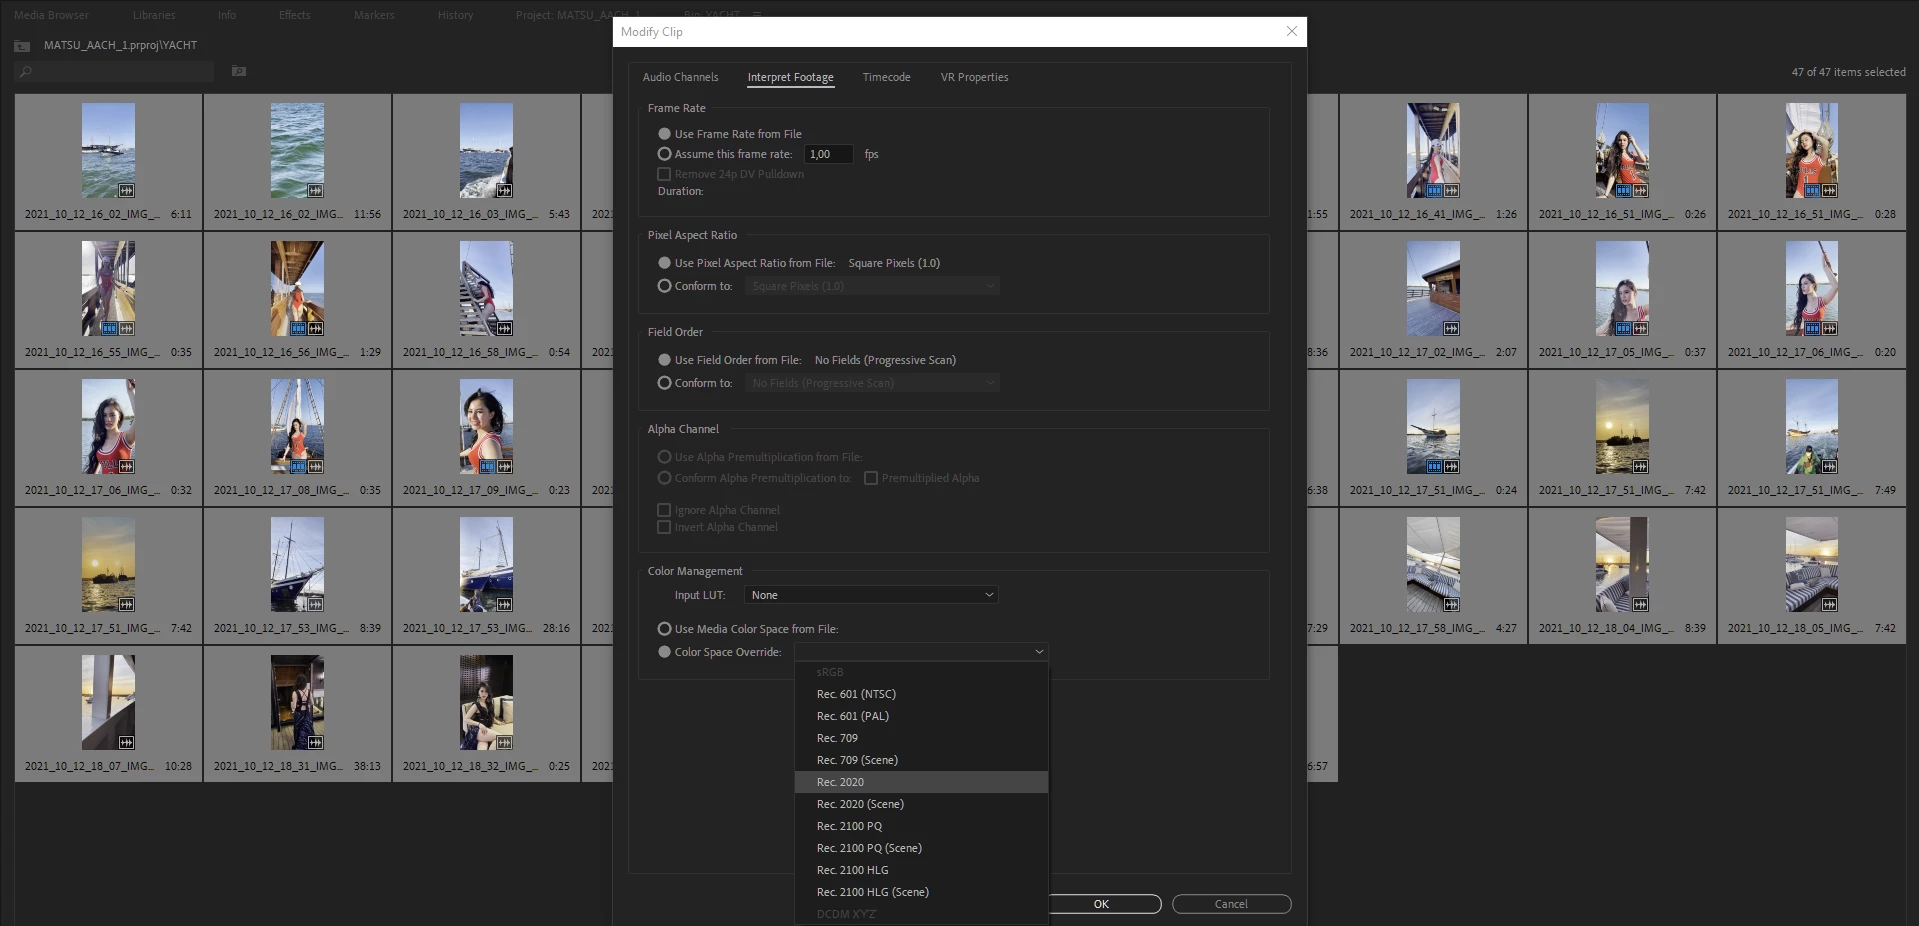
First Solution, go to project panel, select all of your HDR clips > Right Click (windows) > Interpret Footage > Color Space Override > Choose Rec 2020


Screenshot_5.pngScreenshot_6.png


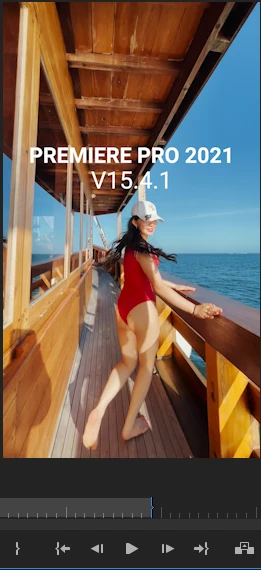
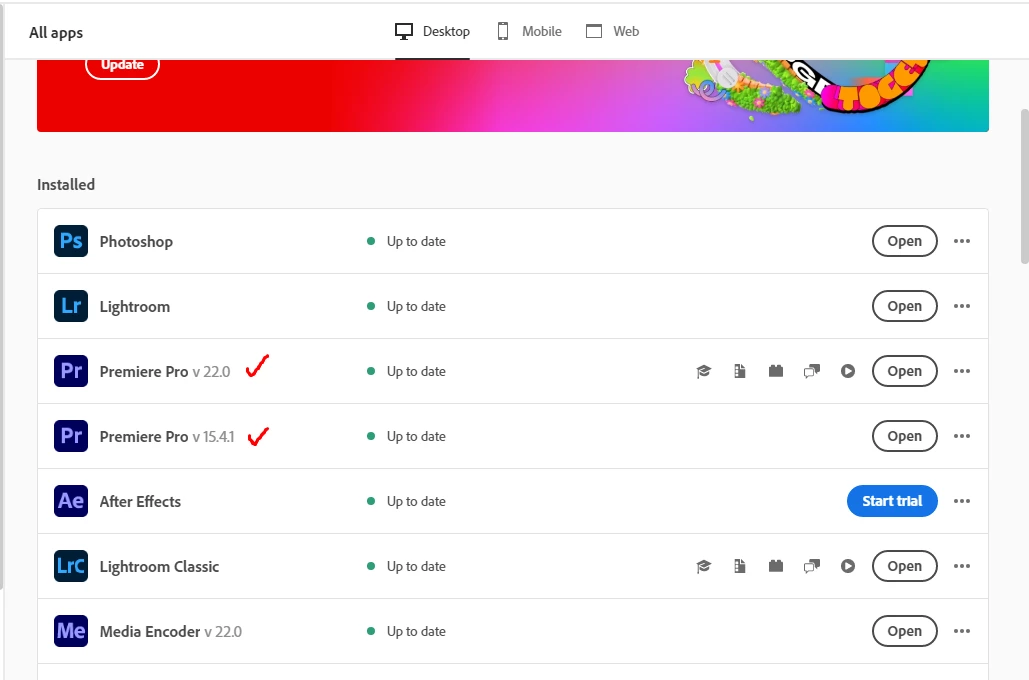
Second Solution (I do recommend using this), open your creative cloud control panel and just re-install previous version Premiere Pro 2021 v15.4.1 (i'm using both PP 2021 & 2022 at the moment)


Screenshot_7.png


Hope this will help whoever having this iPhone HDR footoge blown out on Premiere Pro 2022 v22.0


TOPICS
Editing , Error or problem

Views

109.9K

Translate

Translate

Report

Report
Community guidelines
Be kind and respectful, give credit to the original source of content, and search for duplicates before posting. Learn more
community guidelines

correct answers 2 Correct answers

Adobe Employee , Nov 03, 2021 Nov 03, 2021

Hi Lorenzo,

Sorry about that. Providing color managed workflows, especially for HDR, was a top request for quite some time. Many customers want to deliver HDR video, and with the new features, it makes it a lot easier to do. 


If you just want to shoot non-HDR video and be done with such things as input LUTs and changing the color space of your sequence settings, you can do that by switching it off in your iPhone settings. I have switched it off for my own iPhone, to be honest.

Sorry again about

...

Votes

Translate

Translate
LEGEND , Nov 03, 2021 Nov 03, 2021

This new version added quite a bit of user-settable color management options (CM) and that's confused a lot of people. There are several places to check & set CM.


  • Clip properties in the bin: Modify/Interpret Footage
  • Sequence settings dialog settings
  • Scopes panel settings.


For most users with HDR media right now, I'd suggest setting the sequence to the 2100/HLG option as a starting point. Match that in the scopes and clip settings if you can.


And report back how well it works. It will pro

...

Votes

Translate

Translate
New Here ,
Nov 03, 2021 Nov 03, 2021

Copy link to clipboard

Copied

Thanks for the advice here. Oh an Adobe thank you for costing me time and money once again with a shoddy update. 

Votes

Translate

Translate

Report

Report
Community guidelines
Be kind and respectful, give credit to the original source of content, and search for duplicates before posting. Learn more
community guidelines
Community Beginner ,
Nov 03, 2021 Nov 03, 2021

Copy link to clipboard

Copied

After experienceng this issue, now I know that I shouldn't update right aways when there is new update for adobe softwares. Glad to help

Votes

Translate

Translate

Report

Report
Community guidelines
Be kind and respectful, give credit to the original source of content, and search for duplicates before posting. Learn more
community guidelines
Community Expert ,
Nov 03, 2021 Nov 03, 2021

Copy link to clipboard

Copied

Votes

Translate

Translate

Report

Report
Community guidelines
Be kind and respectful, give credit to the original source of content, and search for duplicates before posting. Learn more
community guidelines
Adobe Employee ,
Nov 03, 2021 Nov 03, 2021

Copy link to clipboard

Copied

Hi Lorenzo,

Sorry about that. Providing color managed workflows, especially for HDR, was a top request for quite some time. Many customers want to deliver HDR video, and with the new features, it makes it a lot easier to do. 


If you just want to shoot non-HDR video and be done with such things as input LUTs and changing the color space of your sequence settings, you can do that by switching it off in your iPhone settings. I have switched it off for my own iPhone, to be honest.

Sorry again about the update causing confusion.


Thanks,
Kevin

Votes

Translate

Translate

Report

Report
Community guidelines
Be kind and respectful, give credit to the original source of content, and search for duplicates before posting. Learn more
community guidelines
New Here ,
Nov 04, 2021 Nov 04, 2021

Copy link to clipboard

Copied

Hi Kevin,


Thanks for the reply. I appreciate the comment. This happened after a whole host of crashes mid project and a corrupted file, which caused me to update to 2022 edition in haste. Ordinarily this wouldn't be something I'd normally do and was an extreme measure to see if I could resolve the stated issues as I was up against multiple deadlines. Oddly enough the previous issues have now stablised and with the fix from R Heil Haugen the HDR situation is resolved.

I should also add, I'm not a developer or programmer, but continually up against the clock freelancer. When this stuff happens, I lose money. It would be great if a change like this is going to affect footage that it's flagged. 

Thanks


Lorenzo 


Thanks


Lorenzo 

Votes

Translate

Translate

Report

Report
Community guidelines
Be kind and respectful, give credit to the original source of content, and search for duplicates before posting. Learn more
community guidelines
LEGEND ,
Nov 04, 2021 Nov 04, 2021

Copy link to clipboard

Copied

Glad you're working ... and yea, the new CM changes caught a lot of users unfortunately.


Neil

Votes

Translate

Translate

Report

Report
Community guidelines
Be kind and respectful, give credit to the original source of content, and search for duplicates before posting. Learn more
community guidelines
New Here ,
Nov 19, 2021 Nov 19, 2021

Copy link to clipboard

Copied

This presupooses that you shoot the footage you're editing. As a professional editor, I'm working more and more with footage shot by phones and have no control of the users settings. (I'm currently cutting makeup tutorials shop by influencers). Something to consider. 


Thanks,

Votes

Translate

Translate

Report

Report
Community guidelines
Be kind and respectful, give credit to the original source of content, and search for duplicates before posting. Learn more
community guidelines
LEGEND ,
Nov 19, 2021 Nov 19, 2021

Copy link to clipboard

Copied

Consider what? And I'm not being flippant here, just ... thoughtful. I work daily with a wide group of colorists, who of course rarely shoot what they're working. And they frequently have to chase down both the color gamut and color space (two very different things) of the clips they're working.


And they may have a couple thousand clips in a job. Just establishing the gamut & space of some of their jobs is a nightmare.


The Premiere Pro developers had to get more color management settings into the app, period. With the various forms of HDR coming down the pike at us all, this had to be added to the program. The devices we're all getting things to edit from are starting to have wider gamuts, other color spaces, well past Rec.709 that has been the solid standard of such an app as PrPro. As you've noted.


The problem with adding more CM options has always been ... how to do so without creating a situation where many users screw the pooch in mis-setting things. As a contrast, Resolve has always had a great depth of CM settings for the users. And so many less-experienced users make less than useful decisions.


But those options have to be included now. Even in PrPro. And they've tried to do so with the most options for the user and least likelihood of disaster for users.


I personally disagree with some of the ways this has been rolled out, as to me the CM choices and options are split all over the app, and it's a bit of work to go chase them all down. Well, first you have to know there might be something there to go look for.


But they've thought, in general, this "location" of the options they have added would be not too difficult for most users to find.


I think that the scattered locations coupled with a couple changes in default behavior are unfortunately leading to troubles that might have been lessened with a different UI setup for CM.


But there's going to be even more options over the next few months. And I'll suggest the likelihood of the location of the CM options shifting is quite high.


Frustrating? Yea. Necessary? Yea.


Neil

Votes

Translate

Translate

Report

Report
Community guidelines
Be kind and respectful, give credit to the original source of content, and search for duplicates before posting. Learn more
community guidelines
Explorer ,
Sep 09, 2022 Sep 09, 2022

Copy link to clipboard

Copied

I feel your pain I am mid project and now everything is all blown out and I think I may have to interpret the footage and recut it from scratch because I cannot modify any of the footage inside my timeline this is a disaster

Votes

Translate

Translate

Report

Report
Community guidelines
Be kind and respectful, give credit to the original source of content, and search for duplicates before posting. Learn more
community guidelines
LEGEND ,
Sep 09, 2022 Sep 09, 2022

Copy link to clipboard

Copied

Doing the Override from the Project panel should affect any use of the clip on any sequence in the project ... that's the design. It's a "source" effect setting.


You don't apply clp CM in a timeline. There, you only apply Sequence CM.


So yes, "interpret" the footage, but you shouldn't need to recut anything.


Neil

Votes

Translate

Translate

Report

Report
Community guidelines
Be kind and respectful, give credit to the original source of content, and search for duplicates before posting. Learn more
community guidelines
Participant ,
Oct 29, 2022 Oct 29, 2022

Copy link to clipboard

Copied

If you have synched footage, the modify clip > interpret footage commands are not available to the synched clip.

Votes

Translate

Translate

Report

Report
Community guidelines
Be kind and respectful, give credit to the original source of content, and search for duplicates before posting. Learn more
community guidelines
LEGEND ,
Nov 03, 2021 Nov 03, 2021

Copy link to clipboard

Copied

This new version added quite a bit of user-settable color management options (CM) and that's confused a lot of people. There are several places to check & set CM.


  • Clip properties in the bin: Modify/Interpret Footage
  • Sequence settings dialog settings
  • Scopes panel settings.


For most users with HDR media right now, I'd suggest setting the sequence to the 2100/HLG option as a starting point. Match that in the scopes and clip settings if you can.


And report back how well it works. It will probably take us all a bit to sort this out.


And the reaction of some users to the engineers adding CM options, is why many of the engineering staff were reluctant: they knew for a lot of users it would be confusing and cause issues until they could figure it out.


Once you understand how it's supposed to work, you'll have more options than you did before. Yea, it's painful to figure out at first.


Neil

Votes

Translate

Translate

Report

Report
Community guidelines
Be kind and respectful, give credit to the original source of content, and search for duplicates before posting. Learn more
community guidelines
New Here ,
Dec 05, 2021 Dec 05, 2021

Copy link to clipboard

Copied

Thank you Neil it solved the problem with HDR footage from the new iPhones. But I use 5 different cameras and have different source material, I know that is not perfect, but for my private project its necessary (gopro hero, Nikon DSLR, iPhone 6s plus, iPhone 12 pro, sony compact), issue here: HDR material from iPhone 12 pro is perfect, rest is now greyish, darker and not vibrant anymore. So I can choose between two evils... do you have any suggestion?

Votes

Translate

Translate

Report

Report
Community guidelines
Be kind and respectful, give credit to the original source of content, and search for duplicates before posting. Learn more
community guidelines
LEGEND ,
Dec 05, 2021 Dec 05, 2021

Copy link to clipboard

Copied

If you're getting "grey-ish" and low on saturation, with media that is all either Rec.709 'native' or conformed/transformed to Rec.709, then it's normally a problem with log-encoded media.


Which takes a 'normalization' step into Rec.709/SDR.


Some use a normalization LUT ... there are tons of them, typically you can find several for each camera. They're also easy to make, I roll my own nearly always. Use the Basic tab Exposure slider to set the middle of the 'trace' of the Waveform and/or RGB parade scopes to 50IRE on the left-side scale.


Then use Contrast to expand contrast, Sat to expand sat. If you need further work, use  the Shadow and Highlight controls.


When you have the image looking "normal", nothing clipped or crushed, sat good but still within bounds on the Vectorscope, you can either save that Lumetri instance as a preset for dropping on that camera routinely, or as a .cube LUT.


If you save as a preset, you can drop that onto an entire selection or bin of clips to 'normalize' them in one action.


If you save as a LUT, I recommend applying such in the Creative Tab's "Look" slot, as then you can go to the Basic tab controls and 'trim' a clip into that LUT correcting for any differences in exposure and contrast between that clip and the one you created the LUT from.


Neil

Votes

Translate

Translate

Report

Report
Community guidelines
Be kind and respectful, give credit to the original source of content, and search for duplicates before posting. Learn more
community guidelines
Participant ,
Dec 28, 2021 Dec 28, 2021

Copy link to clipboard

Copied

This is a nightmare! I'm trying everything you've suggested here (and on your other long tutorial) and all my footage is either washed out or grey. I open the original files in Quicktime and the colors are gorgeous, rich and sharp. In PR, it looks like absolute garbage. When I try to put everything at 709, it's blown out. When I leave it in original color space, it's grey. When I try someone else's suggestion of colorspace 2020, it's grey. When I go back to PR 15.4 as others suggested, it crashes nonstop and Adobe support tells me I need to upgrade to 2022 to resolve the crashes.


I've never felt so close to giving up. Adobe seriously has thrust a knife in the hearts of every up-and-comer small operation out there who used to be able to turn around an edit with a basic working knowledge of the software. They've clearly decided none of us matter and have gone after the Avid market. I've missed so many deadlines I'm not sure my company can survive it. My word means nothing to anyone I work with anymore because of all of these problems causing a major slowdown in my turnaround. Yeah, I get it - hire a REAL editor. I'd love to, but I need the next few months of solid content creation to get monetized so that I can DO that! Adobe is making that impossible.

Votes

Translate

Translate

Report

Report
Community guidelines
Be kind and respectful, give credit to the original source of content, and search for duplicates before posting. Learn more
community guidelines
LEGEND ,
Dec 28, 2021 Dec 28, 2021

Copy link to clipboard

Copied

Hey, I understand the pain! This is one of the reasons they've held off for so long on adopting modern color managment user choices ... but it had to come.


First, the clips you're dealing with are either shot in HLG, hybrid log gamma, a form of HDR. Or they are a log-encoded clip meant to be used on a Rec.709 timeline, and Pr2022 is mis-interpreting them. There are several things to try for fixing this.


First, if the clips are HLG, you might set the camera to a Rec.709 space and totally avoid the problem in the future.


Next ... if the clips are a log-encoded clip from a Panasonic, Canon, or other camera, but Rec.709 for color space, you'll need to create a normalization routine. For clips in the HLG color space, you'll need to use the Modify/Interpret/Override to Rec.709 step first, then normalize. You can apply the Override to all selected clips, so you can do up to a whole bin at once.


"Grey" when you have an override to Rec.709 would tell me it's in typical log form. That it's blown out if not using the Override tells me Pr thinks it's HLG.But Premeire 2022 can also do that with some 'straight' log-encoded Rec.709 media.


Using log-encoded media has normally required the user to "normalize" that media for Rec.709 timelines. "Normalizing" log media involves increasing contrast and saturation while checking the image and most importantly the scopes to make sure you are not "crushing" any values to black nor "clipping" any values to white. And that Saturation is within bounds.


It's actually pretty easy to do. And better yet, once you've done so, you can save the work as a preset and apply it to entire bins of clips at one go. So you can spend a couple minutes with a clip on a timeline working with the Lumetri panel, save that as a preset.


Aand then simply drag/drop that to a selected group of clips. Done.


I'll give you a short bit of information on using the Lumetri basic tab  controls, then tell you how to actually and quickly work with them.


Exposure control is sort of a "lift" control, it brings up perceived brightness across most of the image, though it acts a bit more in the upper middle tones than elsewhere. Doesn't change the black point at all.


Contrast control expands or contracts the ends of the image, the black and white points. It is centered on 50 IRE or nits, whichever you want to call it. That's the left-side scale on the Waveform and RGB Parade scopes. It is the dead center of the scale. And it works exactly the same amount pushing data up from 50 as it does pushing data down from 50.


White control is just like grabbing the white point on the right end of a RGB Curves panel and moving it up/down. A bit different than the Exposure control.


Highlights moves the upper mids/highs more than other parts of the scale, but it moves everything a bit.


Shadows like the Highlights moves the shadows more than other parts, but has some effect everywhere.


PRACTICAL NORMALIZATION


Drop a clip on the timeline area. Make sure the CM settings in the Sequence settings is set to Rec.709 and you are in the Color Worskpace. Have either the Waveform or RGB Parade scopes panel open. Also have the Vectorscope YUV open.


Look at the image of the scopes. What are the darkest and lightest values? Where is the data centered?


If the data is centered in the middle, meaning it goes as much above 50 as below it, then simply increase the Contrast control setting until the data goes to maybe 90 on top (or a bit less) and 5 or so on the bottom.


If the center of the data is a bit closer to the top or the bottom than the middle, use the Exposure control to move the brightness up or down to get to the 80-90 "white" and 5 or so "black" numbers. Work between Exposure and Contrast to set the total range and brightness.


If the image now "feels" a bit dark or light, use the Shadows or Highlights control to fix it.


Now with an image with a good tonal range, use the Satruation control to get the amount of color you want without exceeding the limits of the Vecotorscope.


That's ... it. By the third time you've done it, it takes a few seconds is all. Maybe 10-20 seconds.


But better yet ... now go to the Lumetri panel tab, the three-bar menu ... "Save as a preset". Name it so you know what it is, and what clips to use it with. Also give a bit of info in the description area.


Now, for any similar clips, you simply select one or more in a bin, drag/drop, done. And you can open that Lumetri instance if needed to adjust it better for that clip in the Effects Control Panel's Source tab.


Neil

Votes

Translate

Translate

Report

Report
Community guidelines
Be kind and respectful, give credit to the original source of content, and search for duplicates before posting. Learn more
community guidelines
Participant ,
Dec 28, 2021 Dec 28, 2021

Copy link to clipboard

Copied

You are truly a saint among humans for taking such time with the intermediate novices like myself! I need to sit and take some time with your last message. But I thought you'd get a kick out of knowing that right after I posted my response 2 hours ago, I went to Adobe Support online for help. In 2 hours of help, the Adobe rep took control of my screen and turned color space settings on and off over and over, to very little effect. Each time saying "does it look better to you now". I had the original open on Quicktime, and kept pointing to the color differences. An hour of being told "I don't see the color differences", only to find out that they were comparing the source monitor and project panel - which, yes looked exactly the same - either blown out or greyish. Then we switched to changing PR preferences. That went on for another hour. Clicking things on and off as I watched. Doing all the things I'd already tried from the suggestions here on the boards. "Does it look better now?" "Um, not unless you think green and blue are the same color, and that our faces were made up for a vampire movie". (I wasn't that flippant, but I kind of wanted to be!). 2 hours later, the "punch line" was "I think you should roll back to 15.4". I explained that I've tried that - and it means losing all of my promos and trailers and after effects sequences that I use over and over and created on 2022. A few more button clicks. A request to play the original on VLC "because it may match the colors on the Premiere Pro version". I explained that I shot this footage 3 nights ago and the way Quicktime showed it, is how it looked in real life. I then asked "isn't the point of a video editing program to make my work look better? Not worse than it did when it came out of the camera?" To which the response was: "I think I need to have Senior Support contact you to see if they can figure it out". I'll definitely report back what the result of that call is. I would honestly be happy with a general setting for all of my iphone/gopro footage that I can use over and over and have it look as close as possible to what the original was. I'm happy to learn all about the color profile world and all of that when I have time. But for my purposes right now, I need to put out a couple episodes a week of a lifestyle/personality show that doesn't require Spielberg level colorization tweaking. Silly me though that buying a new macbook pro M1 Pro machine would resolve all the issues I was having on my 2017 intel iMac. I didn't need the new machine to clean the house and the dog, but maybe get me as far as washing some dishes? If you'll pardon the comparison.


Looking forward to reading your post above. Your posts are always SO informative and helpful.

Votes

Translate

Translate

Report

Report
Community guidelines
Be kind and respectful, give credit to the original source of content, and search for duplicates before posting. Learn more
community guidelines
LEGEND ,
Dec 28, 2021 Dec 28, 2021

Copy link to clipboard

Copied

Ahh, Adobe ... Help. It's unfortunate that though there are some great Adobe help staffers, that's not the experience so many users get. In the future, as soon as you get a 'live' person either online or via phone, ask for the "video queue" as that gets you up to someone with specific Premiere Pro experience, rather than a generalist working from a cheat sheet.


Your problem is "doable" with a bit of knowledge and practice. We'll get you going.


Neil

Votes

Translate

Translate

Report

Report
Community guidelines
Be kind and respectful, give credit to the original source of content, and search for duplicates before posting. Learn more
community guidelines
New Here ,
Dec 30, 2021 Dec 30, 2021

Copy link to clipboard

Copied

Hey guys I am reading these responses and am still lost in how to fix the iPhone footage problem. I went back to 15.4 as the Adobe help line told me. The problem is that my company is requiring us to upgrade to adobe 2022 for security concerns. Is there a quick solution to this problem? I am editng 120, 30 minute videos a week all shot on iPhone and the footage is coming from sources I dont have contact with to ask them to change. Can someone help? Sorry for being so ignorant to color space changes, I just need a simple solutio if ther is one. Thank you in advance.


Votes

Translate

Translate

Report

Report
Community guidelines
Be kind and respectful, give credit to the original source of content, and search for duplicates before posting. Learn more
community guidelines
LEGEND ,
Dec 30, 2021 Dec 30, 2021

Copy link to clipboard

Copied

Read these ... you must get some knowledge of the new and completely different color management setup in Pr 2022, as there will only be more options and settings coming. They have to up the capabilities of the program because the media (like the clips you're talking about) and exports have to allow for newer tools.


FAQ:PremierePro 2022 Color Management for Log/RAW Media


How to Set Monitors for HDR work in Premiere Pro 2022?


The quick way to work with that footage is probably select a whole bin of clips after importing them, right-click/Modify/Interpret Footage, then use the CM option at the bottom to Override to Rec.709.


Then simply make sure that the sequence settings for CM in the Sequence Settings dialog box is also set to Rec.709.


You should be able to work normally then for SDR, Rec.709 exports.


Neil

Votes

Translate

Translate

Report

Report
Community guidelines
Be kind and respectful, give credit to the original source of content, and search for duplicates before posting. Learn more
community guidelines
New Here ,
Dec 30, 2021 Dec 30, 2021

Copy link to clipboard

Copied

Thank you explaining this out a bit better. Is there a way to set all imports to always view at Rec.709, since all of my footage is from iPhones? Also I have pre-created overlays I use for the videos created in AE that are affected by the color imaging. As I stated in the previous comment I am working with such a mass amount of videos that it is difficult to change each one and each are seperate exports so I am not importing all to one bin. Thank you for taking the time with these questions.

Votes

Translate

Translate

Report

Report
Community guidelines
Be kind and respectful, give credit to the original source of content, and search for duplicates before posting. Learn more
community guidelines
LEGEND ,
Dec 30, 2021 Dec 30, 2021

Copy link to clipboard

Copied

Not at this time. So on importing, just go to the bin, right-click, Modify/Interpret Footage and set to Override to Rec.709. Takes a few seconds only ... thankfully.


And yea, I wish we had a place to set default behaviors. One panel to rule them all ... defaults, overrides ...


Neil


Color Management Panel

Votes

Translate

Translate

Report

Report
Community guidelines
Be kind and respectful, give credit to the original source of content, and search for duplicates before posting. Learn more
community guidelines
Community Beginner ,
Jan 03, 2022 Jan 03, 2022

Copy link to clipboard

Copied

This is really great, but how do you set up a proxy workflow?  Any of the preset ingest provided by Adobe all can not handle HDR.  I don't mind switching to ProRes HQ, but can not figure out how to make a preset that works for all frame sizes/rates and keeps the color override. 


Thanks,


Jason

Votes

Translate

Translate

Report

Report
Community guidelines
Be kind and respectful, give credit to the original source of content, and search for duplicates before posting. Learn more
community guidelines
LEGEND ,
Jan 03, 2022 Jan 03, 2022

Copy link to clipboard

Copied

Part of my FAQ on the new color management setup is what changed, part how to work with the changes, and part ... what ain't working at this time.


Making proxies for HLG tagged clips to use in Rec.709 ain't working. The engineers are aware of it, and trying to sort why it ain't doing what they had expected. As it is supposed to make Rec.709 proxies if you overrride the clip CM to Rec.709 prior to making proxies.


Well ... it's supposed to auto-transform the media to the sequence ... so HLG clips are supposed to be droppable on a Rec.709 sequence and be transformed to Rec.709. Which ain't happening for most media.


Perhaps the same issue.


And at this time, it might be necessary to create Rec.709 transcodes if you need to use a proxy workflow.


Neil

Votes

Translate

Translate

Report

Report
Community guidelines
Be kind and respectful, give credit to the original source of content, and search for duplicates before posting. Learn more
community guidelines