Exit
  • Global community
    • Language:
      • Deutsch
      • English
      • Español
      • Français
      • Português
  • 日本語コミュニティ
  • 한국 커뮤니티
0

Saving color corrections/grades to apply to other clips?

Engaged ,
Sep 09, 2018 Sep 09, 2018

I want to use Lumetri to do some basic color correction to one clip and apply the changes to many other clips. The clips will not be in the same sequence so I can't use a single adjustment layer. How do you save changes that can be reused? If I also choose to add a LUT after apply the basic color corrections can that be saved as well so I can just press one button somehow to apply this to the other clips?

Thanks.

663
Translate
Report
Community guidelines
Be kind and respectful, give credit to the original source of content, and search for duplicates before posting. Learn more
community guidelines

correct answers 1 Correct answer

LEGEND , Sep 09, 2018 Sep 09, 2018

There are a number of ways to save and apply Lumetri settings.

First, you can always right-click a clip, copy attributes. Then click on clips or a selection of clips and do paste attributes, and in the ensuing dialog box uncheck everything but Lumetri.

Second, save a clip's work as a preset, name it, and apply that to selected clips. This way allows you to always be able to add modifications to taste as needed per clip. Presets can be applied to clips in bins, of course.

Third, export as a .cube LU

...
Translate
LEGEND ,
Sep 09, 2018 Sep 09, 2018
LATEST

There are a number of ways to save and apply Lumetri settings.

First, you can always right-click a clip, copy attributes. Then click on clips or a selection of clips and do paste attributes, and in the ensuing dialog box uncheck everything but Lumetri.

Second, save a clip's work as a preset, name it, and apply that to selected clips. This way allows you to always be able to add modifications to taste as needed per clip. Presets can be applied to clips in bins, of course.

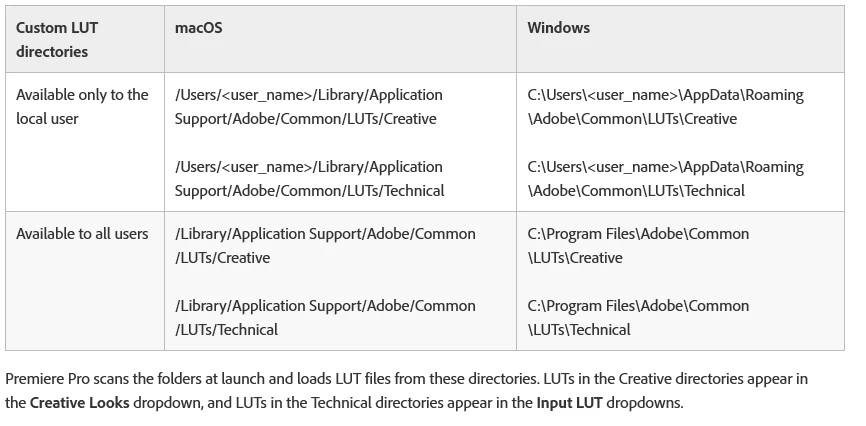
Third, export as a .cube LUT or a Look. This can be saved and then applied to other clips. For your work, if I chose this option, I would setup the LUT locations as shown in the chart below, and save the .cube in the Technical folder ... then you can browse to apply it in the Basic tab of Lumetri, it's applied before everything else, and you can do additional work in the Basic and following tabs all within one Lumetri instance for a bit better playback performance.

For using the chart below, it shows you where and what name you need to use to make locations that will be seen by PrPro, AfterEffects, and Media Encoder for LUT locations. One thing it doesn't say ... is you have to manually add the Technical and Creative folders at the end of the chain shown ... so after you get to the place on-disc where you're in that LUTS folder, you add the Technical or Creative folders.

Then store your LUTs/Looks there according to where you want to use them ... Basic tab, or Creative tab. In Creative tab, you can dial-down the 'intensity' of a LUT or Look, btw ...

Neil

Lumetri LUTs Looks Findable Locations.PNG

Translate
Report
Community guidelines
Be kind and respectful, give credit to the original source of content, and search for duplicates before posting. Learn more
community guidelines