• Global community
    • Language:
      • Deutsch
      • English
      • Español
      • Français
      • Português
  • 日本語コミュニティ
    Dedicated community for Japanese speakers
  • 한국 커뮤니티
    Dedicated community for Korean speakers
Exit
2

Shots overexposed by exporting

Community Beginner ,
May 12, 2022 May 12, 2022

Copy link to clipboard

Copied

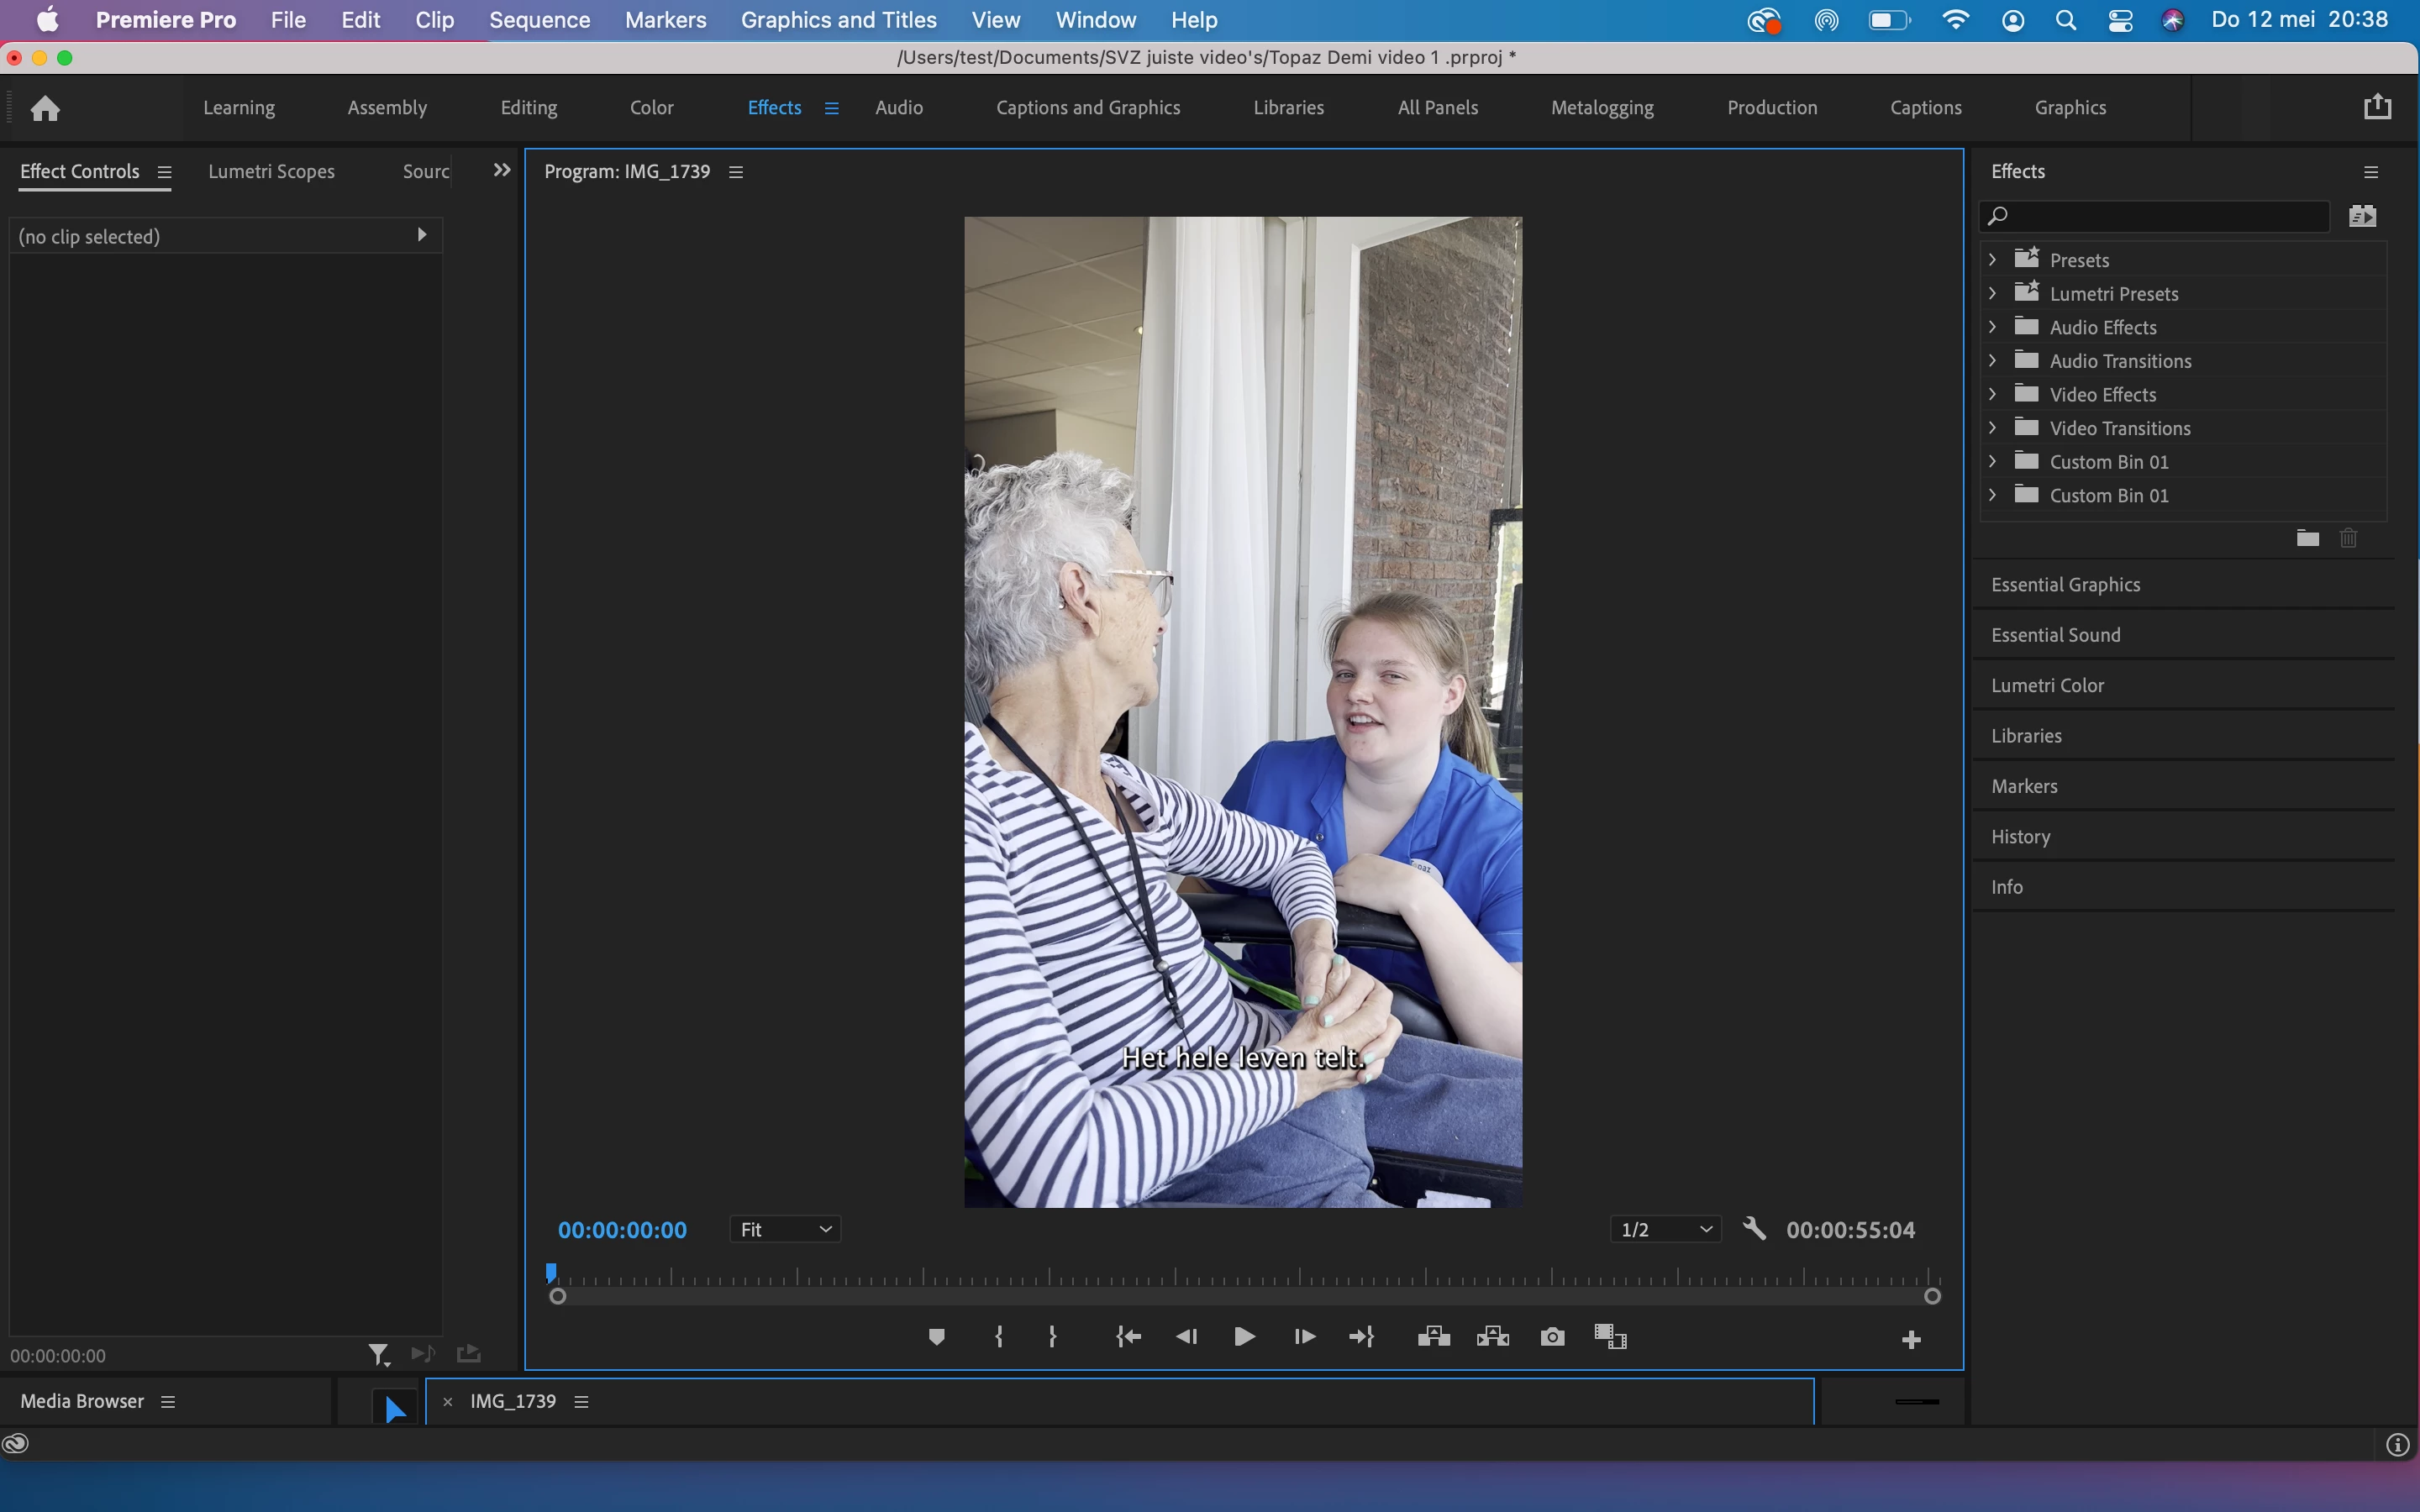
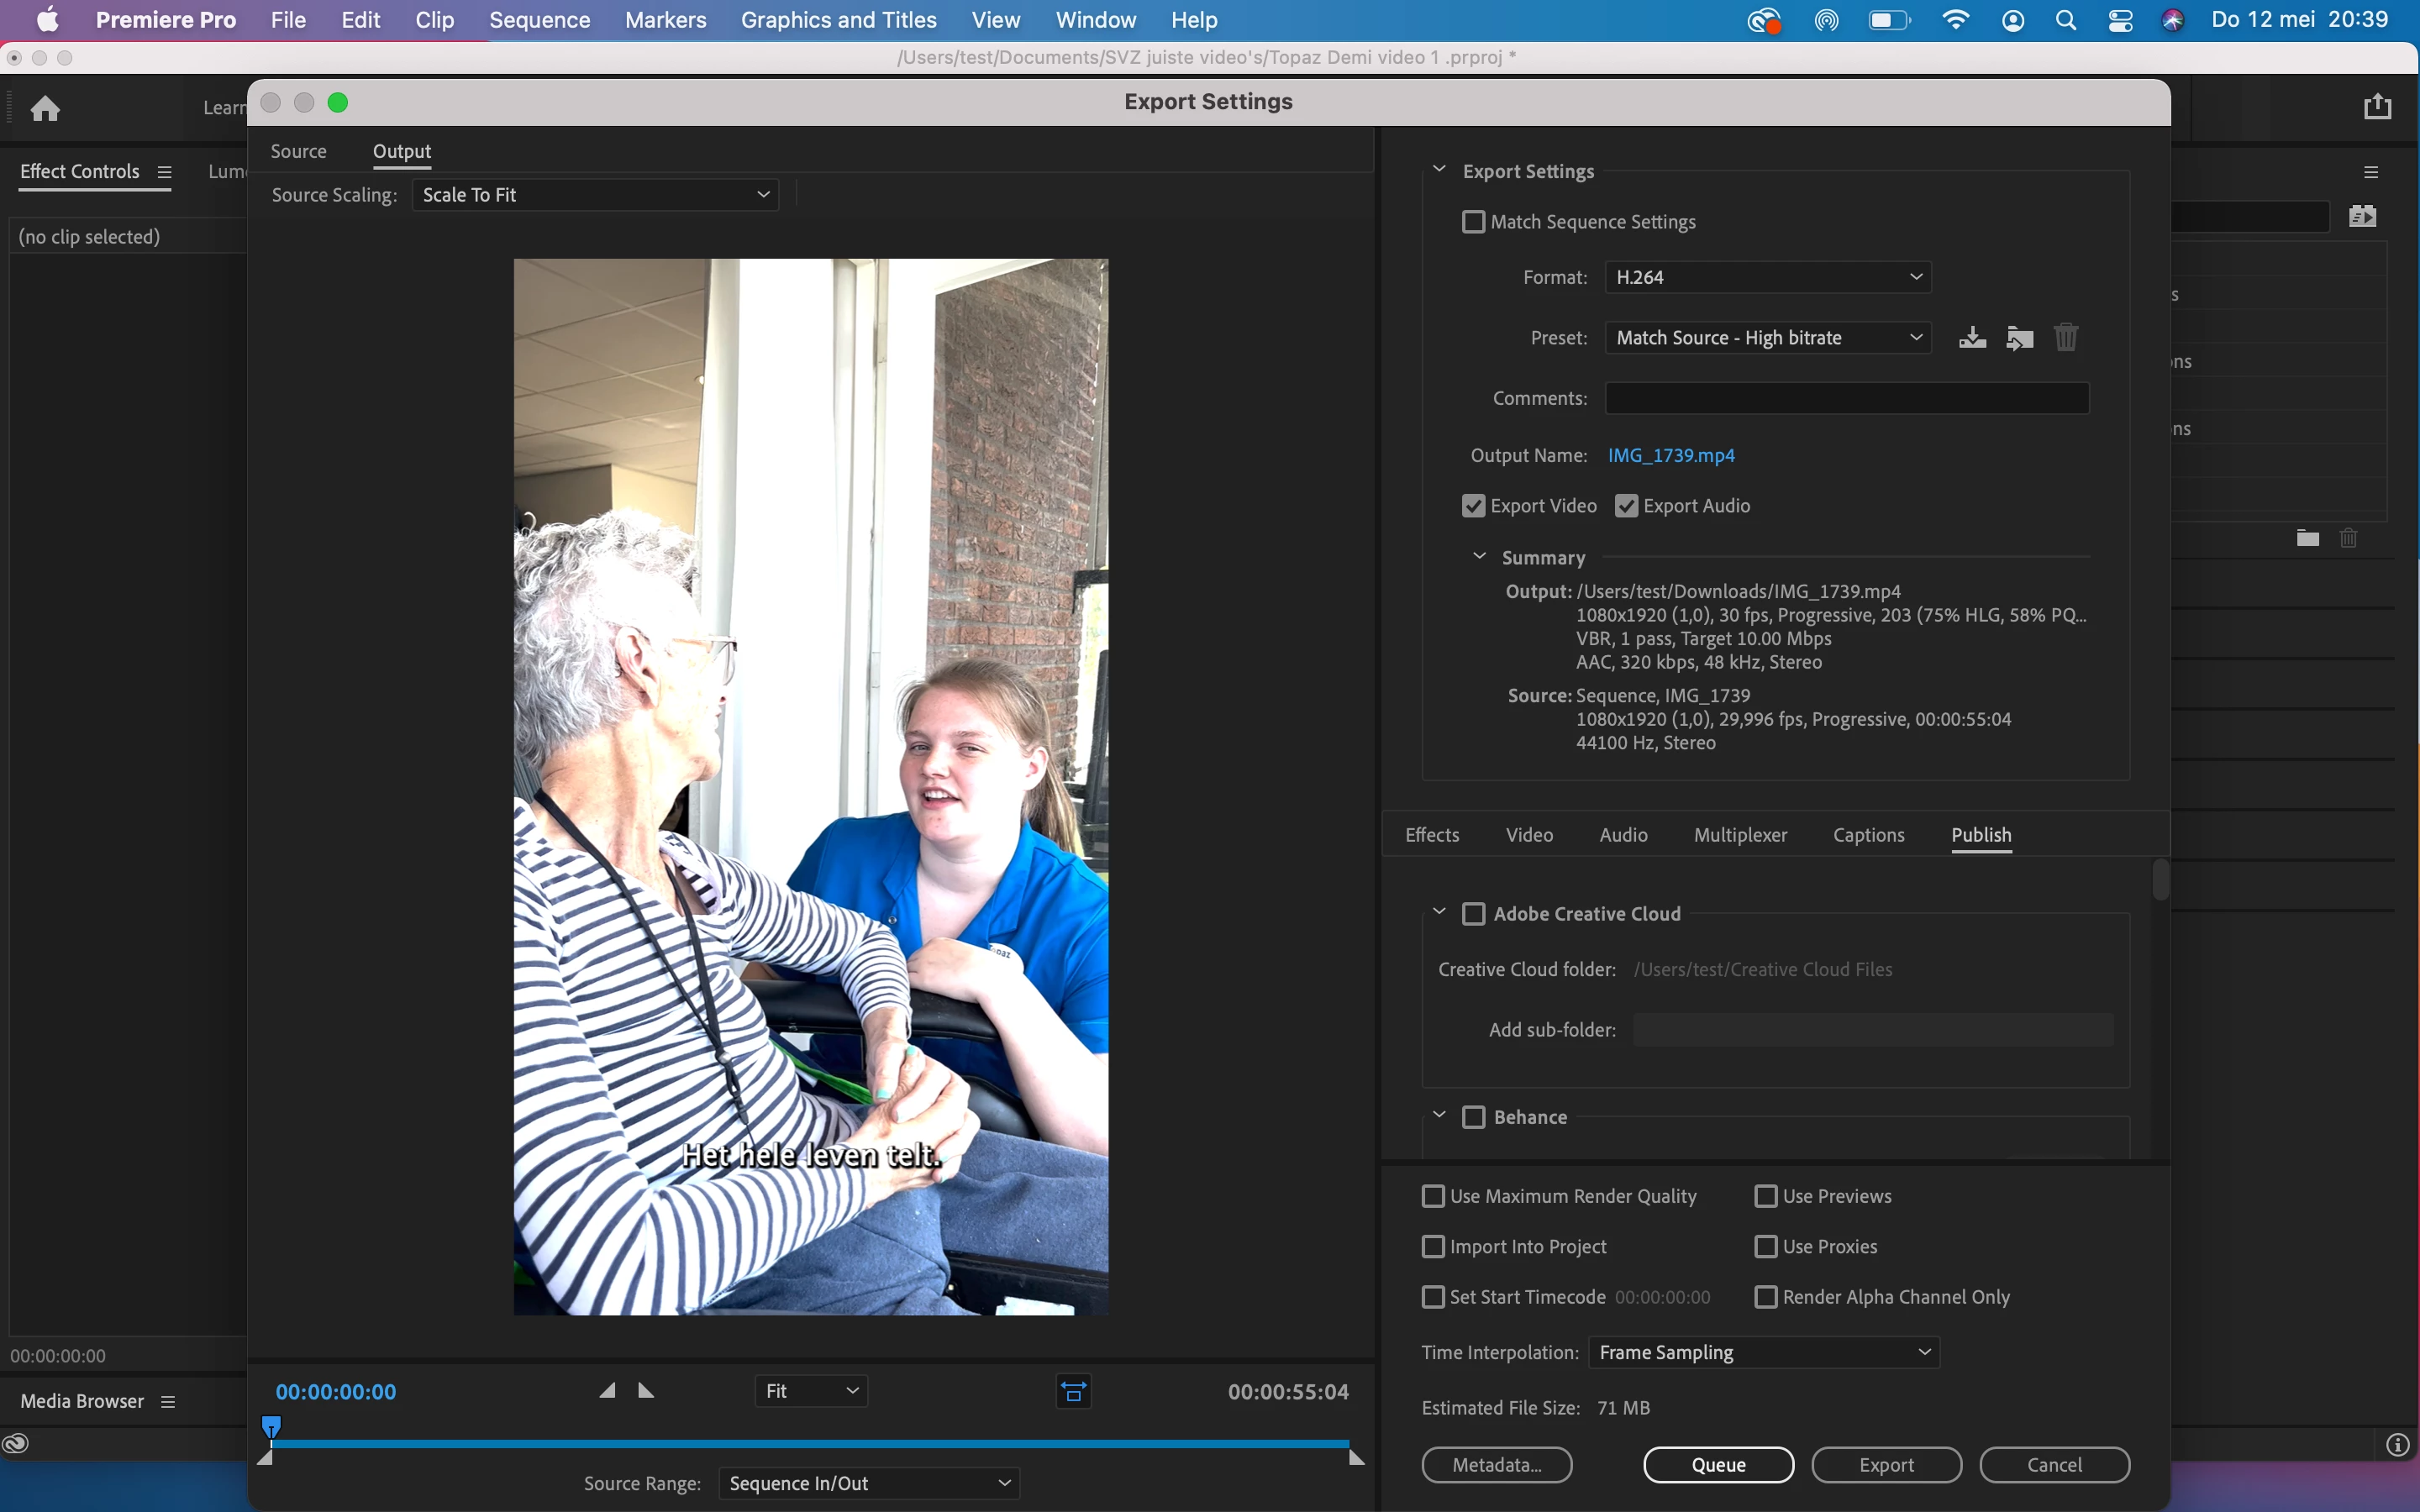
when i try to export my video the images are suddenly overexposed. In the editing part the images are good. Anyone an idea how to solve this? See picturesSchermafbeelding 2022-05-12 om 20.38.58.pngSchermafbeelding 2022-05-12 om 20.39.07.png

TOPICS
Export

Views

10.5K

Translate

Translate

Report

Report
Community guidelines
Be kind and respectful, give credit to the original source of content, and search for duplicates before posting. Learn more
community guidelines

correct answers 1 Correct answer

Community Expert , May 12, 2022 May 12, 2022

Votes

Translate

Translate
Community Expert ,
May 12, 2022 May 12, 2022

Copy link to clipboard

Copied

Votes

Translate

Translate

Report

Report
Community guidelines
Be kind and respectful, give credit to the original source of content, and search for duplicates before posting. Learn more
community guidelines
LEGEND ,
May 12, 2022 May 12, 2022

Copy link to clipboard

Copied

Short story:


The phone is set to shooting HLG, an HDR form. Even bringing the highs down with Lumetri controls on an SDR/Rec.709 timeline so they look fine will get ignored on export.


So ... go to the project panel. Select one or more clips. Right-click/Modify/Interpret Footage.


Go to the bottom, to the new color management controls. Set the Override option to Rec.709.


And maybe ... set your phone to shoot SDR/Rec.709 files to avoid the hassle.


Neil

Votes

Translate

Translate

Report

Report
Community guidelines
Be kind and respectful, give credit to the original source of content, and search for duplicates before posting. Learn more
community guidelines
Community Beginner ,
Jun 13, 2022 Jun 13, 2022

Copy link to clipboard

Copied

Hi Neil, 

Thanks for the reply. I've tried everything you said, but there still is no difference..  Do you have some other tips? Thank you in advance!  

Votes

Translate

Translate

Report

Report
Community guidelines
Be kind and respectful, give credit to the original source of content, and search for duplicates before posting. Learn more
community guidelines
LEGEND ,
Jun 13, 2022 Jun 13, 2022

Copy link to clipboard

Copied

So ... you went to the Project panel, selected the clips and set the Override to Rec.709, then made sure the Sequence CM settings were Rec.709. The image looked fine with Rec.709 scopes, and you exported to a 'normal' export preset, not one with HLG or PQ in the name?


If all that is correct, I'd love it if you could supply a clip for me to test on my rig.


Neil

Votes

Translate

Translate

Report

Report
Community guidelines
Be kind and respectful, give credit to the original source of content, and search for duplicates before posting. Learn more
community guidelines
Community Beginner ,
Jun 14, 2022 Jun 14, 2022

Copy link to clipboard

Copied

Yes I've done that. It changes a little bit but it still looks flat and not even close as good quality as the original video. See the files.. 

Votes

Translate

Translate

Report

Report
Community guidelines
Be kind and respectful, give credit to the original source of content, and search for duplicates before posting. Learn more
community guidelines
LEGEND ,
Jun 14, 2022 Jun 14, 2022

Copy link to clipboard

Copied

" ...as the original " ... as viewed, where? It seems so many people think that say the camera screen is a 'good' screen, when there isn't a photometrically accurate camera screen out there. Not even the $70,000 Red, Arri, or Sony rigs have one. The people at that level always have field monitors that are accurately set that they preview for image quality.


But even then mostly using meters, false color, and zebras for exposure checking.


And video players on computers ... um ... right. Whatever.


Check the scopes in the Lumetri panel. Adjust the image to keep slightly above black, and typically well below 90IRE on the left side scale in SDR/Rec.709 work. Except if you've got speculars from sun/clouds or reflections/light-sources that need to be above 90 and/or clipping.


Then set the contrast, shadows & highlights for tonal values ... saturation.


Neil

Votes

Translate

Translate

Report

Report
Community guidelines
Be kind and respectful, give credit to the original source of content, and search for duplicates before posting. Learn more
community guidelines
Community Beginner ,
Oct 09, 2022 Oct 09, 2022

Copy link to clipboard

Copied

Neil,


This issue has been asked hundreds of times, and we still do not feel adequately helped with this issue. I am in the midst of the same frustration. I have a video that looks great in the preview, but it is unusable once exported. 


We must admit it is preposterous to ask iPhone users to change their camera settings!!!! 


This is where I am at. I import the footage. It looks great! I made my edits, and for this purpose, I do zero color correction because it was shot in ideal settings. Next, while exporting I try various adjustments you mentioned and nothing is adequate.


I even tried changing the color space to rec. 2100 HLG  for export, but this makes QuickTime unusable. 


The preview is a perfect render of the media anyways!!! do you realize how nonsensical this problem is??? 


I am sorry for my obvious frustration, but I have changed the color interpretation settings too, but the footage that looked GREAT on the first import now looks bad, and I would need to recolor everything every time. 


Please help.

Votes

Translate

Translate

Report

Report
Community guidelines
Be kind and respectful, give credit to the original source of content, and search for duplicates before posting. Learn more
community guidelines
LEGEND ,
Oct 09, 2022 Oct 09, 2022

Copy link to clipboard

Copied

You are choosing to use HLG footage. You can set that in the iPhone, as many others have. You don't have to.


But if you choose to stay with HLG, and want to use it on a Rec.709 sequence, you must also then select the clips (and do it in batches, of course!) and do proper color management so Premiere knows you want that transformed to use on a Rec.709 sequence.


Select one or more clips in the bin, right-click/Modify/Interpret Footage, set the Override to Rec.709. Takes a few seconds for the whole batch of clips.


Now use those on a Rec.709 timeline, use a Rec.709 export preset, it all simply works.


But now that Premiere is no longer built as a simple Rec.709 system, users MUST do their own color management.


Neil

Votes

Translate

Translate

Report

Report
Community guidelines
Be kind and respectful, give credit to the original source of content, and search for duplicates before posting. Learn more
community guidelines
Community Beginner ,
Oct 09, 2022 Oct 09, 2022

Copy link to clipboard

Copied

The clips I imported were already rec.709. I have attached a screenshot of the properties window for an example clip. Since I have rec.709 already set I should be able to export with default settings. Here is a screenshot of the defaults. 


I am sorry that I sound exasperated. I am trying to remain calm. 


When I export this, It is overexposed. I am running macOS on the newer M1 chip with the latest version of Premiere. 


I know that there are some shenanigans going on here because if I take the clip I just exported and import it again it is still overexposed in the preview. In fact, I can repeatedly import and export and eventually I get a white image.

Votes

Translate

Translate

Report

Report
Community guidelines
Be kind and respectful, give credit to the original source of content, and search for duplicates before posting. Learn more
community guidelines
Community Beginner ,
Oct 09, 2022 Oct 09, 2022

Copy link to clipboard

Copied

If I try to export with a different colorspace I get the following error when I try to open the clip in QuickTime. Here is the error, and here is the setting.

Votes

Translate

Translate

Report

Report
Community guidelines
Be kind and respectful, give credit to the original source of content, and search for duplicates before posting. Learn more
community guidelines
LEGEND ,
Oct 09, 2022 Oct 09, 2022

Copy link to clipboard

Copied

Exasperation noted ... and yea, been there done that. Wanted to throw things at the screen, you name it.


If the clips are log-encoded, Premiere's new setup oft mis-interprets that as HLG ... as well ... some Rec.709 is log-encoded, but ALL HDR is log-encoded, and it's currently 'seeing' some log-encoded Rec.709 as "HLG" on a practical basis.


Another thing, as it says these are 'full range', which is unfortunate if they are basic Rec.709, as the encoding for Rec.709 YUV clips (basically everything 8 and 10 bit, some 12 bit) is expected by standards to be encoded in 'limited', and only full RGB 12 bit files in 'full'. Things like DPX image sequences.


The full and limited encoding of the file doesn't have anything to do with the data range of the file, just how the data is encoded, which is SO confusing as Hades. But trips up the 'standard compliant' apps like Premiere at times.


Do you have a clip that you could drop-box type upload so I or others could test it on our rigs?


Neil

Votes

Translate

Translate

Report

Report
Community guidelines
Be kind and respectful, give credit to the original source of content, and search for duplicates before posting. Learn more
community guidelines
Community Beginner ,
Oct 09, 2022 Oct 09, 2022

Copy link to clipboard

Copied

I am more than happy to provide you with the clip for you to check on one of your rigs.  

https://drive.google.com/file/d/1jfodwfeP04T72SWrSj7c9DFt54beVGkL/view?usp=sharing 


As I am experiencing it, every clip I upload from an iPhone, GoPro, and Insta360 go2 shows a rec. 709 colorspace with full range. I wonder is there a way to export "full range" rec. 709?


Apologies for the file size, I didn't want to modify it before sending it.

Votes

Translate

Translate

Report

Report
Community guidelines
Be kind and respectful, give credit to the original source of content, and search for duplicates before posting. Learn more
community guidelines
LEGEND ,
Oct 09, 2022 Oct 09, 2022

Copy link to clipboard

Copied

I'll be back in the shop tomorrow, I'll take a look at it then.


Neil

Votes

Translate

Translate

Report

Report
Community guidelines
Be kind and respectful, give credit to the original source of content, and search for duplicates before posting. Learn more
community guidelines
Community Expert ,
Oct 09, 2022 Oct 09, 2022

Copy link to clipboard

Copied

I tried your clip: nothing is over exposed. On import nor on export.

Its a standard mp4 quicktime clip 709 color.

Turn off color managment in the Preferences.

Which player are you using to view the clip outside Premiere?


Votes

Translate

Translate

Report

Report
Community guidelines
Be kind and respectful, give credit to the original source of content, and search for duplicates before posting. Learn more
community guidelines
Community Beginner ,
Oct 09, 2022 Oct 09, 2022

Copy link to clipboard

Copied

Hi Ann, 


Thank you so much for joining the conversation. Do you notice the washout on export? I ran an experiment where I exported with default settings, rec.709. When I reimport and re-export multiple times the washout gets progressively worse, so there indeed is a problem that involves exporting in PP. Would you mind suggesting an alternative for me? could I possibly export in a file type that we are sure will not have distortion, so I can use an alternative program to transcode it to h.264? Is that a good idea?


Thanks Ann.

Votes

Translate

Translate

Report

Report
Community guidelines
Be kind and respectful, give credit to the original source of content, and search for duplicates before posting. Learn more
community guidelines
Community Expert ,
Oct 09, 2022 Oct 09, 2022

Copy link to clipboard

Copied

Export with a High quality preset: same framerate as source not 30.

Votes

Translate

Translate

Report

Report
Community guidelines
Be kind and respectful, give credit to the original source of content, and search for duplicates before posting. Learn more
community guidelines
New Here ,
Apr 24, 2023 Apr 24, 2023

Copy link to clipboard

Copied

This method worked for me. For anyone uing an Osmo, I noticed I had the 'Dolby Vision' turned on, and makes my iPhone record in HDR, even if HDR setting is turned off in the Camera app settings on my iPhone. I turned both of them off and now it records in the proper format. Hopefully this helps anyonee else.

Votes

Translate

Translate

Report

Report
Community guidelines
Be kind and respectful, give credit to the original source of content, and search for duplicates before posting. Learn more
community guidelines
Community Expert ,
May 12, 2022 May 12, 2022

Copy link to clipboard

Copied

Votes

Translate

Translate

Report

Report
Community guidelines
Be kind and respectful, give credit to the original source of content, and search for duplicates before posting. Learn more
community guidelines
New Here ,
Mar 20, 2023 Mar 20, 2023

Copy link to clipboard

Copied

I had this same exact issue. You need to go to sequence settings and make sure "working color space" is set to rec 709. You may have to re-do your color grading after setting it as the pictures are now overexposed on the timeline. But this way the picture won't overexpose after export. 

Votes

Translate

Translate

Report

Report
Community guidelines
Be kind and respectful, give credit to the original source of content, and search for duplicates before posting. Learn more
community guidelines
New Here ,
Apr 05, 2023 Apr 05, 2023

Copy link to clipboard

Copied

Thanks brother it works 

Votes

Translate

Translate

Report

Report
Community guidelines
Be kind and respectful, give credit to the original source of content, and search for duplicates before posting. Learn more
community guidelines
New Here ,
Sep 14, 2023 Sep 14, 2023

Copy link to clipboard

Copied

You have no idea how much this helped me. I've been struggling for the past hour trying to figure out where I was going wrong. Thank you so much

Votes

Translate

Translate

Report

Report
Community guidelines
Be kind and respectful, give credit to the original source of content, and search for duplicates before posting. Learn more
community guidelines
LEGEND ,
Sep 14, 2023 Sep 14, 2023

Copy link to clipboard

Copied

Three places must match for color space ...

  • Clip color space
  • Sequence working color space
  • Export preset color space


If they do it works. Do not try to make an SDR preset into one for HDR, or vice versa.


Use only export presets without a color space name at the end for SDR/Rec.709 exports of Rec.709-set clips on a Rec.709 sequence.


Use only export presets with the CORRECT HDR tag in the preset name for HDR exports. With matching clip CM, working sequence CM, and export preset CM.

Votes

Translate

Translate

Report

Report
Community guidelines
Be kind and respectful, give credit to the original source of content, and search for duplicates before posting. Learn more
community guidelines
New Here ,
Dec 18, 2023 Dec 18, 2023

Copy link to clipboard

Copied

The overexposure is a glitch on adobe's end causing the scanned image to be overexposed. The images looks perfect then morphs when it's saved. Please fix this!

Votes

Translate

Translate

Report

Report
Community guidelines
Be kind and respectful, give credit to the original source of content, and search for duplicates before posting. Learn more
community guidelines
LEGEND ,
Dec 18, 2023 Dec 18, 2023

Copy link to clipboard

Copied

quote

The overexposure is a glitch on adobe's end causing the scanned image to be overexposed. The images looks perfect then morphs when it's saved. Please fix this!


By @Eva34331384nv0t


This thread has been about camera created images, not scanned images.


So ... are you actually talking about an image created by a scanner, or by a camera? And by "saved" do you mean export, and if so, did the export preset match the sequence color management?


And either way, if you don't set color management correctly  ... which is under the user control ... "Adobe" can't fix anything. Especially if you're on a Mac, with their odd and non-standard video color management.

Votes

Translate

Translate

Report

Report
Community guidelines
Be kind and respectful, give credit to the original source of content, and search for duplicates before posting. Learn more
community guidelines