Copy link to clipboard
Copied
Hello..
I'm making a very simple video that needs to have plain colour backgrounds here and there, that match a brand colour. I've tried putting the hex code in when making the colour matte, but the hue it generates when I drag the matte into the sequence is nothing like what it should be. I've also tried making a flat colour jpg in Photoshop (with Adobe RGB 1998 colour profile applied, and no conversion happening when I export it), and bringing that into Premiere but I get a different (and still wrong) hue. So I can see Premiere is applying some kind of colour profile or grading, but I cannot work out how to make it stop. I really don't need anything too complicated, ideally I'd just like it to be as close to the bog standard Adobe RGB 1998 profile as possible so it looks closer to what people will expect.
I've looked at help pages to do with Lumetri colour, but it talks about changing the settings - I'm running Premiere 2023 and no settings for Lumetri are visible to me. Unticking the boxes in the Lumetri panel has no effect on the way the colour looks. I've had a look through project and sequence settings but still can't see any way of applying a colour profile. I don't really know what I'm doing with this particular issue so if anyone could please advise a simple way of getting more accurate colours I'd appreciate it.
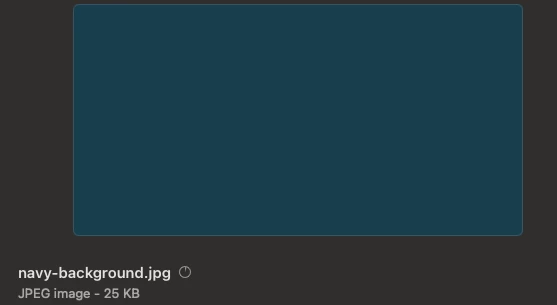
This is how the jpg from Photoshop looks (correct):
And this is how it looks when I bring it into the Premiere sequence (not correct):
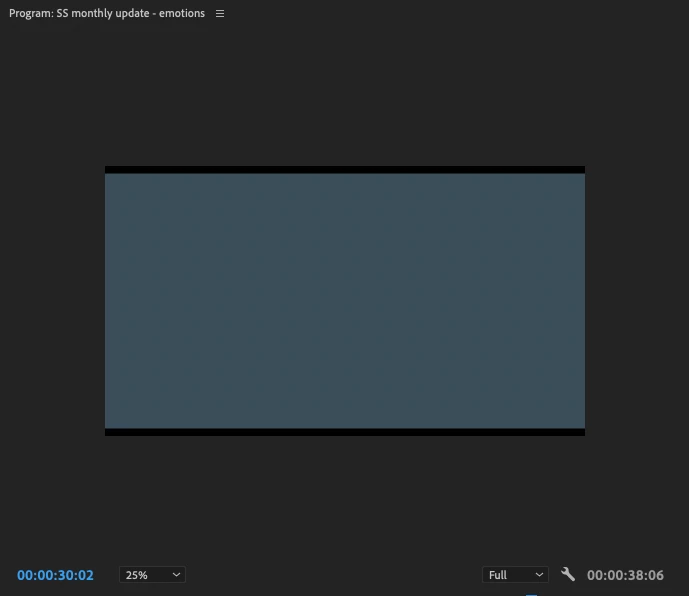
Thank you.
If you click on Premiere Pro in the menu you can go to preferences. There under General there is a checkbox for Use Display Color Management. But now that I see this it must mean that your timeline settings are not correct either. Go to Sequence -> Sequence Settings and see if the timeline is set to Rec.2100 because it should be Rec.709. That would explain the internal difference since the source monitor is not managed in the same way as a timeline->program monitor. It just views the source as i
...Copy link to clipboard
Copied
Have you tried exporting to a video file? What do you get as an output or should you export one frame?
Copy link to clipboard
Copied
Looks the same unfortunately. I've posted in reply to someone else below with more info if this helps.
Copy link to clipboard
Copied
SDR video isn't A-RGB color primaries & color space, it's sRGB. That's part of your issue, the Photoshop image should be sRGB.
And is your monitor set for sRGB or Rec.709 ... or for some other color space? That can also be an issue. Monitor should be set for Rec.709/ and/or sRGB.
Copy link to clipboard
Copied
Here's how general footage is changing when I bring it into the sequence. On the left is how it looks when I view it in the source panel, and on the right is the sequence I'm building. I think the same treatment is being applied to everything I bring into the sequence, including the flat colours.
How can I tell what setting my monitor's on? Had a look in system prefs but not sure this is it.
Copy link to clipboard
Copied
Leaving the complex video standards vs web viewing aside for a moment, if you want a numerical match without any converion you can do 2 things.
1. Open the file in Photoshop and go to Edit->Assign Profile and set it to Don't Color Manage. Then save it as whatever format you want it and make sure "convert to sRGB" is disabled in the save/export options.
2. You are talking about pure color backgrounds so you might as well generate them inside Premiere instead. Just add a new Color Matte and give it one of the brand colors and the accompanying name.
[edit] I see you already tried number 2. But just to verify it's not some other error, make sure in Premiere general settins [display color management] is turned off. Now check the color vs Photshop where you've set the profile to Don't Color Manage. If it's still different there is something else going on.
Further more Adobe RGB is not the space client colors are defined in, unless perhaps in your instance that is explicitly specified. It's typically web based which means sRGB.
Without opening pandoras box too much, you probably want to set your macbook to sRGB / web setting. The stupid thing about that preset is you can't change brightness, but you can make a custom profile based on that one and then set your desired nits. I'd recommend 120nits for controlled average office up to 180 for bright office.
If you keep your display set to P3 1600nits you're forced to work fully colormanaged which for an amateur makes things very complicated because video standards in the current year still don't play very nice with web.
Copy link to clipboard
Copied
Thanks for this. I did mention that I don't know where to find the colour management settings in Premiere, that's the reason I posted - could you tell me where I'd find 'display colour management' please?
If you take a look at the screengrab I've uploaded to the reply above yours - these two views are on the same monitor, at the same time, and Premiere is applying some kind of profile or grading to the sequence footage, because as soon as I drag it into the sequence, it looks wrong, but when I view it in the source panel, it's fine - see below screengrab. So I think Photoshop is a red herring and best ignored for now.
Copy link to clipboard
Copied
If you click on Premiere Pro in the menu you can go to preferences. There under General there is a checkbox for Use Display Color Management. But now that I see this it must mean that your timeline settings are not correct either. Go to Sequence -> Sequence Settings and see if the timeline is set to Rec.2100 because it should be Rec.709. That would explain the internal difference since the source monitor is not managed in the same way as a timeline->program monitor. It just views the source as is afaik.
Copy link to clipboard
Copied
AH - it was that little box in the settings! I've ticked it and now the blue is appearing correctly. This was all I needed. Thank you so much.
Copy link to clipboard
Copied
No problem, but do understand that you're "viewing" your video as if the colors are P3 which is much wider than Rec.709/sRGB so once you render your video and play it back it'll look dull. You still need to set your mac display on web/design srgb with my suggested settings to get a better reference to what you're doing.
Copy link to clipboard
Copied
Sorry, only thing I would say is that when I tick the box on, my typography appears anti aliased - any suggestions?
Copy link to clipboard
Copied
I think your timeline is still HDR, what are your sequence settings? It should be set to Rec.709.
Copy link to clipboard
Copied
And what do you have your monitor settings at both in the OS and in Premiere?
The above screen grab shows you using P3 for the monitor ... which is a very wide space.
You probably should set that to Rec.709, or ... if you have it on your Mac, "HDTV" is better.
Then make sure that the Display color management in Premiere's CM stuff in the Lumetri Settings tab is set so that Display Color Management is on, on a Mac, that Extended Dynamic Range when avaiable is On. And if you don't have the HDTV option for your monitor, maybe for viewing gamma use the 1.96 QuickTime setting.
Copy link to clipboard
Copied
Sorry, could you tell me where to find my monitor settings? I don't know how to check these.
Also there's no settings tab for the Lumetri panel, I did mention that, but possibly I'm looking in the wrong place. I haven't used Premiere for a few years and everything's different.
Copy link to clipboard
Copied
I couldn't see anything about timelines on the sequence settings, whereabouts do you mean?
Copy link to clipboard
Copied
Ah sorry, I wasn't doublechecking what they define it as when commenting.
Where it says Working Color Space that needs to be set to Rec.709 instead of Rec.2100 PQ.
On your mac system preferences -> display just like that picture you showed there it says Preset: Apple XDR Display P3 1600 nits. You'll want to set that to sRGB web/design or something like that it's called. All the way at the bottom of the list. Then after selecting that, you'll want to open the preset dropdown again and select Customise Preset. It will open up a setting window based on the already chosen preset. Now change the SDR nits to 120nits instead of 80. Save it with a proper name and pick that new setting whenever you create video content for web.
And btw, I don't know what exactly happened when you created the sequence but your audio sample rate should be 48000 Hz not 32000.
Copy link to clipboard
Copied
Ahh... OK, I've changed it on the sequence settings now.
I've got this far with the display settings but I can't see what you mean about 'nits'?
Also once I changed it to 'internet and web' (if that's the one you meant), it dimmed the display and locked my brightness controls so I couldn't bring the brightness back up.
I think I created the sequence settings automatically by dragging the footage into the sequence and letting Premiere decide. They're very rough webcam recordings.
Copy link to clipboard
Copied
From that window you show above, click the + icon bottom left. That will initiate a new preset based on what you selected. There you'll be able to change the brightness for SDR to what you like. Again, I would recommend around 120-180 depending on how bright your environment is. Understand that what you set up is a reference mode, which is not intended to be altered in brightness, thus it will be locked out. You could set up two extra presets, one which is 120 and another which is 180nits and switch them depending on your location or time of day.
"I think I created the sequence settings automatically by dragging the footage into the sequence and letting Premiere decide. They're very rough webcam recordings."
For future projects you may want to consider creating a template project with just one sequence already placed. Your desired timeline / export file may be different from what your source is and especially with desktop recordings the files can be in weird formats like the 32000Hz audio sample rate which isn't standard for video. The framerate may also be variable or just something you don't want your export to be. Maybe 60fps while you want to deliver 25fps. Same applies for the resolution of course. With a small template sequence you can be sure the settings are always what they should be.
Copy link to clipboard
Copied
OK! Thank you very much for taking so much time to help me, I really appreciate it.
Copy link to clipboard
Copied
And from a comment above, are you on Pr2023?
Copy link to clipboard
Copied
Yep. I do say that in my original post.
Find more inspiration, events, and resources on the new Adobe Community
Explore Now