Inspiring
August 12, 2017
Answered

Unable to scale in Premiere Pro

  • August 12, 2017
  • 7 replies
  • 27419 views

Can someone please assist me in scaling my video larger between two keyframe points?

I simply wish the video to start to zoom in from a starting point and then end at the next point.  A simple issue, but does not work for me.

Here is what I have done:

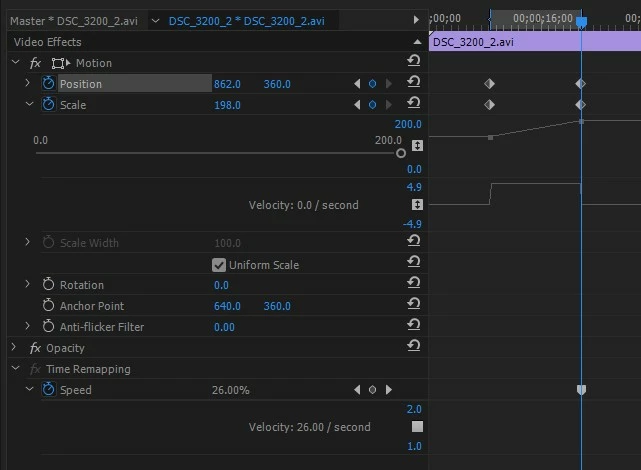
1.  In the effects panel, clicked on adding a Scale keyframe as the starting point. 

2.  Further in the timeline, clicked to add a second keyframe and then dragged the Scale slider/number to the right to increase it.

See the image below of how it looks.

This does not work as the video simply does not zoom in at all.  The video plays, but it is as if I have done nothing.

What could be going wrong here please?

I'm using Premiere Pro CC 2017

This topic has been closed for replies.
Correct answer pahlito

This old post came up on Google when I had the same issue. I tried all the other solutions but nothing worked, UNTIL I switched rendering to GPU acceleration (cuda) in the project settings. This instantly allowed me to preview scaling effects!

7 replies

pahlito
pahlitoCorrect answer
Participant
January 20, 2021

This old post came up on Google when I had the same issue. I tried all the other solutions but nothing worked, UNTIL I switched rendering to GPU acceleration (cuda) in the project settings. This instantly allowed me to preview scaling effects!

Participant
November 13, 2021

Nearly a year later, but you've saved my life haha.

Participant
October 6, 2019

The whole thing is about ur gpu i swtiched to cuda and now everything works perfectly, i hope i helped someone.

Hazem Arafa
Participant
January 30, 2020

Yes correct

Pat Finnegan
Known Participant
June 23, 2019

Resize the image to the minimum size you need.

It's possibly a bug in Pr or a limit of the GPU. This happens only when I use very large images. Although the max still image size for Pr is supposed to 256 megapixels, with as single dimension limit of 32K, I tried one image that is 10K x 5K, and it won't zoom unless I also pan. I resized the image in Photoshop to 1920x1080 and it works fine - I can zoom without panning.

Participating Frequently
April 18, 2019

I'm having the same issue, and I've been having this issue since I can remember. For whatever stupid reason, if you're trying to keyframe a position or scale on a clip, sometimes it doesn't work at all. Whether that's because there's a time remapping on the same clip, etc I don't know. Yes, I know you can nest the clip then adjust position and scale. BUT HERE'S THE PROBLEM WITH THAT. If you're working with a 4k clip and you're trying to scale up, nesting doesn't work because once you nest it and scale it, YOU LOSE QUALITY. Whereas, adjusting the position and scale on the original clip you still have the full quality clip to scale and adjust. This is a ridiculous bug that I've always dealt with.

DrTc
Inspiring
April 6, 2019

I think Premiere will not scale hold frames. Not even transform has any effect on them...

Participating Frequently
January 26, 2019

Same issue. Just spent the last 4 hours banging my head against the wall. (Actually broke an expensive mouse.) Finally got it to work when I made an adjustment to POSITION as well as scale. For some reason, if I did only scale, it did nothing. And just turning position ON did nothing as well. But if I adjusted that, just slightly, at the same positions, keyframe-wise, as scale, then they both seemed to work.

For such a basic adjustment, Adobe has made it mind-numbingly unintuitive and difficult.

Ann Bens
Community Expert
Community Expert
March 17, 2019

Best is to nest between motion keyframes and timeremapping keyframes.

Participating Frequently
March 12, 2021

This fixed my problem.  Thanks!

Ann Bens
Community Expert
Community Expert
August 12, 2017

Nest the time remapping first then add position and scale to nest.

Inspiring
August 12, 2017

Hi Ann,

Seems not to work for me, unless I'm doing it wrong.

1.  I have removed ALL keyframes from scaling, position and Time Remapping

2.  Added the first Time Remapping keyframe

The 'Speed' option turns grey after that and I cannot change the speed at all, up or down.

is there something fundamental that I'm missing here that is somehow locking these options from working at all?  To my mind it should be simply adding Time Remapping keyframes and adjust the speed.  Starting at speed 100% and then ending with Speed at 300% for example.

What am I missing here please?

Enchanted_socialite16B7
Inspiring
August 15, 2017

The horizontal line (rubber band) across the timeline view controls the speed of the clip.

Set the Time Remapping keyframe, then click and drag the rubber band to the right of the keyframe up; this will adjust the speed.

If you want to create a speed transition, drag the left side of the keyframe to the left or the right side of the keyframe to the right. The gray area between the two points indicates the length of the transition.

Hopefully you found this useful!