

- Home
- Premiere Pro
- Discussions
- Premiere Pro Color / Gamma Shift still present aft...
- Premiere Pro Color / Gamma Shift still present aft...

Copy link to clipboard
Copied
I have recently started having issues with Color / Gamma shifts when exporting from Premiere Pro. I have read multiple threads on the issues people have been experiencing while trying to view exported content on QT / VLC / YouTube / Etc., and fully understand the issues with different settings causing the gamma / color space shifts. For me though, I am seeing the issues even when I import the video back into Premiere.
I have tried exporting from DNxHD/HR and XDCAM timelines, both exported to DNxHD, H264, XMF output options and still have the issue. It does vary slightly depending on the flavor of the codec..... On the H264 I tried the REC2020 color options as well and get the same issues. The source content ranges from Sony Fs7, SHOGUN Apple ProRes, R3D, and A7riii / A7sii.
Some clips show just the slightest color shifts, ones that truthfully would never be noticed, but then other clips get the larger gamma shift issue and become very apparent. Washed out blacks, and missing a lot of the warmer tones.
I have been editing TV in Premier since switching over to the platform in 2012 and have never experienced this. I was just exporting TV shows for both national networks, and digital platforms earlier this year (Jan 2019) and everything was fine, no matter what I was exporting to. Everything looked the same once exported as it looked in my timeline in Premiere.
Any insight or suggestions would be greatly appreciated. Thanks!
System Specs:
Windows 10
Premiere Pro (version 13.1.1 build 11) I was also having this issue before this latest update
Nvidia GTX 1080ti GPU
EIZO Color Edge CS2420 monitor
EIZO EX3 puck calibrator


 1 Correct answer

Hi Neil,
This bug is also discussed in this thread:
I tried a test export to H264 with "Render at Maximum Depth" unchecked and it turned out perfect. But the export with that option checked had constricted the range unnecessarily.
 26
Replies
26
26
Replies
26

Copy link to clipboard
Copied
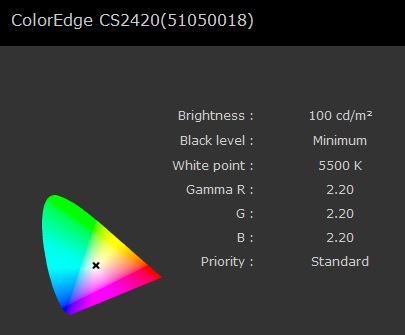
Kind of puzzled by a couple things on the ColorEdge graphic. D5500 especially, as Rec. 709 is by written standards D6500.
And while Rec.709 doesn't have a specified gamma, the vast majority of the colorists I work with are simply always set at 2.4 for broadcast unless they're doing theatrical and then shift to 2 6 for final trims.
Pr is hardwired to be used with D6500, video sRGB, white point 100 nits at gamma 2.4. That's what the Program monitor and Transmit Out monitors assume will be "there".
Neil
Copy link to clipboard
Copied
Thanks Neil, I wanted to try and add as much info as possible in case multiple things were crossed up. I will look into adjusting the settings for the current profile calibration.
My main issue though, is even when importing back into Premiere, the content looks different when viewing it in the program monitor, switching between looking at the source clip in the timeline, then the exported file, the color shifts cooler / blacks shift brighter...... this happens on my other two monitors as well as the ColorEdge. I hope that makes sense.
Copy link to clipboard
Copied
Let's get the viewing situation nailed down first. Pr is expecting a gamma 2.4 monitor, and while the shift between the 2.2 and 2.4 is fairly minor for most things, something with a lot of deep shadow details will show a difference. I'm wondering if your monitor is 2.4 while correcting, if on re-import things will be consistent.
Same with the D6500 setting.
I tend to be someone who wants all "standards" hard-set things nailed down, as only then is a lot of puzzle-thinking trouble-shooting really useful.
Neil
Copy link to clipboard
Copied
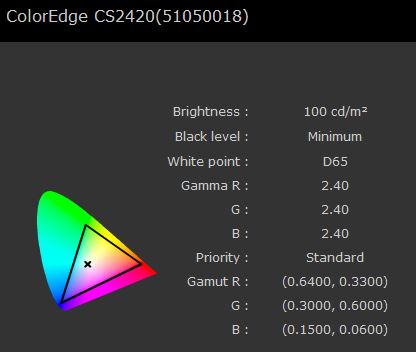
Readjustment has been made. Set 100nits, D6500, REC709, 2.4
Still having the issue when bringing the file back in. I have created two frame exports from the source monitor in Premiere. This is one clip that has the most drastic change.
I guess the oddest part for me is the fact this was not happening a couple months ago doing the same work, or ever before. Same type of content and everything...... I have talked with two other Premier editors that work with similar content and workflows, and neither of them have experienced this as well.
How it looks on timeline
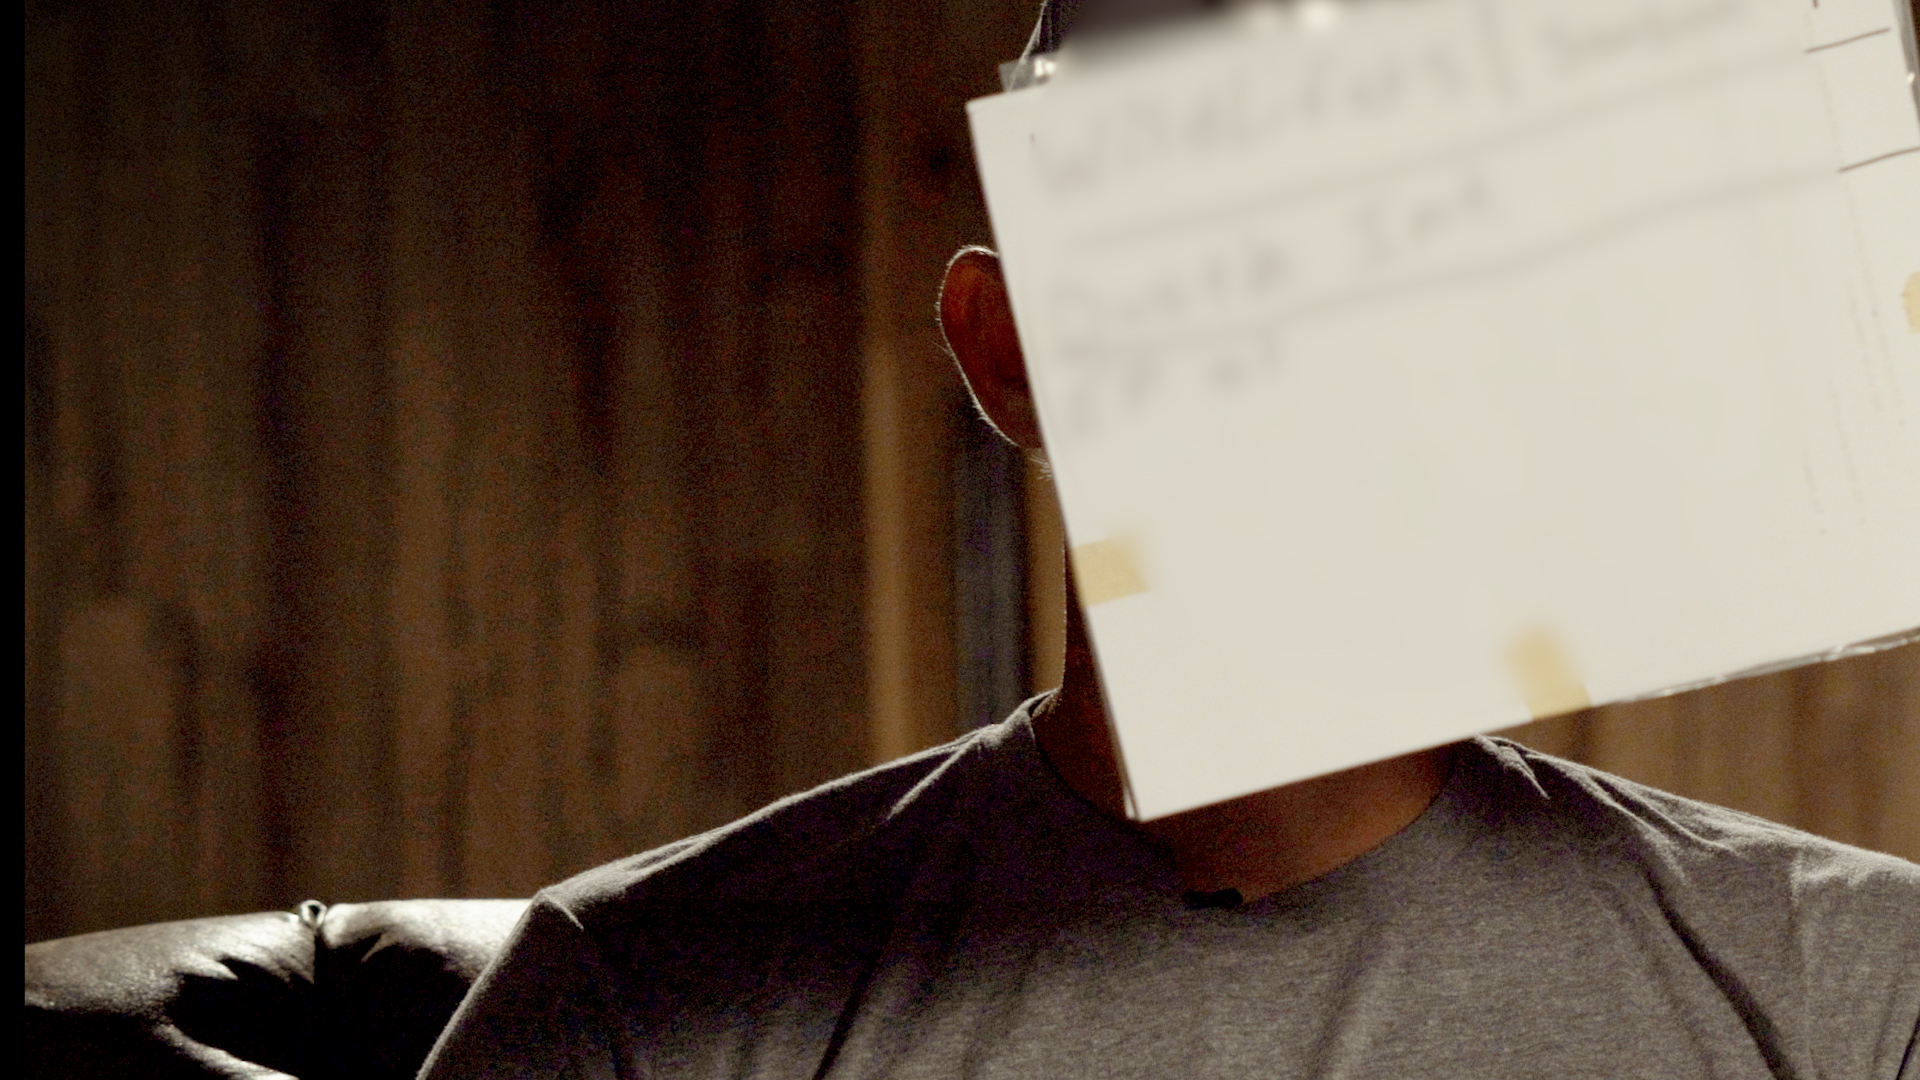
How the export looks. This is H264 but same thing happens when exporting to DNX, even when using XMF wrapper.
Thanks for the inputs and advice!
Copy link to clipboard
Copied
And that's the exported file, on re-importing? If so ... woa, that ... is so not good!
One last thing ... this is exported from a sequence, right? As the only place Pr stores changes to clips is in sequence data, not with the original clips in bins. Which I suspect you already know. I have occasionally had folks new to Pr not realize that exporting a clip from a bin did not carry any changes applied to that clip in a sequence ... but they're typically fairly new.
And not everyone is familiar that the Source monitor shows the original clip if you double-click or drag a clip into the monitor, and only shows the work of a sequence if you open a sequence in the source monitor. Typically, I compare clips in the Program monitor, especially now with the Comparison View ... I'll set that to the "wipe horizontal" mode, and have both forms of the same frame loaded in Reference side and Sequence side.
So if this is a full apples-to-apples comparison, and both show the corrections applied to the sequence ... this ain't good.
Neil
Copy link to clipboard
Copied
Oh yeah, so not good is 100% right.
Yes both clips right on the timeline, apples-to-apples comparison as upsetting as it is for me to say.....
Copy link to clipboard
Copied
Copy link to clipboard
Copied
Hi Neil,
I think in this thread, and in the thread from Dashnill, the same problem is being experienced. Why are you going into monitor calibration before even suggesting looking at the lumetri scopes? If they bring the exported file into the project, and compare the new file's lumitri scope readout with the readout from the sequence, they'll see that the actual video signal components have been effected this way by the export, regardless of monitor calibration.
This is a bug in the Premiere spring update 13.1.2 (this did not happen in 13.0). I've put in a bug report, but the fact that it is part of the suggestion section is weird, and it has to be voted on. Premiere is too expensive to have a work-halting bug like this slip through the cracks in an update.
Copy link to clipboard
Copied
For the vast majority of user-issues with color and Premiere, the underlying problem is that they do not have their system set as Premiere is hard-wired to work. At that point, there isn't a lot that can be done to reliably get them working until that system control is properly setup.
After one is working on a proper system, then ... trouble-shooting becomes far more logical and possible ... and far less time-consuming.
I think you probably pay great attention to scopes, as do I and most but certainly not all color-knowledgeable sorts working with Pr. Yes ... if someone works carefully with the scopes, and understands what they show in Pr (which is not actually what most people think they show) ... then you can get some decent information simply from the scopes.
As in ... that little setting at the lower right of the scopes panel ... options are 8 bit, float, HDR ... that only sets the scale numbers shown on the right side of the individual Parade or Waveform scope. It doesn't have any affect on how Pr is processing data.
And ... Pr works media according to the written standards ... which for most media, is 'limited' range. But the standard scope scale shown when set to 8 bit is ... 0-255. Essentially, this is a 'monitor mapping' of the image, not an indication of how Pr "sees" the signal of the image file. Change say your Waveform Type to YC or YC no chroma ... the right-side scale goes to 16 across from 0 nits, 235 across from 100 nits.
And you have to mentally re-calculate those numbers if your clip is 10 or 12 bit to the appropriate numerical scale standards, as Pr doesn't display those scales though it treats the media always in the original bit-depth.
Especially with something as nasty as say Pr apparently mishandling some clips but not others ... for many such posts, getting the user's system set up correctly has 'fixed' the issue.
For the ones in this thread ... yea, there certainly could be a real bug, and if so, a nasty bugger.
I would love to get a short section of a clip with this issue to test on my system, as .. .with the media available ranging from some Red Weapon files through GH3 and phone media and others ... I cannot replicate this.
If I could get some affected media, and replicate, then ... it would give everyone further confirmation and the engineers far better data.
So ... I'd love a short shared clip. Posted on a link here, let's get a number of people checking it out.
Neil
Copy link to clipboard
Copied
Quick Update as I updated Premier Pro to the latest release 13.1.2
The issue is still there with certain clips being washed out, but the other clips that were experiencing full on color shifts towards the cooler side is no longer present. I exported in various codecs and wrappers, and they all had the same results.
I have boiled it down to the only clips that seem to be experiencing this are from a Shogun filming in Apple ProRes 422 HQ. Even if I remove Lumetri it still raises the blacks. I also tried taking the raw clip from a timeline that was created by dragging it to the new item tab, and it still exported with raised blacks, with nothing on the clip at all.
Copy link to clipboard
Copied
Hi TheProductionDistillery,
I am having this problem too. What seems to be happening, is that when I export, the colour looks like I have applied the lumetri technical preset "Full to Legal Range". When looking at the lumetri scope on a file that I have exported, the waveform shows that the range from black to white has been constricted as if that preset was applied, even though I had not.
I tried applying the "Legal to Full Range" preset to my original timeline before export, and the waveform shows black being below zero. But after export the output file looks like I expect and when I bring it into Premiere and look the scopes, black and white are where they should be.
I tried exporting the same materials in Premiere Pro 2017 which I still have installed, and everything worked perfectly without having to mess around with lumetri technical presets. This issue is a bug in Premiere Pro 2019 and it breaks the ability to trust in its exports.
A colleague has 13.0.2 still installed (before the spring update), and this bug is not present in that version.
Copy link to clipboard
Copied
Is there any way you could share a short clip of affected media? I'd love to see if I could replicate.
Neil
Copy link to clipboard
Copied
Hi Neil,
This bug is also discussed in this thread:
I tried a test export to H264 with "Render at Maximum Depth" unchecked and it turned out perfect. But the export with that option checked had constricted the range unnecessarily.
Copy link to clipboard
Copied
That button is so confusing ... all it can do from a positive nature is tell the CPU ... if you don't have a working GPU ... to process mathematically like a GPU. That's it. It does NOT have any effect on the bit-depth of your export, period.
It can for some reason cause weird ... stuff, ahem ... to happen at times. So that could be the problem here ... especially as leaving that off seems to fix the problem.
So unless you don't have a GPU and are having issues with say banding in an export, do not ever use "Render at Maximum Depth".
And yes, I've spent hours working over every aspect of Pr's color and depth management with engineer Francis Crossman for a presentation I did in the Flanders/MixingLight booth at NAB, and a tutorial coming up in the next couple days on the Mixinglight.com website ... which will be outside the paywall to be available to the entire community of users.
My data is the accurate data on this. Much of it pulled from internal documents and engineering notes, it seems.
Neil
Copy link to clipboard
Copied
Another setting that can often cause funkiness is "Composite in linear ... ". Which appears both in Sequence Settings and in the Export dialog options for certain things. And ... normally ... should be off to avoid issues, especially if you have Ae comps involved or are queuing over to MediaEncoder for exporting.
Just as an fyi.
Neil

Copy link to clipboard
Copied
THANK YOU!!!! That solved this raised blacks issue I was having completely. What kills me is I didn't realize this was happening on some previous projects. THANK YOU AGAIN!!!
Copy link to clipboard
Copied
Hi TheProductionDistillery,
I have a workaround solution for you, until this bug in Premiere is actually fixed.
In the sequence that you are going to export, add a new video track to the top of the stack. In that top video track, place an adjustment layer and make that adjustment layer cover the entire duration of your sequence. In the effects tab go to Lumetri Presets > Technical and drag the "Legal to Full Range, 12-bit" preset onto the adjustment layer. Now your sequence is going to look wrong to your eye and over range on the lumetri scopes but ignore it. Export your sequence with this adjustment layer enabled, this should cancel out the effect of the export bug.
Once the export is complete, bring the exported file back into Premiere and compare it to your sequence with the newly added adjustment layer track turned off. Your video export should match what you intended in your sequence.
Copy link to clipboard
Copied
It appears turning off "Render at Max Depth" when exporting has solved the issue for me.
However, I did get mixed results on 1 of 4 test exports. With the "Render at Max Depth" selected, it exported fine. Moving to another test area on the timeline though, it only looked identical when un-checking "Render at Max Depth" upon export.
Not sure why I didn't try un-checking that before in all the tests, but thanks NRS-Media for the insights. The other workaround you mentioned with adding an adjustment layer did not work for me, just to provide feedback for that as well.
Neil, I am working to get a source clip to upload so you can test it out.
Thanks again and I will update if something changes.
Copy link to clipboard
Copied
Would love to test that.
Neil

Copy link to clipboard
Copied
I ran into a similar problem today and have a solution that worked for me.
Problem: When I was exporting a quicktime or h.264 file (I tried both) from Premiere Pro CC 2019 (PP), the blacks looked washed out on the exported file.
Solution: I'm not sure why this worked, but I'm glad to have stumbled upon it accidentally and I hope that it helps others as well.
Go to your sequence settings for the sequence you are trying to export.
Uncheck/ turn off "Composite in Linear Color" and check the "Maximum Bit Depth" and "Render Quality" boxes.
Set your In and Out points in your sequence to export a short clip. I rendered an Apple Pro Res 4222 File at it's maximum quality.
Import that exported clip.
Right click that clip and make a new sequence.
Copy and paste your footage from the other sequence and paste it in the new sequence.
Export and hope to find your blacks as they should be.
Good luck!
Drew
Copy link to clipboard
Copied
If you're on a Mac, with a P3 monitor ... this ain't always obvious or easy.
The unique Apple P3-Display color space uses the wider gamut of P3, which alone can be problematic when dealing with an app like Premiere which is designed totally for use on Rec.709 broadcast standards.
Then the specs for P3-Display list a white point of D6500, unlike the other two professional P3 spaces.
Also unlike the other two P3 spaces, which use a 2.6 gamma, Apple simply says gamma as for sRGB ... which has a transform curve rather than a fixed gamma. Although the published specs for sRGB say that the total effect is roughly close to 2.2, what the Mac OS apps like FCPx, QuickTime player and the Safari and Chrome browsers seem to use is a scene-referred gamma of 1.96.
They don't list a brightness so it seems wiser to assume the intent is probably 100 nits as sRGB, but ... no way of knowing if that is correct. And I imagine the monitors come set up well over 100 nits anyway. Most do.
So internally Pr is hardwired for sRGB/Rec.709/gamma 2.4/100 nits. Working on such a system ... works as expected.
Try the "enable display color management" option, which is designed to mate the Pr monitors to a generic P3-Display monitor. This may help your work within Pr to be more correct.
It doesn't of course affect what the system, the monitor, and other apps do with the data.
Engineer Francis Crossman has a couple LUTs that are designed for 1) exports into a P3-Display space, and 2) import from a P3-Display app.
They're on a couple documents posted in this forum by Caroline Sears.
Neil

Copy link to clipboard
Copied
Hi Neil,
sorry fo ropening this thread again. And thanks for all the work you already put into this.
I see a lot of technical answers (which mostly I understand). The thing is that a lot of people are not industry professionals and just want to create a nice looking film to upload to their Vimeo and/or Youtube channels.
And to be honest no-one is adressing this issue in the correct way.
I understand Premiere was made for broadcast professionals and if set up coorectly, connected to an industry standard callibrated monitor will get the desired result when exporting (for broadcast).
The main question however is the following: How can you color correct within Premiere and have the exported film look exactly as you wanted to be shown that way on Vimeo or Youtube regardles of how thi slooks o other people's monitors or phones.
Say I'm color grading a film. I export it (to my mac) using the standard Vimeo settings provided by Premiere.
These settings are built into premiere so one would suppose that Premiere would handle this correctly and do the necessary Gamma correction on export. As you stated Safari, Chrome and Quicktime (and OSX) use 1.96
It would be an easy option to add into Premiere Export (or Media Encoder) where the end-user could check/unckeck a bow where he can specify if his work is intended for broadcast or social media.
That way all professionals working for boradcast can still use it the way they are used to and professionals working with online content also have an option that would show their work as intended.
Thanks for your time and input.
For now, I'm using this LUT provided on the adobe forum.
Kind regards,
Erik Bulckens
Copy link to clipboard
Copied
Sorry for the typos by the way, not a native speaker/writer and in my hastyness forgot ot spellcheck. 🙂
Copy link to clipboard
Copied
But it would not work as you expect. Not in any world of phsyics & math as we know them.
Because all systems out there show different images. From the OS through monitor calibrations to apps to GPU settings to viewing conditions, there is NO "absolute" color that you can set so it's "perfect" on any other machine. Period.
If that is your goal, that everyone sees the same image as you, you will never reach that goal no matter what you do.
Why? Go back to the above comment about all machines being different, especially by the time you take in viewing environment. No one can ever see exactly what you see, it is physically impossible. Sure, you can export with different gamma settings from Premiere (it's possible in the Export dialog using LUTs) ... but that means that on a few machines, your output may be closer to your view on your machine.
But on every other machine out there, it will be worse. Farther from your machine in a bad way.
The only possible "best" result, is to achieve a relative relationship to other pro-produced media.
Which is why I've responded above as I can. Yes, this is constantly requested of pro colorists, and they can't do anything about it other than as noted, set up a standards-compliant system so they're always essentially in the middle of the playing field of screens out there.
And their mateiral as noted ... looks in relative terms on ony piece of gear, similar to other professionally produced media.
Neil
-
- 1
- 2

Find more inspiration, events, and resources on the new Adobe Community
Explore Now
 AdChoices