
FYI: White Balance -- why is it so important?
- Adobe Stock customers expect natural colored images.
- Nobody wants to pay for images that require color-correction.
- Proper White Balance helps ensure your images contain no unnatural color-shifts and will appeal to a wider base of customers.
Understand your lighting conditions.
- When shooting with natural light on an overcast day, your photos may have a cold (blue) color tone.
- Incandescent lights with typical tungsten filament create a warm (yellow/orange) color cast.
- Some fluorescent lights can give photos an unnatural green tint. 👽
- Aim for consistent lighting. Avoid mixing light sources which makes corrections harder.
To compensate for lighting conditions, use a gray card (available for a few dollars on Amazon or B&H).
A gray card is a square piece of material specifically shaded at 18 percent gray. This tool helps you find a perfect white balance in-camera on non-RAW images. To set white balance using a gray card, take a shot with the card filling the entire frame. Then go to your camera’s menu, select the option to set a custom white balance, and set it by choosing your photo of the gray card. You can also use shots of your gray card to help fix your white balance in post-production.
RAW vs other file types
Putting your camera on the RAW file setting before you shoot preserves ALL image data that’s recorded by your camera’s sensor. RAW files give you greater flexibility in post-production. But alas, it won't help you adjust white balance in-camera.
Adobe Camera Raw (ACR) is a plugin that allows you to import RAW images into Photoshop and make basic color adjustments. You can even adjust non-RAW images like JPEGs with this tool by clicking “Filter > Camera Raw Filter” in the top menu bar. When you open an image in ACR, the white balance adjustment is near the top, called Temperature. Adjust sliders as needed. It’s easier to adjust white balance of RAW photos, TIFFs, PSDs, and other minimally-compressed files. If you adjust a JPEG too far, you might notice compression color artifacts later.
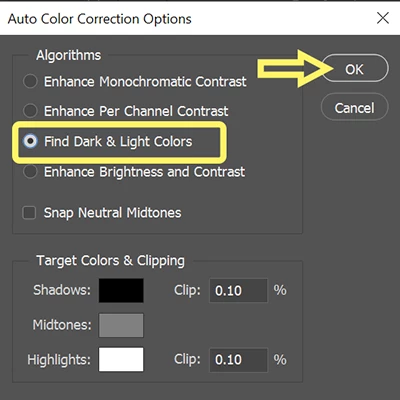
Photoshop Curves Adjustment - Automatic Option
- Add a Curves adjustment layer.
- Click on right hamburger menu of the Properties tab (see screenshot).

- Select Auto Options.
- Select the “Find Light & Dark Colors” option. Click Ok.
This is merely an introduction to White Balance and is by no means an in-depth discussion. I'll let you explore this topic more on your own.
Related links:
https://photographylife.com/how-to-correct-white-balance-photoshop
https://www.adobe.com/creativecloud/photography/discover/white-balance.html