Participating Frequently
October 31, 2021
Answered

P: Perform Healing Operations ( CAR / Spot / Clone ) before AI Selection (Sky, etc) for best results

  • October 31, 2021
  • 24 replies
  • 58268 views

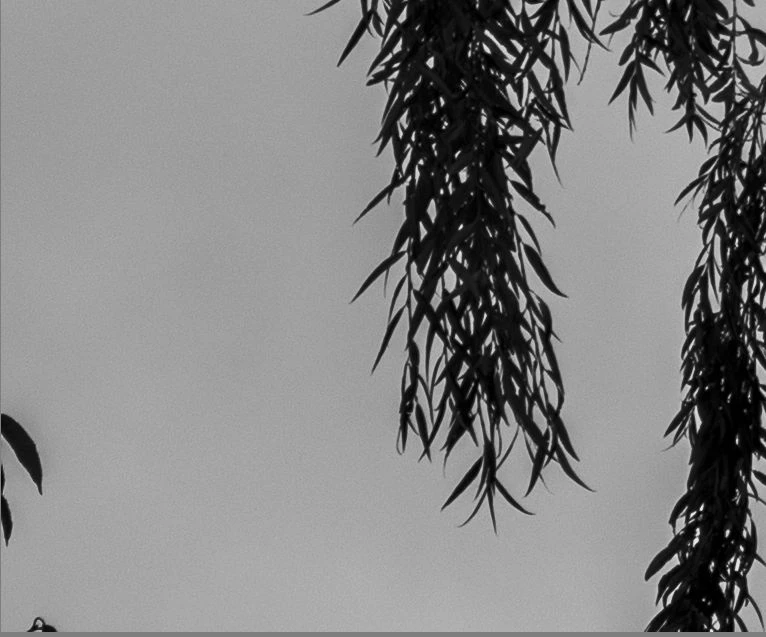
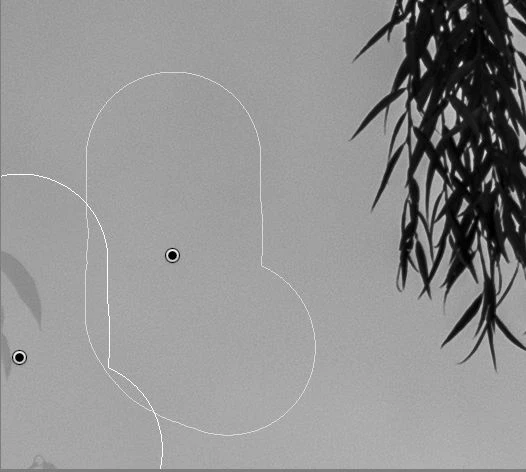
Problem: When I use the spot removal tool in Lightroom Classic version 11 to remove a leaf against open sky after Sky Select was used, Lightroom fails to remove the spot completely. It leaves a light gray version of the leaf behind. See samples below. I checked and opacity is set to 100%.


The problem does not occur if I do spot removal before Sky Select is used.


This is on Windows 10, working on a Fuji GFX 50R RAF.


Correct answer richardplondon

Did you have any masked adjustments already active on this image?


If so: for example, a Select Sky mask that had been put in place before doing this object removal, would have followed the boundary of this object and not treated it as an area of Sky. The adjustments applied by this mask would therefore continue to avoid its area, while applying to adjacent areas of sky, thus leaving a "trace" of that difference.


Working in a changed sequence - so: removing unwanted objects first, and then generating any masks that refer to picture content - will naturally avoid this. Or, forcing a later update of the AI masking - either way resulting in a (e.g.) Sky mask which has taken proper account of your removal of this object.

24 replies

SdeGat
Inspiring
January 8, 2024

Every now and then Removing/healing/clonings is leaving ghost images rather that completely masking what I am trying to get rid of.


Sometimes it works fine.


What is going on?


GoldingD
Legend
January 8, 2024

Not that the following is your actual problem. I do see this on my computer under different situations, but....


I notice from the red dot under the masking button, that you have one or more masks that need to be updated (probably AI masks). That could be the issue. Bring up the mask panel, right click on a mask, select update AI Mask


SdeGat
Inspiring
January 8, 2024

I went back to that picture above @GoldingD  and the red dot was gone already. Not sure what happened...

Participant
November 30, 2023

Hi there, i don't know if this is the right place to talk about this issue i have with one of my computers.

So for my business i use to receive from other photographers pictures in .dng files (no raw embedded)

but in one of my pc (i use windows) i have white spots instead of the corrections made by the photographers with the healing brush

With another computer with the same version of lightroom, i don't have this problem, and i can tell you that the photographers are using the same version too: all of use uptill now we are with the 13.1 version

So basically there's something in the second computer that doesn't allow me to see corrections but white spot, that i 've to update manually one by one. 

attached you can see what i'm talking about,

if anyone can help , i appreciate it


thank

JohanElzenga
Community Expert
Community Expert
November 30, 2023

You used an AI mask. Look at the masking icon. It has a red dot below it. That means you need to update the mask, and that will most likely solve this problem. The explanation is that the current mask has a hole in it were the (now removed) healed area is (because it was created before the objects were removed), and so the mask does not have an effect in that area.


If that is not the solution, then maybe you need to reset the preferences: https://www.lightroomqueen.com/how-do-i-reset-lightrooms-preferences/


-- Johan W. Elzenga
Participant
October 20, 2023

I just updated to the lastest version of LrC (13.0.1) on my Dell PC laptop.  Before doing any masking, I tried to heal out a pole against a bright sky and still have the same issue as descibed- a gray area is left where the pole was.  Remove, Heal and Clone all have the same issue.

Known Participant
October 21, 2023
Can’t explain that right off, just tried it and it worked OK for me. Are you sure you did not have a mask on the sky, even if you have not done anything in it? Check your history in the LH column.

But if you have Photoshop bundled with LR try Generative Fill. In LR go to Photo>Edit In>Edit in Photoshop. When there, choose Rectangular Selection, select an area around the pole, close to it but including all the pole, but it can also include some of whatever the pole is sticking out of. Then go to Edit>Generative Fill (or click Generative Fill on the floating menu) and type in ‘Remove Pole’. In a few seconds it will disappear: in the RH column you will see three alternatives - choose the best one. Save the file (Save rather than Save As..) and go back to LR, where you will have your original file, and a new copy which you can continue editing. Note the new file will be a .psd one, but that won’t worry LR. Selecting the sky will behave just as if the pole was never there.

Good luck!
Tom
Known Participant
August 7, 2023

Attached is a screenshot of a portion of a photo I am editing. It's an Apple RAW DNG file. I've seen this primarily on Apple RAW and HEIC files but occasionally on Canon raw as well. No matter which "Healing" option I select (Clone or Heal; Content-Aware Remove does not perform what I need), I get the same thing, which I'd describe as a ghosting artifact of what was previously there. Is there a way to fix or prevent it? In this case, it would be that the darker color of pink sky would appear there instead of the lighter shade that shows the outline of people that I removed...?

GoldingD
Legend
August 7, 2023

Have you applied any masking before attempting the heal?


Known Participant
August 8, 2023

GoldingD, In this situation that was the issue. Thank you!!! Now I will go back to other files and see if the use of masks that need to just be modified to add the healed area is the issue there as well. Much appreciated.

Known Participant
November 19, 2022


All of my software & drives are up-to-date.

Steps:

  1. Edited a dng in lightroom
  2. Used Topaz denoise plugin, saved back to LR as a tiff.
  3. Edited Tiff in Radiant Photo, saved back to LR as a tiff.
  4. Edited Tiff in Topaz sharpen, saved back to LR as a tiff.
  5. (all is good so far), then found some more spots to remove.  After using the spot healing tool, all areas that were removed (even ones that were done in Step 1) remain highlighted with bright purple circles.  They will not go away, even after reboots and a RTX 3060 driver update.  They are permanently on the photo.  Some remnant of the code to show the circles remains active and does not refresh the area.

System Info below:

Lightroom Classic version: 12.0.1 [ 202210260744-9e008017 ]
License: Creative Cloud
Language setting: en
Operating system: Windows 10 - Business Edition
Version: 10.0.22000
Application architecture: x64
System architecture: x64
Logical processor count: 24
Processor speed: 3.7GHz
SqLite Version: 3.36.0
CPU Utilisation: 0.0%
Built-in memory: 65433.5 MB
Dedicated GPU memory used by Lightroom: 3824.2MB / 12142.0MB (31%)
Real memory available to Lightroom: 65433.5 MB
Real memory used by Lightroom: 2729.6 MB (4.1%)
Virtual memory used by Lightroom: 7473.4 MB
GDI objects count: 840
USER objects count: 2596
Process handles count: 3074
Memory cache size: 0.1MB
Internal Camera Raw version: 15.0 [ 1261 ]
Maximum thread count used by Camera Raw: 5
Camera Raw SIMD optimization: SSE2,AVX,AVX2
Camera Raw virtual memory: 1017MB / 32716MB (3%)
Camera Raw real memory: 876MB / 65433MB (1%)
System DPI setting: 96 DPI
Desktop composition enabled: Yes
Standard Preview Size: 1920 pixels
Displays: 1) 1920x1080
Input types: Multitouch: No, Integrated touch: No, Integrated pen: No, External touch: No, External pen: No, Keyboard: No

Graphics Processor Info:
DirectX: NVIDIA GeForce RTX 3060 (31.0.15.2230)
Init State: GPU for Export supported by default
User Preference: Auto

Application folder: C:\Program Files\Adobe\Adobe Lightroom Classic
Library Path: D:\Pictures\Lightroom\Chris Livingston Photography\ChrisLivingstonPhotography-v12.lrcat
Settings Folder: C:\Users\unfra\AppData\Roaming\Adobe\Lightroom

Installed Plugins:
1) AdobeStock
2) ColorChecker Camera Calibration
3) Flickr
4) Nikon Tether Plugin
5) Pixieset
6) Radiant Photo
7) Topaz Photo AI

Config.lua flags: None

johnrellis
Legend
November 19, 2022

Did you apply masking before using the Healing tool?  That can create artifacts -- Adobe says to do use the Healing tool first:

https://community.adobe.com/t5/lightroom-classic-discussions/p-perform-spot-heal-removal-before-sky-selection-not-after-for-best-results/m-p/12487304

Known Participant
November 23, 2022

I was unaware of that. Good to know. It has not happened since.  Thanks.

Participant
October 24, 2022

You recently changed the way the "Healing" function works on Lightroom mobile app. 
since that change, if you try using the "Clone" brush AFTER editing your photo, the clonning brush will show the relevant area BEFORE the edit.

meaning you can't use the Clone brush after editing.

Known Participant
October 21, 2022

Issue: 

  • Lightroom Classic Version Number: 12.0
  • OS Version Number: Windows 10 Pro 21H2


Steps to reproduce:

  1. Photo with blue sky
  2. Set the opacity to 100, size to whatever, feather to whatever (even 0)
  3. Heal or clone a portion of the image, replacing the object (or part of it) with blue sky
  4. Notice that you can still see some of the object through the blue sky that was added. This was never seen in previous versions of Lightroom


Expected result: With opacity set to 100%, none of the object underneath should show through the blue sky
Actual result: The newly added blue sky has some transparency, showing the object underneath

richardplondonCommunity ExpertCorrect answer
Community Expert
October 21, 2022

Did you have any masked adjustments already active on this image?


If so: for example, a Select Sky mask that had been put in place before doing this object removal, would have followed the boundary of this object and not treated it as an area of Sky. The adjustments applied by this mask would therefore continue to avoid its area, while applying to adjacent areas of sky, thus leaving a "trace" of that difference.


Working in a changed sequence - so: removing unwanted objects first, and then generating any masks that refer to picture content - will naturally avoid this. Or, forcing a later update of the AI masking - either way resulting in a (e.g.) Sky mask which has taken proper account of your removal of this object.

Known Participant
October 22, 2022

Good call, you nailed it. I had a sky mask enabled, then did the healing brush. The other order works as expected.

Participant
September 30, 2022

Bonjour tout le monde,


De temps en temps (la joie des problèmes aléatoires !) l'utilisation de la fonction "suppression des défauts" ne fait pas disparaitre le défaut sous la zone recopiée mais le laisse apparent en blanc.

Même en faisant "duppliquer" plusieurs fois, une fois que le défuaut est blanc, imposible de le modifier.

Dubitatif et perplexe, je suis.

Aucune logique trouvée à ce souci.

Merci d'avance pour votre aide.

Cordialement.

Known Participant
September 28, 2022

What I am doing wrong?

I used Spot Removal tool in order to clear some spots. They are cleared on Develope module but when I go to Library, they are still there? Also are been exported.


I am using the latest 11.5 release

Known Participant
September 29, 2022

Please help me with my issue: I have read that spot removal was updated... so is it a bug ?

JohanElzenga
Community Expert
Community Expert
September 29, 2022

Are you sure they have been removed fully in the develop module? Zoom in to 100% and check. And did you use a mask of any kind? If so, remove spots first and add masks after that.


-- Johan W. Elzenga
Participant
September 27, 2022

Hi


I have noticed this issue on different computers.  The clone brush does not clone at 100% despite the opacity being set to 100%, some of the underlying image still shows through. Any ideas? 

Community Expert
September 29, 2022

In the Masks panel are toggle switches (duplicated at top and bottom) which can temporarily turn off the effect of all local adjustments present on this image.


If when masks are hidden the cloning no longer shows that "shadowed" detail then this is the same issue already discussed here: some mask, e.g. a Subject selection, has been generated using the previous appearance of the image (from before you added this new cloning), hence the out-of-date extent where adjustments are / are not now being applied under the control of this mask, has not taken any account of your newly cloned image.


The answer is either to complete your cloning before generating AI masks that take account of the content of the image (for example, Subject) - or, to re-generate such AI masks when subsequent cloning has made desirable a fresh evaluation of where (e.g.) the "Subject" boundary should now be detected.


It is also possible to have a brushed (non AI) local adjustment mask which when it was originally painted on, took account of the image as it appeared at that time: either manually, or else semi-automatically via the 'AutoMask' brushing option. Such a mask may need to be later updated through new brushing / erasing, in order to once again conform in the desired way to the underlying image content, as that now appears after further work of cloning etc. The same issue in principle, so the same two answers apply.


A local adjustment mask that is selecting its extent "live on the fly" based only on your chosen range of tones or of colours, by contrast, cannot ever be put 'out of date' with the image by new cloning etc.