

DISCUSS: Rec. 2100 HLG HDR workflow
Updated 19 August 2020
Exciting HDR news!
We are proud to announce that we are testing an HLG HDR workflow in Premiere Pro. Work natively in Rec. 2100 HLG with the added sequence working color space option. Apple ProRes and Sony XAVC Intra are both fully color managed and GPU accelerated throughout the HDR pipeline. This is not just one feature; this is a set of features that will allow you to import, edit, and export HLG content in Premiere Pro. HDR is a complex area and this is a work in progress so we would appreciate your feedback. Below are some quickstart instructions to get you up and running quickly. Read on for even more detail.
Quickstart
- Add some HLG media to your project. Currently, we support ProRes or XAVC-Intra formats. You may download this sample project here HLG Sample Project
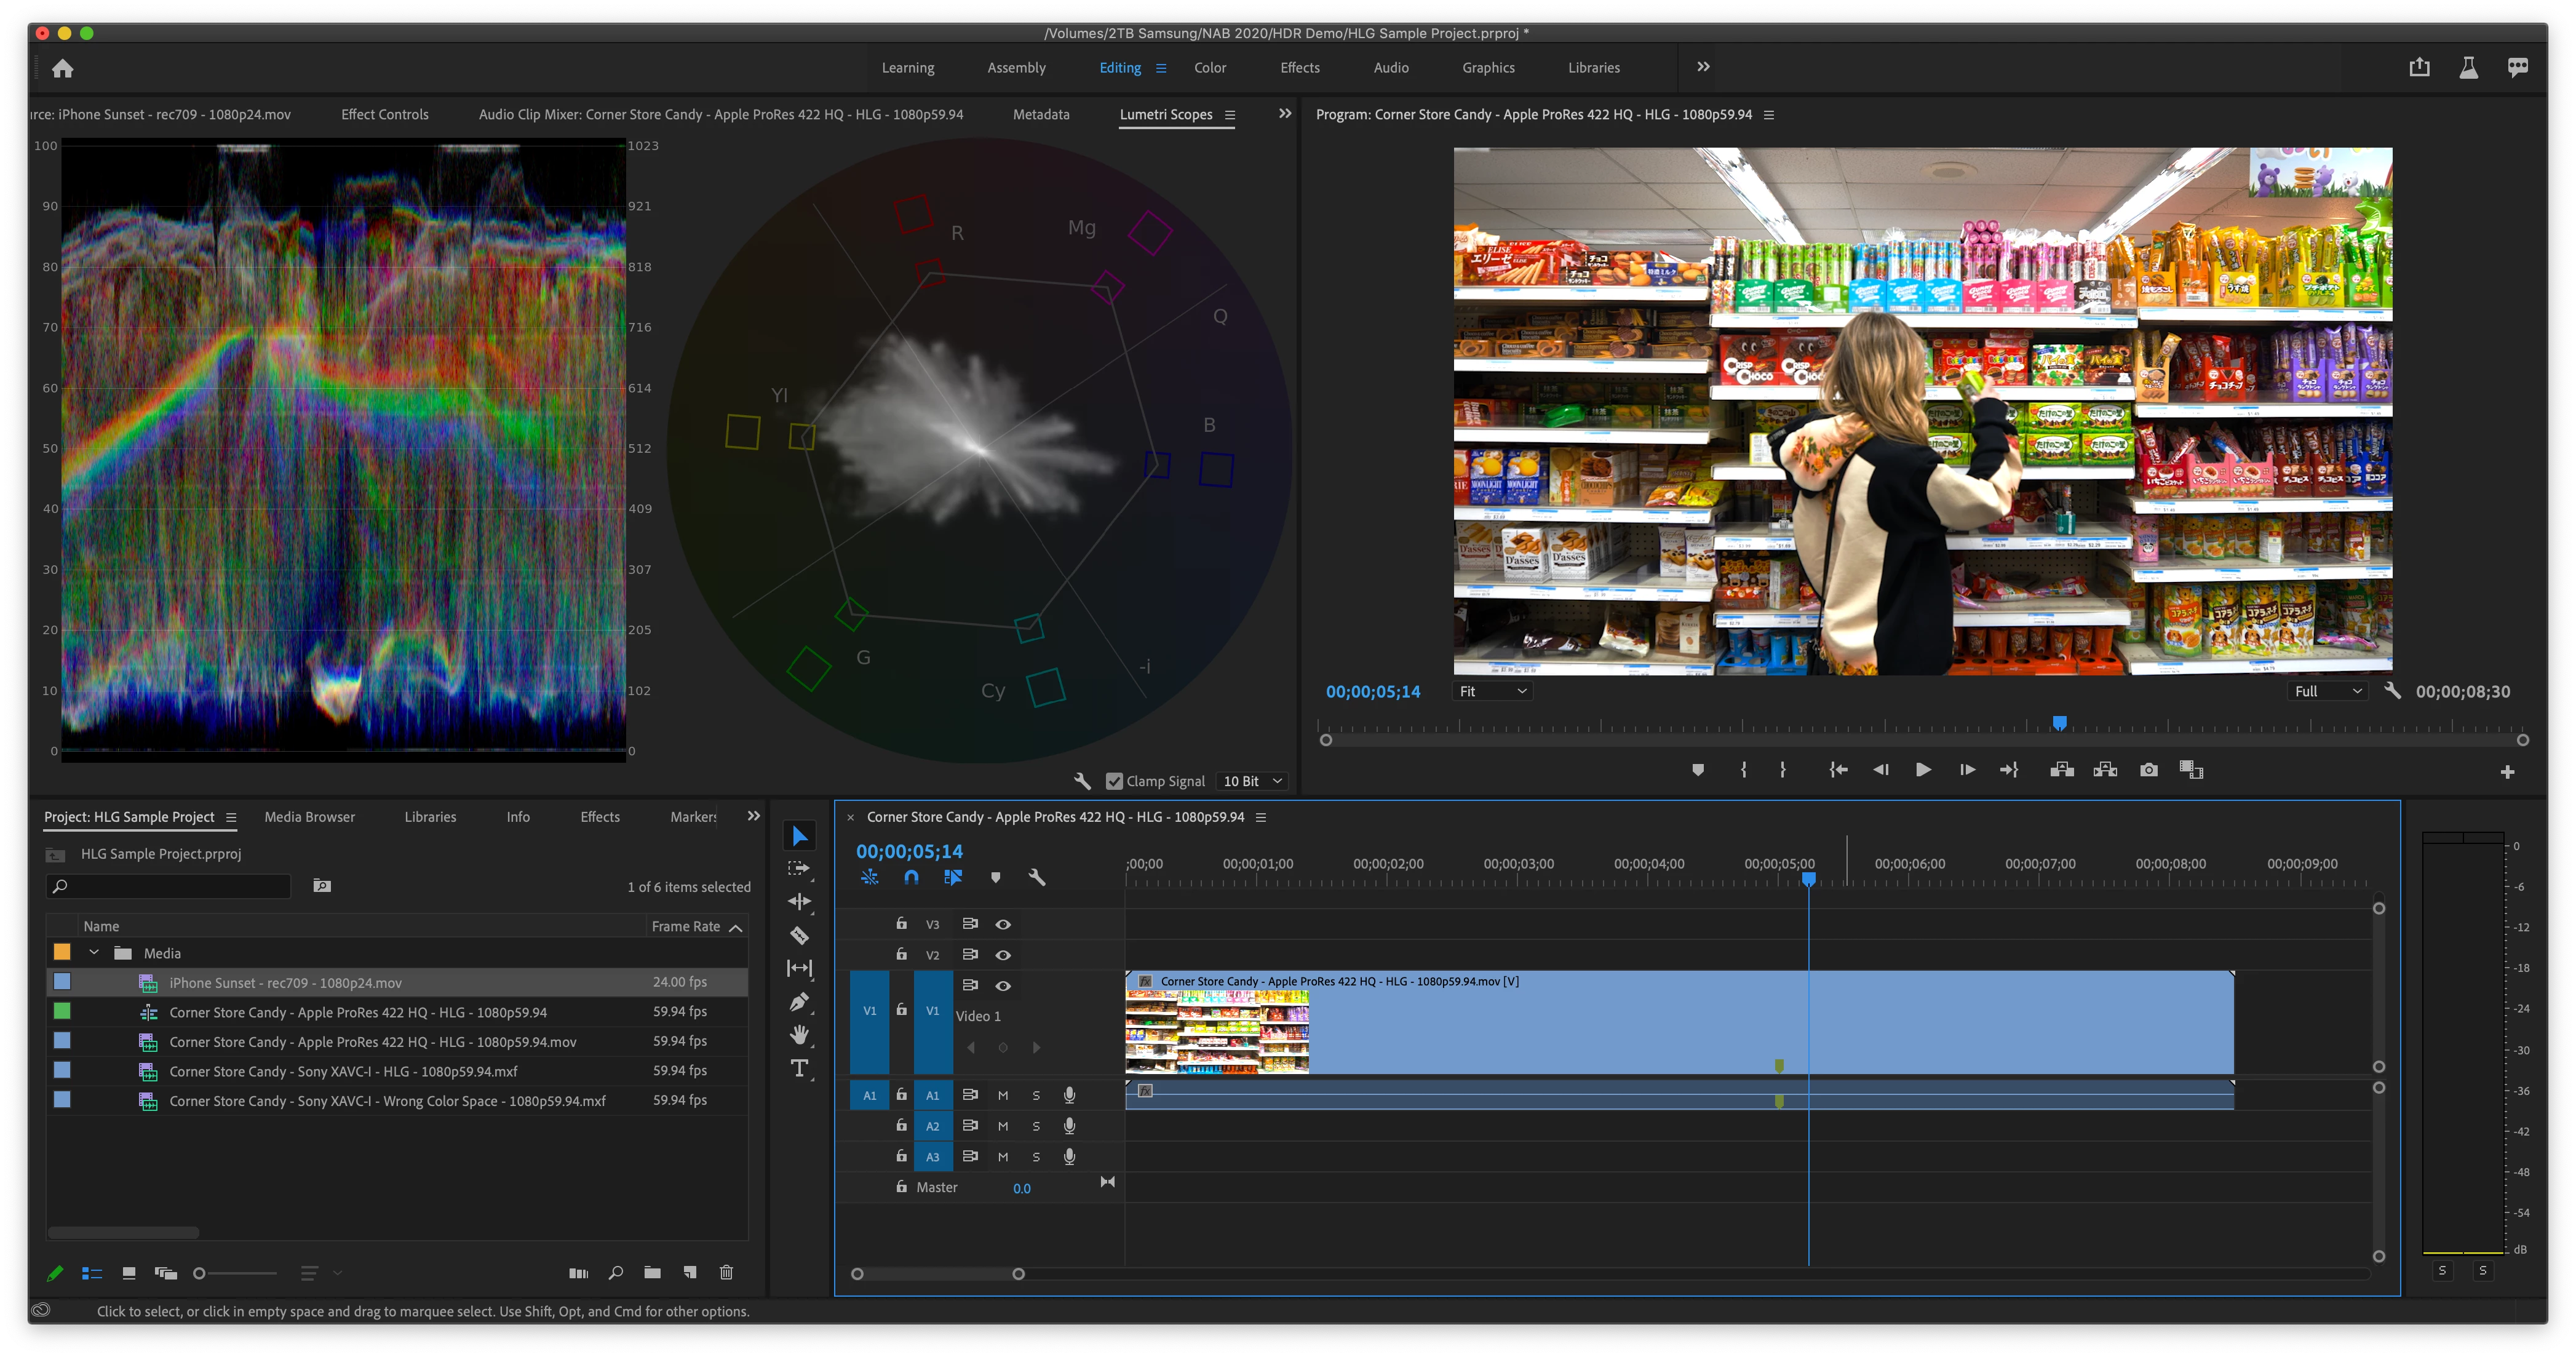
- Drag an HLG clip into the sequence panel to create a new sequence
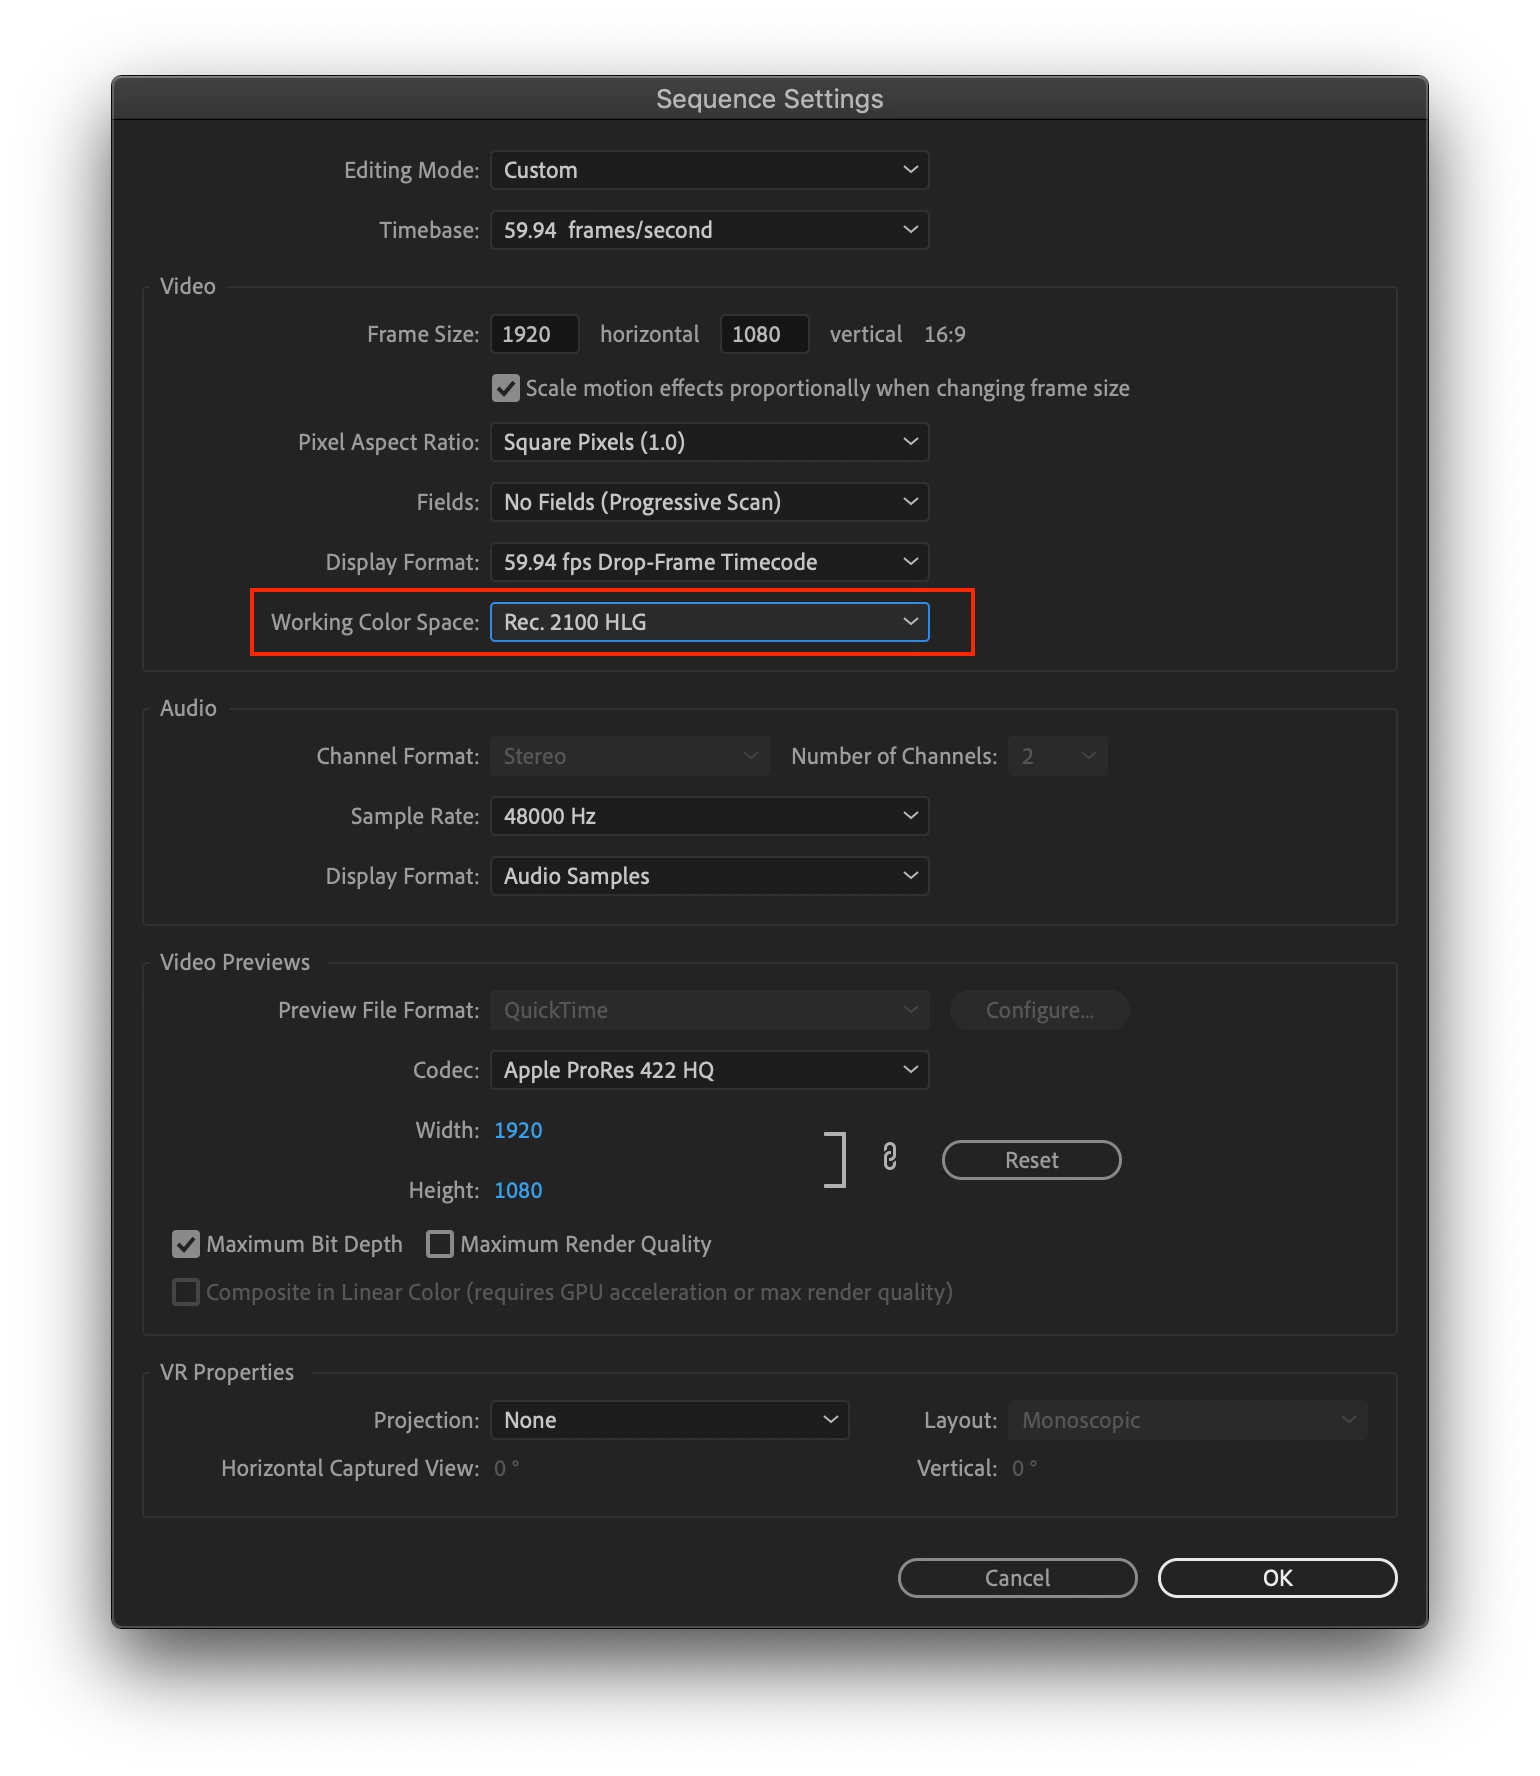
- Open the sequence settings to inspect the new working color space – been automatically set to Rec. 2100 HLG.
- Open the Lumetri scopes from the Window menu. Set the color space from the wrench menu to Rec. 2100HLG. You are now scoping HLG.
- Add some Rec. 709 content to the HLG timeline. Notice that the luminance only peaks at a little over 60% on the scopes and the image looks dim. Try changing the “HDR Graphics White” setting in the Project Settings to control the default brightness of Rec. 709 content added to an HLG sequence.
- Choose File > Project Settings > General – look for the color management section at the bottom. Change the “HDR Graphics White” setting to 203. Watch the Rec. 709 clip get brighter. Now it should peak around 75% on the timeline, which is the level that is recommended by the ITU.
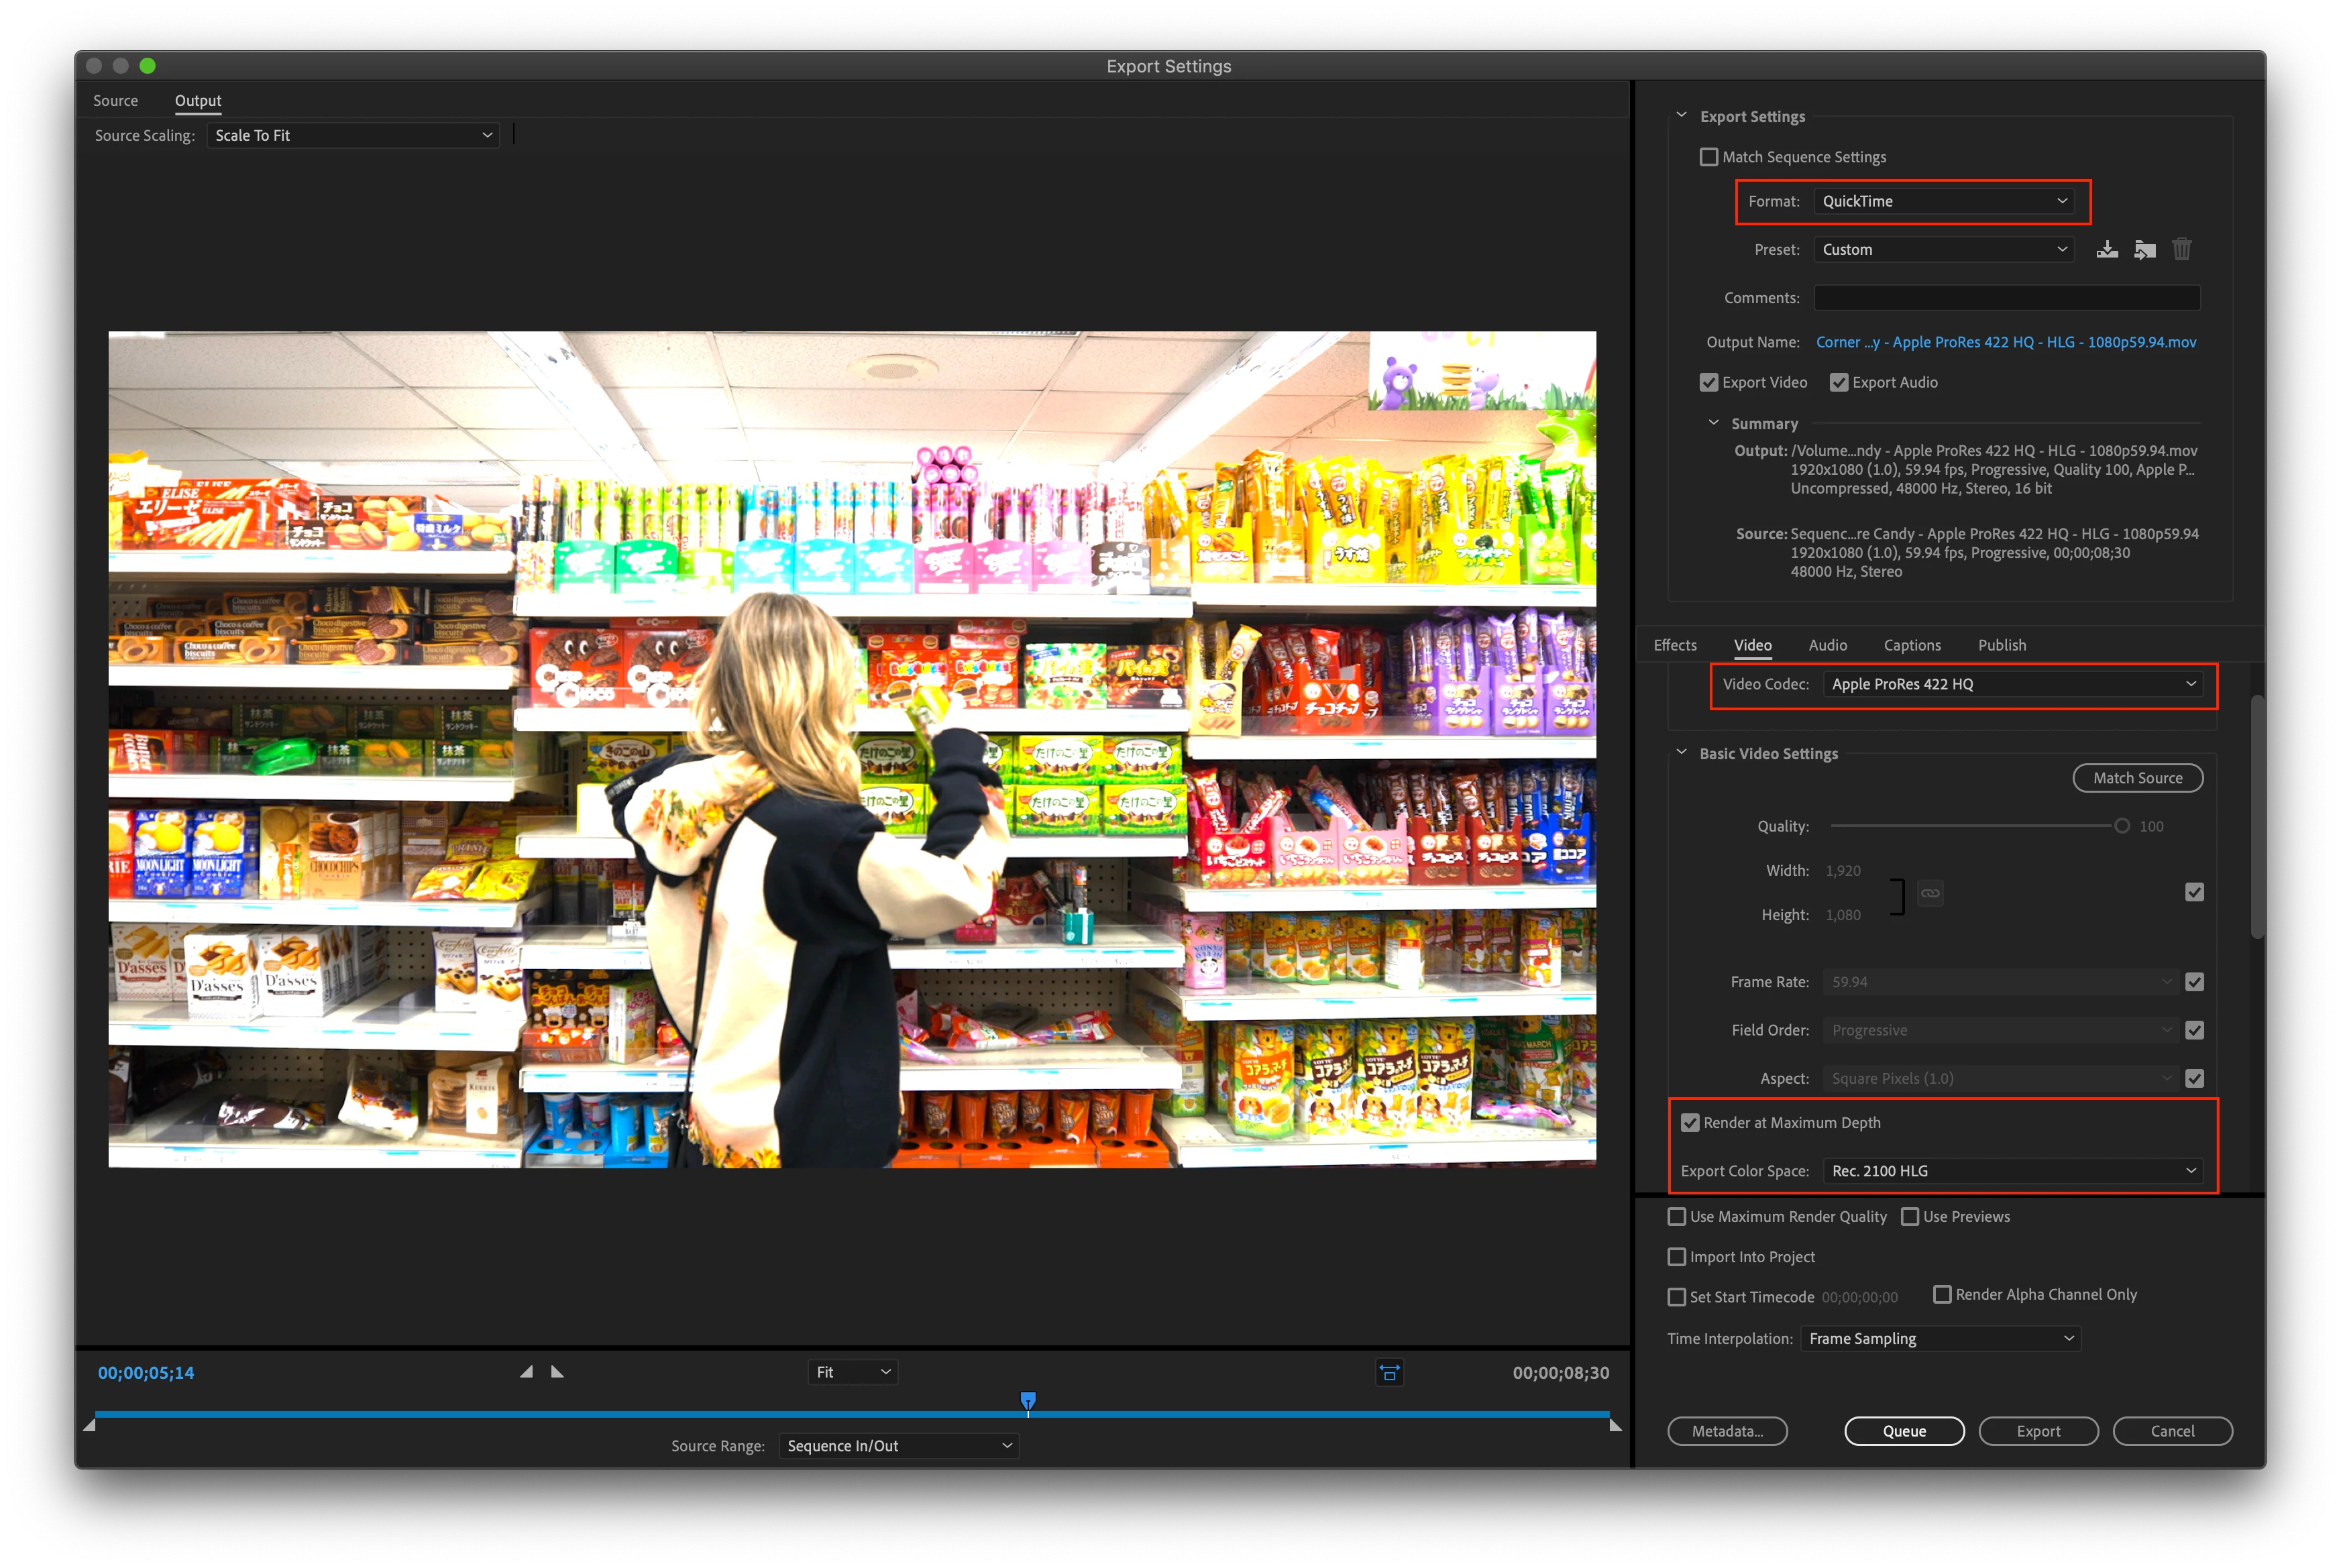
- Export your sequence as ProRes HQ – Choose File > Export > Media and set the following options.
- Format: Quicktime
- Preset: Apple ProRes 422 HQ
- Video Settings: Render at Maximum Bit Depth – enabled
- Video Settings > Export color space – Rec. 2100 HLG
- Export
The details
Rec. 2100 HLG sequence working color space
Choose Sequence Menu > Sequence settings. All color values process within the timeline will now happen natively in Rec. 2020 color primaries using the Hybrid Log Gamma transfer function. If an HLG file is placed on an HLG timeline, no conversion is necessary, and the values are just passed through which is a great performance benefit. Rec. 709 files placed on the timeline will be converted to HLG using a colorimetric conversion method. No inverse tone mapping is performed. We do not yet have a PQ sequence working color space option. An HDR monitor and hardware transmit device are required to properly monitor HDR content. For an explanation of what you are seeing on your desktop monitor, look for the Program and Source monitor section below.
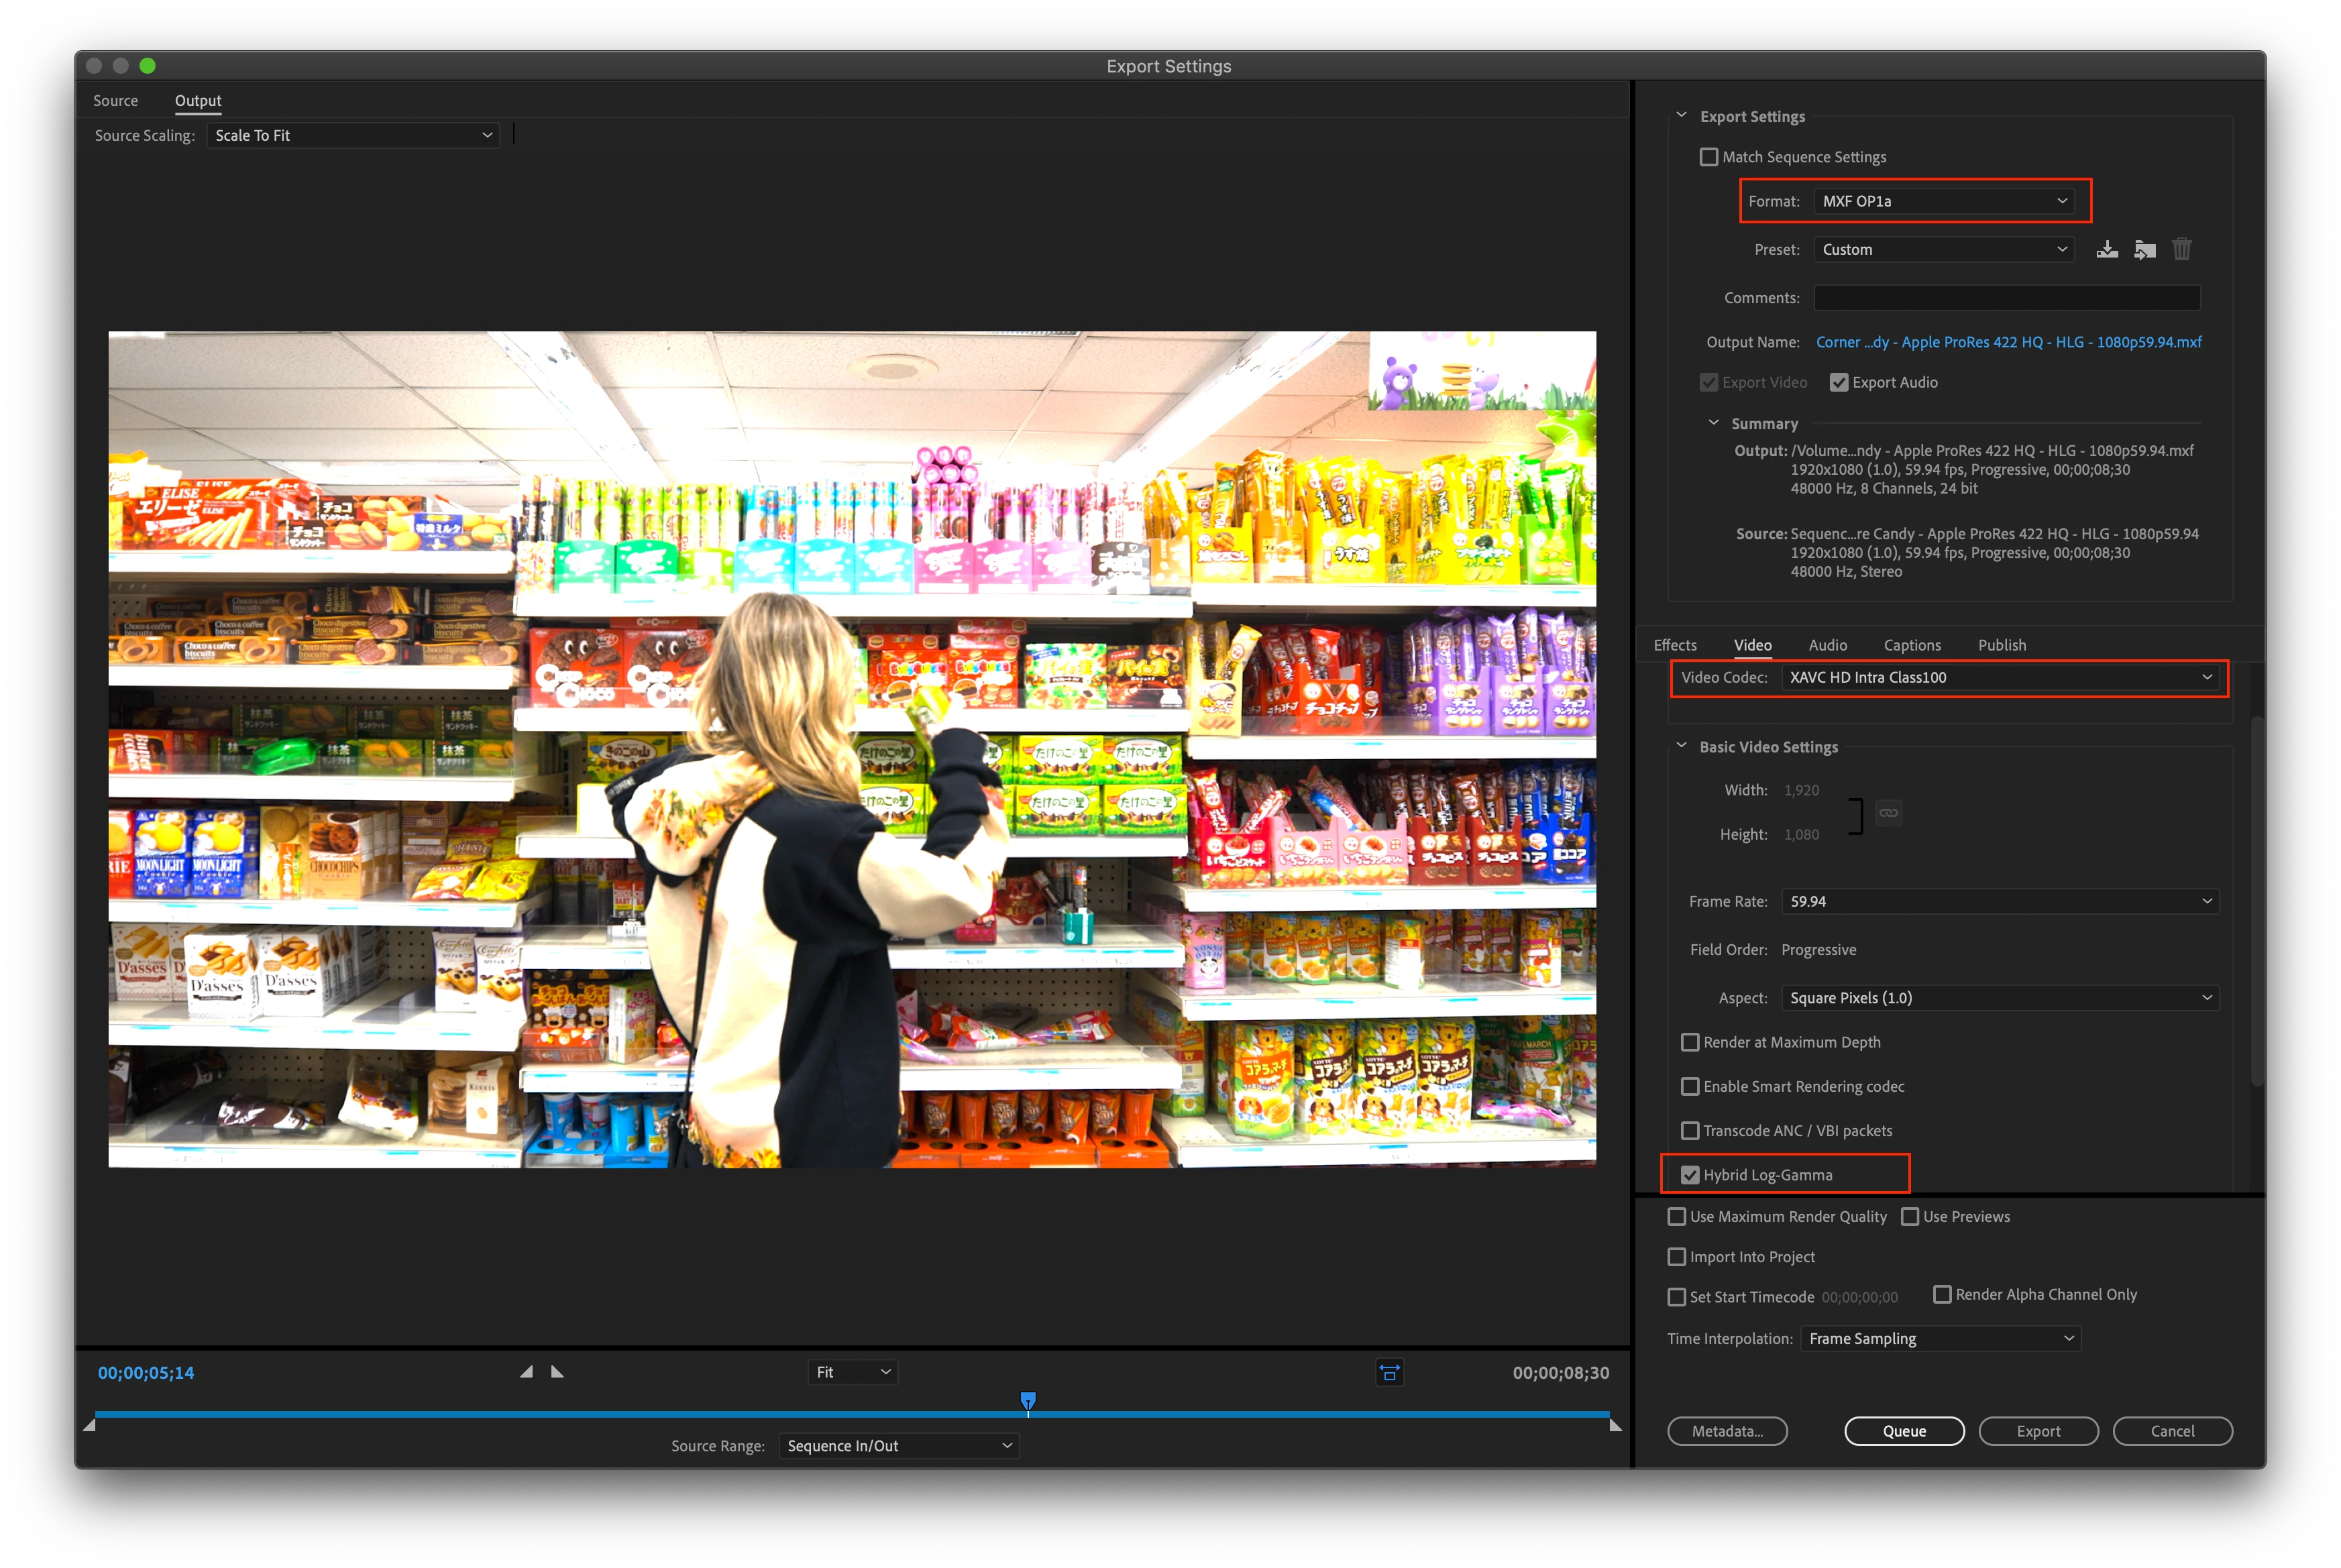
Color-managed import and export of Sony XAVC Intra HLG files
XAVC-I files with the HLG colorspace tag present in the metadata will pass though the GPU-accelerated color conversion library. An HLG sequence can be exported to an HLG file using any of the XAVC-Intra codec options.
- Choose File > Export
- Format > MXF OP1a
- Preset menu > chose any of the XAVC Intra codec options
- Video > Basic Video Settings > Render at Maximum Bit Depth
- Video > Basic Video Settings > Enable Hybrid Log-Gamma
If the source media is XAVC-I HLG footage and no effects have been added, smart rendering is possible, and no re-encoding will take place which is very fast.
Color-managed import and export of ProRes HLG and PQ files
ProRes 422 HQ and 4444 files in a MOV wrapper with the HLG or PQ colorspace tag present in the metadata will pass though the GPU-accelerated color conversion library. When placing HLG content into an HLG sequence, there will be no colorspace conversion necessary which has great performance benefits. If there is a colorspace mismatch, like putting PQ or Rec. 709 into an HLG sequence, we will do a colorimetric conversion but no tone-mapping. We do not yet have a PQ sequence working color space option. An HLG sequence can be exported to an HLG file using the Apple ProRes 422 HQ and 4444 codecs in a MOV wrapper. ProRes MXF is not supported for HDR at this time.
- Choose File > Export
- Format > Quicktime
- Preset > Apple ProRes 422 HQ or 4444
- Video > Basic Video Settings > enable Render at Maximum Depth
- Export Color Space > HLG
If the source media is ProRes HLG footage and no effects have been added, smart rendering is possible, and no re-encoding will take place.
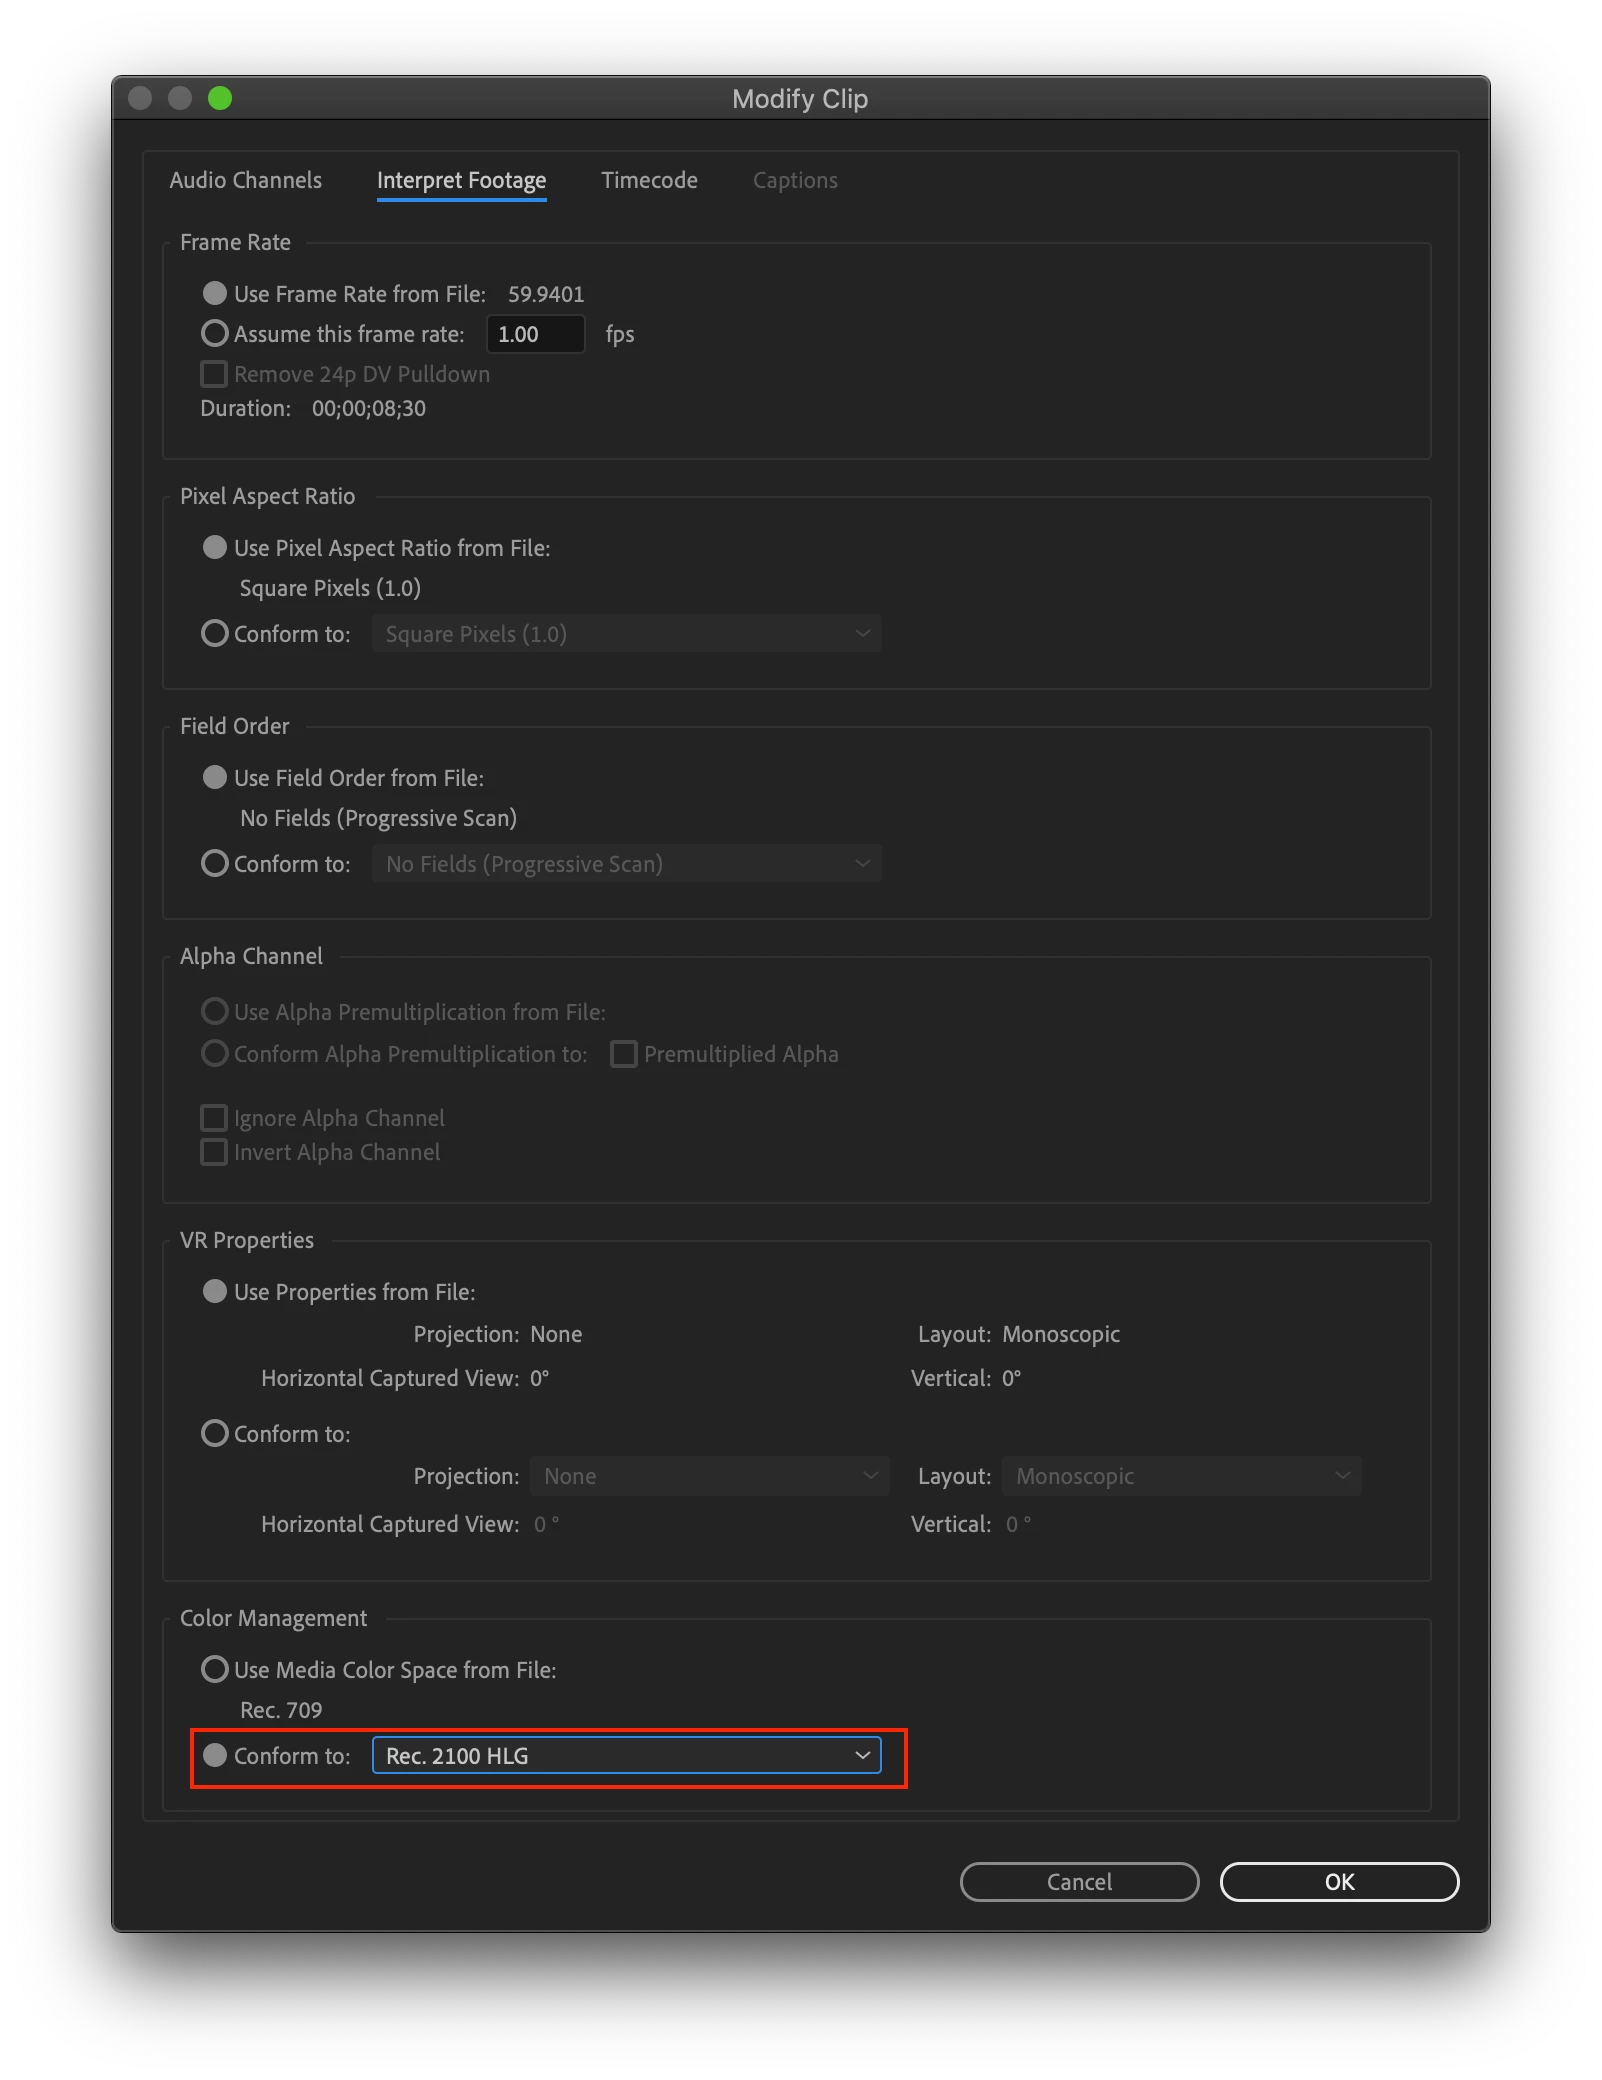
Media colorspace override using interpret footage
If the colorspace of the imported file is wrong or missing, you can force Premiere Pro to interpret the file using the correct colorspace. Currently, this will only work with color-managed files, which right now means XAVC-I and ProRes. It is surprisingly common when working in HDR productions that the color space in the file is incorrect. There is a file in the demo project linked above (HLG Sample Project) that is tagged with Rec. 709 but is supposed to be Rec. 2100 HLG. You can experiment with that file – overriding it to HLG (PANA3008 Sony XAVC-I - Wrong Color Space.mxf).
- From the project panel, highlight the file
- From the Clip menu, choose Modify > Interpret Footage (or right-click on the file and use the context menu)
- At the bottom of the Interpret Footage dialog, in the Color Management section, choose Color Space Override to > choose the correct color space from the dropdown. For the sample file, the correct colorspace is Rec. 2100 HLG
There is no colorspace conversion, the file is simply treated as if it were tagged with the chosen colorspace. Look for further development that will allow color space conversions from this menu.
Please note, there is a known issue that we are looking into where ProRes files tagged as Rec. 709 cannot be overridden. It is our intention that this should be possible. Look for future updates.- This issue has been fixed - please update to the latest beta version
***NEW***
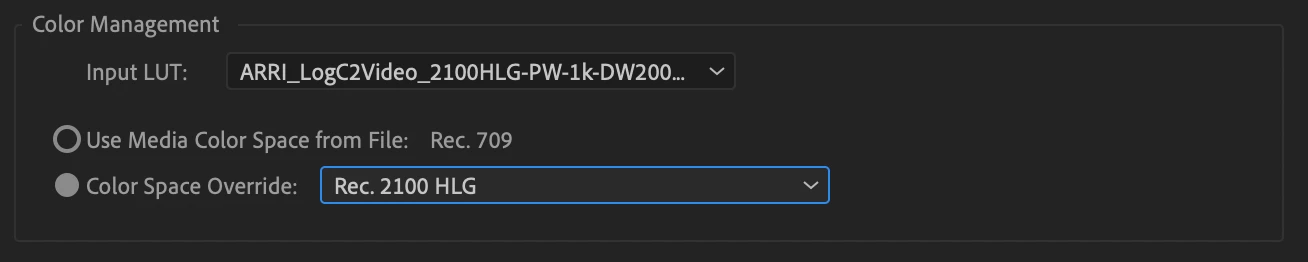
Media colorspace conversion using a custom LUT in interpret footage
If an actual color space transformation is necessary such as upconverting Rec.709 to HLG with tone-mapping, that can be accomplished with a LUT.
- From the project panel, highlight the file
- From the Clip menu, choose Modify > Interpret Footage (or right-click on the file and use the context menu)
- At the bottom of the Interpret Footage dialog, in the Color Management section, choose Input LUT > Add LUTs and navigate to your custom LUT on disk.
- Specify the resulting color space of the file with the Color Space Override dropdown.
- Premiere Pro will use the LUT to transform the color space and will treat the file as the new color space throughout the project.
For example, apply a Clog to HLG LUT and tag the file as Rec. 2100 HLG. This option is not just limited to HDR production. You can use this to apply a Vlog to Rec709 LUT too. You must supply your own LUTs and these are often supplied by camera manufacturers.
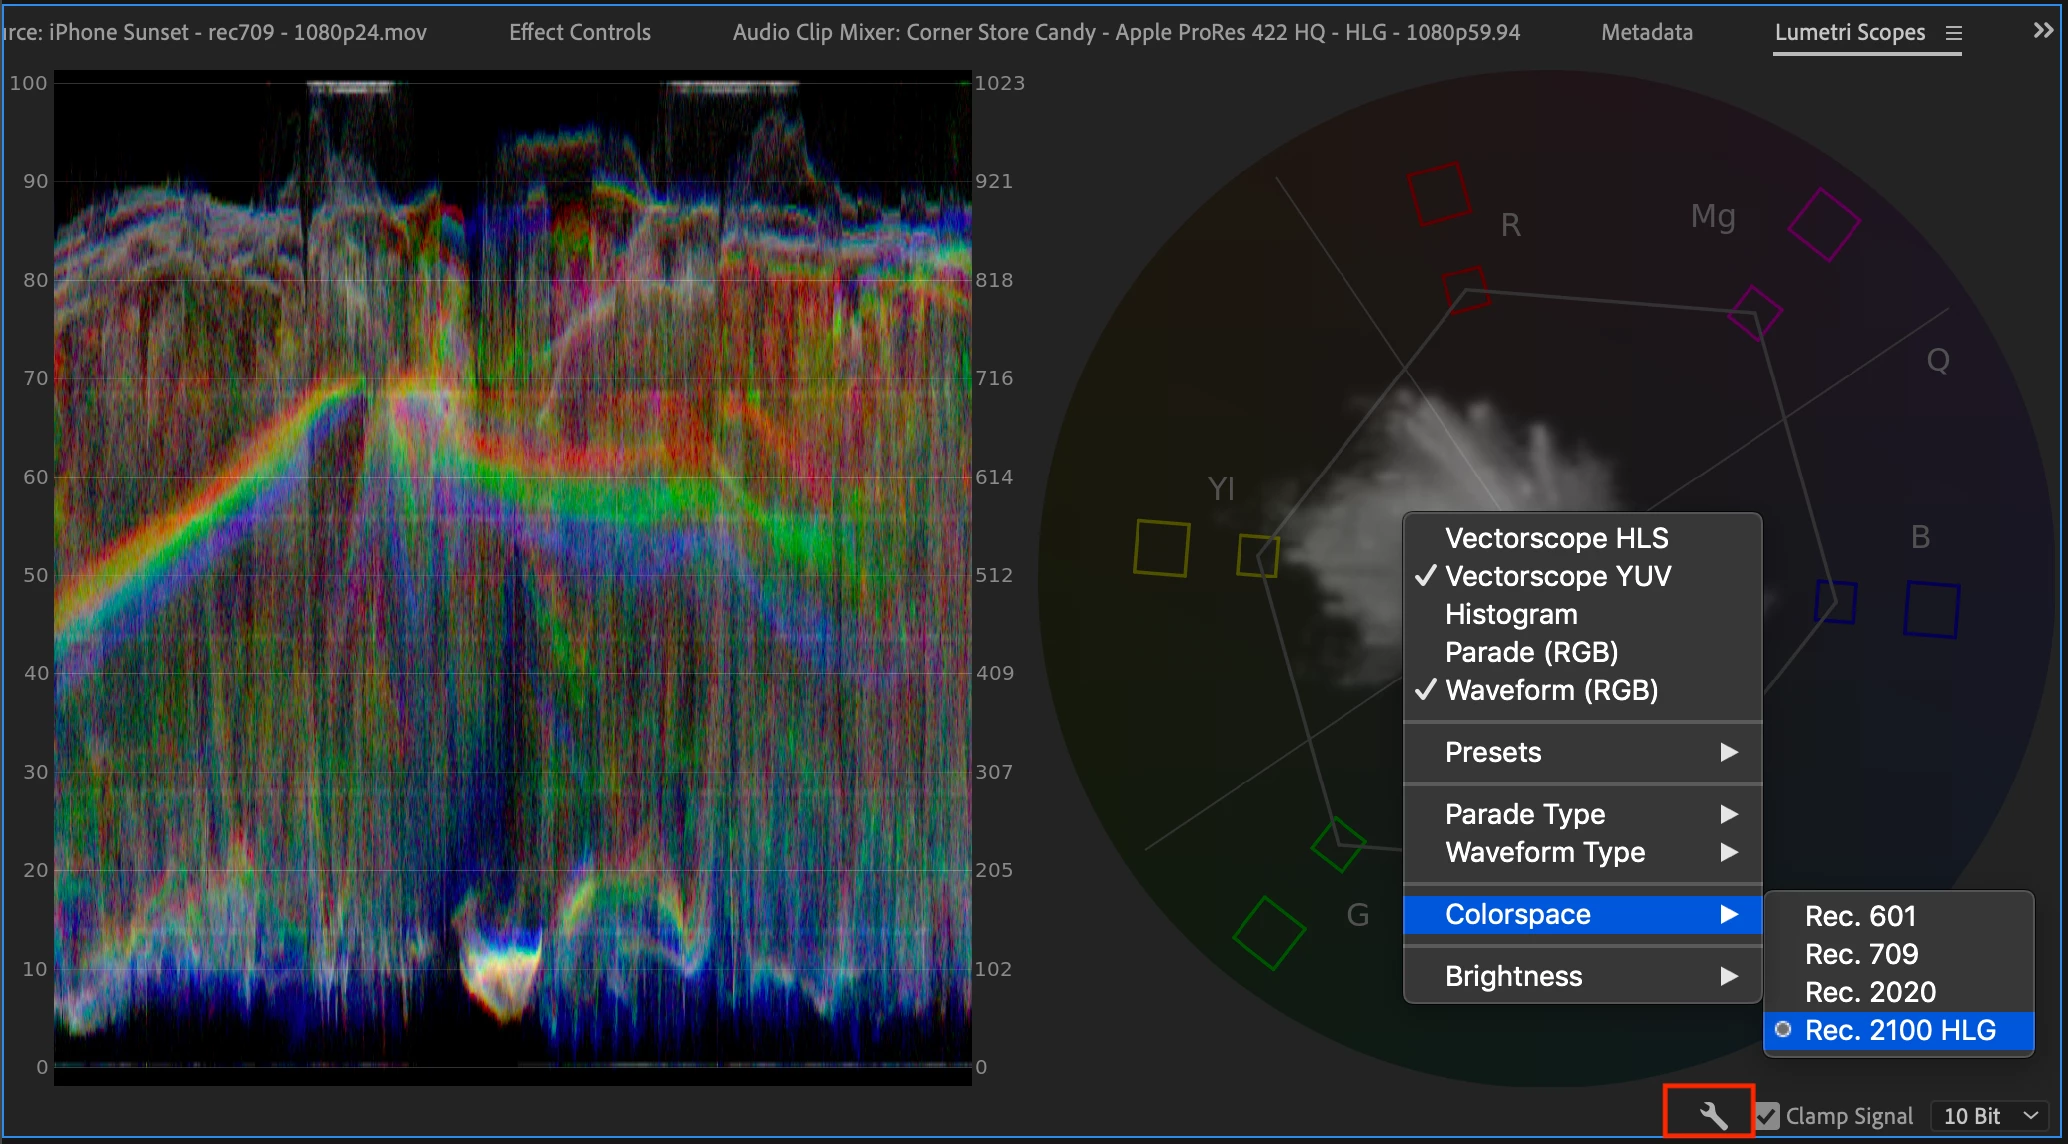
Rec. 2100 HLG option and 10bit processing in the scopes
- Open the Lumetri scopes from Window > Lumetri Scopes
- From the scopes wrench menu choose Colorspace > Rec. 2100 HLG
You will notice that the new 10bit option is automatically chosen from the neighboring dropdown menu. 8bit is not appropriate for HLG production and that option is grayed out. You may still choose Float or HDR from the dropdown menu. The HDR dropdown option has known issues and should not be relied upon for HDR production at this time. It is recommended to stick with the 10bit scope option when working with HLG at this time.
*** NEW ***
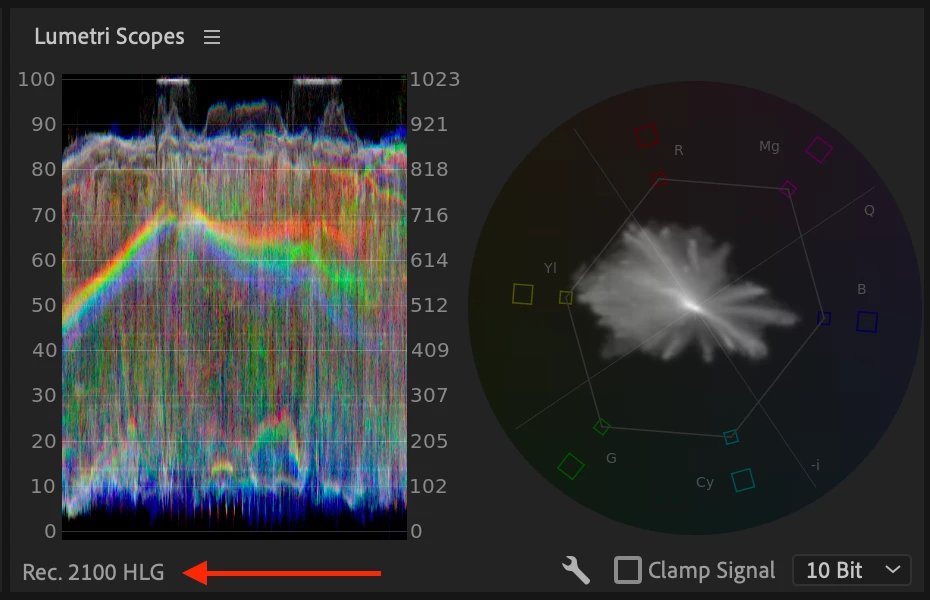
- Scopes will now automatically switch to the correct color space based on the selected sequence or media
- We now display the color space of the scope in the lower-left corner of the scopes panel
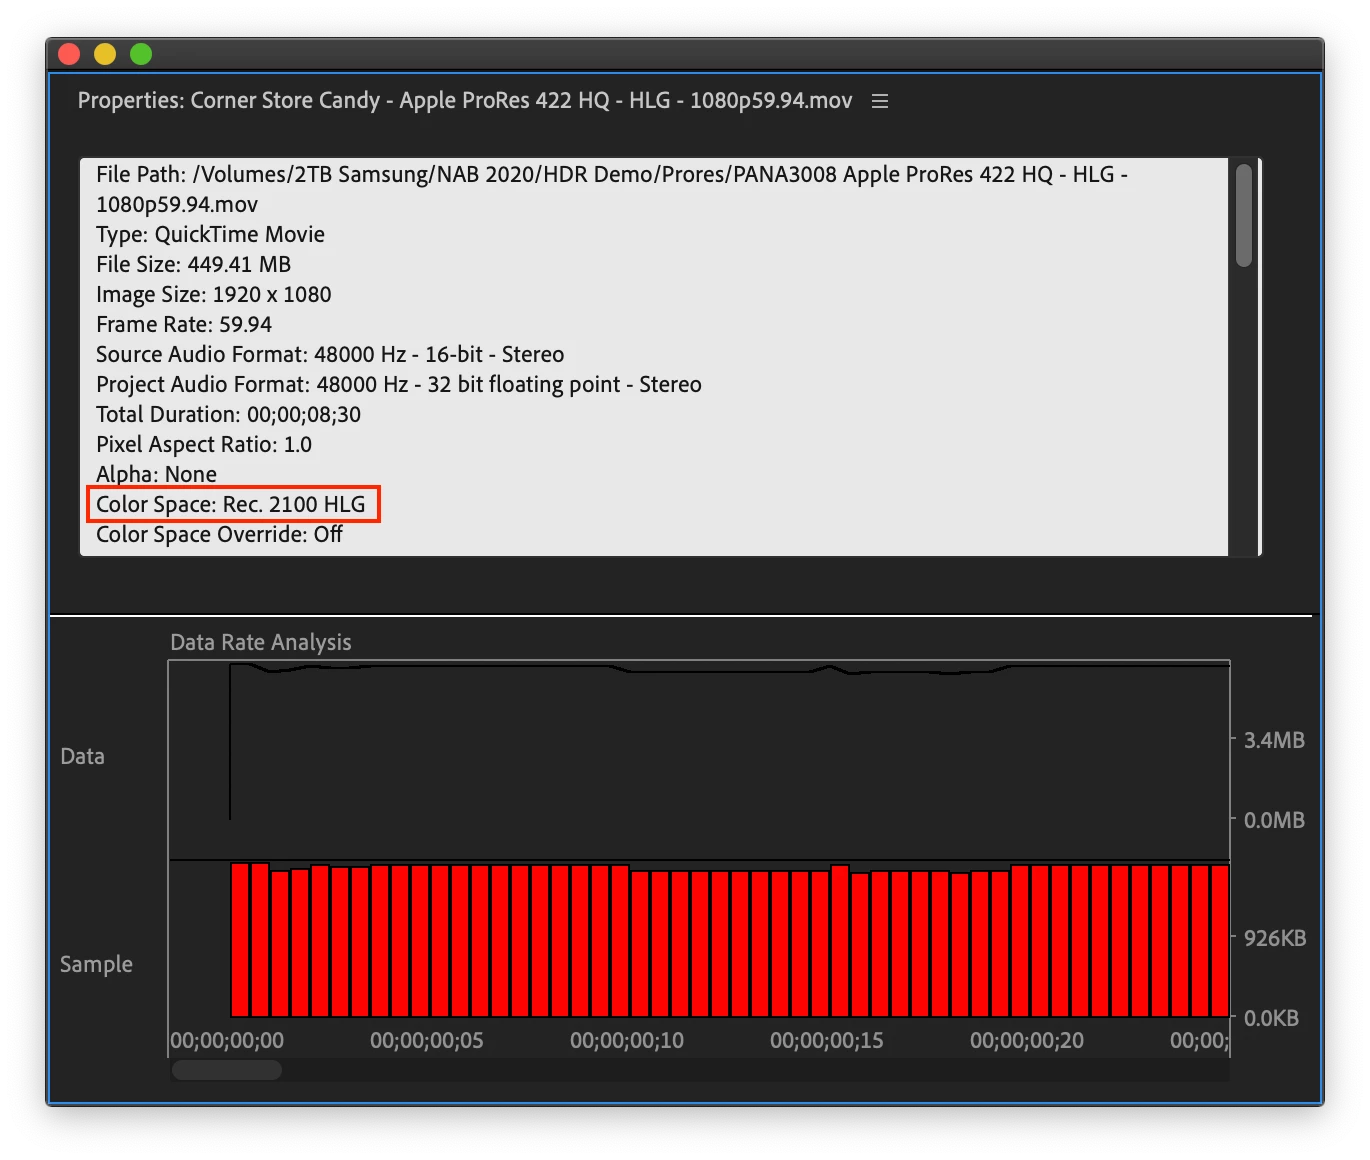
Color space information for color-managed codecs is displayed in the properties panel
Right-click on the file in the Project Panel and choose Properties. Color-managed codecs include ProRes HDR files and all XAVC-I right now. Non-color-managed files will not indicate the color space in the properties panel and it will be left blank. Non-color-managed files are brought in as Rec. 709 with over range values preserved in 32bit floating point. This is what has made HDR production possible in Premiere Pro in the past. It is our goal to change this behavior and have all HDR files handled in their native color space.
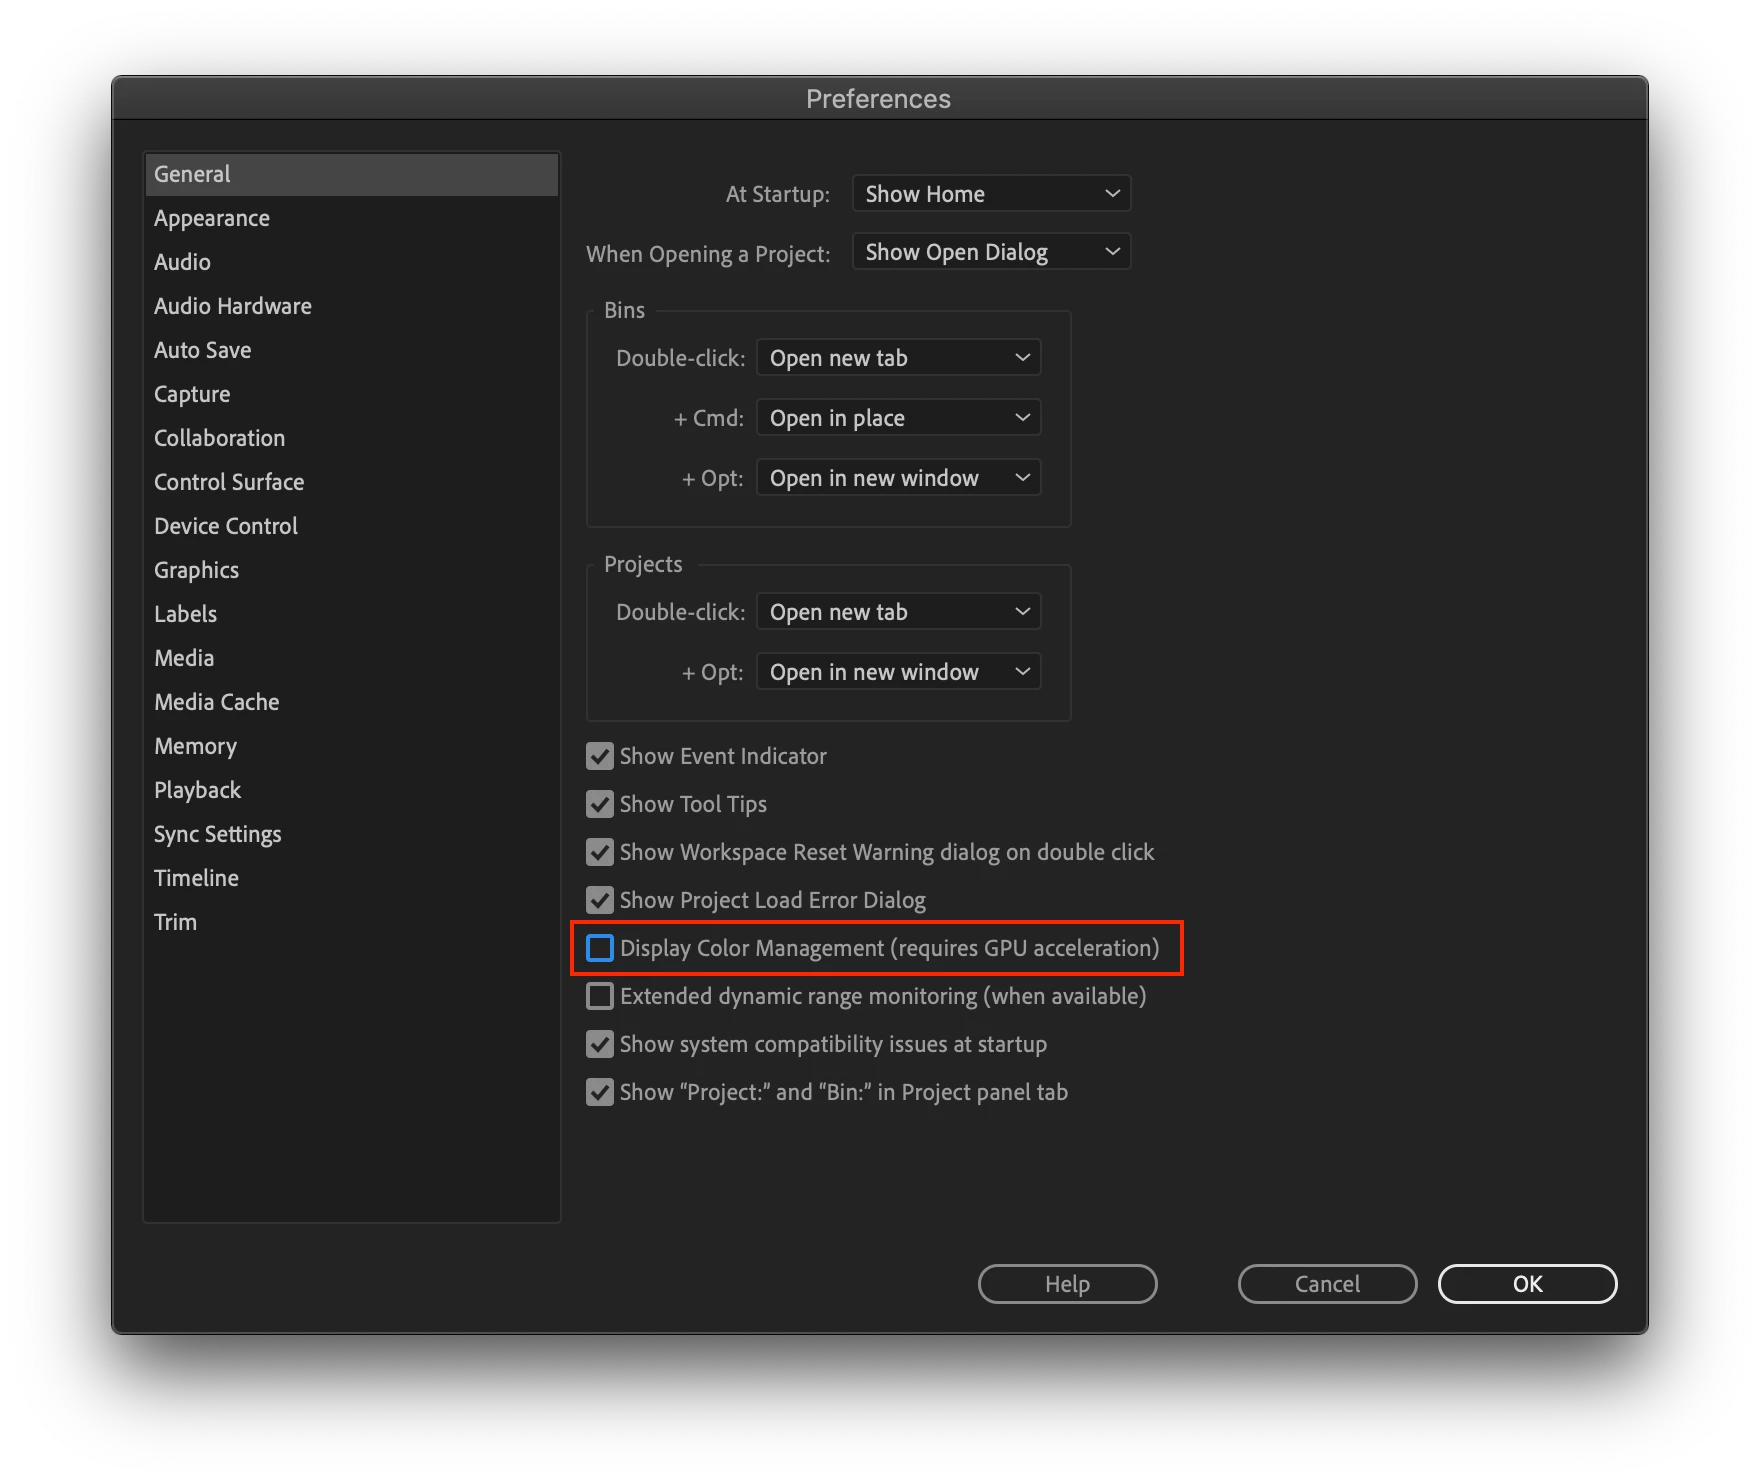
The Program and Source monitor – display color management
It can be a bit confusing to wrap your head around what you are seeing in the program and source monitors. By default, with display color management turned OFF, you will be viewing the raw HDR signal. It will, therefore, look quite low contrasty and not very colorful – not HDR at all. Turning display color management on in Preferences > General will convert the colors from HLG into the color space of your monitor using the monitor ICC profile set in your OS preferences. Colors that overlap between the two color spaces will now look correct, but we have another problem now – the color and luminance range that is beyond what the color space of your monitor can handle will get clipped by the display and the image will look blown out. Check the scopes to verify that the signal is not in fact clipped. To properly monitor HDR content you need proper transmit hardware. See below.
- Please note: Display color management settings have no effect on exported files; it only affects what you see on the screen.

__________________________
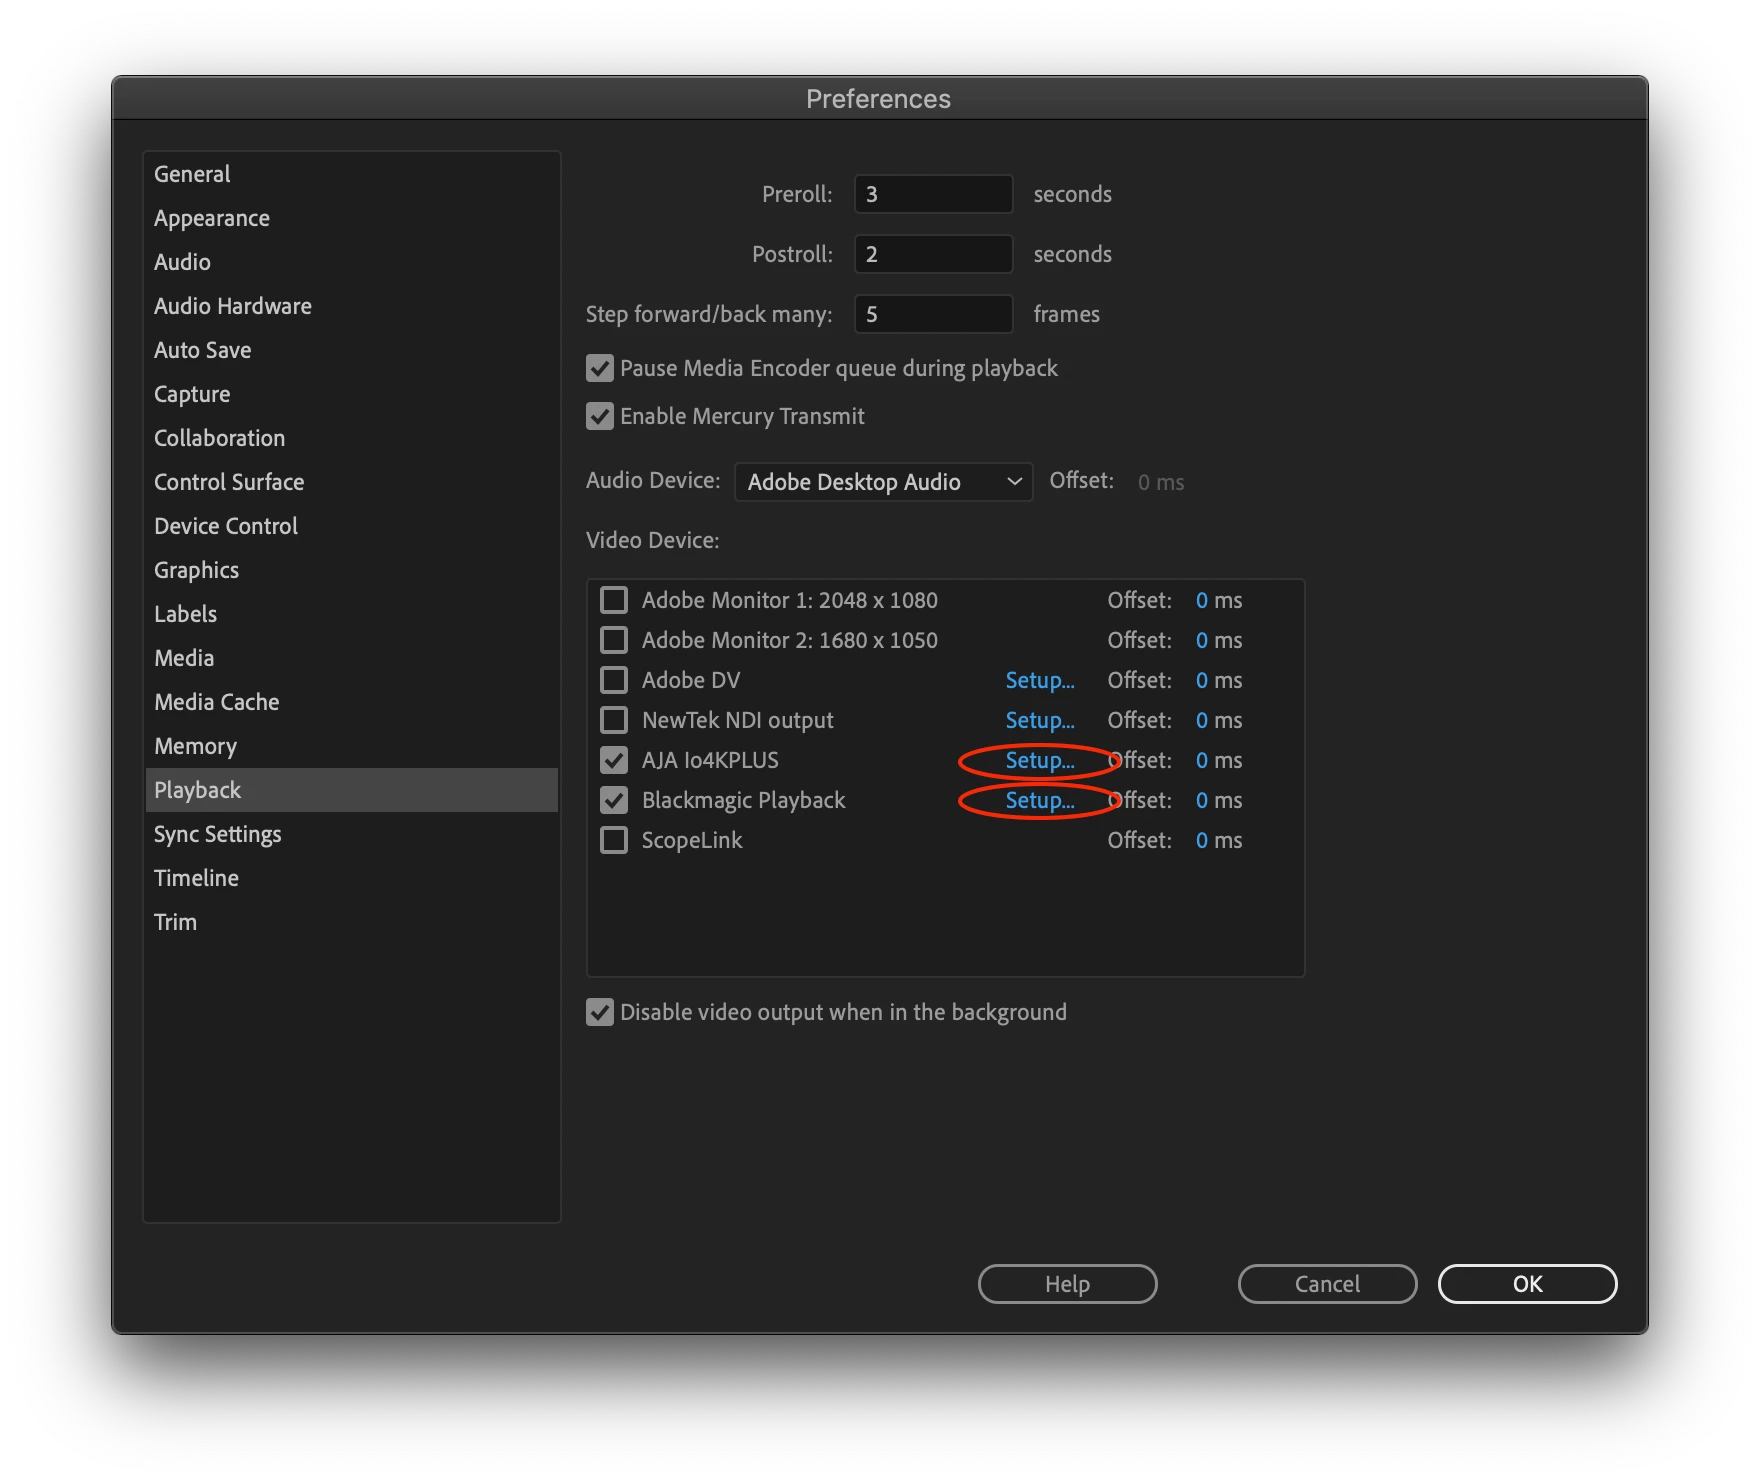
HDR reference monitoring with transmit hardware
To properly monitor HDR content, an HDR reference monitor is required which needs to be hooked up through a compatible hardware HDR transmit device using SDI or HDMI such as AJA IO 4K Plus or Blackmagic Ultrastudio 4K. Please note that even if you have an HDR desktop monitor connected to your GPU, this is not supported at this time.
- AJA (io4K plus, Kona 4, Kona 5)
- Blackmagic (Ultrastudio 4k, Ultrastudio 4k Mini)
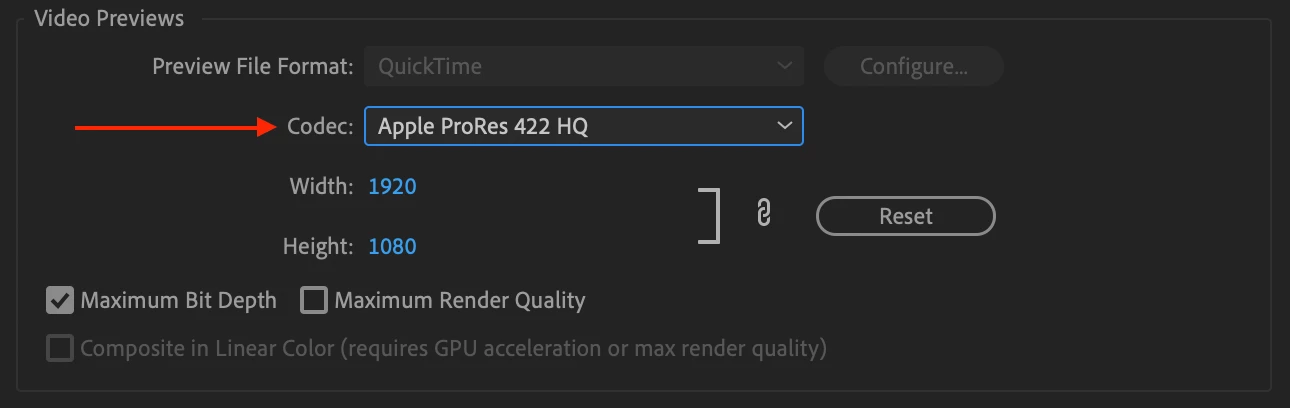
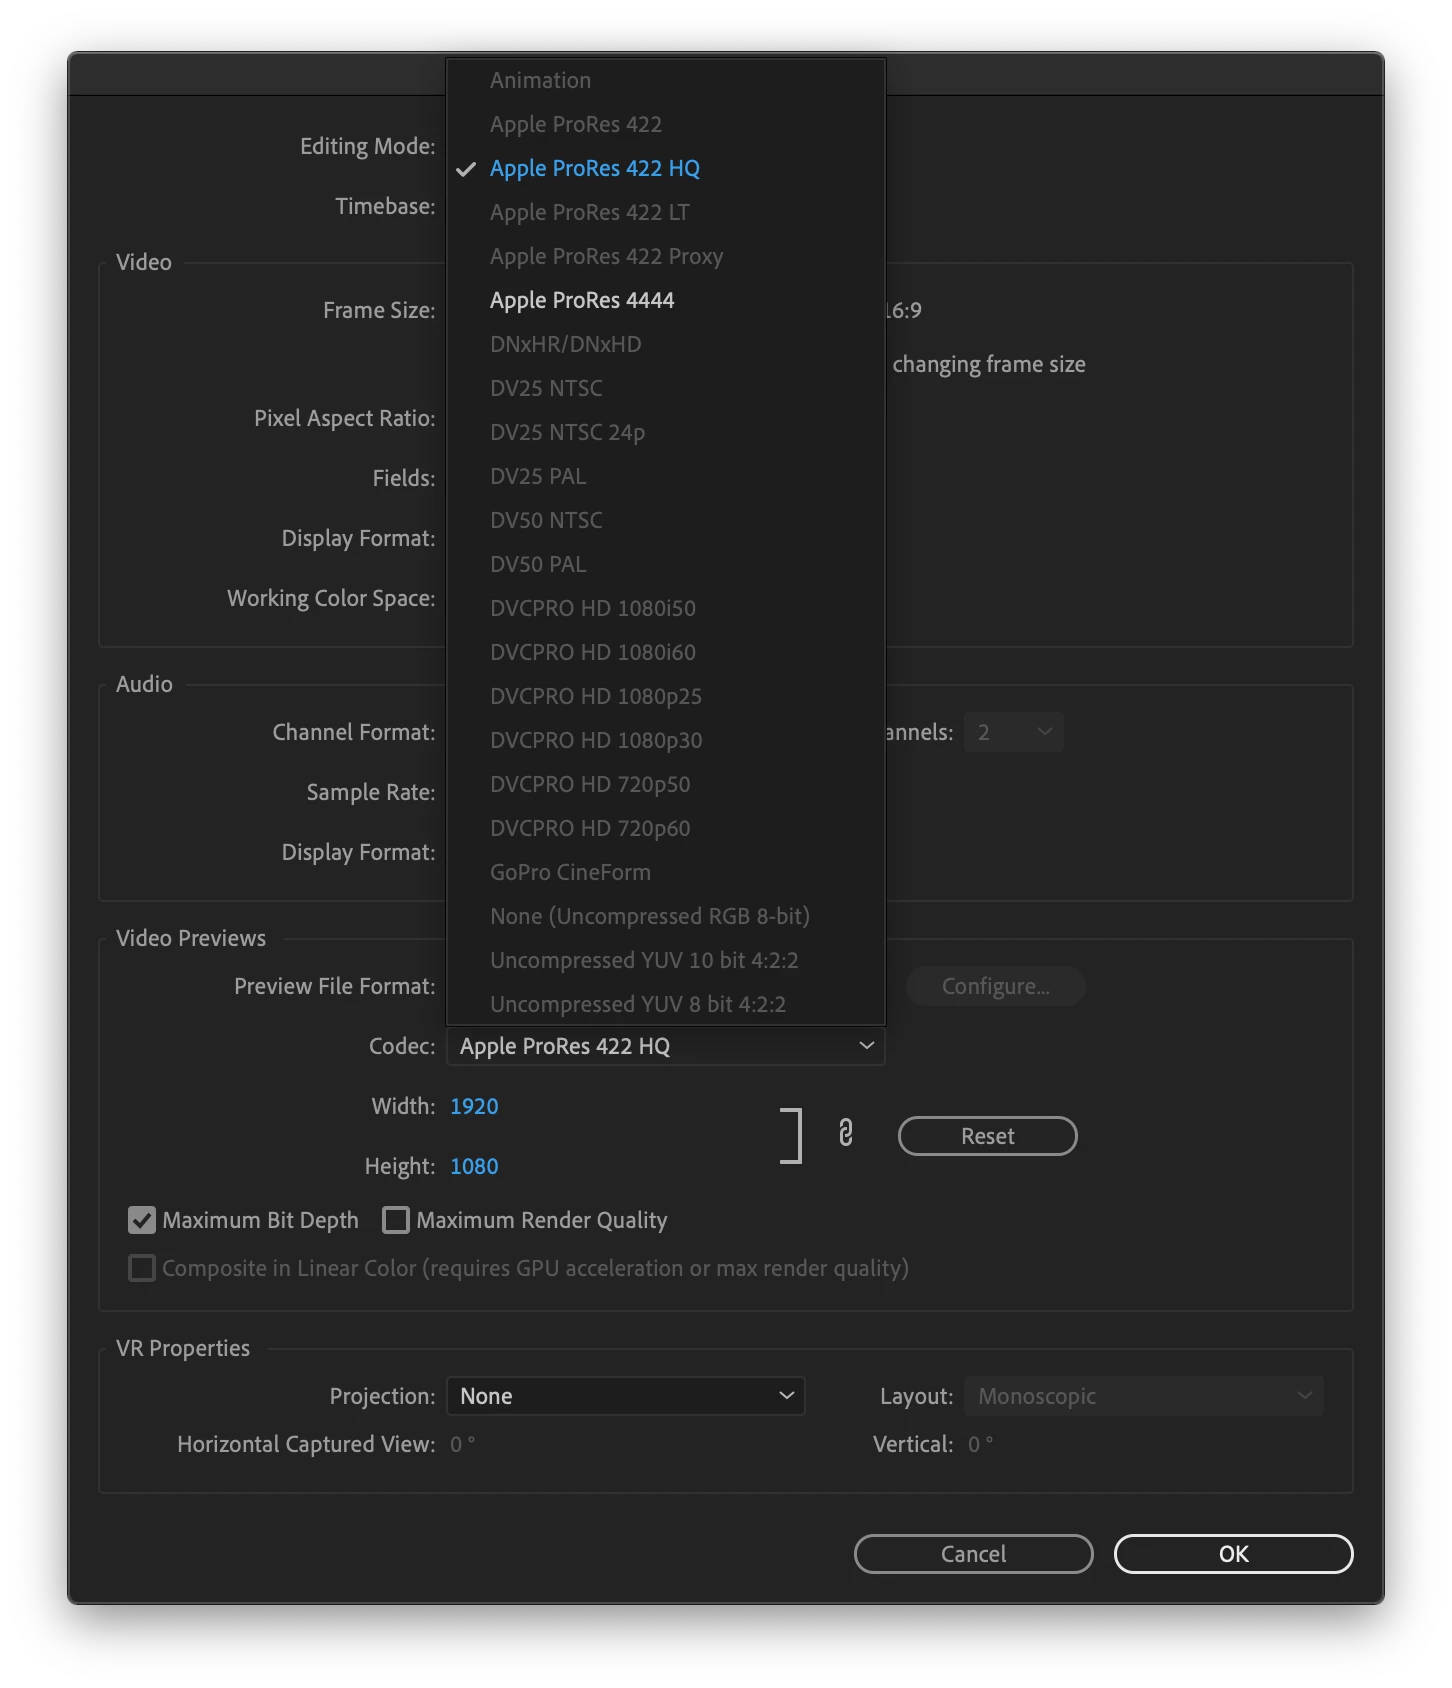
Preview rendering for HLG sequences using ProRes
If effects or adjustments are added that require rendering for smooth playback, the sequence can be rendered while maintaining HDR range and color space. When a sequence is set to the HLG color space, the video previews will automatically also be set to ProRes HQ at 1920 x 1080. You have the option to choose ProRes 4444 if you want higher quality color encoding and you may change the video preview file resolution if you wish (eg. 3840x2160), but no other codecs may be chosen for the preview file codec. Premiere Pro can export ProRes on Windows, which makes it an ideal high-quality cross-platform codec. Other codecs for preview rendering is expected to come at a later time.
Grading with Lumetri
Grading and color correction on HDR footage is possible using the Lumetri color panel today but there are a few things to be aware of. Do not use the “High Dynamic Range” mode in Lumetri. Wait! What? The HDR mode in Lumetri was designed for operating on over-range values in the Rec. 709 color space. In previous versions of Premiere Pro, HDR workflows were capable because we process everything in 32bit floating point and could hold onto the values outside of the Rec. 709 Gamut and luminance range. Internally we would end up with really large floating point values, well above 1. Now that we have a proper HLG working color space we no longer have values in the range that the HDR controls in Lumetri are expecting to operate on. We intend to re-engineer this, but for now, run Lumetri in the standard mode when working with an HLG sequence. And when judging the result of your work, you must be using an HDR reference monitor hooked up through appropriate transmit hardware. See the section above “HDR reference monitoring with transmit hardware”
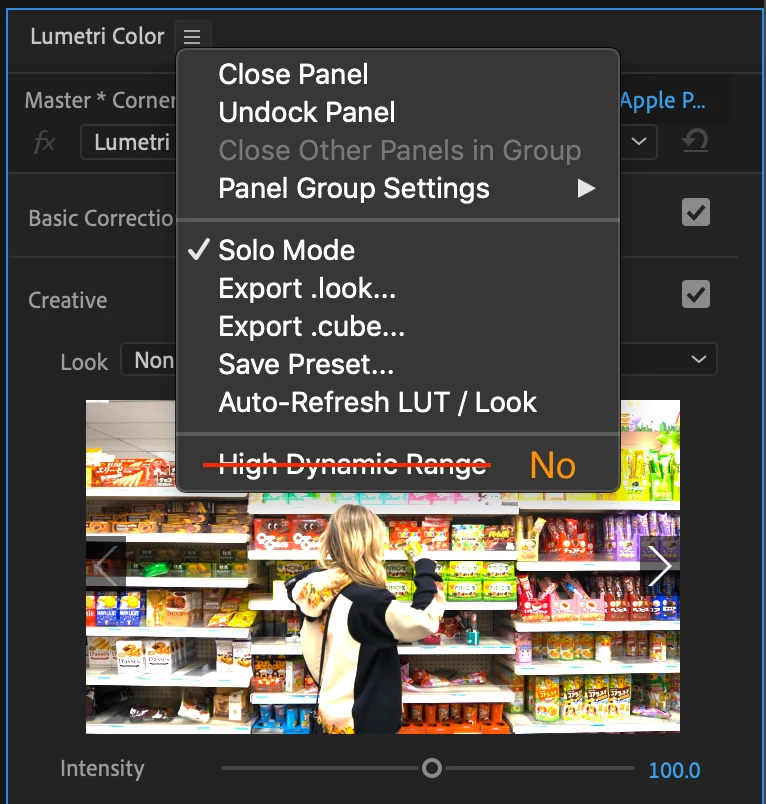
*** NEW ***
The High Dynamic Range options in Lumetri have been temporarily removed.
HDR technology has evolved dramatically since these options were first introduced and the approach is no longer valid for true HDR working color spaces. To avoid confusion, we have disabled these options and are working to re-engineer them to work properly in our new HLG sequence working color space. Lumetri will work just fine on an HLG clip in an HLG sequence without the additional controls for specular highlights. Legacy projects that have used these settings will continue to function and the controls will be available, but the controls have been disabled from being enabled in new projects. We will bring these controls back in the future.
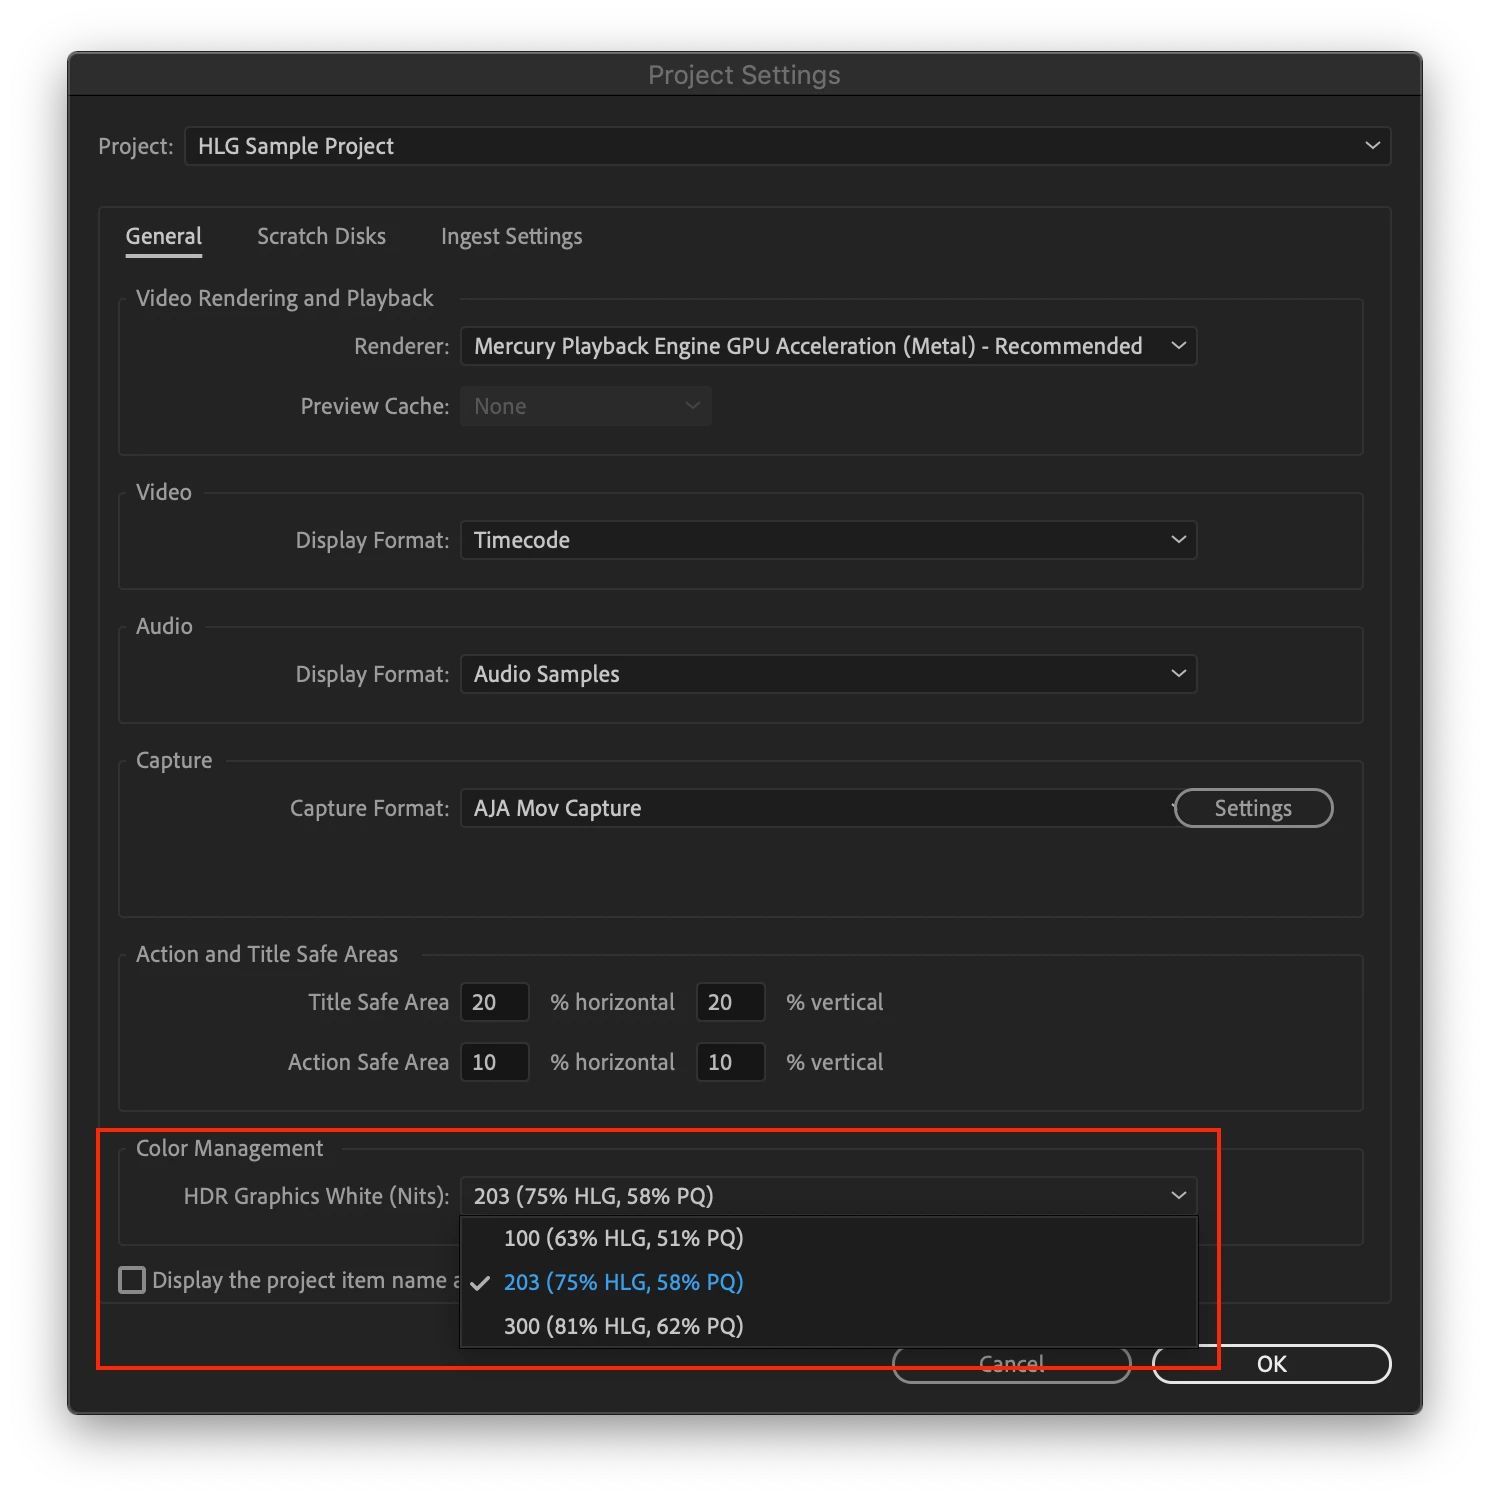
Graphics white setting for SDR <-> HDR range scaling
Graphics white describes the target luminance for a 100% white color (like white text – “graphics”) when performing SDR to HDR or HDR to SDR conversions. Mapping 100% SDR (100nits) to 100% HLG (1000 nits) would be far too bright. Conversely, mapping 100% HLG (1000 nits) to line up with 100% SDR (100nits) would yield an image that is too dark.
- Choose Project Settings > General > Color Management
- Choose HDR Graphics Whites setting from the 3 options [100, 203, 300]
The HDR Graphics White (nits) setting has three options: 100, 203, 300. The default currently is 100 but we plan to change this soon to 203 which is the recommended setting by the ITU. We also helpfully display the relative signal level for HLG and PQ. For example, 203 nits is equal to 75% HLG, 58%PQ.
HDR Graphics White is also the pivot point that is used by display color management to convert HDR content to your display space in order to display HDR content on your SDR desktop monitor. Viewing HLG content on an SDR monitor with the graphics white setting set to 203 will yield an acceptable looking image, although highlights will be clipped. This is, however, a really good approximation of what your HLG content would look like on a viewer’s old SDR TV if no range mapping or color space conversions are performed. This is one of the benefits of the HLG color space – it is fairly backwards compatible with SDR.
That’s all for now. We welcome your feedback and discussion on this exciting and dense topic!
