Participating Frequently
November 9, 2020
Answered

Text Characters Uniform 3D Rotation

  • November 9, 2020
  • 3 replies
  • 4372 views

Let say I have a simple text  (first image) :


It's all in 3D and I enabled the "Enable Per-Character 3D" of its Text property as my goal would be to have all individual letters to rotate on Y axis.


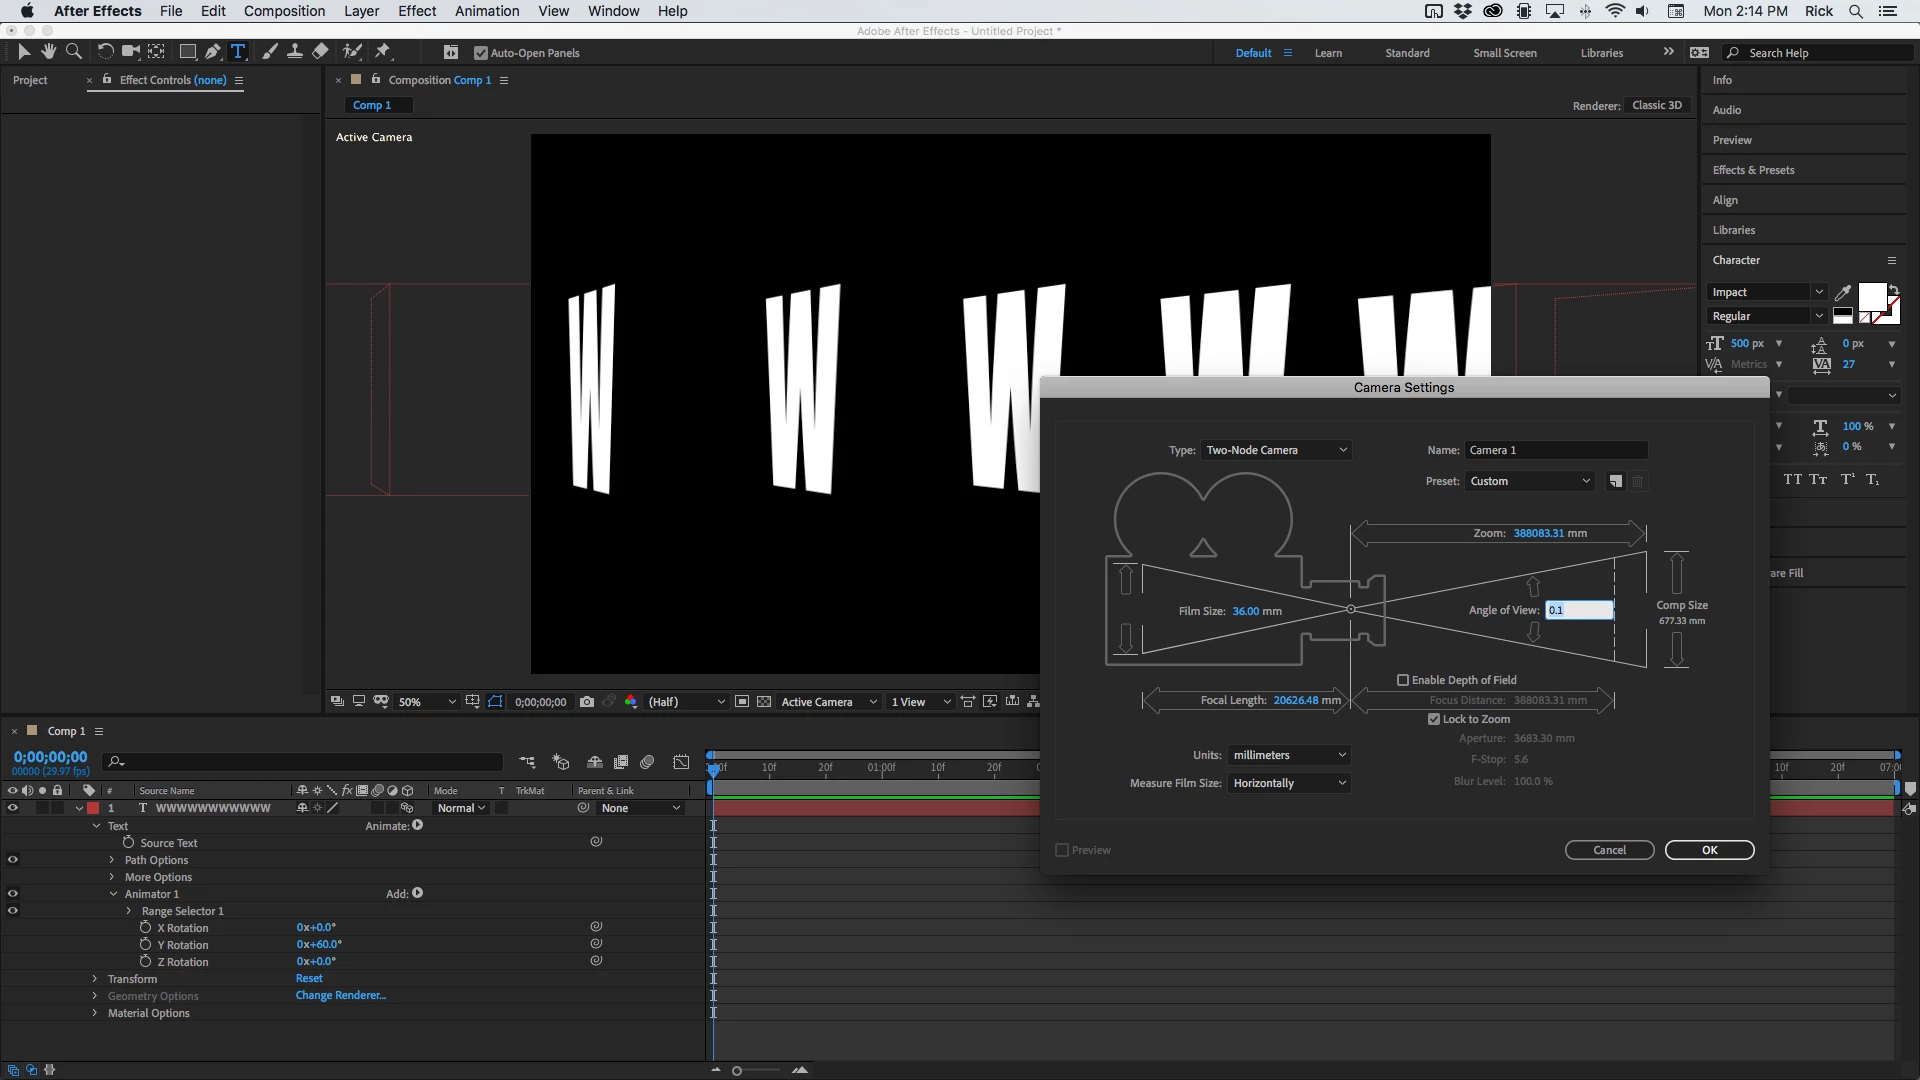
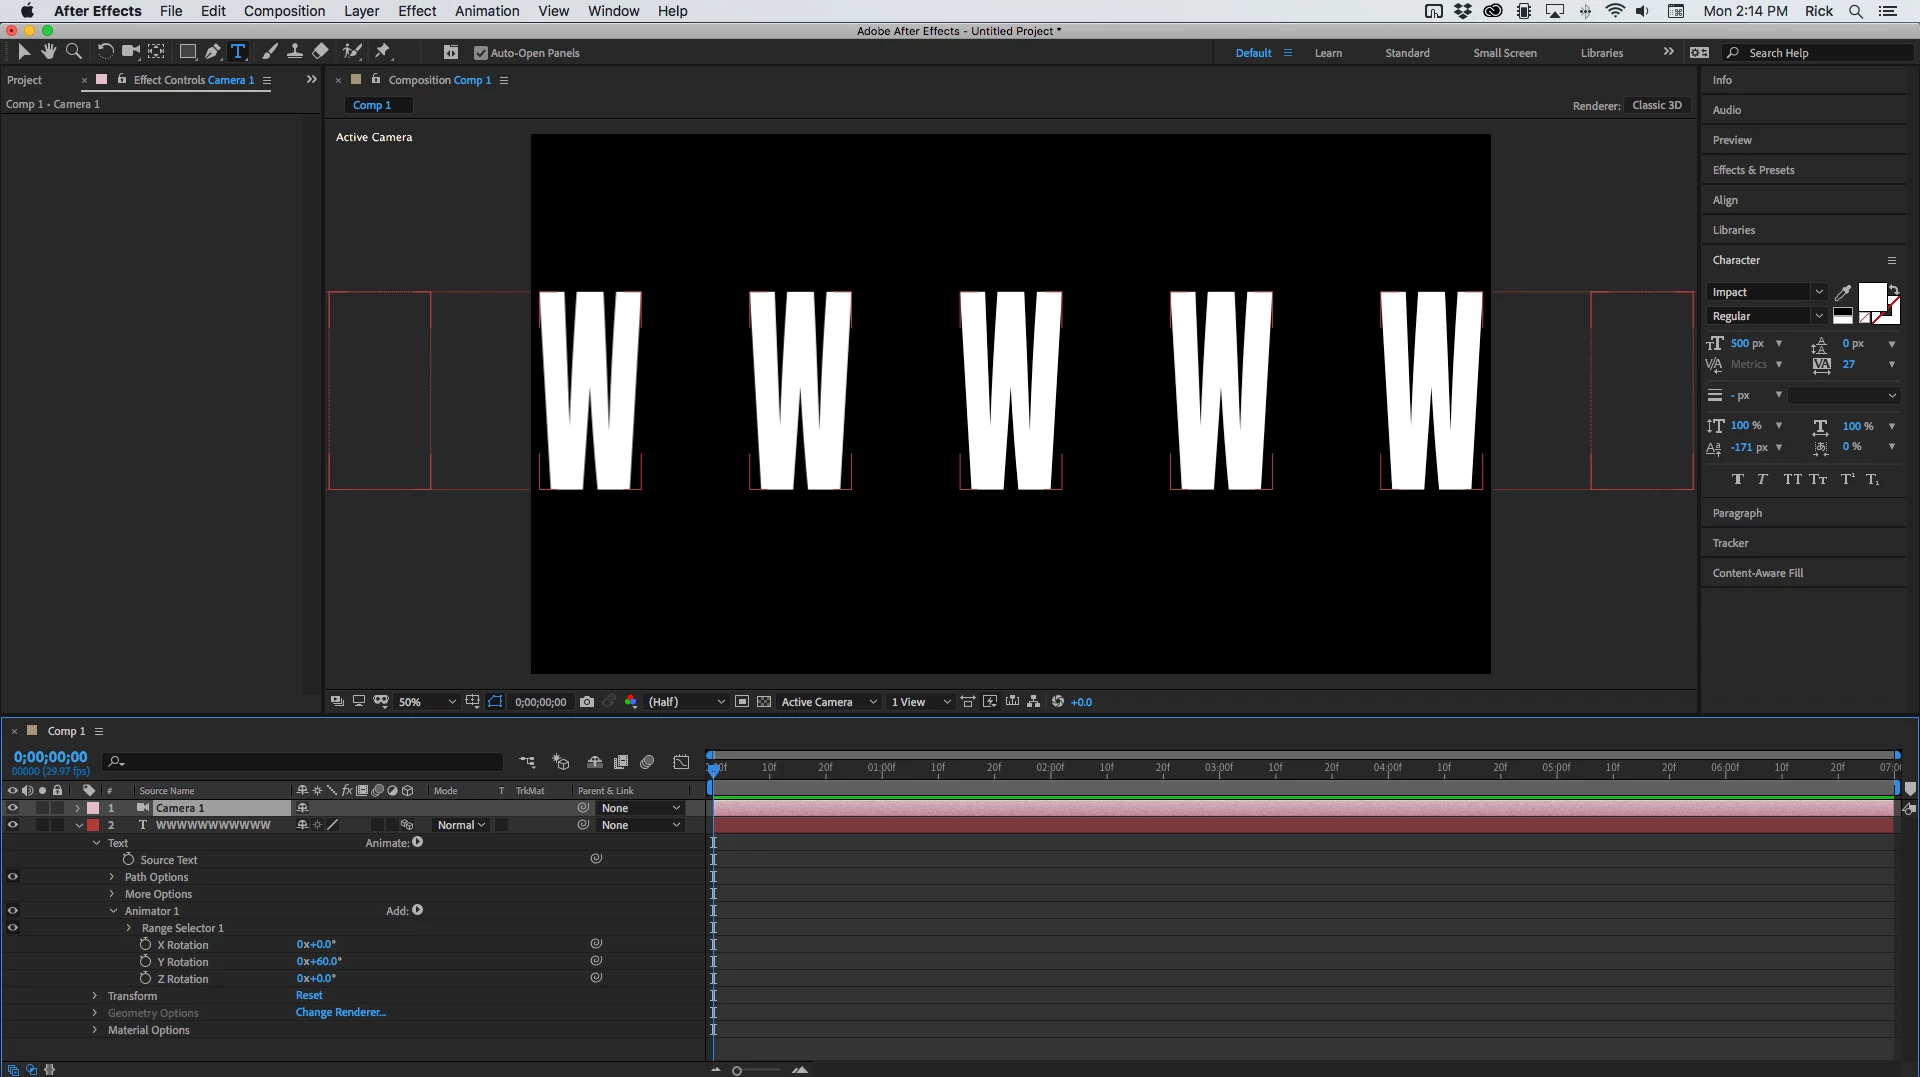
The problem is I can't do otherwise than get each letter which its own angle, due to the kind of view of the camera with a vanishing point (2nd image).

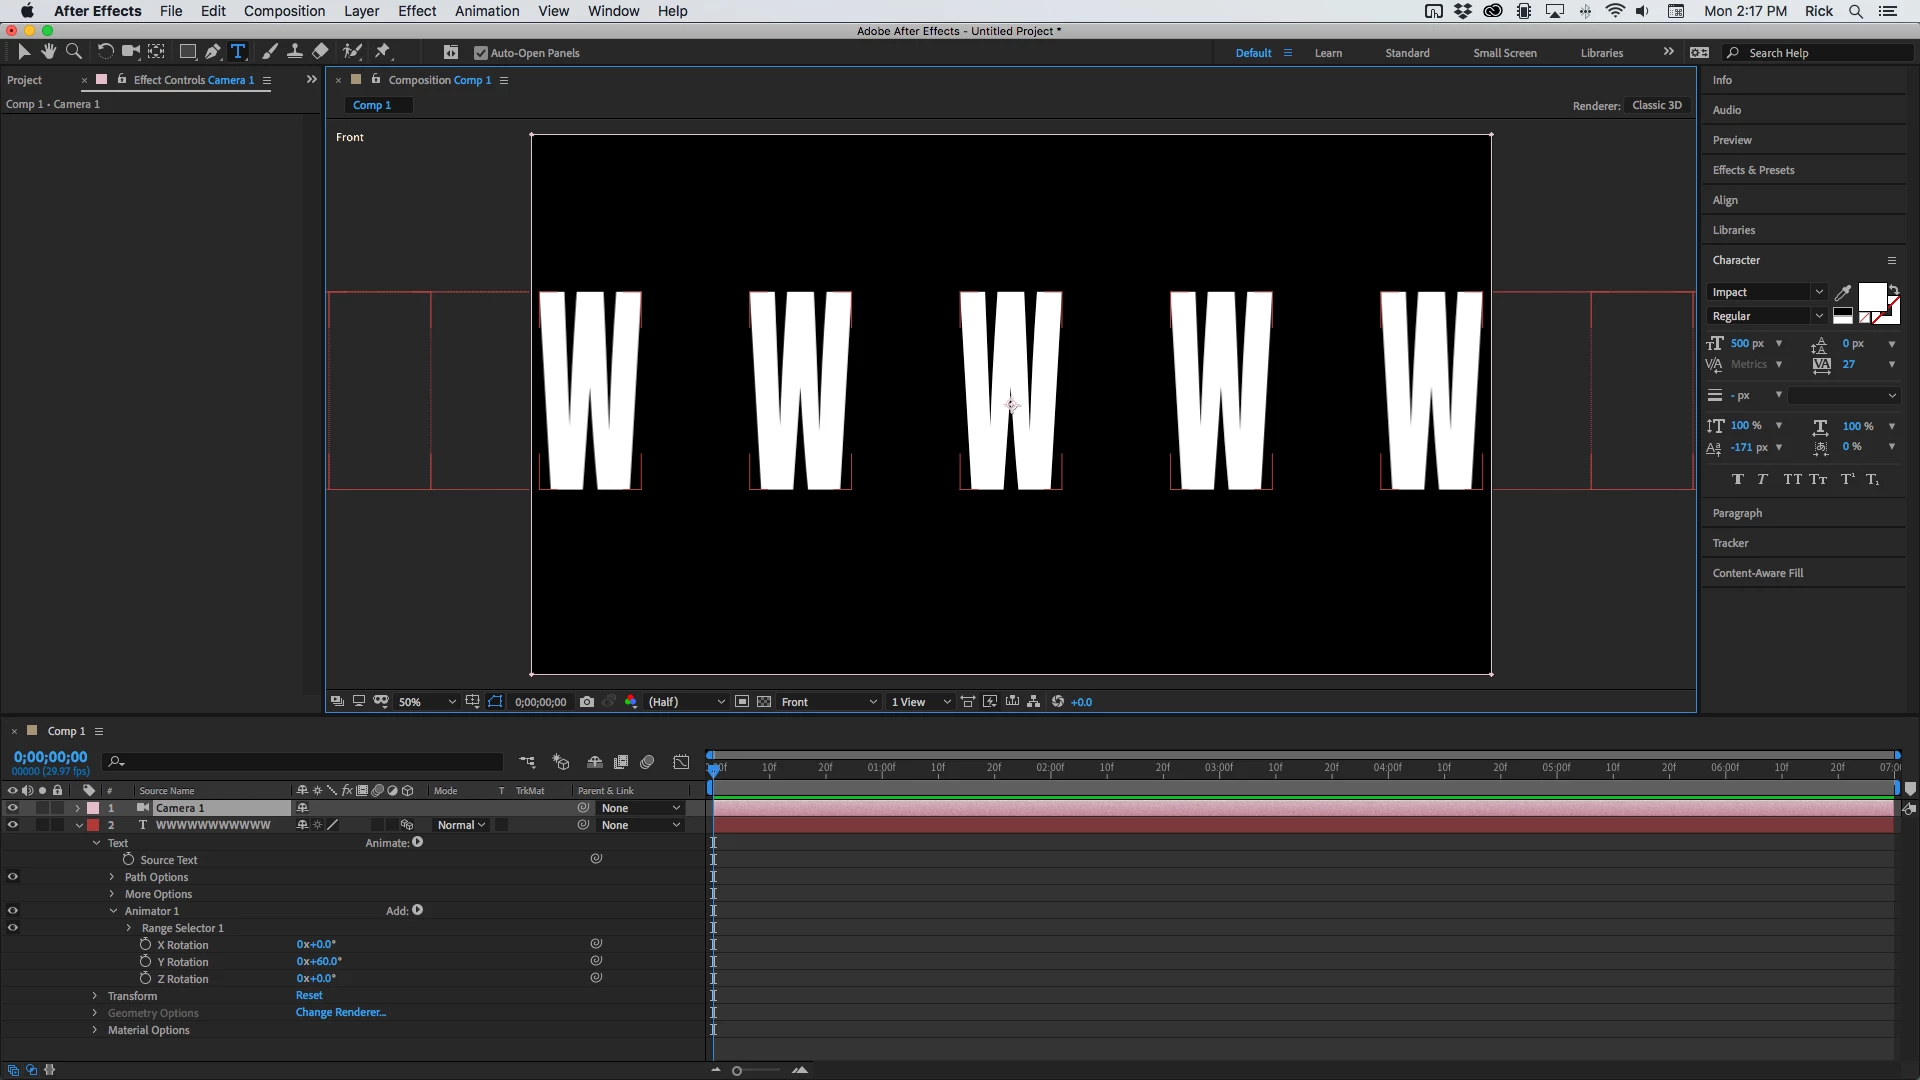
I'd like to get what's in the 3rd image, with all letters rotating totally simultaneously with the same angle (with a somehow vanishing point set to infinite).


Would that still be possible without separating each letter and moving each one separately ? How could I perform this?


Thanx to everybody that can bring me some help, I'm very beginner on AE.

Correct answer Rick Gerard

By far the easiest way to get close to an isometric camera in After Effects is to just add a new camera with an angle view of .1º then immediately lock the camera so you don't move it. Here's a series of screenshots with a bunch of W's, Per-Character 3D enabled, and a Rotation animator added with the Y rotation set to 60º. You can see the perspective with the default camera, then the perspective with the camera added to the scene, then a comparison to the Front view which is isometric. 

This is about as close as you can get to an isometric camera in AE. You can also go the other way and set the angle of view to as much as 179º. Perspective is controlled by the camera position. The narrow-angle of view will move the camera a long way from zero Z and an angle of view approaching 180º will put the camera very close to 0 Z. 

3 replies

Adobe Expert
November 12, 2020

I failed to consider how the text animator works. Turns out the right workflow is to add an Anchor Point property to the text animator and add the offset by the index value to that instead of using a position. That's why your characters are not properly positioned with an offset. Here is a screenshot of how I set up the first two text layers.

I multiplied the index value by .5 because a whole pixel offset gave me an undesirable moray pattern when the characters were rotated 90º. I also tied the material options in the top copy to the material options in the bottom text layer with a pickwhip expression so I could control material options for all text layers at the same time. The expression for Animator 1/Anchor Point looks like this:

[0, 0, index * .5]

The next step was to duplicate the second text layer 28 times so I had a total of 30 text layers. This second screenshot shows the position and settings for two Point Lights, one in front and one in back. I found the second point light worked better than the ambient light for generating shadows. Setting the material options and positioning the lights was critical in getting the text to look extruded. This is how that looks:

You can also use the same basic lighting and material options and just extrude 1 text layer using the Ray-traced rendering option (CS 6), or the C4D rendering option if you have a newer version of AE. The comp will be a lot simpler with that option, but you may run into rendering issues. On my machine, Ray-traced rendering takes about 40 seconds a frame for this comp.

Ray-traced or C4D rendering does look better for this workflow if you can stand the render time. If you decide to go with Ray-traced rendering I strongly suggest that you create a very simple comp with just the camera and lights, then render it using the Render Cue and the default lossless preset or render to an image sequence. Then you would import that render and put it in your main comp with the rest of the layers.


I hope this helps. Sorry about forgetting to check a per-character text animator comp and missing the anchor point offset required to get the text layers to stack up.

Participating Frequently
November 16, 2020

Hello Rick, well, thanx again for your dedicated answer, but this is way too complex for me I guess because I really tried to do your solution but this is such a complex one that I simply don't manage to recreate it based on your screen shots, there are tons of parameters, settings and expressions to tune and I must say I'm overfolwed by its complexity.

Rick GerardCorrect answer
Adobe Expert
November 9, 2020

By far the easiest way to get close to an isometric camera in After Effects is to just add a new camera with an angle view of .1º then immediately lock the camera so you don't move it. Here's a series of screenshots with a bunch of W's, Per-Character 3D enabled, and a Rotation animator added with the Y rotation set to 60º. You can see the perspective with the default camera, then the perspective with the camera added to the scene, then a comparison to the Front view which is isometric. 

This is about as close as you can get to an isometric camera in AE. You can also go the other way and set the angle of view to as much as 179º. Perspective is controlled by the camera position. The narrow-angle of view will move the camera a long way from zero Z and an angle of view approaching 180º will put the camera very close to 0 Z. 

Participating Frequently
November 10, 2020

Thank you Rick, this definitely works perfectly!

Now I'm running into another issue as I need each letter to have a thickness. What I found so far was the fact of switching to the renderer Ray-traced 3D (the only available one as I work with AE CS6), which allows access to property Geometry options > Extrusion Depth

This works but I still have an issue as the quality of the rendered image isn't that good, especially depending of the angle: here are 2 attached screenshots, one with an angle of 0.1° and the second with an angle even smaller of 0.01°, this second one being of worse quality as you can see on the images especially looking at the upper part of letters "B" and "C". Is there any way to change that (ideally this should be perfect but neither one is), maybe there are settings in the composition settings about that renderer...


Participating Frequently
November 10, 2020

By default, a 3D layer does not cast a shadow. If you select a 3D layer and press 'aa' the material options will appear. Set Cast Shadows to On. 


White against black does not compress well, especially if the edges are antialiased at all. Any color value at the maximum, 255 if you are using 8-bit color, or 1, if you are using 32-bit color project settings that are adjacent to a color value of 0, is going to get fouled up when you compress the video for distribution. Color is compressed and sampled in blocks of 4 pixels so when there is no room left to make calculations you get uneven results and banding. 


With the text layer selected, open up the color picker by double-clicking the fill color in the Character panel, check the brightness, and set it to about 95%. This will give you some room on your whites. Something like this:

You should spend some time using the Learn workspace and going through the first tutorials. You should also spend some time with the User Guide. Links are available on the AE product page, on this forum, and the Search Help field at the top right corner of AE is a lot better than Google for finding answers. Just poking around in the forum or searching YouTube for tutorials is a very inefficient way to learn how to use After Effects. Most of the tutorials you find with a web search are prepared by enthusiasts that have found a recipe for a specific effect and most of the workflows are poorly explained and some are crazy. Make sure you vet your trainiers. The number of views has nothing to do with how effective a tutorial is.


Hi and thanx for these good advices, I'll take some time as soon as possible to check these tutorials, the fact is the learning curve of AE isn't very easy and sometimes tutorials can get you straight to the point, that's the reason people use them I guess (although you're right about their global quality).


That being said, I'm sorry to get back to this issue but I still don't manage to get same result as you, although I followed your instruction the best I could. Here's my result:

Any idea of why I can't get any kind of thickness to these letters? Also the front layer color isn't going well - the red is surrounded by the white, well, I really didn't manage to make it works like yours 😞

Mylenium
Brainiac
November 9, 2020

You could calculate an individual rotation value for each letter using the cosine function and then experiment with the virtual lens curvature until it looks "flat". Still tricky, though. It might be simpler to just buy one of those iso(metric) scripts you can find on AEScripts.com and let it set-up and rig your scene with those typical long focus cameras that almost have no curvature anymore. Still a pain in the posterior, but manageable. If you're feeling really adventurous, you could also try Cinema 4D. It does have actual renderaple orthographic cameras and with the basic MoGraph step effector the rotation behavior could easily be mimiced in a fashion similar to AE's text animators.


Mylenium

Participating Frequently
November 9, 2020

Hi Mylenium, thanx for your fast reply, and well... I didn't think this was such a big deal to perform that. ouch! I'd rather make them twist letter by letter I guess, rather than playing with such complicated features - I'm really starting with AE so for the moment it feels more reachable as an objective 🙂