

- Home
- Audition
- Discussions
- Re: How can I make make all clips in multitrack th...
- Re: How can I make make all clips in multitrack th...

Copy link to clipboard
Copied
I have tons of clips in the multitrack and want to make all the volume levels (not gain levels) set to 0 db.
Is there an easy way to do that without clicking and dragging all 500 clips?


 1 Correct answer

If you don't mind going scorched earth on keyframes, or getting your hands a little dirty with a text editor and Regular Expressions, you should be able to remove all of those quickly and easily.
Save the session .sesx file, then open it in an advanced text editor like Sublime Text. These should offer the ability to perform a Find & Replace using regex which are sort of template-driven searches for text. If you want to wipe out all keyframes on all clips and tracks, this example should work. Au
... 18
Replies
18
18
Replies
18

Copy link to clipboard
Copied
Two fairly easy methods. Either try Match Loudness from the Clip menu. Or from the Edit menu use Batch Process. there you can drop all your audio files and use one of the Normalize Favorites.
Copy link to clipboard
Copied
Thank you for your response. Match Loudness is not what I'm looking for and the clips are already in a multitrack / I don't want to mess with the original audio files. I just want to set the clip level/volume to a default 0 db.
In Premiere all you have to do is right click - select "remove attributes" - and have "volume" checked. It's that simple.
Is there a way to do this in Audition? If not there should be.
Copy link to clipboard
Copied
Unfortunately I am not a Premiere user so I am not sure exactly what you are after in Audition. What is it with your clips in the Audition's Multitrack that is not correct level wise? I am not sure exactly what you mean by 'set clip level/volume to default 0dB'.  In the thread title you mention 'clicking and dragging'. What would you be clicking and dragging in order to do what you want?
Copy link to clipboard
Copied
Clip volume in Audition is adjusted in 2 ways:
(1) Change the gain in clip properties
(1) Move the line in the middle of the clip in the sequence (click and drag) --- that's what I need help with.

Copy link to clipboard
Copied
Orf wrote
Clip volume in Audition is adjusted in 2 ways:
(1) Change the gain in clip properties
(1) Move the line in the middle of the clip in the sequence (click and drag) --- that's what I need help with.
They aren't the same thing at all. The first one is the overall clip gain, which you can either alter using the track control, or in the clip properties box. The second is the line which indicates what the track automation settings are. If you go to the track automation controls and set them to 'Off', then the level indicated by the line is ignored, whatever it's been set to.
If you have an issue with the clip gains in many tracks being set to a value other than 0dB, you can reset these globally by using Ctrl-A (select all) and opening the basic settings box in Properties, and resetting the gain to 0dB, or whatever you want. As far as I'm aware this is the only global change you can make, as there is no facility to do this with the Automation system; you have to set each track individually.
Copy link to clipboard
Copied
How do I go to track automation controls and set them to "off"?
Still seems to me the lines on the clips are separate from the track automation controls, right? Otherwise I would be seeing the track fader move every time it goes by a clips with a line at a different level.
Copy link to clipboard
Copied
Ah, yes I should have made this clearer. In an individual clip, you get clip key-framing - that's the line that runs through a clip, and won't be shown as 'automation' as such. This shouldn't be a problem though, unless you've been altering the settings in individual clips deliberately. It's still not the same as clip 'gain' though - you can alter these settings without anything changing about that - it will still say 0dB whatever you do with them until you alter it specifically. The automation applies to the entire track, and is independent of the gain and the clip keyframe settings. You can see how to control the automation system (and make the automation visible as a separate track by expanding the track controls slightly until you see a twirl-down that defaults to 'Read'. If you twirl it, you'll get options to show as much or as little keyframe information as you want (bear in mind that there are a heck of a lot of things you can automate):
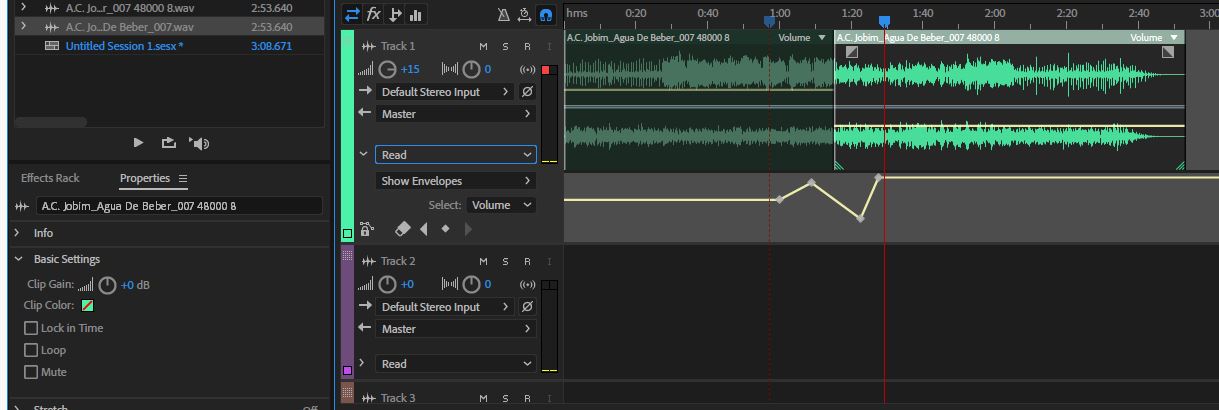
Here you can see all of this at once. The highlighted section still has a clip gain of 0dB, despite the clip key-framing set much lower, demonstrating that these aren't interlinked at all. And there are two clips at different levels (the first one being at 0dB), but only set by the clip key-framing. The automation track shown underneath is yellow (active) and will affect the whole track, regardless of what any clip key-framing does. Yes, you would be correct in assuming that it's possible for them to cancel each other out completely if set carefully... But, you only ever see the automation system moving faders in the mixer, not the key-framing (unless it's automation key-framing - that can drive the faders).
If you turn the automation off, the yellow line turns black:

The clip keyframing remains yellow though, and still active.
Should there be options to turn it all off in sections globally? I don't recall any requests to do so, although I can see some potential value in it. As it stands, the only option you can control globally (as I mentioned before) is the actual clip gain.
Copy link to clipboard
Copied
Thank you for clarifying.
I'm very disappointed there is no way to change the yellow line on all clips at once. (Btw is there a correct term for those other than "yellow lines on clips" that differentiate them from "actual clip gain"?
Is there a hotkey to raise the yellow line(s)? That would be helpful and solve the issue.
The yellow lines are all over the place because I migrated from Premiere. Many of the line changes in the music were not even visible in Premiere---a result of selecting all music clips as "balanced background music" in Essential Sound panel.
Copy link to clipboard
Copied
Orf wrote
I'm very disappointed there is no way to change the yellow line on all clips at once. (Btw is there a correct term for those other than "yellow lines on clips" that differentiate them from "actual clip gain"?
Generally the term used for automation lines is 'rubber band' - simply because you can add key frames and 'stretch' the line, and it pings back if you remove the key-frame. Any other term would require more words, so generally this one's stuck, even though it sounds a bit childish to me!
Is there a hotkey to raise the yellow line(s)? That would be helpful and solve the issue.
There isn't, I'm afraid. Just to make sure, I did some more tests on this, and even if you group clips and select all of them, you can't group the rubber bands; they still remain isolated from any form of group control.
The yellow lines are all over the place because I migrated from Premiere. Many of the line changes in the music were not even visible in Premiere---a result of selecting all music clips as "balanced background music" in Essential Sound panel.
I'm afraid that this doesn't surprise me in the slightest. Premiere's audio is pretty terrible, from a technical point of view. Any system that, when you drop the same audio file onto different tracks, places it at different levels sucks big-time, and apparently this is what Premiere does...
I'm afraid that I don't know what the 'good' answer to your problem is, except that regardless of anything else, I'd prefer to have all the files I was using to be of a uniform level anyway, and if they weren't, then I'd use Batch Processing to make sure that they were. If you have multiple clips taken from one file and you want to normalize them individually (which might not result in the same changes per clip as normalizing the entire file in one go), then you can convert the clips to unique copies, and normalize these individually instead.
My understanding of Premiere's 'remove properties' feature is that all it does is remove whatever properties the NLE has given the file, and doesn't actually alter the file itself anyway - which is what you'd expect from a NLE. The thing about Audition is that it doesn't allocate any properties (hidden or not) to a file unless you actually do it yourself - as in altering the clip gain, key-framing, etc. So, if you're saying that an import from Premiere has all this mess attached to it, that rather looks like it's Premiere's fault, doesn't it? I have to say in the same breath though that this is currently a work in progress, and because of all these idiosyncrasies, it's not the simplest thing to achieve by any means - so we have to cut the developers a bit of slack here.
So, when you import a typical clip from Premiere, what properties does it appear to have? Rubber bands set at some random value, or the clip gain set to something other than 0dB?
Copy link to clipboard
Copied
A screen grab of some of the clips with their automation envelopes (rubber bands) showing might help us to suggest a better remedy. After all 'A picture paints a thousand words' or whatever the saying is.
Copy link to clipboard
Copied
ryclark wrote
automation envelopes (rubber bands)
That's the thing - seven syllables plays three, and no clue as to what they behave like!
Copy link to clipboard
Copied
This worked perfectly for me, thank you.
Copy link to clipboard
Copied
If you don't mind going scorched earth on keyframes, or getting your hands a little dirty with a text editor and Regular Expressions, you should be able to remove all of those quickly and easily.
Save the session .sesx file, then open it in an advanced text editor like Sublime Text. These should offer the ability to perform a Find & Replace using regex which are sort of template-driven searches for text. If you want to wipe out all keyframes on all clips and tracks, this example should work. Audition's .sesx file format is fairly human-readable XML, so searching for:
.*<parameterKeyframe sampleOffset=.*
should find each instance of a keyframe.
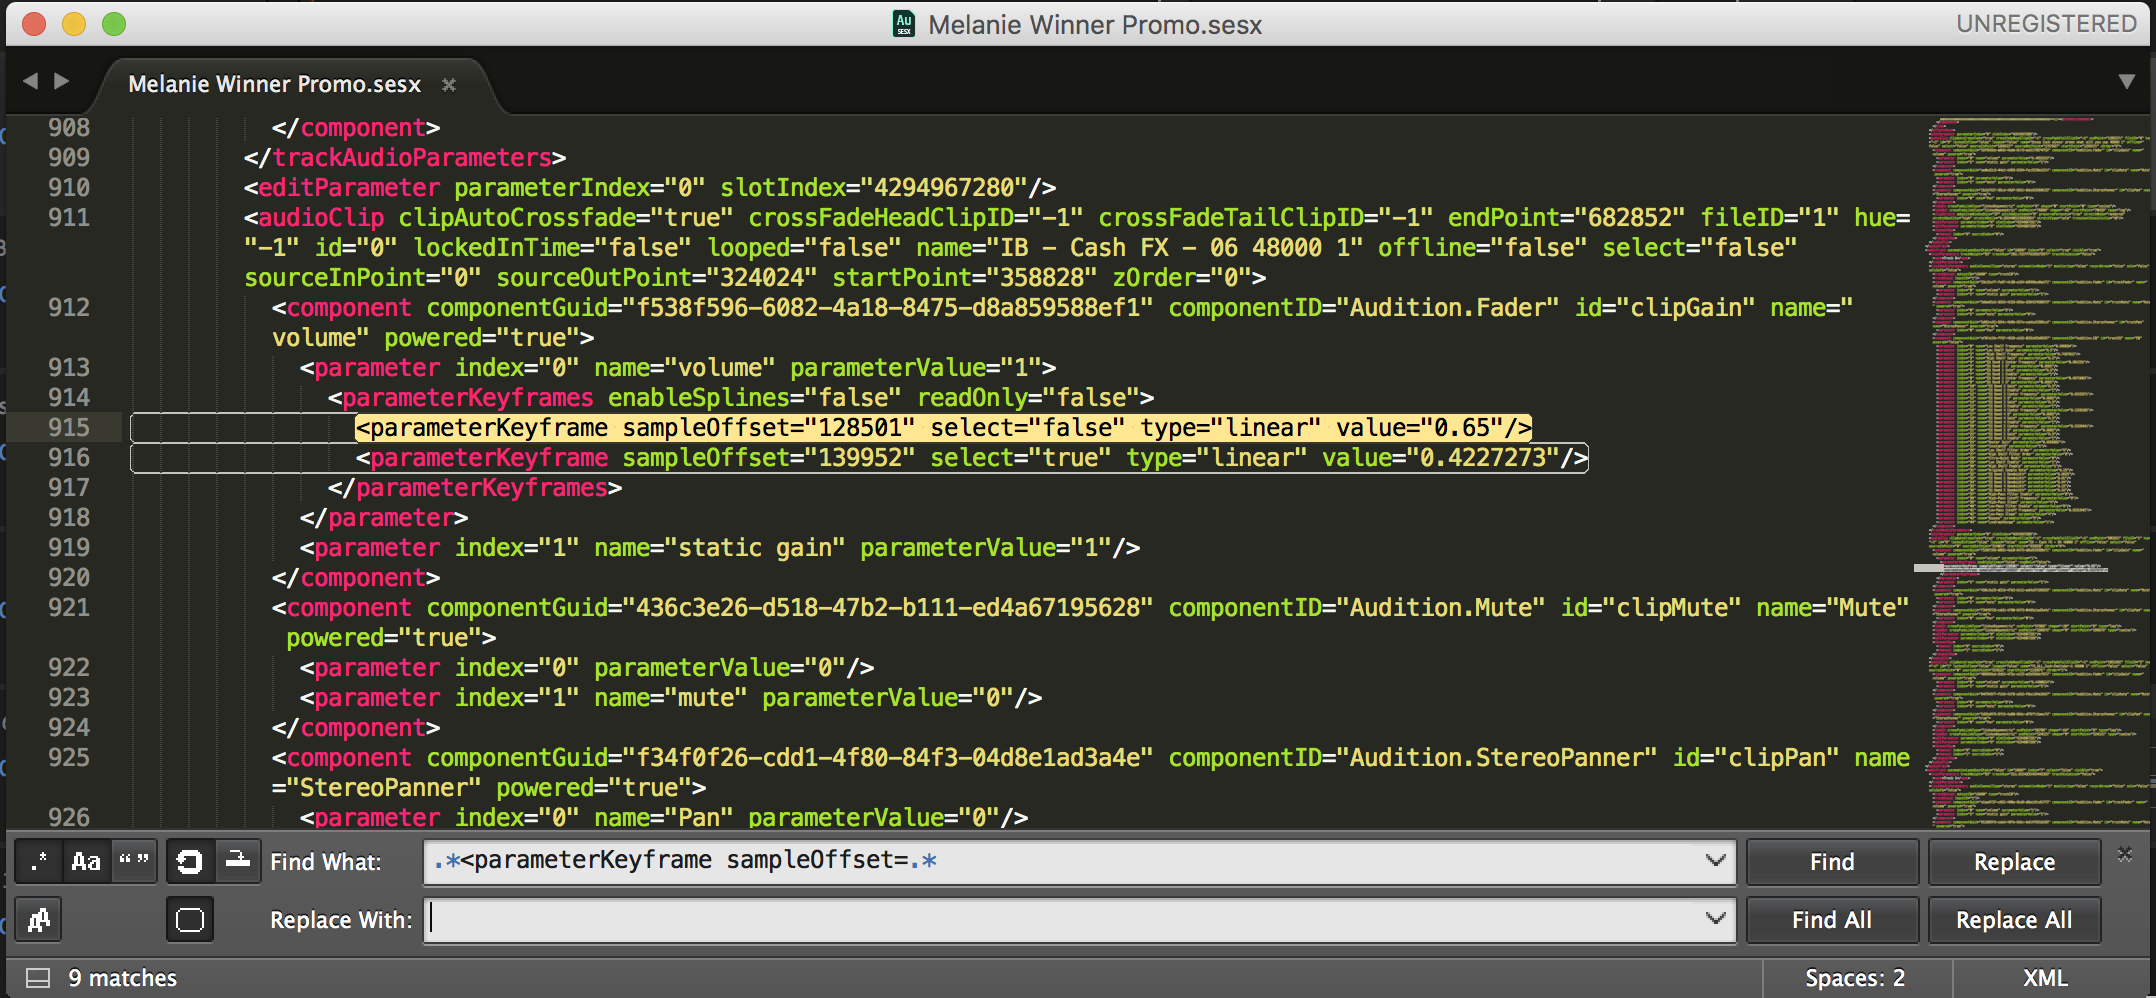
However, that doesn't really explain why you'd end up with so many volume keyframes. The Essential Sound panel doesn't generate any keyframe information. The Clip Volume keyframes that show up when sending to Audition would be based on any keyframes in the standard Volume effect for every audio effect in Premiere. I don't think anything else would be translated as clip volume keyframes when importing to Audition.
Copy link to clipboard
Copied
This solution worked EXACTLY as needed, and should be labeled the answer for addressing keyframes on multiple clip 'rubber bands' across a whole file. I've had this issue for years with importing Premiere OMF from various editors, and it has always been an incredibly tedious task either requesting an OMF with clip attributes removed, or manually removing keyframes by hand.
One additional step I needed to do beyond what is outlined above is resetting all adjustments to the volume parameterValue - which in VS Code was as simple as searching for all occurrences of:
<parameter index="0" name="volume" parameterValue=
opting to "Change all occurrences", press shift+end, and then replace all with:
<parameter index="0" name="volume" parameterValue="1"/>
Hope this helps someone who may still be struggling with this!
[Mod note - Durin's answer is now marked as correct]

Copy link to clipboard
Copied
I've had this problem for years too and spent countless hours clicking on every single clips keyframes -> Deleting -> setting audio back to 0.
I had a play around today with some solutions and found that if I went back to premiere and selected all clips and clicked "clear audio type" in the essential sound panel and exported an omf, when i bring that into audition all the keyframes are gone and the audio is set correctly at 0dB.
So i think i can confidently say that it is an essential sound issue within Premiere and i now have a very quick and easy solution!

Copy link to clipboard
Copied
I know exactly what you're talking about. I just mixed a track but I have to ship the raw file to someone else without volume envelopes. Here is what I did. I haven't tried it with multiple tracks but for me, this got the job done.
Right click on a keyframe, "Select all keyframes," Right click again, "Delete selected keyframes." Easy as that. You may have to drag the clip volume envelope to "0" if it isn't there already but you can get all of your clips back to zero this way. I was very happy to find this solution.

Copy link to clipboard
Copied
Export your session to FCP XML interchange format,then re-open the new project. And boom all level parameters are back to default.

Copy link to clipboard
Copied
This worked perfectly! Very quick, all volume keyframes gone, all "yellow lines"/"rubber bands" set to 0.
Find more inspiration, events, and resources on the new Adobe Community
Explore Now
 AdChoices