

- Home
- Illustrator
- Discussions
- Blend Tool Not Making Smooth Color Blend
- Blend Tool Not Making Smooth Color Blend
Blend Tool Not Making Smooth Color Blend

Copy link to clipboard
Copied
I'm using Illustrator CC (on a Win7 Pro machine) at a beginner level, probably halfway to intermediate. I'm trying to learn how to blend colors together for highlights of various types (skin tones, clothing, light on objects, etc.) so that when I'm making a graphic for a project I'll have a decent idea of which tool/technique is best for the specific effect I need.
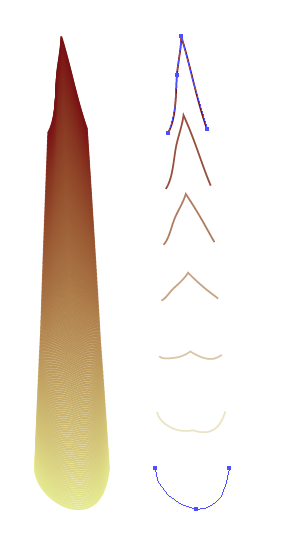
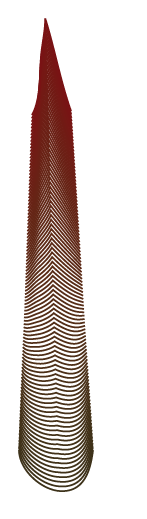
I'm trying to use the Smooth Color option in the blend tool. Late yesterday afternoon I recall creating two ellipses (one of which was a solid fill and one of which was a gradient going from black to transparent) and getting a smooth color transition between the two. It was a much harsher effect than I was looking for so I didn't keep it. This morning, while trying to replicate the same thing, I seem to be unable to use smooth color between two objects if one or more of them has a gradient applied. I only get what you see below, which is a step between the two objects.
I've done searches and found multiple references to blending gradients in this way and have followed those instructions (create the shapes, fill with the gradients, then either click on the Blend tool and click on the center of each shape, or click on Object -> Blend -> Make) but I can't seem to get a Smooth Color blend if either object has a gradient applied. Am I missing an important step somewhere? I'm 95% sure I accomplished it yesterday and nothing has been changed since then.
I realize the blend tool might not be the best option in this particular instance but this is just a learning exercise for me. I could as easily have chosen a metal or plastic object (and I'm sure I will do some of each to practice) but I would probably still be here asking the same question.


Explore related tutorials & articles
 45
Replies
45
45
Replies
45

Copy link to clipboard
Copied
Yesterday's test involved default rectangle and ellipse shapes with fills applied. Hardly a complex scenario.


Copy link to clipboard
Copied
Can you share an example file? I get the second result immediately without expanding appearance.
Copy link to clipboard
Copied
Hey Doug - thanks for your interest. Here's a link to that example AI file:
https://www.qreativbox.com/wp-content/uploads/2023/05/IllustratorBlend.ai_.zip

Copy link to clipboard
Copied
You wanted to see it:
Expand appearance not available:

This is the result of the blend:

You will always have to check the blend steps so that there are neither too many nor too few.
Copy link to clipboard
Copied
@Monika Gause , there's a mystery here and perhaps you have a better idea than me of the cause, as I can't see a reason for it.
Create a new document using the built-in 'Web' document profile. Draw an ellipse without changing anything. 'Expand appearance' is available.
Create a new document using the 'Art & Illustration' profile. Do the same. Expand appearance is not available.
Some issue with the default graphic style? There is no visible difference in the appearance panel.
Edit: spotted it, the default style in 'Web' docs has an Inside stroke. But that's not the issue, because removing the stroke also removes the Expand Appearance option, and that's not the case in Gabriel's doc.
Edit 2: Ok I think I have the answer. If you remove the stroke by changing the stroke weight to '0', the 'inside' attribute is not removed and Expand Appearance is still available. If you remove the stroke by trashing it in the appearance panel, it clears the appearance and Expand is not available.
So the cause of this is the Inside stroke attribute in the default graphic style of the 'Web' document preset.
Copy link to clipboard
Copied
Blimey - well spotted. I'd have never thought to explore document profiles as the root cause. Sherlock Points.
Copy link to clipboard
Copied
@Gabriel5FDF schrieb:
Blimey - well spotted. I'd have never thought to explore document profiles as the root cause. Sherlock Points.
Document profiles are NOT the "root cause" of this. My example has been done in a Print document.

Copy link to clipboard
Copied
In the event that anyone is still looking for a solution.
Create your two shapes and give them two different color fills. Use Smooth Color blend and then Object > Expand. Then you can turn the new shape into a single color. Kind of a work-around, but I thought it might be helpful.

Copy link to clipboard
Copied
I did a test with 2 2.25"w x .3"h rectangles, each with a separate gradient fill, no stroke. I created a blend 2 ways: 1 with specified steps, the other using smooth color. The rectangles are 2 inches apart vertically. The smooth color version had separation lines and only stepped 7 times. The specified steps version I set for 72 per inch or 144 steps. I was able to achieve what appears in your latest screen grab. The smooth color failed. The specified steps succeeded.

Copy link to clipboard
Copied
KarynRH wrote:
Jacob Bugge wrote:
Karyn, You may (also) start looking at Gradient Meshes.
That's next. I was going in what seemed to me the order of complexity - gradients, blends, and then gradient meshes. I used a gradient mesh once before while following a tutorial but that gave me a barely passing understanding of it. Thanks!
KarynRH wrote:
I'm using Illustrator CC (on a Win7 Pro machine) at a beginner level, probably halfway to intermediate. I'm trying to learn how to blend colors together for highlights of various types (skin tones, clothing, light on objects, etc.) so that when I'm making a graphic for a project I'll have a decent idea of which tool/technique is best for the specific effect I need.
Not to take away from the topic and issues being discussed concerning blends but I think Jacob's suggestion in the very first post is the direction you need to head concerning the objectives you outlined in your initial post. You may also wish to look into the free plugin "Mesh Tormentor" for working with gradient meshes more indepth. I believe to achieve the results your ultimately striving for which you mentioned "(skin tones, clothing, light on objects, etc.)" then gradient meshes in general are where you need to spend your time and learning efforts for such things.

Copy link to clipboard
Copied
@KarynRH
This issue has plagued me for years!
Today I was having this problem again and I found this thread as a means to see if there was a solution. It basically told me what I do already - manually define steps.
However it got me thinking that there must be a reason why it works sometimes and not others.
The answer is - the tool needs data from which its calculations can derive the proper outcome.
What data does it need?
If you have a square with the colour R0 G0 B0 and another square of R255 G255 B255 and a Smooth Colour Blend is applied, then the tool's coding will get the larger of the value sets and minus the lesser of the value sets. In this case, 255 - 0 = 255. It then gets the distance between the two objects and divides this distance into value sets which define the best transition between the objects, perhaps R5 G5 B5 > R10, G10, B10 > R15 G15 B15, etc.
If both of the colours present in the squares were R255 G255 B255, then 255 - 255 = 0. Now you can't divide 0 with anything, or divide by 0 itself, so to stop Illustrator crashing, there would likely be some coding to the effect of "if X = 0 then X = 1". This is why you would be presented with 1 step when Smooth Colour Blend is used.
This can be made apparent when you create two squares with both R0 G0 B0, create a smooth blend, then change one of the squares to R2 G0 B0. 2 steps are created. Change this to R1 G0 B0 and you get 1 step. Change it to R0 G0 B0 and you are left with 1 step.
The Smooth Colour option for the Blend tool doesn't make a smooth colour based on visual aesthetics of a continual non-stepping graduation, but rather a calculated and approximated representation that does the thinking for you.
Why do some objects not blend correctly or despite ample colour value variation, still step incorrectly?
Perhaps you have some text "Smooth Blend" on two lines. These were create using the type tool, they were then expanded into shapes. You then copy it and change its colour. You create the blend and it steps badly. Why, if I have the required amount of variation in the colour values, does it still step badly?
Part of the Blend tool is not just about colour but also shape. So if the tool can't calculate a smooth transition between the shapes, it likely still has the clause "if X = 0 then X = 1". While I can't expand on how it would calculate this (I would assume it is based on X,Y coords for each node assigned on a path with some other algorithms to approximate transition shapes), but that's beyond me  ; there is a way to fix it and make it work.
If you delete the copied expanded text, leaving the original in place, you can copy and paste it directly on top of the original. Selecting the two expanded text objects directly over eachother, you then use pathfinder (I like pressing alt here while clicking the Unite button then click "Expand" to ensure the operation has worked the way I want it). Now you have effectively made a new object with no "history". This object no longer holds the seperate node groupings of the expanded text object since it is likely that the expand command runs left to right, top down in creating the objects.
Now when you create your objects to blend, it will smoothly blend the shape and the colour.
Note: This "fresh object creation" trick can be used in any instance where an object isn't behaving properly.
@Cydward: With your example showing the stepping, you might need to apply this "fresh object creation" to overcome this fault in your transition.

Copy link to clipboard
Copied
Hi. I am having the same issue,in CS6. I have a tutorial where a blend is working as desired, then I am changing the two strokes defining the extents of the blend. When I change the opacity from 100% the blend has problems generating smooth colour. In fact when I change the opacity of one stroke, the blend degrades to a number of individual strokes. It appears that with the smooth colour setting, internally, Illustrator is creating discrete steps - just enough of them to give the illusion of a smooth colour blend. Here I duplicated the blend and changed the lowest path to 10% opacity. I then changed it to a different solid colour and this now clearly seems to be using steps. Answer - not 1005 reliable...
Copy link to clipboard
Copied
Illustrator always generates discrete steps. The setting "Smooth color" only sets how the number of steps is calculated. Nobody holds you from selecting "Number of steps" and then entering a number you consider appropriate.

Copy link to clipboard
Copied
I struggled just now with the same problem. I downloaded an EPS from istock which had smooth transitions in the blend in the file displayed on iStock, but when i opened the EPS file the transitions where filled with stripes. Selecting the 'smooth' option in the spacing box would not solve this problem. After some searching and trying i found an answer.
My top layer of grouped objects has an opacity of 80% and is filled gray with no stroke.
My bottom layer of grouped objects has an opacity of 0% and is filled white with no stroke
I then blend the two groups with the option 'specified distance' on 1px
With the blend group selected in you layers panel you see an 'opacity' link in your control bar
Click this link and deselect the option 'Knockout group'
This made my blend a smooth gradient like i was looking for.

Copy link to clipboard
Copied
Hi I was having the same issue and realized one of my elements was a compound path. try going to object>compund path and releasing it. that should work.
Copy link to clipboard
Copied
I was just having a similar problem. I fixed it by not outlining my shapes.

Copy link to clipboard
Copied
The blend "smooth color" option will break like this if there is another special effect, (fx), assigned to the appearance.

Copy link to clipboard
Copied
I know it's been over a decade since this question, but hopefully this answer helps anyone still struggling with no answer.
My Issue: Whenever I tried to blend two objects with a gradient fill, Illustrator would not allow me to press Make.
Solution: Create two objects with single-color fills and blend them. Then click Object > Blend > Expand. Then select all the objects in the blend and use the eyedropper tool to select the gradient you're wanting to use. Bam, it works.
*Make sure you have your blend setting set to Specified Steps.

Copy link to clipboard
Copied
Hello @mary-margaret_9870,
Could you share more details, like the version of the OS/Illustrator and a small screen recording of the workflow, so I can check this with the team?
Looking forward to hearing from you.
Anubhav
Copy link to clipboard
Copied
So many solutions in this thread and none of them works for you?

Copy link to clipboard
Copied
Check out Freeform Gradient, this will give you a nice way to create skintone at no time.
-
- 1
- 2

Find more inspiration, events, and resources on the new Adobe Community
Explore Now
 AdChoices