Andreas Jansson
Inspiring
March 24, 2017
Answered

InDesign what determines where the different colours of a gradient swatch begins?

  • March 24, 2017
  • 2 replies
  • 2280 views

Sometimes when I apply another swatch (to see what it looks like) and then switch back to the original gradient swatch, the starting positions of the lines or circles are moved. Just unchecking and checking the preview checkbox has the same effect.

Howcome? Is the position where the gradient "begins" recalculated, and if so, why is the result different from before?

The two circles below are the same size and have the same gradient swatch applied as stroke, but the yellow colour (right-most in the "gradient ramp") is just barely visible on the left circle. Why are they not affected in the same way?

If I select the left circle and reapply the swatch it becomes the same as the right one.

This topic has been closed for replies.
Correct answer Laubender

Well, the effect that I'm asking about seems to be the same in the downloaded "fill" example. The "origin" of the lines or circles changes when I select an object and enter the properties of the applied gradient swatch (and just turn on preview).

On the external sample I just noticed that the changes made to the fills must be that they have manually set origins and "lengths" (I don't know the correct terms) for the gradients. Using the gradient tool I can restore the looks of the original fill that was obviously reset when I reapplied the swatch (or just watched the looks of it being reapplied using the preview option).

I never used the gradient tool on my own circles though, so there it must be some other change that I've made that has affected the origin or range of the gradient stroke.


Hi Andreas,

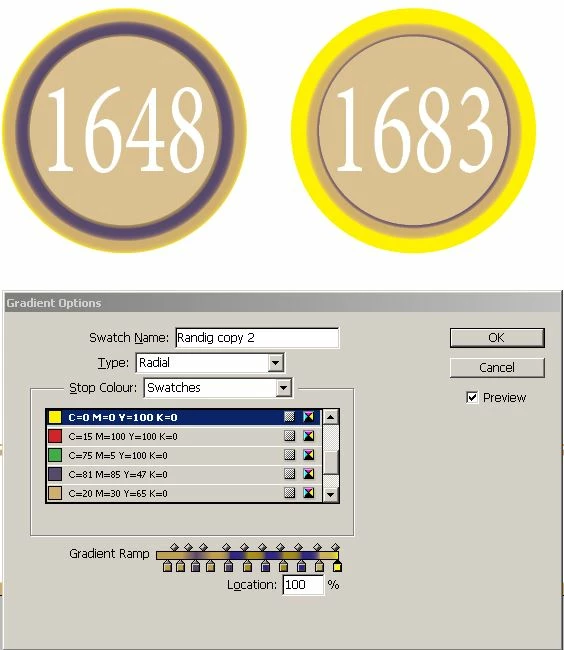
you must be aware that on one hand we have the gradient like you see it in the Swatches panel.
On the other hand there is the graphic frame where the gradient is applied to.

Trivial?

Not, if you consider the following:

The look of the applied gradient is shaped by a triple of properties of the graphic frame.
Not of the gradient.

Three properties that come along with the fill and three that come along with the stroke of a graphic frame.

Setting e.g. the fill to "none" will not reset the values for that three properties.
EDIT: Setting the fill to a non-gradient swatch will not reset the values either.

The three values are:

gradientFillAngle will define the angle of a linear gradient
gradientFillLength will span the 0% to100% of your gradient stops.
gradientFillStart will define the start of an applied gradient in x/y values

With the Gradient Tool one can manipulate the three properties.
Depending on the type of a gradient—linear or radial—the three properties may react differently.

The same properties do exist for strokes:

gradientStrokeAngle

gradientStrokeLength

gradientStrokeStart

And what makes this case more complex is:

1. We also have to consider, if some scaling, rotation or shear transformations are applied to the graphic frame.

2. Changing the size of a graphic frame will not change the values for the three properties.
And by changing the size I do not mean scaling. Rotation and shear will not change the size.

What has all this to do with your problems?

Maybe you resized a circle and then applied a new gradient?
Or you changed the shape of a rectangle to a circle where you once applied a gradient, changed the defaults using the Gradient tool, applied fill color "None" and forgot about it?

If you want to make sure that a specific "look" is applied by using a gradient, make sure that you start from scratch with a new graphic frame. Otherwise you cannot be absolutely sure, that one of the three properties will not start at their default values.

Regards,
Uwe

2 replies

rob day
Community Expert
Community Expert
March 24, 2017

If you apply a radial gradient swatch to a stroke of a circle, it looks to me like the gradient is calculated from the center of the circle and not the width of the stroke. Also the position of the stroke (inside, center, outside) matters. Here I have a 100pt diameter circle with a 99pt stroke and when I change it to 10pt you can see what happens:

But it doesn't seem like you really are trying to get a gradation, but want multiple solid strokes. Why not simply nest different sized circles where you can spec the dimension and color of each stroke and then group the circles?

Willi Adelberger
Community Expert
Community Expert
March 24, 2017

The left circle is determined how it was applied to the object with the gradient. But it is not the very same as the open swatch.

The transition is also determined by the small diamond indicator above the ramp bar.

Andreas Jansson
Inspiring
March 24, 2017

How can I see what has been altered, or if there is a change at all? On style there are "+" characters that indicate overridden attributes. Can I detect a similar thing on my circles?

You can observe the same thing as my example in this sample: Tips & Techniques: Create stripes in InDesign

(download the sample file from the link in the text). Just open the file, select the right rectancle, and you will see that the swatch "Stripes radial" will get selected in the Swatches palette. Right click it and select "Swatch options". (Uncheck and) check the "Preview" box, and the circles will change in the rectangle.

I appreciate your answers, both Rob and Willi, but there must be something I don't understand.

Andreas Jansson
Inspiring
March 24, 2017

Hm…
The stroke width.


How is your definition of the preferences with scaling?
And what options are checked with your Transformation panel for strokes?

Regards,
Uwe


>How is your definition of the preferences with scaling?

>And what options are checked with your Transformation panel for strokes?

I'm not sure what panels these are, that you are asking for. You will have to guide me (screen shots or where I should look for them).

I did no other changes than the steps I described above. Stroke width was what made this appear...