 Adobe Community
- Home
- Lightroom Classic
- Discussions
- Images exporting darker than shown in Develop/Libr...
- Images exporting darker than shown in Develop/Libr...
Images exporting darker than shown in Develop/Library
Copy link to clipboard
Copied
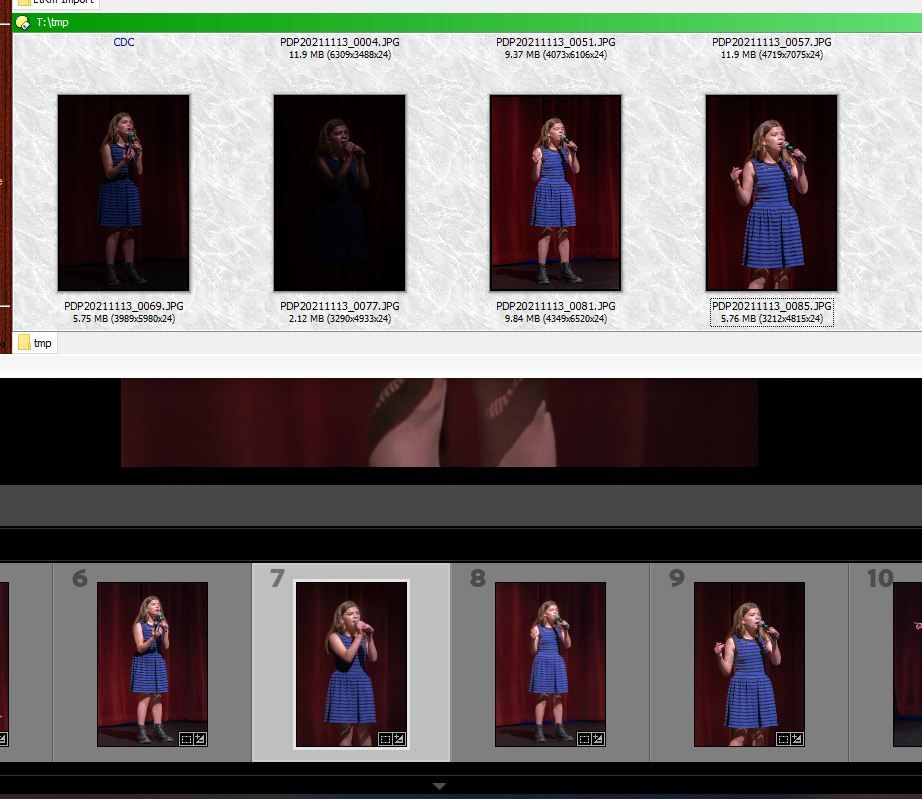
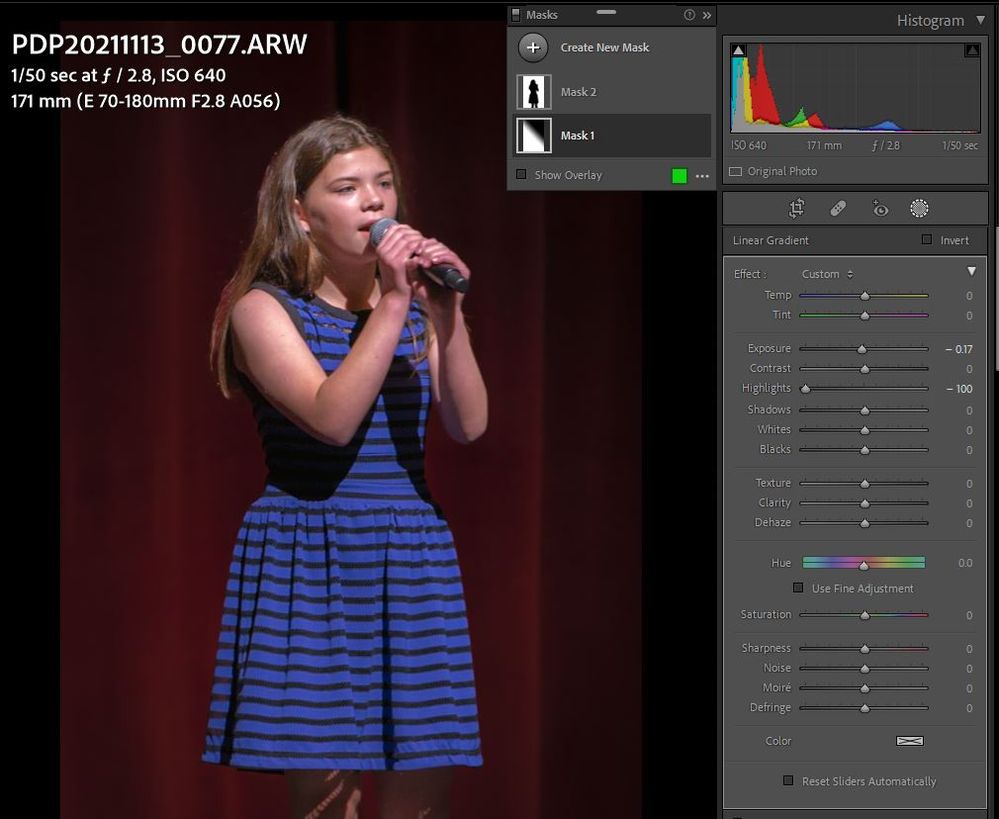
Since updating to latest versions with mask enhancements, some of my images are exporting with significant dark overlays which seem related to linear masks. See attached example. The top set of images are how the four were exported. The same set below are how they appear (correctly) in LR. Strange thing is that the last two images of the four look correct, but have the same type of masks as the other two. Second attached screen cap is of the worst of the four, showing the two masks.
Copy link to clipboard
Copied
I did some further testing and narrowed it down to something with the combo of exposure and highlights sliders, not with maps. The setting for all these images are high exposure and very low, if not -100% highlights settings. If I bring the highlights slider back to 0 and the exposure down a bit, the in R and export images are much closer. Strange thing is, if I copy the settings from one image the that has no problem to the ones that do, it does not fix the problem. BTW - how does one edit or delete a post here?
Copy link to clipboard
Copied
@Paul Peterson wrote:
BTW - how does one edit or delete a post here?
Click on the ... More 'link'.
Copy link to clipboard
Copied
Thanks, but I don't see anything like a More link.
Copy link to clipboard
Copied
You do not see this?
Copy link to clipboard
Copied
Interestingly enough, no. Hmmm.
Copy link to clipboard
Copied
The forum software, in its infinite wisdom, limits the capability to edit previous posts to those who are more frequent posters.
Copy link to clipboard
Copied
Your screenshot indicates you used a Select Subject mask. Two others have reported similar symptoms with the Select Subject/Sky masks:
Has this issue happened with any photo that doesn't use Select Subject/Sky masks?
Copy link to clipboard
Copied
My image looks equally good in the Libray and Develop panels. Loading the raw image, increasing exposure and decreasing the Highlights is enough for the problem to present itself. See my latest comment with attached image and XMP file. Thanks.
Copy link to clipboard
Copied
/Edit/a post timing thing, so now their are two replys stating the same thing/no biggie
The author is a new member, as such, no "More" button yet. Takes some postings/reply's before being given that right in the community.
IMPORTANT UPDATE We've changed the backend configuration to now allow users that have a certain rank to edit their own posts. This means new users won't be able to do so until they've participated in the community and reached a particular rank, which will hopefully solve the problem we were having with spammers and abusers. These users are usually brand new and have not posted any previous content. We will monitor the situation closely to see how this change affects the community as a whole.
Copy link to clipboard
Copied
Not about your problem, just an observation, and something to experiment with.
1. On either Mask1 or Mask3, double click on the mask iscon, then you can name the mask with something better to remind you, bith masks.
2. Been experimenting with the new masks, been watching tutorials. And I notice it appears you have applied Mask1 perhaps to work on background? Then Mask2 on subject. Experiment with first creating select subject, do nothing just yet to the adjustments, (well maybe rename it) duplicate that mask, invert the duplicate, and rename it (for example background). then go and edit the masks as you desire. Might cut down on some Add/Subtracts in each mask. Just something to try.
Copy link to clipboard
Copied
I have reduced the problem to the Exposure and Highlights sliders. Load the supplied .ARW image, set the exposure level to 2.75 and the Hightlights slider to -84, then export. It will be much darker than in LR.
Files:
Image: https://www.dropbox.com/s/mozz19iq4v4tstt/PDP20211113_0077.ARW?dl=0
XMP file: https://www.dropbox.com/s/y65t46a3s3f196f/PDP20211113_0077.xmp?dl=0
Copy link to clipboard
Copied
[This post contains formatting and embedded images that don't appear in email. View the post in your Web browser.]
"Load the supplied .ARW image, set the exposure level to 2.75 and the Hightlights slider to -84, then export. It will be much darker than in LR."
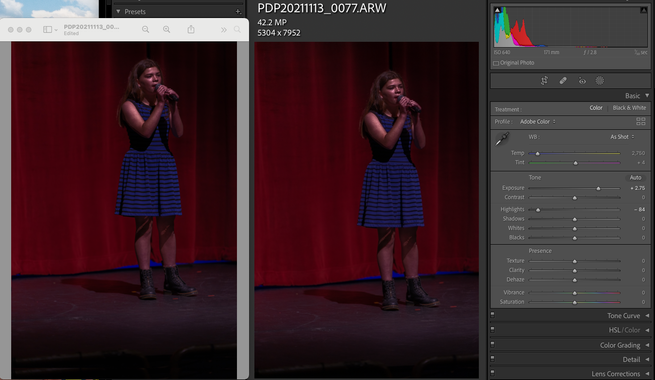
I don't see that with the .arw and .xmp you supplied. I made the changes to Exposure and Highlights and exported as JPEG, and on my LR 11.0.1 / Mac OS 11.6 the exported JPEG (left) looks nearly identical to Develop (right):
Usually when there's a large discrepancy between Develop and exported images on Windows, it's one of two things:
1. Using a non-color-managed viewer app. I don't recognize the app you're using in the screenshot -- what is it? Firefox, Irfanview, and Faststone are three free color-managed viewers (Google Chrome still has bugs, last time I checked) (you have to explicitly enable color management in the latter two).
2. A color display profile that either doesn't conform to industry standards (fairly common on Windows) or is incompatible with LR (e.g. a version 4 ICC profile). You can quickly test that following these steps:
Copy link to clipboard
Copied
Thanks, John. My external viewer is the Directory Opus utility and has not been changed since things were looking correct.
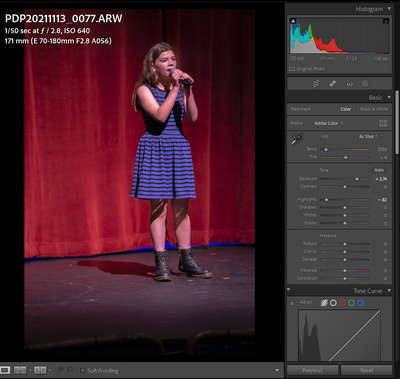
Your in-LR rendering doesn't look like mine, here:
Mine looks more like what you'd expect for a dim original image with exposure boosted and highlights lowered. I'm surprised a how your's rendered so dark. I have changed no monitor settings or color profiles. Only change was the upgrade to v11. Things have worked great till I started doing the exports.
Copy link to clipboard
Copied
After yet some more testing, I came across some odd behavior by the software. From the screen looking like it does in my last post, I click on Before/After. The Before looks overly bright compared to the After image (which doesn't make sense). I zoom in on either of the images and after 2-3 seconds, both images darken. I go back to Loupe view and now the image looks as dark as it does in John's screenshot (two posts back). I then click on the previous image in the strip and I can see the image that darkened go back to the lighter version of itself! What would cause that?!!
Copy link to clipboard
Copied
Forget about the Before/After component in my last post. All I have to do is zoom into one of these problem images and within 2-4 seconds the brightness of the image will shift on its own to a darker level. This is apparently the "true" level. I can then unzoom, adjust the exposure level up to where it looks right, export out, and the saved image will look correct. But if I then move to another image in the set and wait, the icon in the filmstrip for that last image will still look correct for a second, but then it jumps to an overexposed level. I go back to it and sure enough, it looks overexposed. If I export it out, the save file will look correct! I have hundreds of images for this event that are having this problem and need to deliver soon. I would appreciate a look by Adobe staff.
Copy link to clipboard
Copied
Do these photos have Select Subject / Sky masks, or did they have it at one point in the past?
Two methods for working around rendering bugs that may have gotten captured in the preview cache:
- Clear the Camera Raw cache via Preferences > Performance > Camera Raw Cache Settings > Purge Cache.
- Select all the photos with suspected issues and do Library > Previews > Build 1:1 Previews. That's easier than zooming in on each individual photo but usually has the same effect at working around rendering problems that have gotten captured in the preview cache.
Copy link to clipboard
Copied
John,
Thanks for your suggestions. I checked my monitor profile and switched it from one that had the name of my monitor to the sRGS one the directions listed. Nothing seemed to change.
I was hopefull when I initiated the rebuild of the preview, because I noticed the slow correction of the icons in the film strip and when I went to those that looked too dark, I was able to adjust the levels and save out a good image. But as soon as I went to a different image, the preview for that last image revered to the overexposed preview. Something is incorrectly rendering previews that are too bright!
Copy link to clipboard
Copied
"But as soon as I went to a different image, the preview for that last image revered to the overexposed preview. Something is incorrectly rendering previews that are too bright!"
Was this after purging the Camera Raw cache and doing Build 1:1 Previews?
Copy link to clipboard
Copied
"I have changed no monitor settings or color profiles."
You may not have made any changes, but Windows has a nasty habit of updating your display profile with defective manufacturer profiles. And Microsoft broke profile-based color management in Windows 11.
So at this point I think your issue is less likely related to the display profile, but it's certainly possible -- different code paths through LR trigger problems with profiles in much different ways (e.g. Library and Develop and zooming). I recommend you remove the possibility of a broken color profile by doing the five-minute diagnostic test:
https://www.lightroomqueen.com/how-do-i-change-my-monitor-profile-to-check-whether-its-corrupted/
Copy link to clipboard
Copied
For those on this thread:
If you send the affected image to Camera Raw does Camera Raw render it correctly or the same as Lightroom Classic?
Copy link to clipboard
Copied
Rikk, I appreciate what you're getting at by your question. But as I was trying to explain in my latest post, the shift in exposure level is happening within Lightroom. For some reason, the image is showing up at a brighter level until you zoom into the image. It shifts darker afer a few seconds and stays there until you move on to a different image. Then it goes back to the brighter (inaccurate) level. Now, I would think that it's something paticular about my workstation setup, like my graphic card setting. But I've deactivated the GPU option in lightwave with no improvement. I had not changed any colorspace or other related settings in my Win10 system before this issue showed up. It showed up with the installation of v11 of LR
Copy link to clipboard
Copied
Further detail discovered: zooming in at a level of less than 100% does not reveal the querk. One must zoom in 100% or greater for the image to switch to rendering at a correct level.
Copy link to clipboard
Copied
The underlying engine for LrC Development is Camera Raw. If Camera Raw shows the behavior as well, it is likely a Camera Raw issue - not Lightroom Classic. Fortunately Todd has answered the question in a post below. Now we need a sample for the engineers to review - see my post below.
Copy link to clipboard
Copied
Rikk, It renders the same in Camera Raw as LrC Develop module.


