

Exit
- Home
- Lightroom Classic
- Discussions
- Re: P: Generative Remove Feedback (Lr Classic & Lr...
- Re: P: Generative Remove Feedback (Lr Classic & Lr...
31
P: Generative Remove Feedback (Lr Classic & Lr Eco)

Adobe Employee
,
/t5/lightroom-classic-discussions/p-generative-remove-feedback-lr-classic-amp-lr-eco/td-p/14797225
Aug 13, 2024
Aug 13, 2024
Copy link to clipboard
Copied
This post applies to Lightroom Classic and the Lightroom Ecosystem products.
Camera Raw feedback can be found here.
Generative Remove makes it easier to remove unwanted objects and distractions with a simple gesture, even on complex backgrounds. For more accurate results, be sure to include the object's shadow in your selection and/or expand its size.
Detect Objects uses AI to find the objects underneath a brushed area. The masked areas will now appear larger than the Early Access version of this feature. You can also circle objects for quicker selection now.
We have also updated the spot selection experience to make it easier to manage variations, switch the fill type, refine the selection area, or re-generate as needed.
Batch updating is also now supported for Generative Remove spots.
Try out the latest updates and share your feedback with us here. Please also include the following details in your post:
-
App version
-
System details
-
Example image(s) if you wish to share
Our team continually monitors this thread to track issues for future improvement. Thanks!
Lisa Ngo: Lightroom Product Manager
Posted by:
Rikk Flohr: Adobe Photography Org
TOPICS
macOS
,
Windows

Community guidelines
Be kind and respectful, give credit to the original source of content, and search for duplicates before posting.
Learn more

 1 Pinned Reply
Adobe Employee
,
Dec 12, 2024
Dec 12, 2024
Update (Dec 2024): With the new release, it is no longer necessary to perform Generative Remove Operations prior to Cropping.
 1009
Replies
1009
1009
Replies
1009

Contributor
,
/t5/lightroom-classic-discussions/p-generative-remove-feedback-lr-classic-amp-lr-eco/m-p/15212233#M399415
Mar 14, 2025
Mar 14, 2025
Copy link to clipboard
Copied
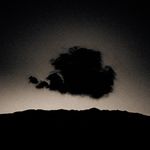
LrC Generative AI has issues with blurred wire fencing (as does PS Remove distratctions) It seems to substitute another set of wires for the fencing.
Image attached
The erase tool can deal wit it but the "fix" can easily be seen.
It does seem to work OK with fencing that is in focus ( I don't have an example right now)
Community guidelines
Be kind and respectful, give credit to the original source of content, and search for duplicates before posting.
Learn more

LEGEND
,
/t5/lightroom-classic-discussions/p-generative-remove-feedback-lr-classic-amp-lr-eco/m-p/15212415#M399422
Mar 14, 2025
Mar 14, 2025
Copy link to clipboard
Copied
@Jim 185: "LrC Generative AI has issues with blurred wire fencing (as does PS Remove distratctions) It seems to substitute another set of wires for the fencing."
Interesting, I saw the same behavior until I made the selection around the wires wider (changing the margin around the selected object is always something to try when Remove replaces rather than removes):


Community guidelines
Be kind and respectful, give credit to the original source of content, and search for duplicates before posting.
Learn more

Explorer
,
/t5/lightroom-classic-discussions/p-generative-remove-feedback-lr-classic-amp-lr-eco/m-p/15214452#M399523
Mar 16, 2025
Mar 16, 2025
Copy link to clipboard
Copied
Try increasing the contrast considerably, remove, and then lower the
contrast back down to normal levels.
--
Sent from Gmail in PC
contrast back down to normal levels.
--
Sent from Gmail in PC
Community guidelines
Be kind and respectful, give credit to the original source of content, and search for duplicates before posting.
Learn more

Community Beginner
,
/t5/lightroom-classic-discussions/p-generative-remove-feedback-lr-classic-amp-lr-eco/m-p/15215253#M399568
Mar 17, 2025
Mar 17, 2025
Copy link to clipboard
Copied
I'm feeling so lost now.
before I used to use a clone brush, then select an object/area which should be removed. Then I could move the 'source' to whichever part of the pic that suited.
Now, this function is devided into three (different?) 'Remove', heal and clone. And I simply cant use it anymore.
Concrete: I have a branch which I want to get rid of.
WHICHEVER of the three functions I chose, the branch stays there! (The background changes).
Simply put: How to use 'normal' clone?
Yes I set opacity to 100 (doesn't help). But there are so many submenus..
Can someone help?
Thx.
Community guidelines
Be kind and respectful, give credit to the original source of content, and search for duplicates before posting.
Learn more
Community Beginner
,
/t5/lightroom-classic-discussions/p-generative-remove-feedback-lr-classic-amp-lr-eco/m-p/15215257#M399569
Mar 17, 2025
Mar 17, 2025
Copy link to clipboard
Copied
The white branch on the very right won't go away. Why?

Community guidelines
Be kind and respectful, give credit to the original source of content, and search for duplicates before posting.
Learn more
Advocate
,
/t5/lightroom-classic-discussions/p-generative-remove-feedback-lr-classic-amp-lr-eco/m-p/15215394#M399577
Mar 17, 2025
Mar 17, 2025
Copy link to clipboard
Copied
@Davidb_nor Nothing ahs changed for Clone and Heal.
You can still paint the Clone or Heal and choose the source
Using you screenshot
Be sure the right "Mode" for the "Remove" you want to paint is selected.

e.g Clone
Be sure to have Tool Overlay set to "Auto" or "Always" or "Selected"

You can cycle throigh them with "h" on your keyboard.
After having painted a Clone or Heal you can "convert" them to the new tools
Use the Drop Down menu in "Fill" for the "Selected" remove.


Community guidelines
Be kind and respectful, give credit to the original source of content, and search for duplicates before posting.
Learn more
Community Beginner
,
/t5/lightroom-classic-discussions/p-generative-remove-feedback-lr-classic-amp-lr-eco/m-p/15215432#M399579
Mar 17, 2025
Mar 17, 2025
Copy link to clipboard
Copied
Thank you so much for your answer.
I did (and have done exactly like you described, several times).
I tried again, and the result look like this: (why...)

Community guidelines
Be kind and respectful, give credit to the original source of content, and search for duplicates before posting.
Learn more
LEGEND
,
/t5/lightroom-classic-discussions/p-generative-remove-feedback-lr-classic-amp-lr-eco/m-p/15215702#M399589
Mar 17, 2025
Mar 17, 2025
Copy link to clipboard
Copied
[This post contains formatting and embedded images that don't appear in email. View the post in your Web browser.]
@Davidb_nor, it looks like you're appyling Remove on top of an AI mask, e.g. Sky or Background. Do you see a red dot under the Masking icon? That indicates that the AI mask needs to be recomputed -- do the menu command Settings > Update AI Settings.


Community guidelines
Be kind and respectful, give credit to the original source of content, and search for duplicates before posting.
Learn more

New Here
,
/t5/lightroom-classic-discussions/p-generative-remove-feedback-lr-classic-amp-lr-eco/m-p/15218706#M399681
Mar 18, 2025
Mar 18, 2025
Copy link to clipboard
Copied
With the current update to generative Ai update, selections after being replaced now have a noticeable tone change from the selected area. Making it now obvious where things were removed. Is anyone else having this problem? I'm on v. 14.2.
Or does anyone have a solution?
Community guidelines
Be kind and respectful, give credit to the original source of content, and search for duplicates before posting.
Learn more
LEGEND
,
LATEST
/t5/lightroom-classic-discussions/p-generative-remove-feedback-lr-classic-amp-lr-eco/m-p/15218782#M399688
Mar 18, 2025
Mar 18, 2025
Copy link to clipboard
Copied
@Dan-Fx: "With the current update to generative Ai update, selections after being replaced now have a noticeable tone change from the selected area. Making it now obvious where things were removed."
Did you apply Remove on top of an AI mask (e.g. Sky or Background)? If so, do the menu command Settings > Update AI Settings. Otherwise:
Many have observed here that the replacements made by Generative Remove sometimes don't match the photo's tone or noise. To get better matches, these techniques sometimes help:
1. Adobe recommends applying Denoise before Remove. This can reduce the noise, making it more likely the replacement will match.
2. The replacement patch supplied by Adobe Firefly has a maximum size of 2048 x 2048 pixels. If the selected area in the photo is larger than that, then the replacement patch gets upscaled (and blurry). Try removing smaller selections if possible.
3. Conversely, try making a larger selection, even including the entire background. Upscaling of the replacement sometimes won't be noticeable then.
4. Sometimes there's a distinctly visible boundary where the tone or noise don't match. You can often use the heal tool around the boundary to get better feathering and make it less noticeable -- apply Heal in small brush strokes. Or use a Brush mask with maximum feathering, dropping local Texture, Clarity, and Sharpness to their minimum values. Sometimes, making a very raggedy selection around the object makes the boundary less noticeable.
5. For grain/noise in particular, see this post for how to ameliorate the problem by adding the grain back or reducing the grain:
https://community.adobe.com/t5/lightroom-classic-discussions/p-generative-remove-feedback-lr-classic...
Community guidelines
Be kind and respectful, give credit to the original source of content, and search for duplicates before posting.
Learn more
Resources
Get Started

Troubleshooting
New features & Updates
Careeeesa
Suzanne Santharaj
Copyright © 2025 Adobe. All rights reserved.
 AdChoices