- Home
- Photoshop ecosystem
- Discussions
- Re: Adjusting exposure in ACR/PS
- Re: Adjusting exposure in ACR/PS
Copy link to clipboard
Copied
Hi all,
I accidentally overexposed a shot by about 2 stops. When adjusted in ACR using the exposure slider, I can correct it OK. However, when using an exposure adjustment layer in PS, it gives me terrible resuilts. Please see attached images. Why? Similar issue although not as bad, if I open in PS with no ACR adjustment then use ACR filter from withi
 1 Correct answer
Adjusting exposure in ACR is using the linear raw camera data where "latent" data exists for remapping.
In Photoshop, you have already rendered and mapped the tonal values, there is nothing to work with except what is there in 8 or 16 bpc.
The exposure slider in Photoshop is for 32 bpc HDR images, again where "latent" usable data may exist.
Perhaps these PDF whitepapers will help:
...
Explore related tutorials & articles
Copy link to clipboard
Copied
Adjusting exposure in ACR is using the linear raw camera data where "latent" data exists for remapping.
In Photoshop, you have already rendered and mapped the tonal values, there is nothing to work with except what is there in 8 or 16 bpc.
The exposure slider in Photoshop is for 32 bpc HDR images, again where "latent" usable data may exist.
Perhaps these PDF whitepapers will help:
https://www.adobe.com/digitalimag/pdfs/understanding_digitalrawcapture.pdf
Copy link to clipboard
Copied
Thanks
Copy link to clipboard
Copied
Further, the only way to know about exposure in raw data is with a raw Histogram which ACR and LR (most raw converters) lack. Check out RawDigger or Raw Fast Viewer; both provide a true raw Histogram that actually provides real information about exposure. More here:
https://www.fastrawviewer.com/blog/mystic-exposure-triangle
https://www.fastrawviewer.com/blog/red_flowers_photography_to-see-the-real-picture
https://www.rawdigger.com/howtouse/exposure-for-raw-or-for-jpegs
https://www.rawdigger.com/howtouse/beware-histogram
https://www.rawdigger.com/howtouse/calibrate-exposure-meter-to-improve-dynamic-range
Copy link to clipboard
Copied
Hi.
I just ran across the exact same problem. his seems like a bug or some feature change. I typically "expose to the right" as the fist PDF on the concept of linear cameras suggest. I often shoot about 3 images to get it right. The first normal expose so I can see what the image will look. Then sucesive over exposed until the camera shows me burn out. (I now have the R5 and dismayed they don't show burnout real time in viewfinder. histogram is there but not really useful).
In any case I go into lightroom and adjust exposure slider to left until looks fine. But if go into photoshop and add exposure adjust layer I get washed out image as tOzPhotoMan has found.
I have use PS since version 6 and have always "shot to the right". I think I would have noticed this before.
So I think this is a bug recently introduce or some strange intentional functional change.
The couple of answer here don't make sense since the sliders work fine in LR and ACR (and brightness in ps I will mention below) as they alway have and not now in PS. There is no technical reason this should not work. EV correction is simply multiply, scaling, in the linear domain. So you simply un-gamma the color space,scale, re-gamma.
Some info:
-The curves adjustment layer does the same.
- The brightness adjustment in the adjust layer works correctly. But it is just %, not ev. Inconvient but work around
- ACR works correctly.
- I was sure the exposure was a bug and was scaling in the gamma space. So I converted to custome RGB gama=1 space but didn't help. But not sure if that should have.
I keep looking for a preference of some setting that could be a new feature that I need to reset but cannot find anything.
I would like to hear Adobes input on this..
Thanks,
And thanks to ozPhotoMan for saving me the trouble of uploading my images. They look exactly the same...
Copy link to clipboard
Copied
@SeattleTall – As already stated, the exposure adjustment is "best suited" (intended?) for 32bit HDR work, not for regular image editing. Not a bug or feature change. It's the wrong tool for the job for anything other than HDR work. Exposure works correctly in Lightroom and in Adobe Camera Raw, as both are manipulating the linear raw camera data, before it is rendered into standard gamma-corrected RGB data with the exposure "baked in".
https://helpx.adobe.com/au/photoshop/using/high-dynamic-range-images.html
https://helpx.adobe.com/au/photoshop/using/adjusting-hdr-exposure-toning.html
Copy link to clipboard
Copied
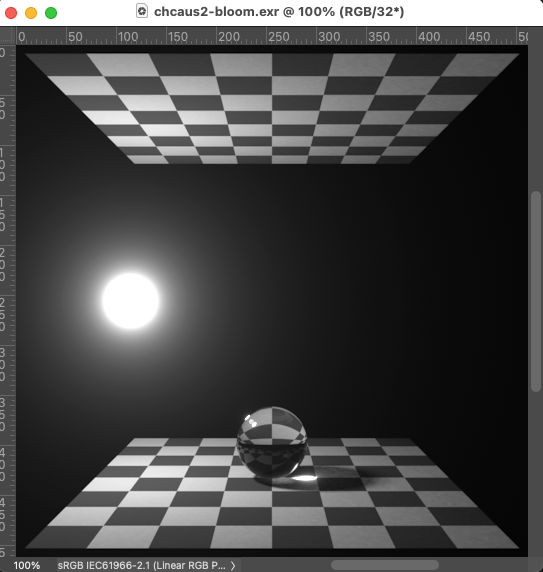
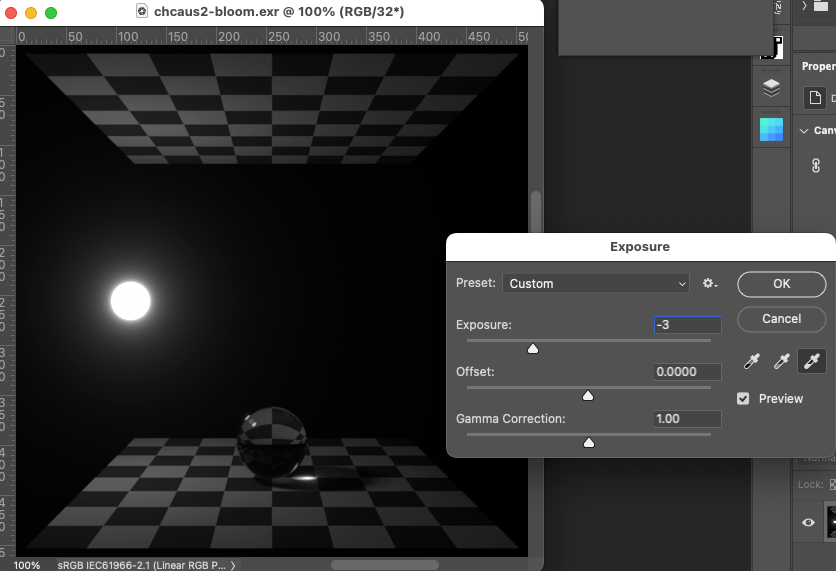
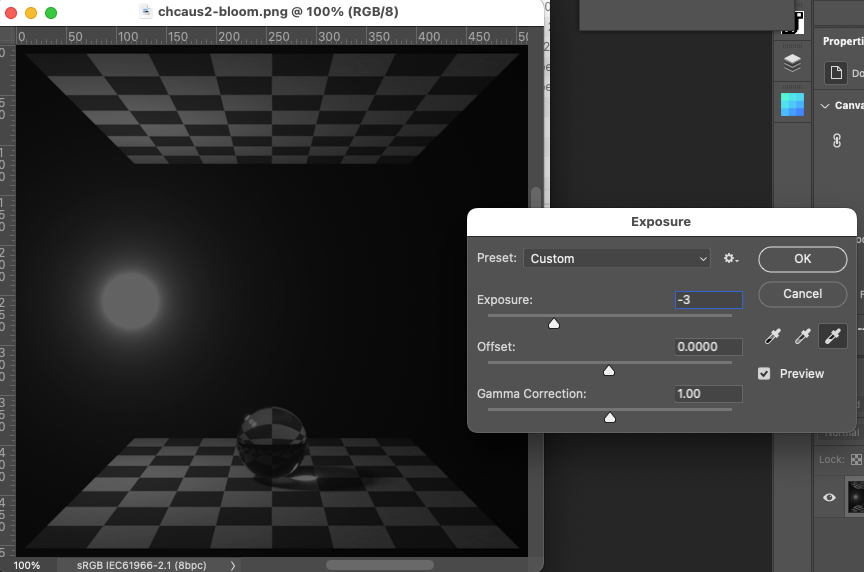
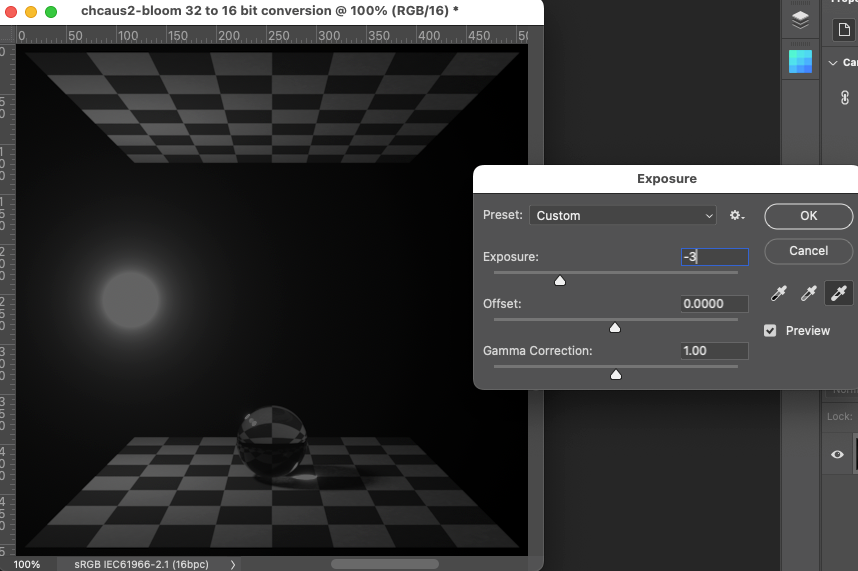
Further to my previous reply, the following example uses a HDR EXR file. This is similar to a raw camera file in the sense that "there is more data than one can see". Just as raw camera files need to be manipulated in the Adobe Camera Raw plug-in to take advantage of the original raw data (not rendered into Photoshop), one should make extreme exposure adjustments to the EXR file and not a derivative file such as PNG.
Screenshot of original EXR image with no adjustments:
Screenshot of EXR -3 exposure adjustment:
Screenshot of 8 bpc -3 exposure adjustment:
Screenshot of 16 bpc -3 exposure adjustment:
Copy link to clipboard
Copied
Hi Stephen,
I had no doubt that the exposure tool is doing what you are demonstrating. As I guessed it is linearly scaling the bit values which is exactly what you want an EV adjustment to do if you are in a linear (gamma = 1) space as HDR 32bit is.
In a "gamma'd" space the pix value is pix = pix_in**gamma. When the exposure slider is doings linearly scaling you get non-usuable results. If K is the adjust then pix_adj = K pix_in**gamma. That is equivalent to pix_adj=pix_in**(log(K)*gamma). So it is equivalent to channing gamma and leads to the strange results we saw.
Exposure pretty much universaly means one thing. Changing the amount of light hitting the sensor. To do this in a gamma space is trivial. Just un-gamma the pixel, scale, then re-gamma.
So here are my thoughts and observations and would like your thoughts.
1. As I mentioned to most peopel I think exposure means exposure. Same as exposure on your camera
2. Is it good user interface to have a menu that says "exposure" when it is not (with except being linear space that I suspect majority don't use).
3. That menu works differently that all other menues labeled exposure in PS/Lightroom.
4. If it an HDR adjustment should it be under the HDR menu? Actually it is all ready there under HDR toning.
5. I mentioned that I had no recollection of this working this way having used ps since CS2. Though I could be wrong. I don't use exposure often. Almost alway curves. But I found it odd that I came across this last month and was pretty confused. That is when I spent several hours and figured out what it was really doing.
6- I just looked on web a little more. I happened across an 11/15/2022 Adobe article on 'adjusting exposure'. It is about the Brightness/Contrast setting not this menu. It showed that there is a "legacy" button. I played with that and it just switches it from true exposure adjustment, accounting for gamma, doing what the exposure menue is doing. If they made a change there could they have made a change to the regular exposure menu and forgot the legacy button?
I don't know. This has been interesting. But one thing I feel pretty confident about is from UI standpoint that is not good. If it is only for HDR it should be under that menu.
Like to hear your thoughts,,
Thanks,
Jay
Thoughts? Should it be as is. How would I know except maybe taking a class. I don't need that for the exposure sliders in LR/RAQ
Copy link to clipboard
Copied
SeattleTall, you're overcomplicating this. Stephen has the correct explanation.
A raw file has a dynamic range of up to 14 stops. A gamma encoded RGB file can only contain about 7 or 8 stops of this. This 7 or 8 stop dynamic range is what you see in the ACR window, but there's still hidden data that you can't see.
That doesn't mean it's wasted, because you can use the controls in ACR to map the original 14 stop data into an 8 stop RGB file. But you can't go the other way, and that's the whole point. Once encoded into RGB, the bread is baked.
You would see this clearly if you could see the original raw data as a normal image file (you normally can't). Then you would see a very tonally compressed and seemingly flat image, without contrast. That's what it looks like when 14 stops is compressed into 8. Remember the old black and white film negatives? That's what it looks like.
Copy link to clipboard
Copied
Hi,
Is it D Fosse who just posted a follow up.? Hi. The post may have been longer than need be. But did you see my opening line? I have no technical question or confusion at all. I actually work on photosensor, not the ones in camers, miniture single bit ones. I do HDR all the time. Have for years. I've used photoshop since CS2...
To boild it down I really had two thoughts
- Seemed odd to me that in 20 years of using PS i would get triped up by that. And concidently I was not the only one. And I found that post this month about legacy in the exposure menu. So it was only wondering if something had changed. Maybe not. I don't use sliders very often.
- The other question was if this struck any of you as a UI problem for the reasons I mentioned. It is not exposure in a gamma space, which is probably 95% off what people use. It is not what the exactly same name slider in LR or in RAW. Yes, I know raw there is underlying technical reason why. That is irrelevent to UI. Finally the exact same slider is all ready in the HDR menues. That is what really confuses me. Did some one intentionally duplicate that in the main front/center exposure that will probably be the first place most new people go?
Seems it must be a mistake. But for how long I have no idea.
But please, if you have good reason why it should be there front and center and no hint that it is meant for HDR only let me know.
Jay
Copy link to clipboard
Copied
D Fosse and Stephon,
I did have another technical thought you can comment on. I have always been unsuer about was how photoshop was handling 16 bit data. In this exposre thing used Python scripts to generate files, either tif or JPEG. That way I could do experiments writing different bit lengths, I could put linear or gammed data in. I could also assign profiles or not. Then I could read them in PS, view them, change or assign profiles, read the pixels values in PS and then save the files and re-read them in Python.
OK, that confirmed for me what the slider was do exactly as you two were explaining. It appears to me that hotoshop applies gamma when you read the file into a color manage color space. If you leave unmanage or use custom space with gamma=1 it stays linear.
The problem sensors and the raw is usually less than 16 bits. Was twelve and now I think most are 14. I think my R5 is fourteen but not even sure.
The problem is if you you apply gamma you loose information and add noise when you don't need to. If that isn't clear I can give you two lines of simple arithmatic example that shows.
Now converting from 16 to 8 for JPEG you do want gamma. Your are throwing away huge amounts of information and gamma takes advantage of human percept to shape that loos to minimize visual impact.
The anser is not that you are converting raw into a color space that has a gamma like virtually all do. It is trivial to apply transorm to convert that space to a tempory linear space that you worrk in. You can then work in that space all you want. Then at only last possible instant convert that linear space back to the gamma space.
I have one thought on why may want to pay the price of going straight to a gamma space at the price of adding some noise up front. But I would like your thoughts first..
Jay
Find more inspiration, events, and resources on the new Adobe Community
Explore Now


