Exit
  • Global community
    • Language:
      • Deutsch
      • English
      • Español
      • Français
      • Português
  • 日本語コミュニティ
  • 한국 커뮤니티
0

How do I Overlay a transparency over all layers?

Community Beginner ,
Feb 04, 2023 Feb 04, 2023

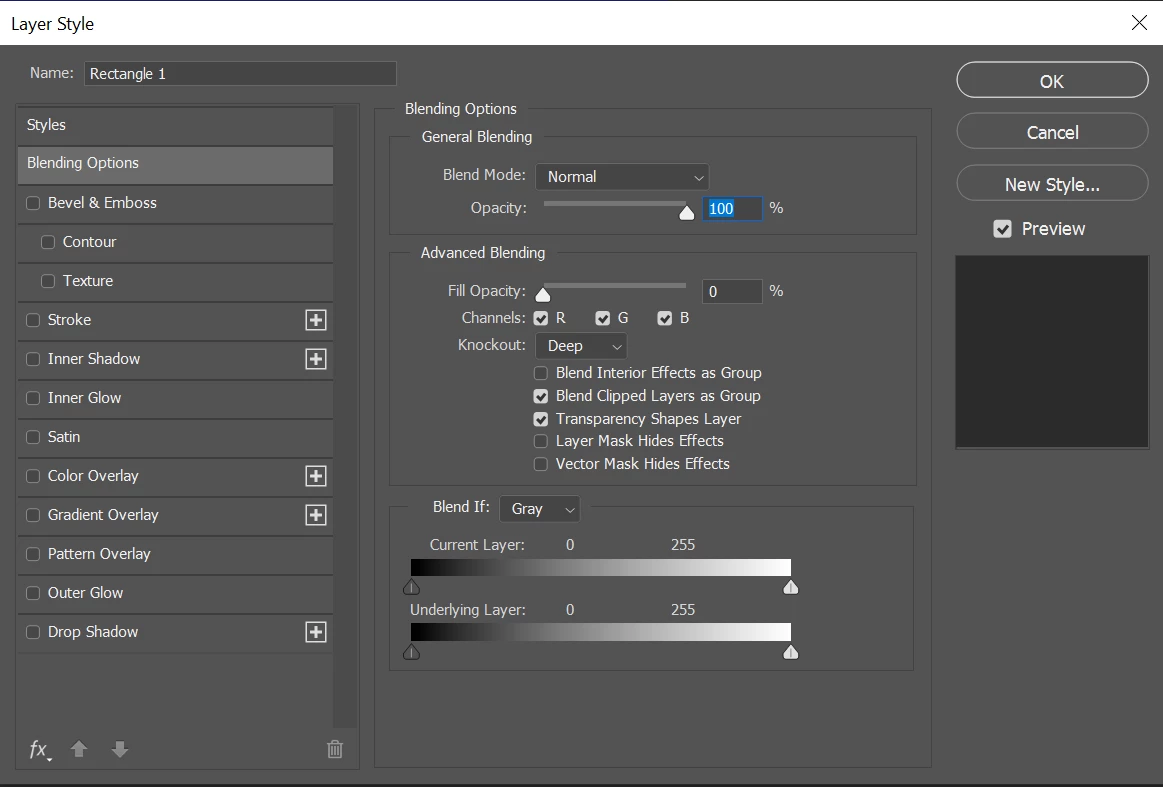
How do I overlay a shape that has a transparent background, over all below layers, so that the below layers have the area of that shape replaced with a transparency.

I am looking to have multiple layers in an image.

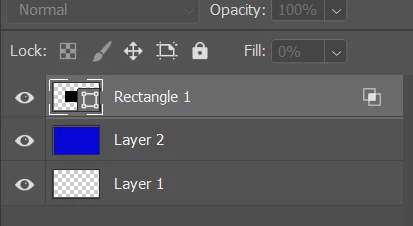
1.) Top Layer with a Square Transparency
2.) Background image

I want any transparency layers I created in layer 1 to also appear in all of the below layers.
I DO NOT want to have to switch to layer 2 and edit it in any way.

For example, if I create a transparent square in layer 1, I want that same transparent square to appear in after I add a background image.

This way if I switch between different backgrounds that same transparent square will appear in the same spot, in the final image, regardless of which background I use in layer 2.

I need to create large numbers of backgrounds with aeas of transparency and was hoping there an easy way of doing so.

Transparent Square on Layer 1

Mischa21999798bn7e_0-1675537936767.png

Layer 2 (black background) - example 1

Mischa21999798bn7e_4-1675538204655.png


Layer 2 (blue background) - example 2

Mischa21999798bn7e_3-1675538176461.png


Outcome I am looking for when using a black background

Mischa21999798bn7e_1-1675538089607.png


Outcome I am looking for when using a blue backgroundMischa21999798bn7e_2-1675538110582.png


TOPICS
Windows
6.7K
Translate
Report
Community guidelines
Be kind and respectful, give credit to the original source of content, and search for duplicates before posting. Learn more
community guidelines

correct answers 1 Correct answer

Community Beginner , Feb 04, 2023 Feb 04, 2023

Thank you for the videos. They were extremely helpfull!

The third video had a section on a feature called "KnockOut".
This solved my problems!

I created 3 layers.

1.) The top layer has the shape.
I then went into Blending options.
Turned on"Knockout".
Set it to "Deep"
And then set the fill Opacity to 0%.

AV_Editor9000_0-1675548179772.png
2.) The second layer is now my "background" layer.
I can quickly swap out different images.

3.) The third layer I kept as 100% transparent.

AV_Editor9000_1-1675548311392.png


Whenever I add any shapes to Layer 1, they automatically are remov

...
Translate
Adobe
Community Expert ,
Feb 04, 2023 Feb 04, 2023

Group the layers and put a mask on the group.

Translate
Report
Community guidelines
Be kind and respectful, give credit to the original source of content, and search for duplicates before posting. Learn more
community guidelines
Community Expert ,
Feb 04, 2023 Feb 04, 2023

Hello, you can do it if you put the layer whose transparency you want to apply to others below them, then Alt-click between them, it is called a Clipping Mask: https://helpx.adobe.com/photoshop-elements/using/clipping-masks.html (the process is similar for Photoshop)

Translate
Report
Community guidelines
Be kind and respectful, give credit to the original source of content, and search for duplicates before posting. Learn more
community guidelines
Engaged ,
Feb 04, 2023 Feb 04, 2023

Eye Icon Off on Blue - Reveal Blk MatEye Icon Off on Blue - Reveal Blk MatI'm not sure what you need is a transparency... at least the way you've described it.


You can create 2 different layers with Edit > Fill. One a black layer. One a blue (or whatever color desired) layer. Then put a mask in the shape you want on each of those layers. See my attached, layers-labelled snip.


Save that as a .PSD for regular use (if you want to re-use).


You can open whatever images you want below those layers then just turn on/off the eye icon visibility to display the color mat you want to show.


(If you want to get "tricky" about it you could even write an "Action" to perform those steps of applying the black or blue mats for you in an automated way. Google "How to create Photoshop Action"). Good luck!


Screen Snip of layers you need from PsScreen Snip of layers you need from Ps

Translate
Report
Community guidelines
Be kind and respectful, give credit to the original source of content, and search for duplicates before posting. Learn more
community guidelines
Community Beginner ,
Feb 04, 2023 Feb 04, 2023

Thank you to everyone who is trying to help.

Apologies, I believe the description of what I need was not very clear.

I would like to create a custom shape on layer 1 and have that shape "cut out" of layer 2 so that it appears transparent.
The article that "PECourtejoie" linked was almost what I wanted.

Here is a quick moc up, using the above article to better describe what I am looking to do.

AV_Editor9000_1-1675544537604.png


Translate
Report
Community guidelines
Be kind and respectful, give credit to the original source of content, and search for duplicates before posting. Learn more
community guidelines
Engaged ,
Feb 04, 2023 Feb 04, 2023

What part of the article re: using a Clipping Mask with another layer isn't helping you achieve your goal? 


Is it not helping you create your custom shape? Other?


In your mockup just above how is that different than the approach shown in the article? Can you explain a bit more... Does this video demo help at all?

https://www.youtube.com/watch?v=xToD2Kff9O0


Also, if using the Clipping Mask approach isn't what you want to do, did you check out this way to basically cut out a 'hole' using your custom shape:

https://community.adobe.com/t5/photoshop-ecosystem-discussions/can-i-invert-a-shape-layer/td-p/30702...


Here's a snip I just did with a Color Fill Background, Custom Shape Layer (I used Rectangle) - with the "Exclude" setting in the Options Bar, then I added an image layer at top - not clipped to the shape layer.

This follows process for Exclude using ShapeThis follows process for Exclude using Shape

Translate
Report
Community guidelines
Be kind and respectful, give credit to the original source of content, and search for duplicates before posting. Learn more
community guidelines
Community Expert ,
Feb 04, 2023 Feb 04, 2023

Excellent suggestion, @Fotomaker01RA @to invert the shape!

Translate
Report
Community guidelines
Be kind and respectful, give credit to the original source of content, and search for duplicates before posting. Learn more
community guidelines
Community Beginner ,
Feb 04, 2023 Feb 04, 2023

I took a look at both.
Neither of them allows me to cut out a "transparent" hole.

I would like to define a custom shape in one layer.
Then have that shape cut out in a differnt layer.

When I export the file as a .png with transparency, I would like to see the background with a transparent shape.

Normally, this is achieved by...
1.) Creating a new photoshop file with transparency
2.) Adding a background
3.) Using the Rectangular marquee tool to select an area
4.) Deleting that area
5.) Exporting the file as a .png with transparency on.

However, for a project I have I need to rapidly save multiple .png files with different backgrounds and different "shapes" that need to be cut out of that background.

Therefore I am looking for a method that allows me to create a shape on a single layer, swap out the background multiple times and save each copy as a seperate .png file.

Simple example of one of the files I created as a demo.
As you can see there are two transparent rectangles.

I need a quick way of leaving the rectangles exactly as they are and replacing the blue with another background.
Please note these backgrounds are NOT solid colors. They are high resolution images.

AV_Editor9000_0-1675547406084.png


Translate
Report
Community guidelines
Be kind and respectful, give credit to the original source of content, and search for duplicates before posting. Learn more
community guidelines
Community Beginner ,
Feb 04, 2023 Feb 04, 2023

Apologies for the confusion.
I flip-flopped a bit as I was trying a different approach then I had in my original post, since I was trying to follow the article you had provided.

Yes I want the transparency of one layer to be applied to all other layers.
I will take a look at the videos.

Translate
Report
Community guidelines
Be kind and respectful, give credit to the original source of content, and search for duplicates before posting. Learn more
community guidelines
Community Expert ,
Feb 04, 2023 Feb 04, 2023

Ah, I understood that you wanted the transparency of one layer to be applied to others, but in this last message, you show the opposite, where the opacity of one layer creates transparency on others.

will it always be black?

If you have some time and want to learn a lot, check this series of videos: 

https://creativecloud.adobe.com/cc/discover/video/Crash-Course-Masks-Modes-More-Photoshop-Basics-wit...

https://creativecloud.adobe.com/discover/video/Photoshop-Crash-Course-Top-Tips-for-Masks-with-Tim-Mo...

and https://m.youtube.com/watch?v=_LAdBwf5TVk


I believe part 3 might get you covered, but seeing all parts will let you know everything about the different masking methods.


Translate
Report
Community guidelines
Be kind and respectful, give credit to the original source of content, and search for duplicates before posting. Learn more
community guidelines
Community Beginner ,
Feb 04, 2023 Feb 04, 2023

Thank you for the videos. They were extremely helpfull!

The third video had a section on a feature called "KnockOut".
This solved my problems!

I created 3 layers.

1.) The top layer has the shape.
I then went into Blending options.
Turned on"Knockout".
Set it to "Deep"
And then set the fill Opacity to 0%.

AV_Editor9000_0-1675548179772.png
2.) The second layer is now my "background" layer.
I can quickly swap out different images.

3.) The third layer I kept as 100% transparent.

AV_Editor9000_1-1675548311392.png


Whenever I add any shapes to Layer 1, they automatically are removed from the 2nd layer and only the 3rd layers transparency displays in-place of that shape.

Translate
Report
Community guidelines
Be kind and respectful, give credit to the original source of content, and search for duplicates before posting. Learn more
community guidelines
Community Expert ,
Feb 04, 2023 Feb 04, 2023

Super!!! Yes, sorry for the length, but they are so packed with info, it would be sad to miss them... you wanted a 101 on masking, and almost got a doctorate 😉 play with what you learned, revisit the videos in a week to memorize the information.


Yes, I thought that knockout might be the answer, but I couldn't test, as I was sharing my computer. Glad to hear you are all set. 


Will you use an action and batch processing or Image processor/image processor pro, launched from Bridge to automate the process? 

Translate
Report
Community guidelines
Be kind and respectful, give credit to the original source of content, and search for duplicates before posting. Learn more
community guidelines
Community Beginner ,
Feb 05, 2023 Feb 05, 2023

More information is always better then less, in my book 🙂

I have never used the Image Processor, but believe I should have access to it, since it is part of the Adobe CC package I have.
I may look into this, as it would most certainly expedite this process. 🙂

Translate
Report
Community guidelines
Be kind and respectful, give credit to the original source of content, and search for duplicates before posting. Learn more
community guidelines
Community Expert ,
Feb 05, 2023 Feb 05, 2023
LATEST

What kind of file do you intend to output?

If you need PNG, you'll need to install Image processor pro: https://sourceforge.net/projects/ps-scripts/files/Image%20Processor%20Pro/v3_2%20betas/

Translate
Report
Community guidelines
Be kind and respectful, give credit to the original source of content, and search for duplicates before posting. Learn more
community guidelines
Community Expert ,
Feb 04, 2023 Feb 04, 2023

You might not even need an empty layer 1, please try it out. Groups can also be useful, as Tim explained.

Translate
Report
Community guidelines
Be kind and respectful, give credit to the original source of content, and search for duplicates before posting. Learn more
community guidelines
Community Beginner ,
Feb 05, 2023 Feb 05, 2023

Yes, if I group Layer 1 and 2 it seems to work as well.

Translate
Report
Community guidelines
Be kind and respectful, give credit to the original source of content, and search for duplicates before posting. Learn more
community guidelines
Community Expert ,
Feb 05, 2023 Feb 05, 2023

I think that Tim showed at the end of part 3, a workaround to put a layer without transparency in a group, in order to use the blend if sliders in coordination with knockout.

If you want to learn, do stick around when you can, try to answer posts here and there, you'll learn a lot doing so!

Check out also the blog of Julieanne Kost, she is an excellent educator: https://jkost.com/blog/

Translate
Report
Community guidelines
Be kind and respectful, give credit to the original source of content, and search for duplicates before posting. Learn more
community guidelines